Checkout, Deposits & Card Readers
These settings control how much customers pay at checkout, how security deposits are processed, and how to set up card readers for in-person payments.
Online Checkout Settings
The deposit in this section is a booking deposit -- a partial upfront payment that counts toward the booking total (for example, 30% now and the remaining 70% later). It is not the same as a Security Deposit, which is a separate refundable hold or charge that protects against damage and is returned to the customer after the rental.
The Online checkout settings section holds everything about how customers pay through the booking widget: how much they pay upfront, how the balance is collected, whether they can choose to pay in full, and how security deposits are handled.
Choose how much customers must pay when they complete a booking through the booking widget:
- Click Settings in the sidebar.
- Select Payments from the settings menu.
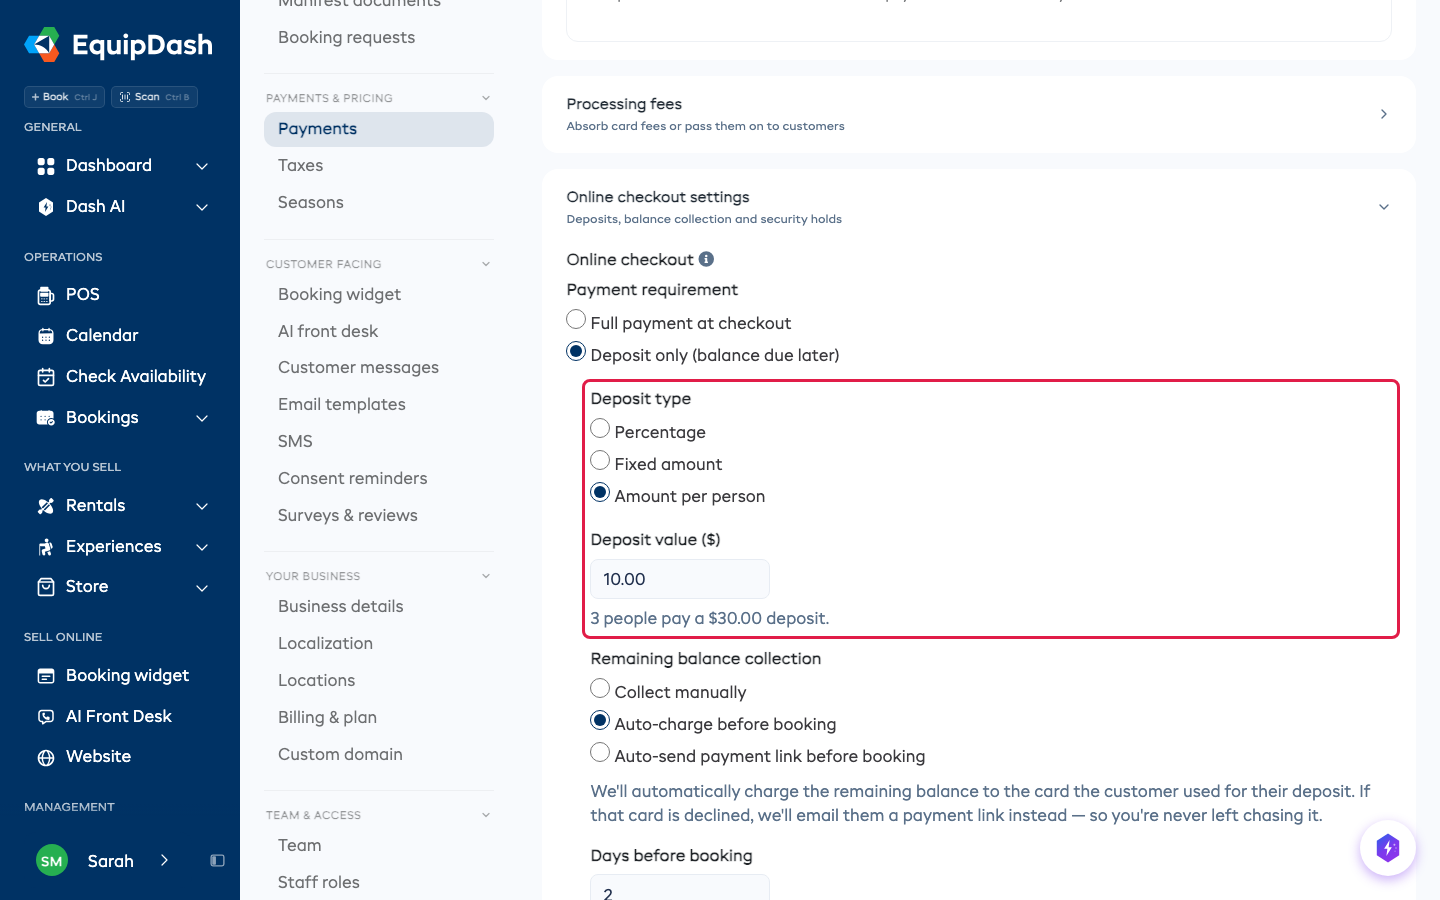
- Open the Online checkout settings section. Under Payment requirement, choose one of:
- Full payment at checkout -- customers pay the entire booking total upfront.
- Deposit only (balance due later) -- customers pay a deposit upfront, with the balance due later.
If You Choose Deposit Only
-
Select the Deposit Type:
- Percentage -- a percentage of the total (e.g., 30%).
- Fixed Amount -- a set dollar amount (e.g., $50).
- Amount per person -- an amount for each person booked (e.g., $50, so 3 people pay $150). A rental counts each item hired as one person.
-
Enter the Deposit Value (the percentage or amount).
-
Choose the Balance Collection Method:
- Collect manually - your team records the remaining balance when it arrives, including bank transfers due before the booking.
- Auto Charge -- EquipDash automatically charges the remaining balance to the same card the customer used for their deposit, a set number of days before the booking. If the card is declined, the customer is automatically emailed a payment link instead, so you're never left chasing it. (Requires Stripe.)
- Auto Payment Link -- EquipDash automatically sends a payment link to the customer a set number of days before the booking.
-
Enter Days before booking for the balance deadline. With Collect manually, use 0 for the booking day; EquipDash does not collect the money automatically.
-
Decide whether to Let customers pay the full amount at checkout:
- On (default) -- customers can choose to pay just the deposit now or pay the full amount up front, whichever they prefer.
- Off -- only the deposit is collected at checkout; the "Pay in full" choice is hidden. Use this if you only ever want the deposit up front.
-
Click Update.
What your customers see
When you take a deposit, EquipDash shows the split everywhere the customer needs it, so there are no surprises:
- On the product/experience page -- a short line such as "A 30% deposit is required to book. The remaining 70% is automatically charged 2 days before your booking."
- In the cart -- a breakdown of Deposit due now and Balance due later.
- At the payment step -- the customer can choose Pay deposit now or Pay in full, whichever they prefer. (If you've turned off "Let customers pay the full amount at checkout," only the deposit is collected and the "Pay in full" choice is hidden.)
All of this is shown in the customer's language (including French).
Last-minute bookings
If a customer books inside your "Days Before Booking" window (e.g. within 2 days of the activity), there's no time to collect the balance later, so EquipDash automatically requires full payment at checkout. The deposit option isn't offered for those bookings.
Cancellations
If a customer cancels before the balance is collected, no balance is charged. The deposit they already paid is handled according to your cancellation policy.
For bank transfer checkout, enter Bank transfer instructions under Settings > Payments and click Update, or ask Dash and approve its review. The deposit and balance stay due until you record the received money. See Bank transfer after booking.
Security Deposits
A security deposit (damage bond) is a separate, refundable amount that protects against damage or loss -- it does not count toward the booking total and is returned (or captured) after the rental. This is different from the booking deposit in Online Checkout Settings above, which is a partial upfront payment toward the total.
Control how security deposits (damage bonds) are processed when a booking includes a security deposit amount. The Security deposits options sit at the bottom of the Online checkout settings section (they only appear once Stripe is connected, because the hold option uses Stripe):
- Open the Online checkout settings section and scroll to Security deposits, then choose one of:
- Hold (pre-authorize the amount, release after return) -- a temporary hold is placed on the customer's card. The funds are not actually charged unless you capture them. The hold automatically expires after the rental is returned.
- Charge (charge the amount, refund after return) -- the deposit amount is charged to the customer's card as a separate transaction. You refund it manually after the rental is returned.
- Click Update.
Security Deposits on Authorize.net
Deposits work the same way on Authorize.net: a hold on the customer's card at pickup, released or charged at return. One difference is worth knowing before you use it.
Charging part of a hold releases the rest. If you hold $500 and charge $120 for a scratch, the other $380 goes back to the customer and cannot be taken later. Work out the full figure you need and charge it in one go.
The same applies to giving money back. A deposit you charged today has not settled yet, so returning part of it is not possible: the whole charge goes back to the customer. Wait until the next day if you need to return only part of it.
Card Readers (Stripe Terminal)
Card readers are now their own section at the bottom of the Payments page. If you take payments in person, you can register a Stripe Terminal card reader (such as the Stripe Reader S700 or S710) to collect tap-to-pay payments directly from the booking detail page.
The Card readers section appears once Stripe is connected and charges are enabled -- on either your Live or your Test account. See Connecting Stripe.
Live and test readers don't clash
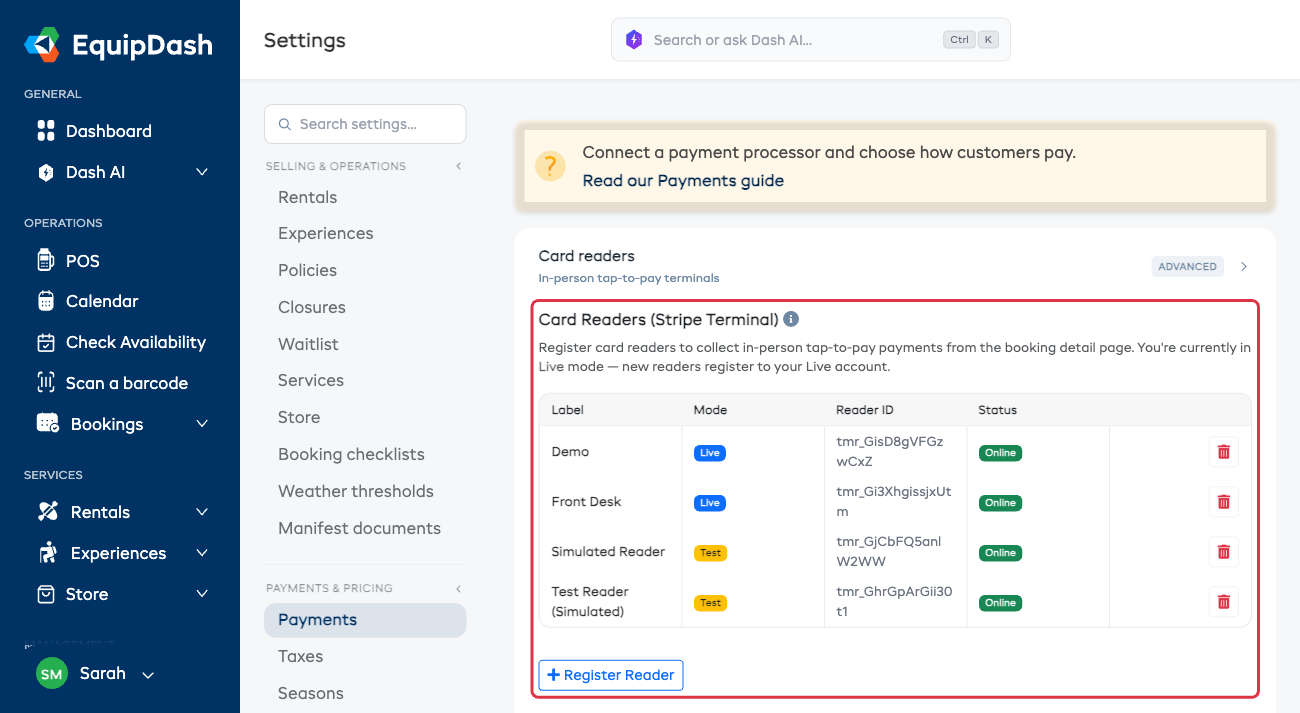
A card reader belongs to one Stripe mode -- either Live or Test -- because live and test are completely separate Stripe accounts. The Card Readers table lists all your readers together, with a Live or Test badge in the Mode column, so you always know which is which.
- Switching the Stripe mode toggle never removes a reader. It only changes which mode is active. Your live reader keeps working in live mode; your test reader keeps working in test mode.
- You can keep one reader per mode at the same time -- your physical reader on Live for real payments, and a simulated reader on Test for practice. They don't interfere with each other.
- If a mode is connected but has no reader yet, EquipDash shows a short prompt (for example, "No reader registered for Live payments yet") so you know exactly what's missing.
Switching modes is always safe, but disconnecting or deleting a Stripe account (live or test) removes the card readers registered on it -- a reader's pairing lives inside that Stripe account, so it can't survive the account being deleted. After you reconnect, register the reader again.
Step 1 -- Get the pairing code from your reader
Registering a reader uses the short pairing code (also called a registration code) that the reader shows on its own screen -- not the reader's ID or serial number.
On a Stripe Reader S700 / S710:
- Swipe in from the right edge of the reader screen.
- Tap Settings (enter the reader's admin passcode if prompted).
- Tap Generate pairing code.
The reader displays a short code. It expires quickly, so have EquipDash open and ready before you generate it. For the full device walkthrough, see Stripe's guide: Set up Stripe Reader S700/S710.
Step 2 -- Register it in EquipDash
- On the Payments settings page, open the Card readers section at the bottom of the page.
- Click Register Reader.
- In the Pairing code field, enter the code shown on the reader.
- In the Label field, enter a name to identify the reader (e.g., "Front Desk").
- Click Add.
The reader appears in the table showing its Label, Reader ID, and Status (Online or Offline).
The most common mistake is pasting the Reader ID (tmr_...) or Location ID (tml_...) from the Stripe Dashboard into the pairing-code field. Those are rejected with an "invalid registration code" error. Only the short pairing code shown on the reader's own screen will work.
Testing without a physical reader
In Test mode you don't need a physical device -- you have two options:
-
Quickest: click Add simulated reader (test). One click registers Stripe's simulated reader -- no code to type. (This button only shows in test mode.)
-
Or click Register Reader and enter one of Stripe's test pairing codes:
Code Simulates simulated-wpeWisePOS E simulated-s700Stripe Reader S700 simulated-s710Stripe Reader S710
EquipDash also registers a simulated reader for you automatically the first time you connect in test mode.
Once a simulated reader is registered, you can run a full practice tap -- see Testing Tap to Pay in the Stripe Test Mode guide.
Removing a Card Reader
Click the delete icon next to the reader you want to remove.
How It All Fits Together
| Setting | What it controls |
|---|---|
| Online checkout settings | How much the customer pays upfront (full or deposit) |
| Balance Collection | How and when the remaining balance is collected (if deposit only) |
| Pay in full at checkout | Whether customers can pay the full amount up front, or only the deposit (if deposit only) |
| Security deposits | Whether the damage deposit is a hold or a charge (inside Online checkout settings) |
| Card readers | In-person tap-to-pay payment collection via Stripe Terminal |
| Processing fees | Who pays the card processing fees (see Processing Fees) |
Things to Keep in Mind
- Security deposit settings only apply when a product or experience has a security deposit amount configured.
- The Hold method is preferred by most businesses as it does not charge the customer unless you explicitly capture the funds.
- Card readers require a connected Stripe account. See Connecting Stripe.
- Changing these settings does not affect existing bookings. Only new bookings use the updated configuration.