Floating "Book Now" Button
The floating button is a persistent call-to-action that sits in a corner of every page on your marketing website. Customers can click it from your homepage, your blog, your FAQ — from anywhere — and the EquipDash booking widget opens in a modal on top of your site. They never leave your domain.
One snippet, pasted into your website's global footer, runs everywhere.
Turning It On
- Go to Settings → Booking widget → Embed options tab.
- Click the "Book now" button embed type.
- Toggle Enable floating button on.
- Configure:
- Opens — which page the modal opens on: Main (your whole booking site), Rentals, Experiences, or Store.
- Button label — the text on the button (default: "Book now").
- Position — Bottom right or Bottom left.
- Icon — Calendar, Ticket, Cart, or No icon.
- Everything saves automatically — there's no Save button.
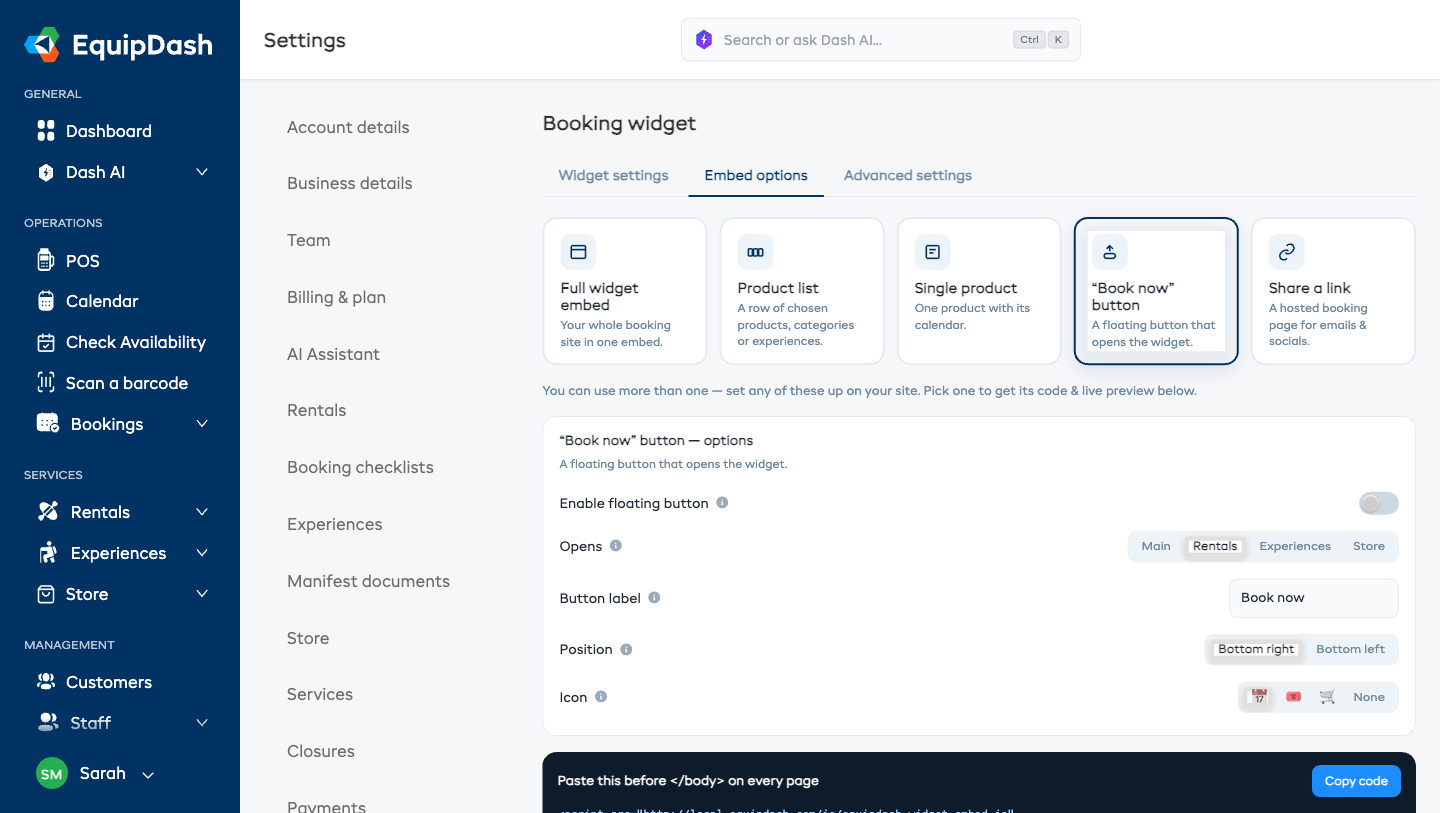
Copying the Snippet
Below the options, a ready-to-paste snippet appears with a Copy code button. It's a single <script> tag with your settings baked in as data attributes:
<script src="https://app.equipdash.com/js/equipdash-widget-embed.js"
        data-supplier="your-slug"
        data-mode="floating-button"
        data-position="bottom-right"
        data-label="Book now"
        data-icon="calendar"
        data-target="experiences"
        data-primary-color="#0d3b66"
        defer></script>
Paste it just before the closing </body> tag on every page of your website. Most CMSs have a "global footer" or "custom code" field where you can drop it once and it runs site-wide.
Where to paste it in popular CMSs
Step-by-step guides for each builder are in Add bookings to your website. On WordPress, our plugin adds the button with one switch instead.
| CMS | Where |
|---|---|
| Squarespace | Settings → Advanced → Code Injection → Footer |
| Wix | Settings → Custom Code → Add Custom Code → Body (end) |
| WordPress | Use a plugin like Insert Headers and Footers, then paste into Footer Scripts |
| Webflow | Project settings → Custom Code → Before </body> tag |
| Shopify | Online Store → Themes → Edit code → theme.liquid, before </body> |
Using Multiple Buttons on the Same Page
If you have a combined site — rentals and experiences and a store — you can drop multiple snippets on the same page. Each button opens a different listing.
Just paste the snippet once per target (set a different Opens value for each) and each button shows up in its own position. Customers get one-click access to the right listing.
How It Looks to Customers
Clicking the button opens the widget in a 95% × 95% modal over your site. A close button in the corner dismisses it. Your site stays visible underneath — the customer never loses context.
Troubleshooting
The button doesn't appear.
Check the <script> is loaded: open your browser's Developer Tools → Network tab, reload your site, and search for equipdash-widget-embed.js. If it's missing, your snippet is probably in the wrong place or your CMS is stripping <script> tags.
The modal opens but is blank.
Your supplier slug might be wrong. Double-check the data-supplier value in the snippet matches your actual widget URL slug.
The button is covered by my chat widget.
Switch the button position to the opposite corner (Bottom left vs Bottom right) so the two don't overlap.