Send a Custom Email to a Customer
Sometimes you just need to reach out to a customer — a thank you note, a debt reminder, a quick check-in about a future booking. Instead of switching to your personal email client, you can send a branded email directly from the customer's profile in EquipDash.
Custom emails are logged automatically against the customer record, so your whole team can see what has been sent.
When to Use This
- Quick thank-you notes after a rental
- Follow-ups about outstanding balances
- Proactive check-ins (e.g. "Your gear is ready for pickup")
- One-off questions that don't fit into a standard notification
For bulk announcements to many customers at once, use the Campaigns feature instead.
Who Can Send Emails
Sending custom emails is controlled by the Send customer emails permission (customers.email). By default:
- Admin and Manager roles can send emails
- Staff cannot send emails by default (can be enabled per-role)
If you don't see the Send email button on a customer's detail page, ask your admin to enable the permission in Settings → Team & Permissions.
Sending an Email
- Click Customers in the sidebar and open the customer's profile.
- Click the Send email button in the hero card on the right (envelope icon at narrow widths, Send email text at wider widths — sits next to the + New booking button).
- A side panel slides in from the right titled Send email to {Customer Name}.
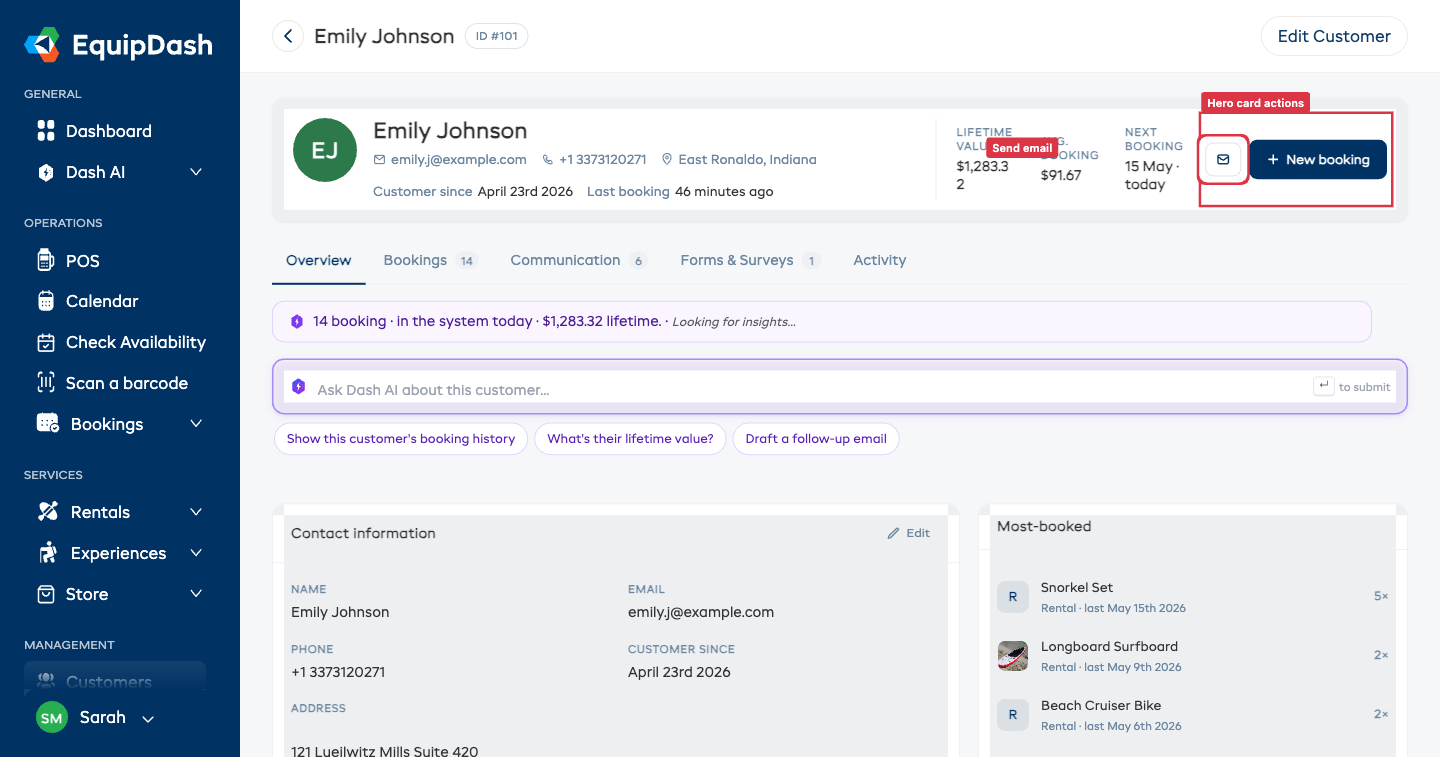
- Fill in the form:
- To — locked to the customer's email address
- Subject — a short line summarising the email (required, max 255 characters)
- Message — your email body (required). Use the formatting toolbar for bold, italic, underline, bullet lists, numbered lists, and links.
- Attachments — optional. Click + Add file to attach PDFs, images, or other files (up to 10 files, 10MB each, 25MB total).
- Send me a copy — tick this to receive a BCC copy in your own inbox.
- Click Send email.
You'll see a confirmation toast — "Email sent to {First Name}" — and the side panel will close. The email arrives at the customer's inbox with your business's branding (logo, colours, contact details).
Attachments
- Allowed: PDFs, images (PNG, JPG, etc.), Word docs, Excel files, plain text, CSVs
- Blocked: executables and scripts (
.exe,.bat,.sh,.js,.php, etc.) — for security, these cannot be attached - Each file must be 10MB or less
- Total attachments across one email must be 25MB or less
To remove an attachment before sending, click the × next to its name in the attachments list.
Using Dash AI to Draft an Email
Dash AI can draft an email for you based on the context of the customer profile.
- On the customer's detail page, look at the Ask Dash AI input at the top.
- Click the Draft a follow-up email starter chip (or type your own request, e.g. "Write a thank-you email for last week's rental").
- Dash returns a draft inline, with an Open in compose button below the answer.
- Click Open in compose — the Send email panel opens with the subject and body pre-filled.
- Review the draft, edit anything you want to change, then click Send email.
Dash never sends the email automatically — you always have a chance to review and tweak the draft first.
What the Customer Sees
The customer receives a branded email with:
- Your business name and logo in the header
- The subject line you entered
- The body you wrote (with rich formatting preserved)
- Any attachments you added
- A footer with your business name
If you ticked Send me a copy, you'll also receive the email in the inbox of whichever address is on your EquipDash user account.
Where Emails Are Logged
Every email you send is logged against the customer and shows up in two places on their detail page:
- Communication tab — a read-only timeline of every email and SMS this customer has received. Each row shows the channel, sender (you, or "System" for automatic emails), timestamp, delivery status, subject, and a preview of the body. Click the reply arrow on any email to open the Send email panel pre-filled with
Re: {subject}and the original body quoted. - Activity tab — emails also appear in the merged event timeline alongside bookings, payments, SMS, and form responses.
Automatic system emails (booking confirmations, payment receipts, overdue alerts, waiver requests, etc.) are logged the same way and show up as System in both tabs, so the timeline is a complete record of what the customer has received from your business.
Each log entry captures:
- Subject + body (HTML + plain text versions, with bearer tokens redacted for security)
- Attachments (filename, size, mime type)
- Whether a CC copy was sent to you
- Who sent it (your user account, "System" for automatic, or the API key / MCP tool if sent programmatically)
- Whether it was delivered successfully or failed (with failure reason)
- The exact time it was sent
Troubleshooting
- "Send email" button is missing — You don't have the
customers.emailpermission. Ask an admin. - "This customer does not have an email address" — The customer profile has no email saved. Edit the customer and add one.
- Email didn't arrive — Check the customer's spam folder. The email comes from your configured business email, so if your domain isn't set up correctly with SPF/DKIM, it may be filtered. Contact support if this keeps happening.