Multiple PDFs From One Form Growth+This feature requires the Growth+ plan or higher
Sometimes one signing needs to produce more than one document. A guided rental, for example, might need a Rental Contract and a separate Acknowledgement of Risk — two PDFs with different wording, each holding a different set of answers, both produced from a single signing.
The Documents feature does exactly that. You build one form, the customer fills it in and signs once, and EquipDash produces a separate, neatly laid-out PDF for each document you set up — each containing only the content and answers you placed on it.
This is advanced and optional. Most waivers never need it. If you don't set up any documents, nothing changes: one signing produces a single PDF with every answer, exactly as before — no setup required.
How it works
- From your form, you open the Documents panel and add one or more documents, giving each a name.
- You open a document and build it on a simple drag-and-drop page — drag in your own headings, text and images, and drag in the form's questions wherever you want their answers to appear.
- When a customer fills in and signs the form, EquipDash produces one PDF per document, each laid out the way you built it.
- Every PDF is attached to the booking, emailed to the customer, and available to download from their response — one at a time or all together.
Setting up a document
- Open your form and click Documents in the top bar. A panel slides in from the right.
- The first time, you'll see a short explainer — Custom PDF documents · Advanced · Optional — reminding you that most waivers don't need this. Click Add a document.
- A new document starts as a copy of your whole form — every heading, section and question already laid out — so you build by editing it down, not from a blank page. Prefer a clean slate? Click or start blank instead.
- A document row appears. Give it a Document name — this becomes the PDF's title, for example Rental Contract.
- Tick Needs staff counter-signature if a staff member should sign this document after the customer (see Counter-signing a document below). Leave it unticked otherwise.
- Click Add a document again for each extra PDF you need. Each one is saved straight away — there's no separate Save step in the panel.
- To remove a document, click Delete on its row. Any copies already signed by customers still download.
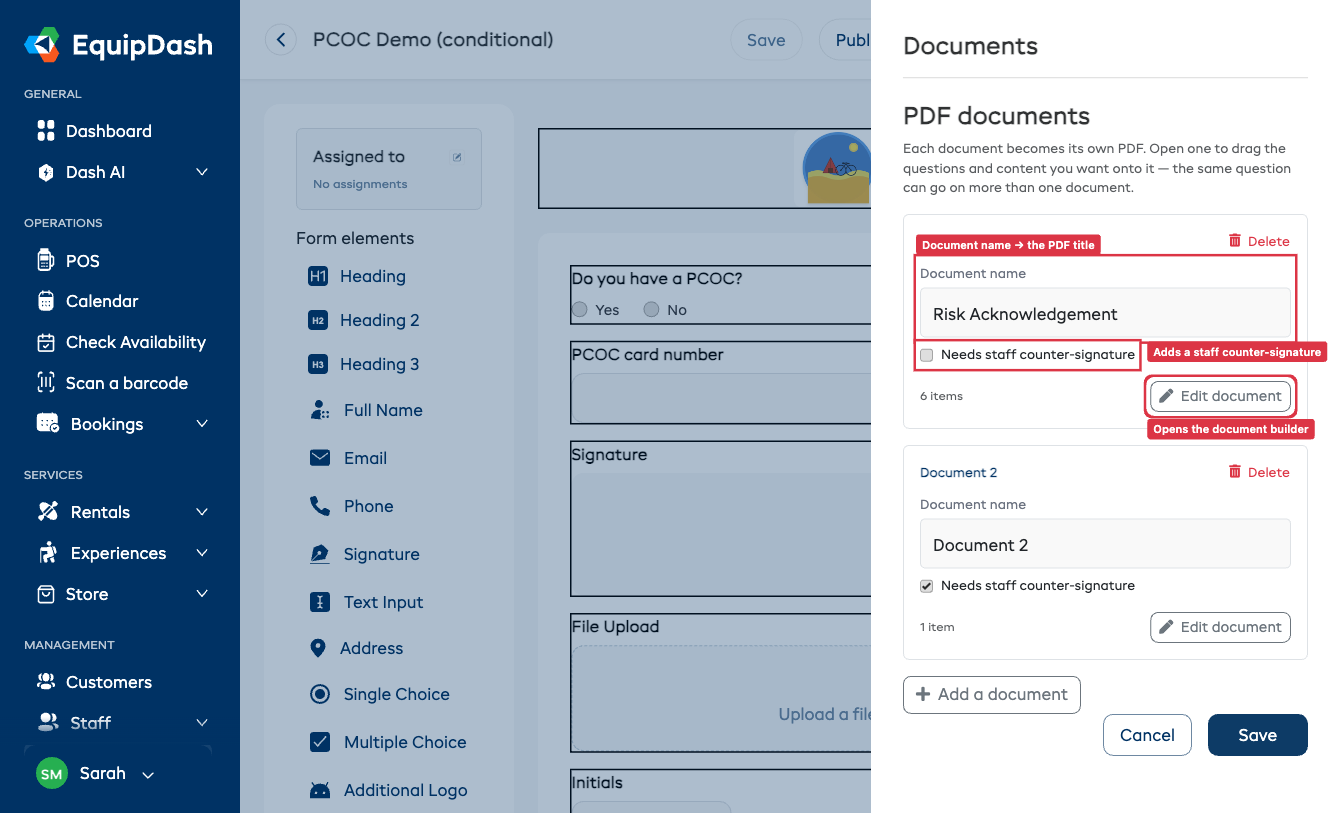
Each row shows how many items are on the document, and an Edit document button. Because a new document is pre-filled with a copy of your form, you'll usually open it and remove the parts that don't belong on that particular PDF — that's the next step.
Building the document
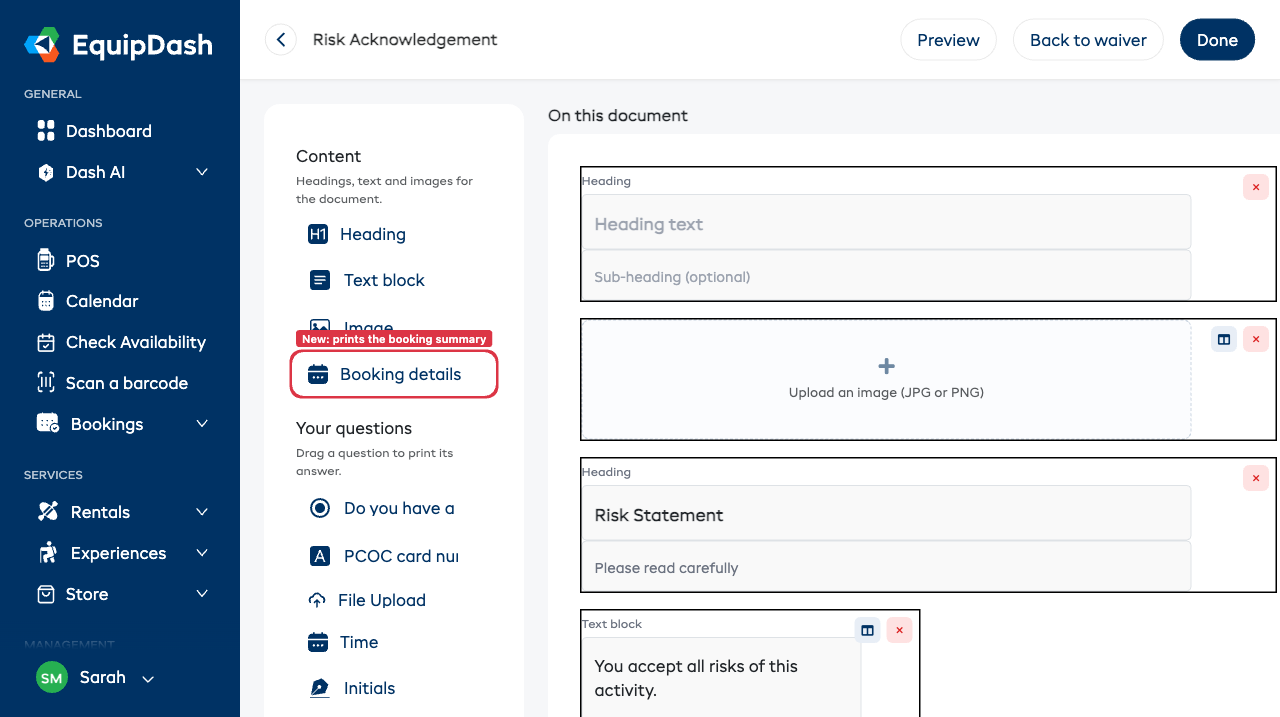
Click Edit document on any row to open the document builder — a full-page, drag-and-drop layout, just like the form builder. Across the top you'll find a back arrow, the document's name, and Preview, Back to waiver, and Done buttons.
Because the document opened as a copy of your whole form, it already shows your form's headings, sections (as headings) and questions in the same order. Delete anything that doesn't belong on this PDF, tweak the wording, and add anything extra.
On the left is a palette split into two groups:
- Content — Heading, Text block, Image, and Booking details. These are things you write, upload or place onto the document itself: a section title, a paragraph of terms, your logo or a diagram, or an auto-filled booking summary. The customer doesn't fill these in.
- Your questions — every question from your form. Drag a question onto the document and that customer's answer prints there on the PDF.
The white card in the middle — On this document — is the document itself.
To build it:
- Drag an item from the palette on the left onto the card. Drag a Heading or Text block to write your own wording, an Image to add a picture, or a question to print its answer.
- Reorder anything by dragging it up or down on the card.
- Type directly into a heading or text block right on the card. Headings also have an optional sub-heading line beneath them.
- Add a picture by dragging in Image, then clicking the dashed Upload an image (JPG or PNG) box. Once uploaded, align it left, center, or right.
- Each item has a columns icon (to place two side by side — see below) and a × to remove it.
Place two items side by side. By default each item takes the full width of the page. Click the columns icon on an item to shrink it to half-width, then drop a second item beside it — handy for, say, a name next to a date, so the PDF reads tidily. Click the columns icon again to return to full width.
See the result. Click Preview in the top bar to open this document's PDF in a new browser tab. It shows your chosen content with blank placeholders where each answer will go, so you can check the layout and even download a sample before any customer signs. When you're happy, click Done to return to the form.
A few things to know:
- The same question can go on more than one document. A customer's name and contact details usually belong on both a contract and an acknowledgement — drag the question onto each.
- Headings, text and images are yours alone. They're the wording and branding you author on the document; the customer never edits them.
- A question prints the answer, not the question. Dragging a question on simply reserves the spot where that customer's answer will appear on the finished PDF.
Add a booking summary
Drag Booking details from the Content palette onto the document to print an auto-filled summary of the booking — the customer, the dates, the items booked, and the total — pulled straight from the booking, a bit like a mini invoice. You don't fill anything in; it fills itself when the form is signed against a booking. On the builder it shows a short placeholder explaining this; on the finished PDF it's the real booking summary. (A form signed without a booking simply leaves it out.)
Generate a document in more than one language
If you offer your form in more than one language (set in Settings → Localization), each document can be produced in several languages from a single signing — handy for a bilingual region where you need, say, a rental contract on file in both English and French.
- Open your form → Documents.
- On the document you want, tick Also generate in other languages, then tick each language to produce (for example Français). English is always produced, so it isn't listed.
- Save.
Now every time that form is signed, EquipDash produces a separate PDF of that document in each ticked language — wherever you download or receive documents (booking, response, email, bulk export) you'll see one per language, e.g. Rental Contract and Rental Contract (Français).
A few things to know:
- The wording is translated for you. Your headings, text and question labels are auto-translated into each language. You can review and fine-tune any of it in Settings → Localization — your edits are kept.
- The customer's answers are never translated. Names, dates and anything they typed appear exactly as entered, in every language version.
- This option only appears when you have more than one language enabled, so single-language shops aren't bothered with it.

Only generate a document when an answer matches
Sometimes a particular PDF should only be produced for some customers. A guided trip might need a Driver Agreement only when the customer says they're driving, or a Minor Consent only when someone is under 18. Instead of producing every document for everyone, you can tell a document to generate only when a customer answered a question a certain way.
- Open your form → Documents.
- On the document you want, tick Only generate this PDF when an answer matches.
- Choose a question, pick is / is not / includes / is at least / …, and set the answer to match — for example Are you the driver or a passenger? is Driver.
- Need more than one rule? Click Add another condition and choose whether all or any of them must match.
- Save.
Now that document is produced only for responses that match. A customer who answers Driver gets the Driver Agreement; a passenger doesn't — and it never appears on their booking, email or downloads.
A few things to know:
- Leave the toggle off to always produce the PDF. This is the default, so every document you've already set up keeps generating for everyone — nothing changes unless you turn this on.
- Any question on the form can be the trigger — it doesn't have to be near the document or earlier on the form.
- If none of your documents match a particular signing, EquipDash still files the standard single PDF with every answer, so a response is never left with no record.
- It pairs with the language option above. A conditional document that's also set to generate in other languages produces each language only when its condition matches.

Different logos and images per language
If you offer your form in more than one language (set in Settings → Localization), you can show a different logo or image for each language — handy for a bilingual region.
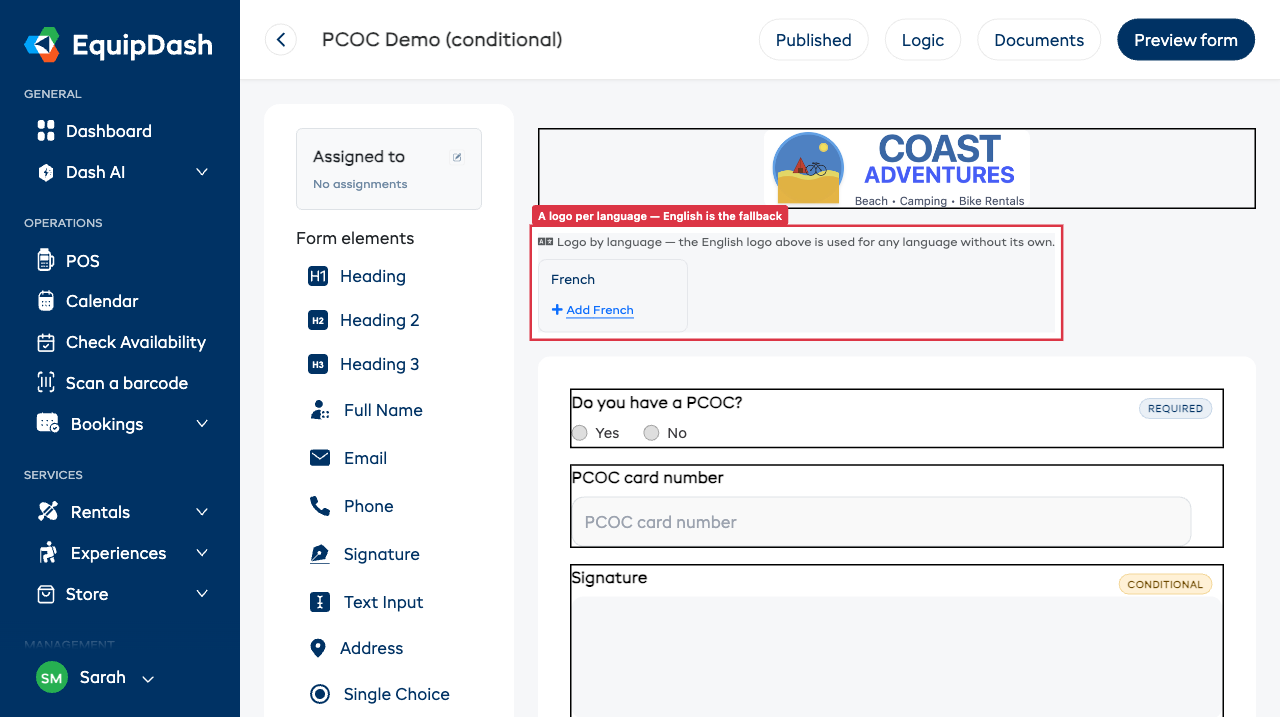
- On your form's logo, on the second header image (when you split the logo into two columns), and on any Image element, you'll see a small Multi-language button. Click it to reveal a slot for each language you've enabled.
- Click Add [language] and upload the version for that language.
- Customers signing in that language see that version; the English one is used for any language without its own, so you only set the languages you want to differ.
The language slots only appear when you have more than English enabled, so single-language forms stay clutter-free.
What each PDF contains
A finished document's PDF includes:
- Your business branding along with the headings, text and images you placed on it.
- Each question's answer, shown wherever you dropped that question.
- The customer's signature, where you placed a signature question on the document.
Only the content and questions you actually put on a document appear on its PDF — nothing more.
A few things to know:
- Hidden questions never leak onto a PDF. If a question was hidden from the customer by conditional logic — so they never saw or answered it — it's automatically left off that document's PDF.
- Empty placeholders are only in the Preview. Preview shows blank answer slots for your reference; each customer's finished PDF fills them with their real answers.
Counter-signing a document
Some documents — typically a contract — benefit from a staff member signing after the customer. Tick Needs staff counter-signature on that document's row in the Documents panel.
To counter-sign once a customer has signed:
- Open the form's responses and open the customer's response (see Viewing Responses).
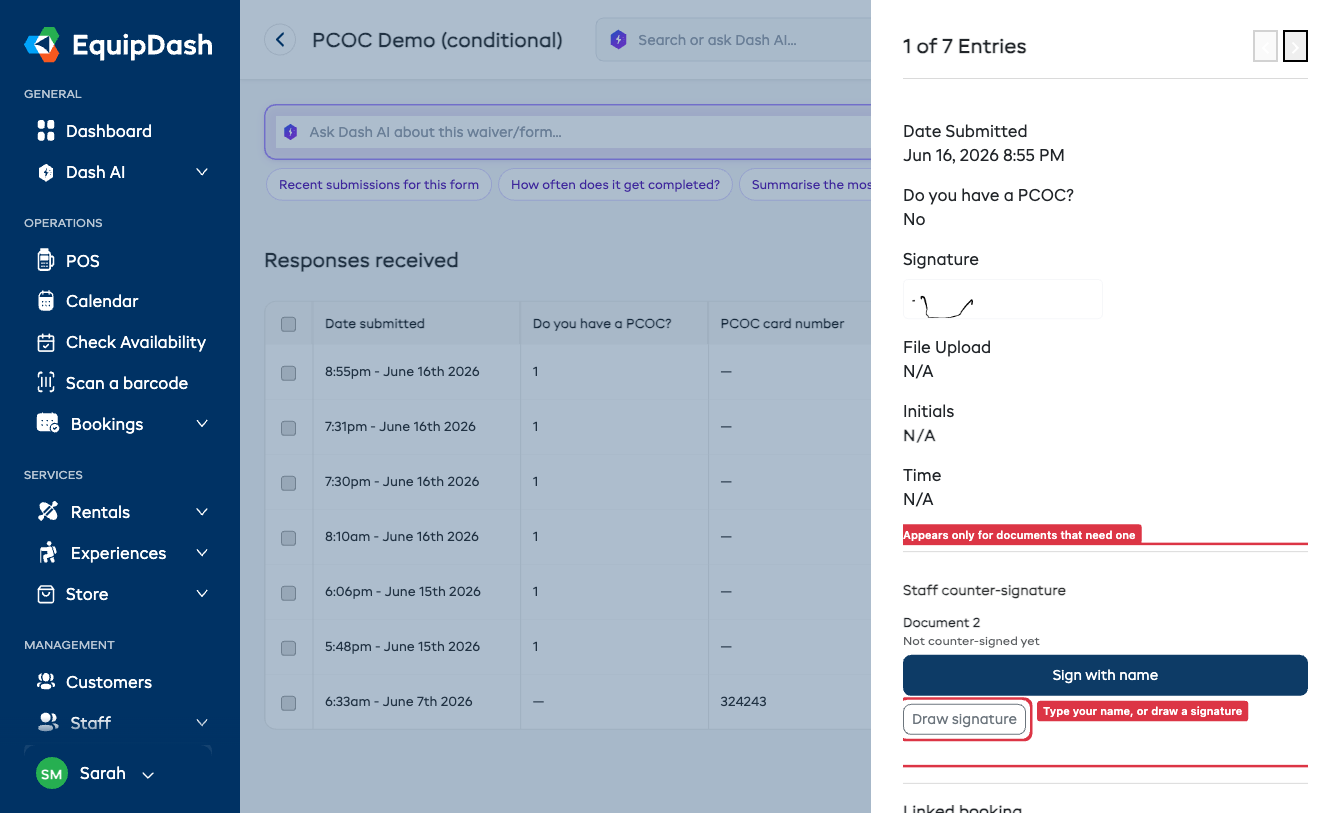
- Scroll to the Staff counter-signature section. It lists each document that needs a counter-signature.
- Click Sign with name to record your typed name, or Draw signature to sign on a pad. Your name and the date are recorded and printed on that document's PDF.
- Made a mistake? Click Undo to remove it.
A customer's signature alone is what makes a contract valid — the counter-signature simply adds your confirmation on top.
Downloading the documents
Wherever you could download a signed form before, you now get each document separately:
- On the booking — under each participant you'll see a download chip for every document (for example Rental Contract and Acknowledgement of Risk), so you can grab exactly the one you need.
- From the response — open a response and use Download documents to grab each document on its own (and each language, if you generate in more than one), or Download all as a zip.
- By email — the customer's confirmation email attaches every document automatically (one per language where you generate more than one).
- Bulk export — a bulk export includes one file per document for each response.
Tips
- Put shared details on every document. Name, contact and emergency contact belong on each PDF so every document stands on its own when filed.
- Keep each document focused. One set of clauses per PDF makes a customer's signed records easy to file and find later.
- Use Initials after each clause. If you've added Initials questions to your form — one after each risk clause — drag them onto an acknowledgement document, with a Signature question at the end.
- Preview before you rely on it. Click Preview to open the PDF and confirm the layout reads the way you want before customers start signing.