Inventory Management
EquipDash lets you track stock quantities for your store products so you always know what is available, what is running low, and what has sold out. Inventory tracking is optional -- you can enable it per product depending on your needs.
Inventory Tracking Types
EquipDash supports two inventory tracking methods. You choose the type when creating or editing a product.
Group-Level Tracking
Group-level tracking maintains a single stock count for the product (or per variation). This is best for generic items where individual units are interchangeable.
- How it works: A simple number represents how many units you have in stock.
- Stock adjustments: Add or subtract quantities with a reason for the change.
- Best for: T-shirts, accessories, consumables, and other items where tracking individual units is not needed.
Item-Level Tracking
Item-level tracking creates an individual record for each physical unit in your inventory. Each item gets a unique identifier and can optionally have a barcode assigned.
- How it works: Each unit is a separate inventory item with its own identifier (e.g., "HELMET-001", "HELMET-002").
- Stock is calculated automatically: The stock count equals the number of active inventory items.
- When items are sold: Individual items are soft-deleted (marked as removed) rather than permanently deleted, preserving the audit trail.
- Best for: High-value items, serialised goods, items with barcodes, or anything you want to track at the individual unit level.
If you are unsure which type to choose, start with Group tracking. You can switch to item-level tracking later if you need more granular control.
Enabling Inventory Tracking
Inventory tracking is configured on each individual product:
- Go to Store > Products and open the product you want to track.
- Click Edit Product.
- Navigate to step 3 (Additional Details).
- Toggle Track inventory on.
- Select the Tracking type (Group or Item).
- Click Update Product.
Once enabled, the Inventory tab appears on the product detail page where you can manage stock levels.
EquipDash will:
- Display stock status on the product detail page and store widget.
- Prevent customers from purchasing more units than are in stock (unless backorders are allowed).
- Automatically reduce stock when products are sold through bookings or the widget.
- Flag products as "Out of Stock" when the quantity reaches zero.
If you do not enable inventory tracking, the product is treated as having unlimited stock. This is useful for digital goods or made-to-order items where stock limits do not apply.
Inventory Tab Overview
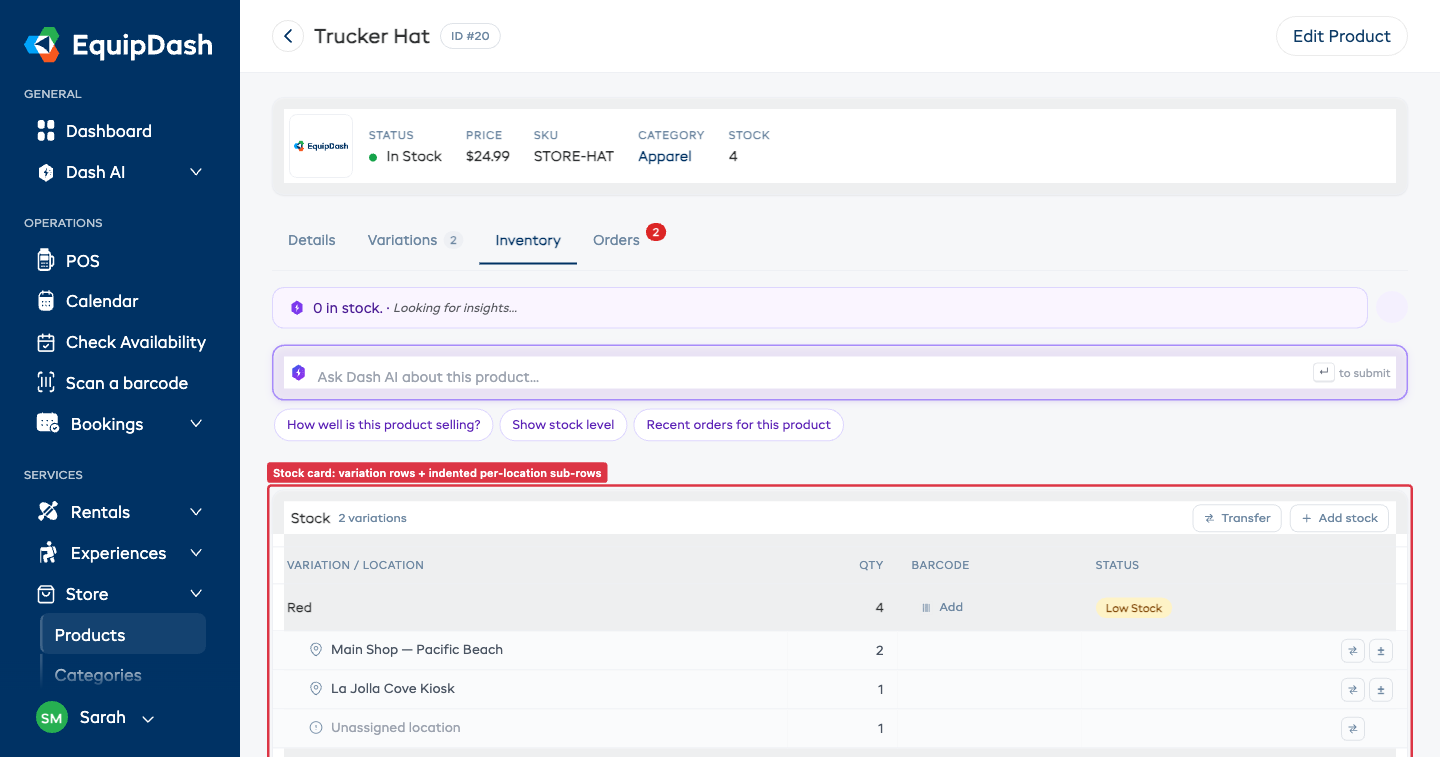
Once inventory tracking is enabled, the product detail page shows an Inventory tab with:
- A merged Stock card. For group-tracked products this is a single table that breaks stock down by variation and by location in the same view -- variation rows on top, with each location indented as a sub-row beneath. For item-tracked products, the table lists every individual unit instead.
- A Transfer action and an + Add stock action in the Stock card header (Transfer only appears when you have multiple locations).
- An Inventory Log below showing every stock change with a timestamp, type, location, variation, signed quantity change, the resulting per-location running total, and the reason.
The Stock card adapts to your setup:
| Setup | What you see |
|---|---|
| Variations + multiple locations | Variation header rows with indented per-location sub-rows under each |
| Variations only (single location) | One row per variation |
| No variations + multiple locations | One row per location |
| No variations + single location | A single Total stock row |
If a product has any inventory records that are not yet assigned to a location (typically legacy or imported stock), you will see an Unassigned location sub-row showing how many units sit in that bucket. Use the transfer icon on that row to move them onto a real location -- this is the recommended way to clear the unassigned bucket without affecting the variation's total stock.
Stock Statuses
Each row in the Stock card shows a status pill:
| Status | Meaning |
|---|---|
| In Stock | Quantity is above the low stock threshold |
| Low Stock | Quantity is at or below the threshold but above zero |
| Out of Stock | Quantity has reached zero |
These statuses are visible on the product table, the product detail page, and the store widget.
Adjusting Stock (Group-Level)
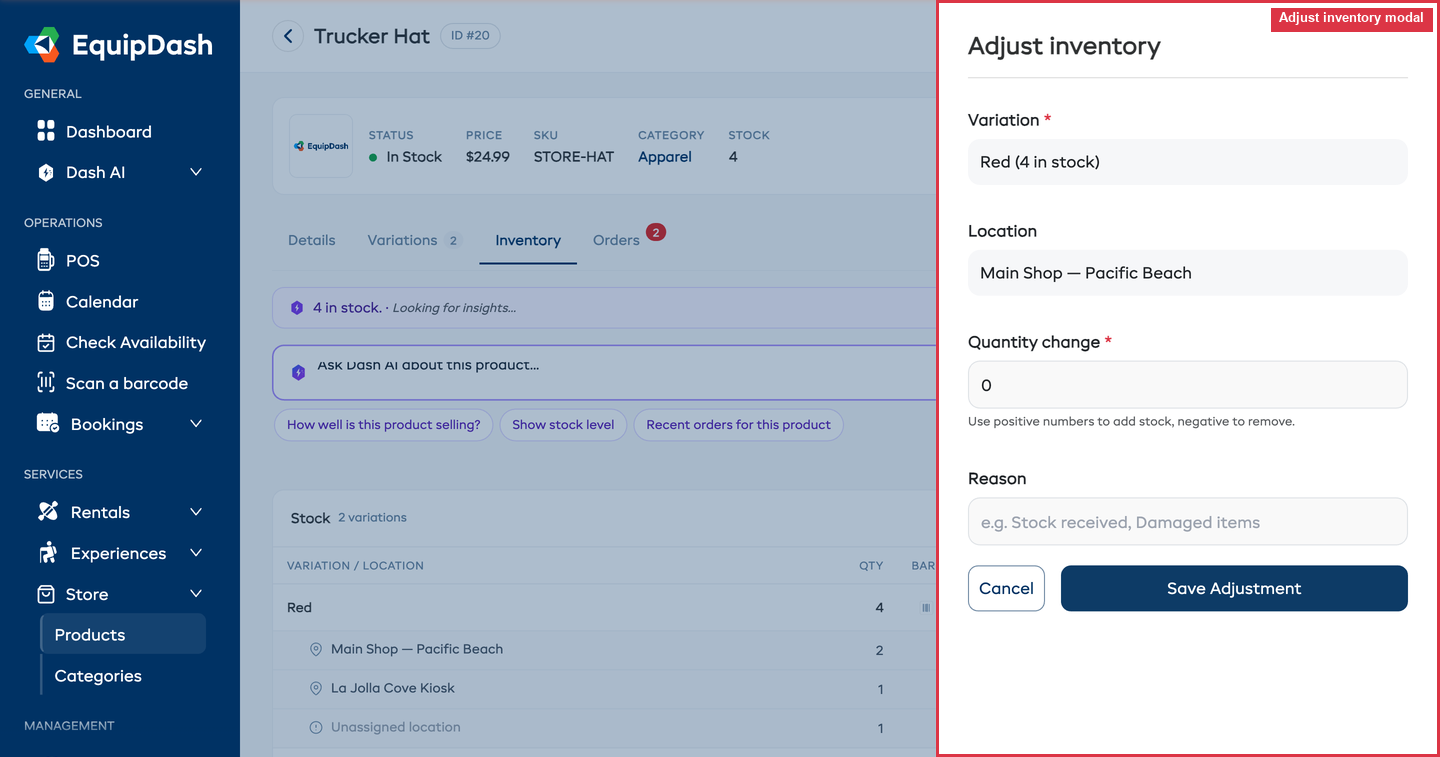
For products using group-level tracking, you adjust stock directly from the Stock card.
The ± icon on each row
Every variation × location row has a small ± button on the right edge. Clicking it opens the Adjust inventory sidebar with the variation and location pre-selected, so you do not have to pick them in the form.
- Open the product detail page and go to the Inventory tab.
- Click the ± icon on the row you want to adjust.
- Enter the Quantity change:
- Use a positive number to add stock (e.g.,
5for a restock). - Use a negative number to remove stock (e.g.,
-3for damaged items).
- Use a positive number to add stock (e.g.,
- Enter a Reason for the adjustment (e.g., "Stock received", "Damaged items").
- Click Save Adjustment.
Add stock
Use + Add stock in the Stock card header when you are adding new units that did not exist before (a new shipment arriving, for example). The form lets you pick variation, location, and quantity. Unlike Adjust, Add stock does not need a reason -- it is for new inventory, not corrections.
Use ± (Adjust) for corrections and stock-takes, and + Add stock for new inbound inventory. Adjust always asks for a reason, giving you a complete audit trail.
Transferring Stock Between Locations
If you physically move stock from one of your locations to another, log the move in EquipDash so per-location counts stay accurate. The product's variation total does not change -- transfers only move stock between locations.
You can start a transfer from two places:
- The Transfer button in the Stock card header — opens an empty Transfer form, you pick the variation, source, destination, and quantity.
- The transfer icon (↔) on any location sub-row that has stock — opens the Transfer form pre-targeted at that variation and source location, so you only pick the destination and quantity.
In the Transfer form:
- Pick a Variation (only shown when the product has variations).
- Pick a From location. Once chosen, the form shows how many units are available at that location and caps the Quantity field to that maximum. The Unassigned location option lets you move legacy stock onto a real location.
- Pick a To location -- the From location is automatically disabled in this dropdown.
- Enter the Quantity to move.
- Optionally add a Reason / note (e.g., "Restocking back shop", "Customer pickup move").
- Click Transfer.
EquipDash writes two entries to the inventory log -- a -{quantity} row at the source and a +{quantity} row at the destination -- both tagged as Transfer with the matching reason on each side.
Transfer is only available when you have two or more pickup locations, and only for group-tracked products. Item-tracked products move differently: when an item is returned to a different location, EquipDash records the new location automatically.
Managing Inventory Items (Item-Level)
For products using item-level tracking, you manage stock through the Inventory Items table on the product detail page.
Viewing Inventory Items
- Open the product detail page and go to the Inventory tab.
- The Inventory Items table shows all items with their:
- ID -- The system identifier.
- Identifier -- The unique name or serial number for the item.
- Variation -- Which variation the item belongs to (if applicable).
- Actions -- Edit, delete, and barcode buttons.
You can search items by identifier and filter by variation.
Adding Inventory Items
- Click Add Items on the Inventory tab.
- If the product has variations, select the Variation.
- Enter the Quantity of items to add.
- Optionally enter an Identifier prefix (e.g., "WIDGET"). Items will be numbered automatically (e.g., "WIDGET-1", "WIDGET-2").
- Optionally toggle Add barcode? on to automatically create barcodes for the new items.
- Click Add Items.
The product's stock quantity updates automatically to reflect the total number of active items.
Editing an Inventory Item
- Find the item in the Inventory Items table.
- Click the Edit icon (pencil icon) to update the item's identifier.
- Click Save Changes.
Removing an Inventory Item
- Find the item in the Inventory Items table.
- Click the Delete icon (trash icon) on the item row.
- Confirm the removal.
The item is soft-deleted (marked as removed) and the stock count decreases. Soft-deleted items are preserved for audit purposes.
Barcodes on Inventory Items
Each inventory item can have a barcode assigned for scanning:
- Find the item in the Inventory Items table.
- Click the Barcode icon to add, edit, or view the barcode.
- You can scan an existing barcode or manually enter a barcode value.
Inventory Log
Every inventory change is recorded in the product's inventory log, shown at the bottom of the Inventory tab.
The log table shows:
| Column | Description |
|---|---|
| Date | When the change occurred |
| Type | The type of change (Addition, Sale, Adjustment, Return, or Transfer) |
| Location | Which of your locations the change happened at (— for unassigned) |
| Variation | Which variation the change applied to (only when the product has variations) |
| Change | The signed quantity change -- green for additions, red for removals |
| After | The per-location running total after the change |
| Reason | The reason for the adjustment, or for transfers, the source/destination |
A Transfer writes two log rows -- one at the source with a negative change and one at the destination with a positive change -- so you can see both sides of the move at the right per-location running total.
You can filter the log by variation and by location using the dropdowns above the table.
Variation-Level Inventory
When a product has variations (e.g., sizes or colors), stock is tracked independently per variation, and the merged Stock card shows each variation as its own row:
- Each variation has its own status pill, total quantity, and -- when you have multiple locations -- a set of indented sub-rows showing how the total breaks down by location.
- Adjustments and transfers are made per variation × location combination, not at the product level.
- A variation can be out of stock while other variations of the same product remain available.
- For item-level tracking, each inventory item is assigned to a specific variation.
Low Stock Alerts
EquipDash can flag products that are running low so you know when to reorder.
Setting the Low Stock Threshold
The low stock threshold is a global setting that applies to all store products:
- Go to Settings > Store.
- Set the Low Stock Threshold value (e.g.,
5). - Click Update.
When a product's stock reaches or falls below this number, it will be flagged as "Low Stock" on the product table.
Choose a threshold that gives you enough time to reorder. If your supplier takes two weeks to deliver, set the threshold to cover two weeks of typical sales.
Backorders
By default, customers cannot purchase products that are out of stock. You can change this by enabling backorders.
Enabling Backorders
- Go to Settings > Store.
- Toggle Allow Backorders on.
- Click Update.
When backorders are enabled:
- Products can be sold even when stock is at zero.
- Stock quantities can go negative to indicate backorder quantities.
- Customers will still see that the product is out of stock, but they will be able to proceed with the purchase.
Enabling backorders means you are committing to fulfilling orders even when you do not currently have stock. Only enable this if you have a reliable restock process in place.
How Stock Changes Happen
Stock quantities change automatically in the following situations:
| Event | Stock Change |
|---|---|
| Product sold via widget checkout | Decreased by quantity purchased |
| Product added to a booking via POS | Decreased by quantity added |
| Booking canceled or product removed from booking | Increased (stock returned) |
| Manual inventory adjustment | Increased or decreased by specified amount |
| Inventory item added (item-level) | Increased by 1 per item |
| Inventory item removed (item-level) | Decreased by 1 per item |
Related Guides
- Creating Store Products -- Setting up inventory tracking when creating a product.
- Managing Store Products -- Product management.
- Product Variations -- Tracking stock per variation.
- Store Settings -- Configuring low stock threshold and backorders.
- Adding Store Products to Bookings -- How stock is affected by POS sales.