Multi-Location Inventory Setup
If your business operates from more than one site, EquipDash lets you assign inventory to specific locations. This means you always know which items are at which site, and your customers see accurate availability for the location they choose.
Every account starts with one default location. Adding a second location or more requires the Pro plan. Starter and Growth plans are limited to a single location.
How Multi-Location Inventory Works
- Each inventory unit (for item-tracked products) or stock entry (for group-tracked products) is assigned to a business location.
- Locations marked as a rental pickup location appear in inventory forms, booking forms, and the widget location picker.
- When a customer books through the booking widget, they pick a location first, and only inventory at that location is shown as available.
- Staff creating bookings in the POS also select a pickup location, which filters inventory the same way.
- The calendar, bookings list, fulfillment board, reports, and availability report can all be filtered by location.
- Store product inventory follows the same pattern -- group-tracked store products create per-location inventory records with a "by location" breakdown on stock cards.
Setting Up Locations
Before you can assign inventory to different sites, you need to create your locations.
- Click Settings in the sidebar.
- Select Locations from the settings menu.
- Click + Add location.
- Enter a Location name (e.g., "Beach Shop" or "Downtown Depot").
- Toggle Rental pickup location? to Yes if customers can pick up and return rentals from this location. Only pickup locations appear in inventory and booking forms.
- Toggle Include address? to Yes if you want to add the location's address (shown on booking confirmations and the widget).
- If you enabled the address, fill in Address line 1, Address line 2, City, State/Province, Postal code, and Country as needed.
- Click Save.
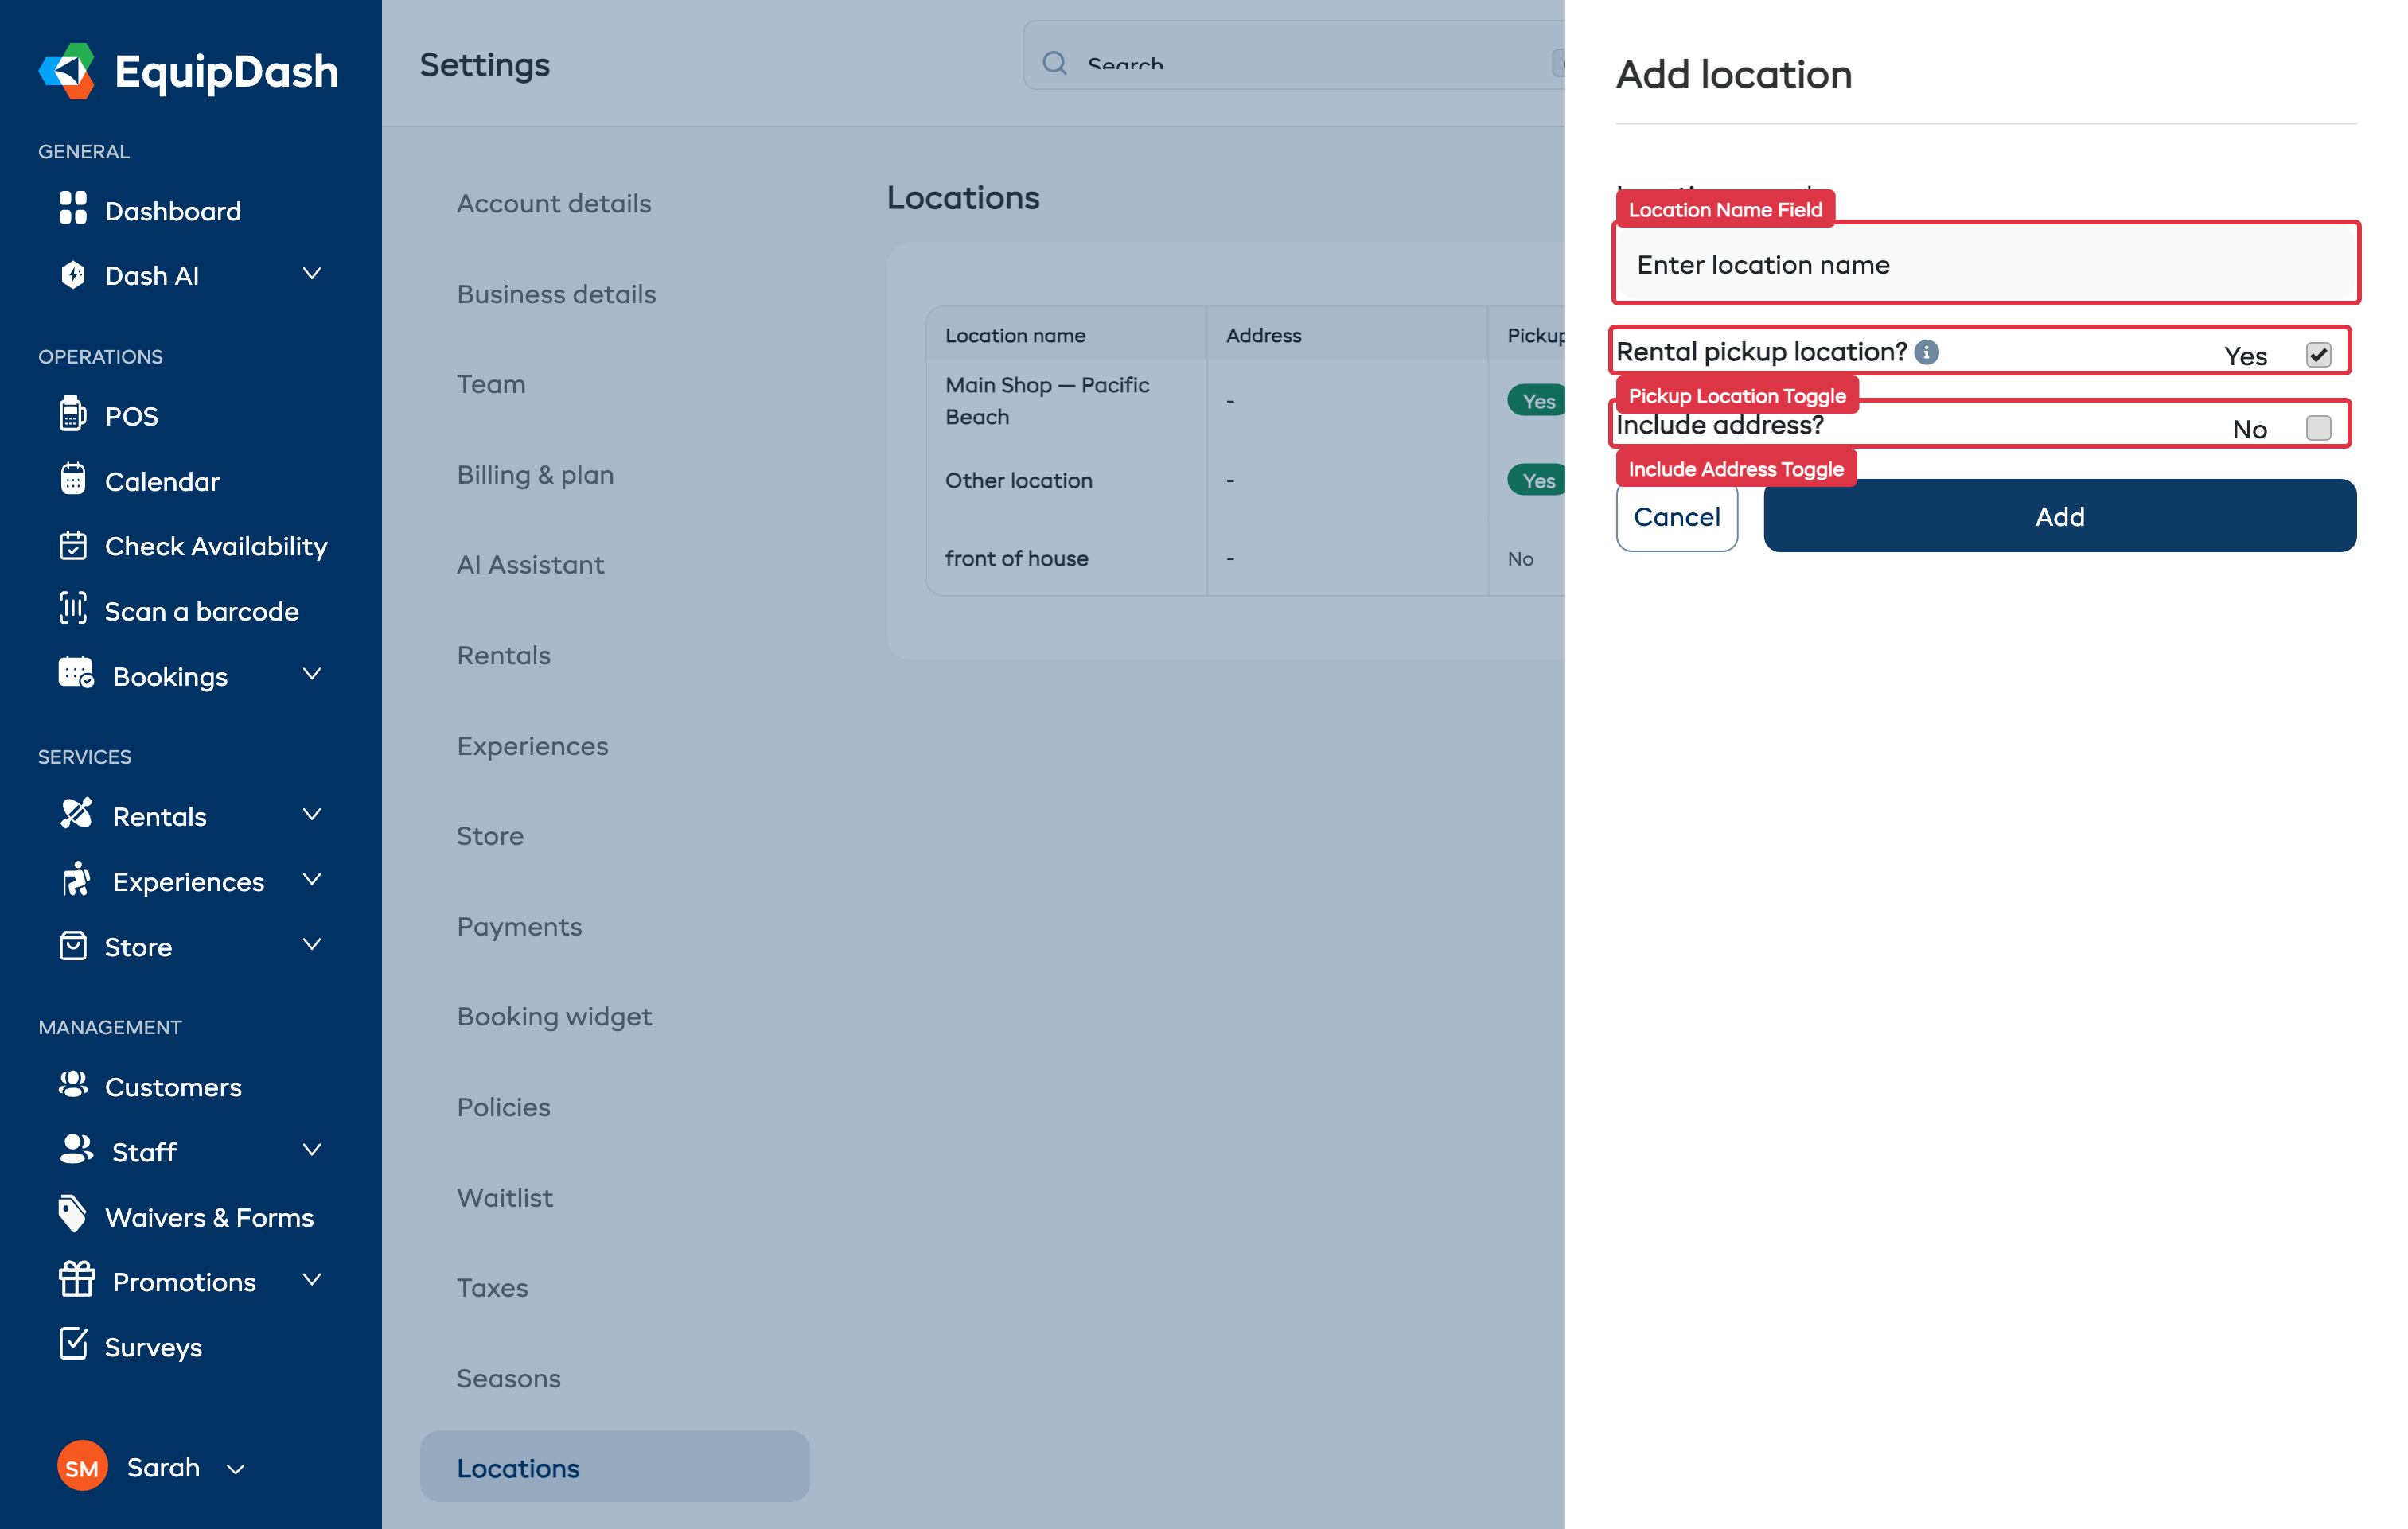
Repeat for each site you operate from. For full details, see Locations settings.
The Rental pickup location? toggle controls whether a location appears in inventory and booking dropdowns. If you have a warehouse that customers never visit, leave this toggle off -- you can still assign inventory to it, but it will not appear as a pickup option.
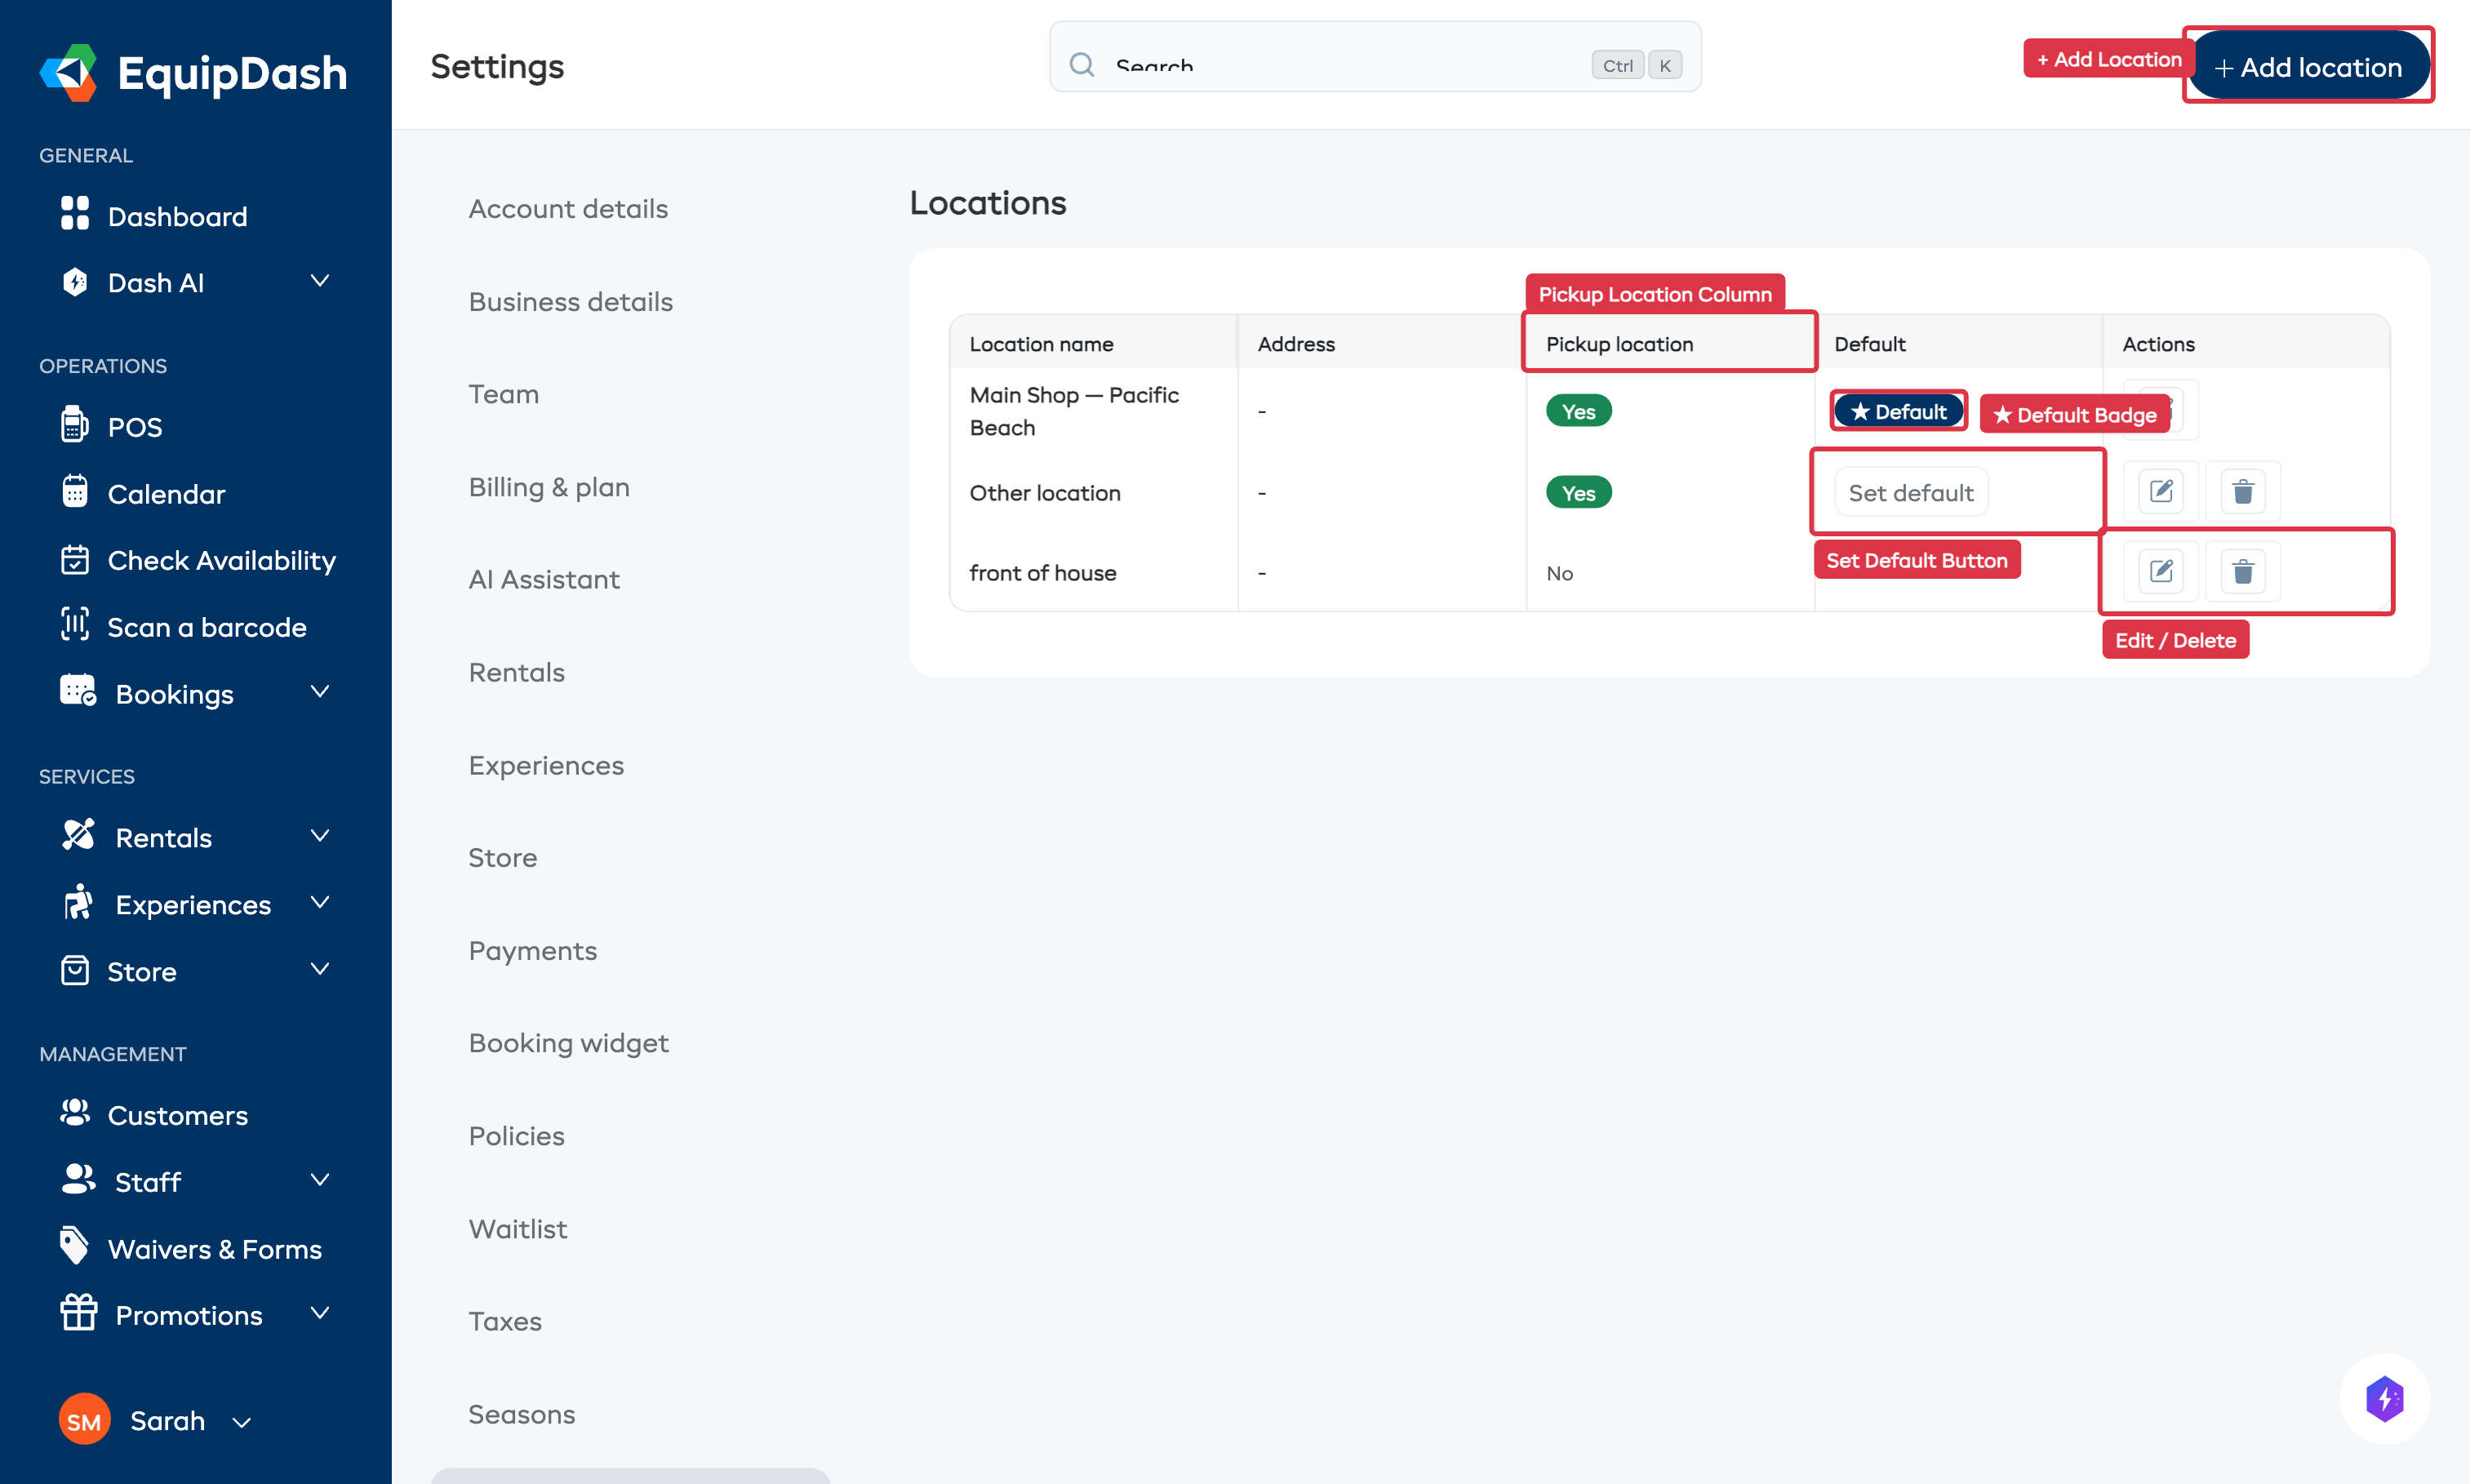
Setting a Default Location
Your first location is automatically set as the default. The default location is shown with a star (★) badge next to its name. The default location is pre-selected when you add new inventory or create bookings in the POS.
To change the default:
- Go to Settings > Locations.
- Click the star icon next to the location you want as the default.
- The star fills in to confirm it is now the default.
When you set a new default location, all existing inventory that has no location assigned is automatically moved to the new default. This ensures nothing is left unassigned.
Deleting a Location
You cannot delete a location that has inventory assigned to it. You must first reassign or remove the inventory.
- Go to Settings > Locations.
- Click the delete icon next to the location you want to remove.
- If inventory is assigned, you will see an error message. Reassign the inventory first, then try again.
If you delete the current default location, the next available location automatically becomes the new default.
Assigning Rental Inventory to a Location
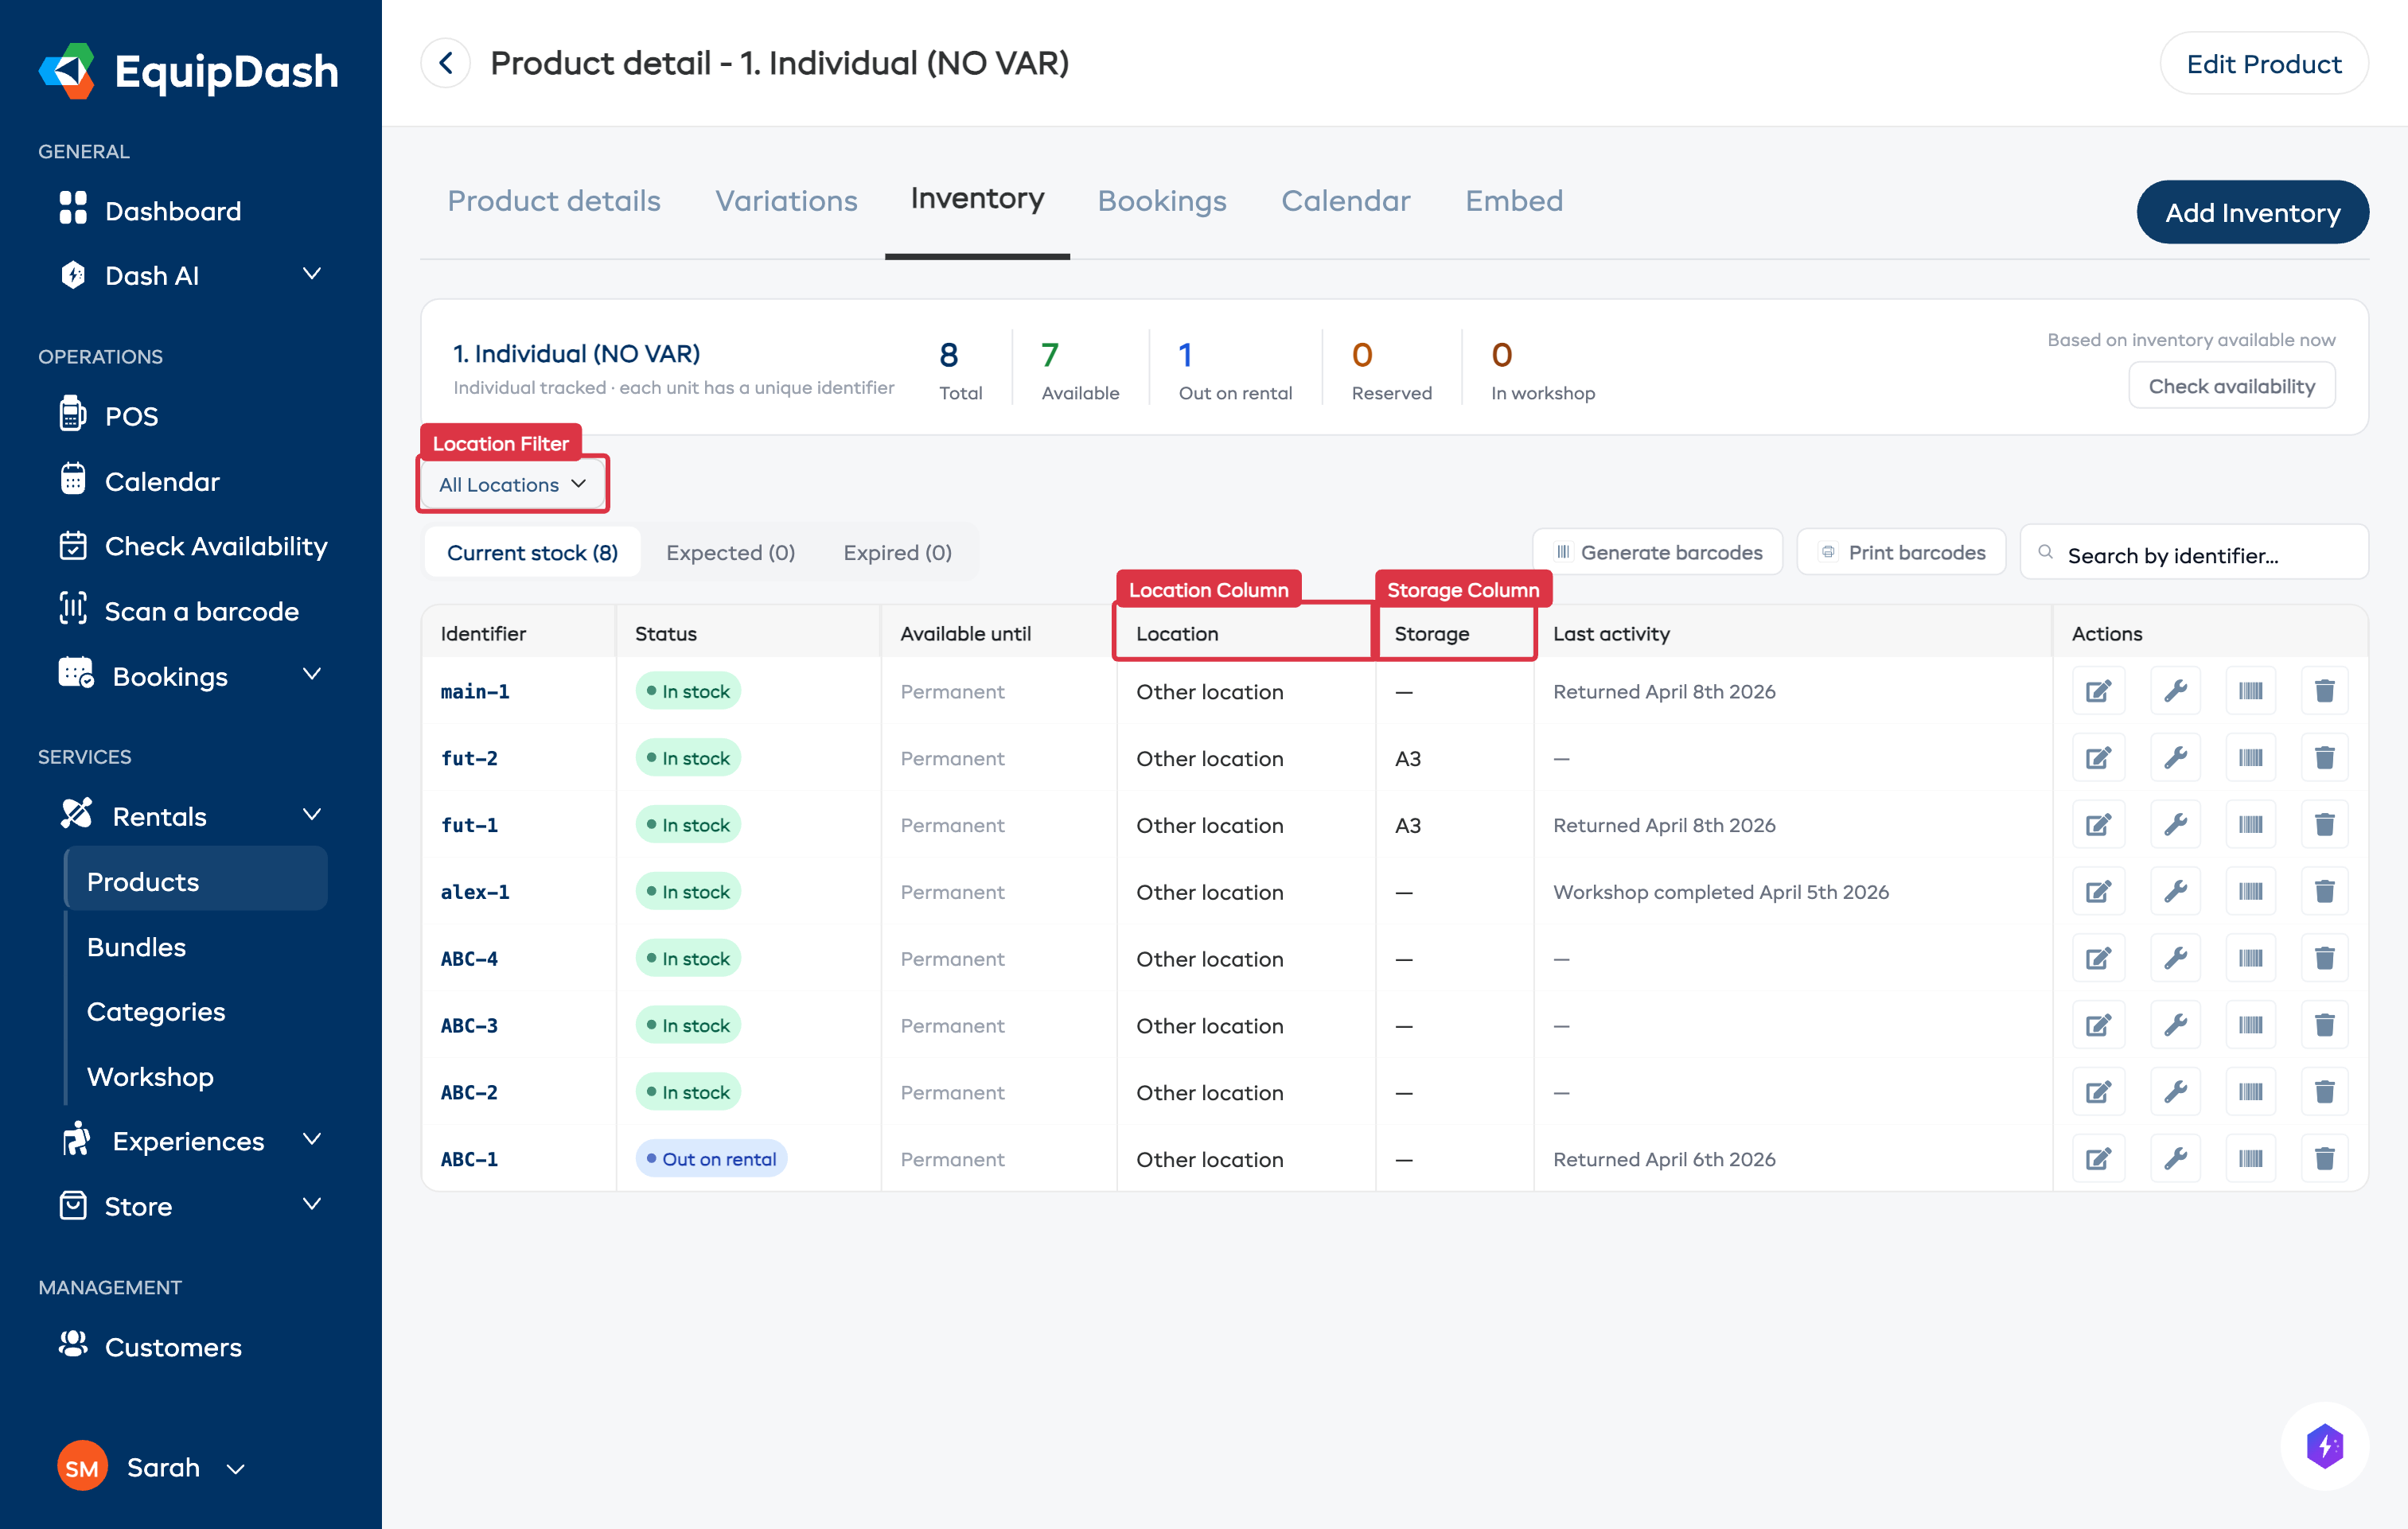
When you add inventory to a rental product, you choose which location it belongs to. The Location dropdown is mandatory when your account has locations set up.
For item-tracked products
- Go to Rentals > Products and open the product.
- Click the Inventory tab, then click Add Inventory.
- Fill in the identifier pattern and other fields.
- Select a Location from the dropdown.
- Optionally enter a Storage location (free text for shelf, bin, rack, etc. -- e.g., "Shelf A3" or "Warehouse Bay 12").
- Click Add Inventory.
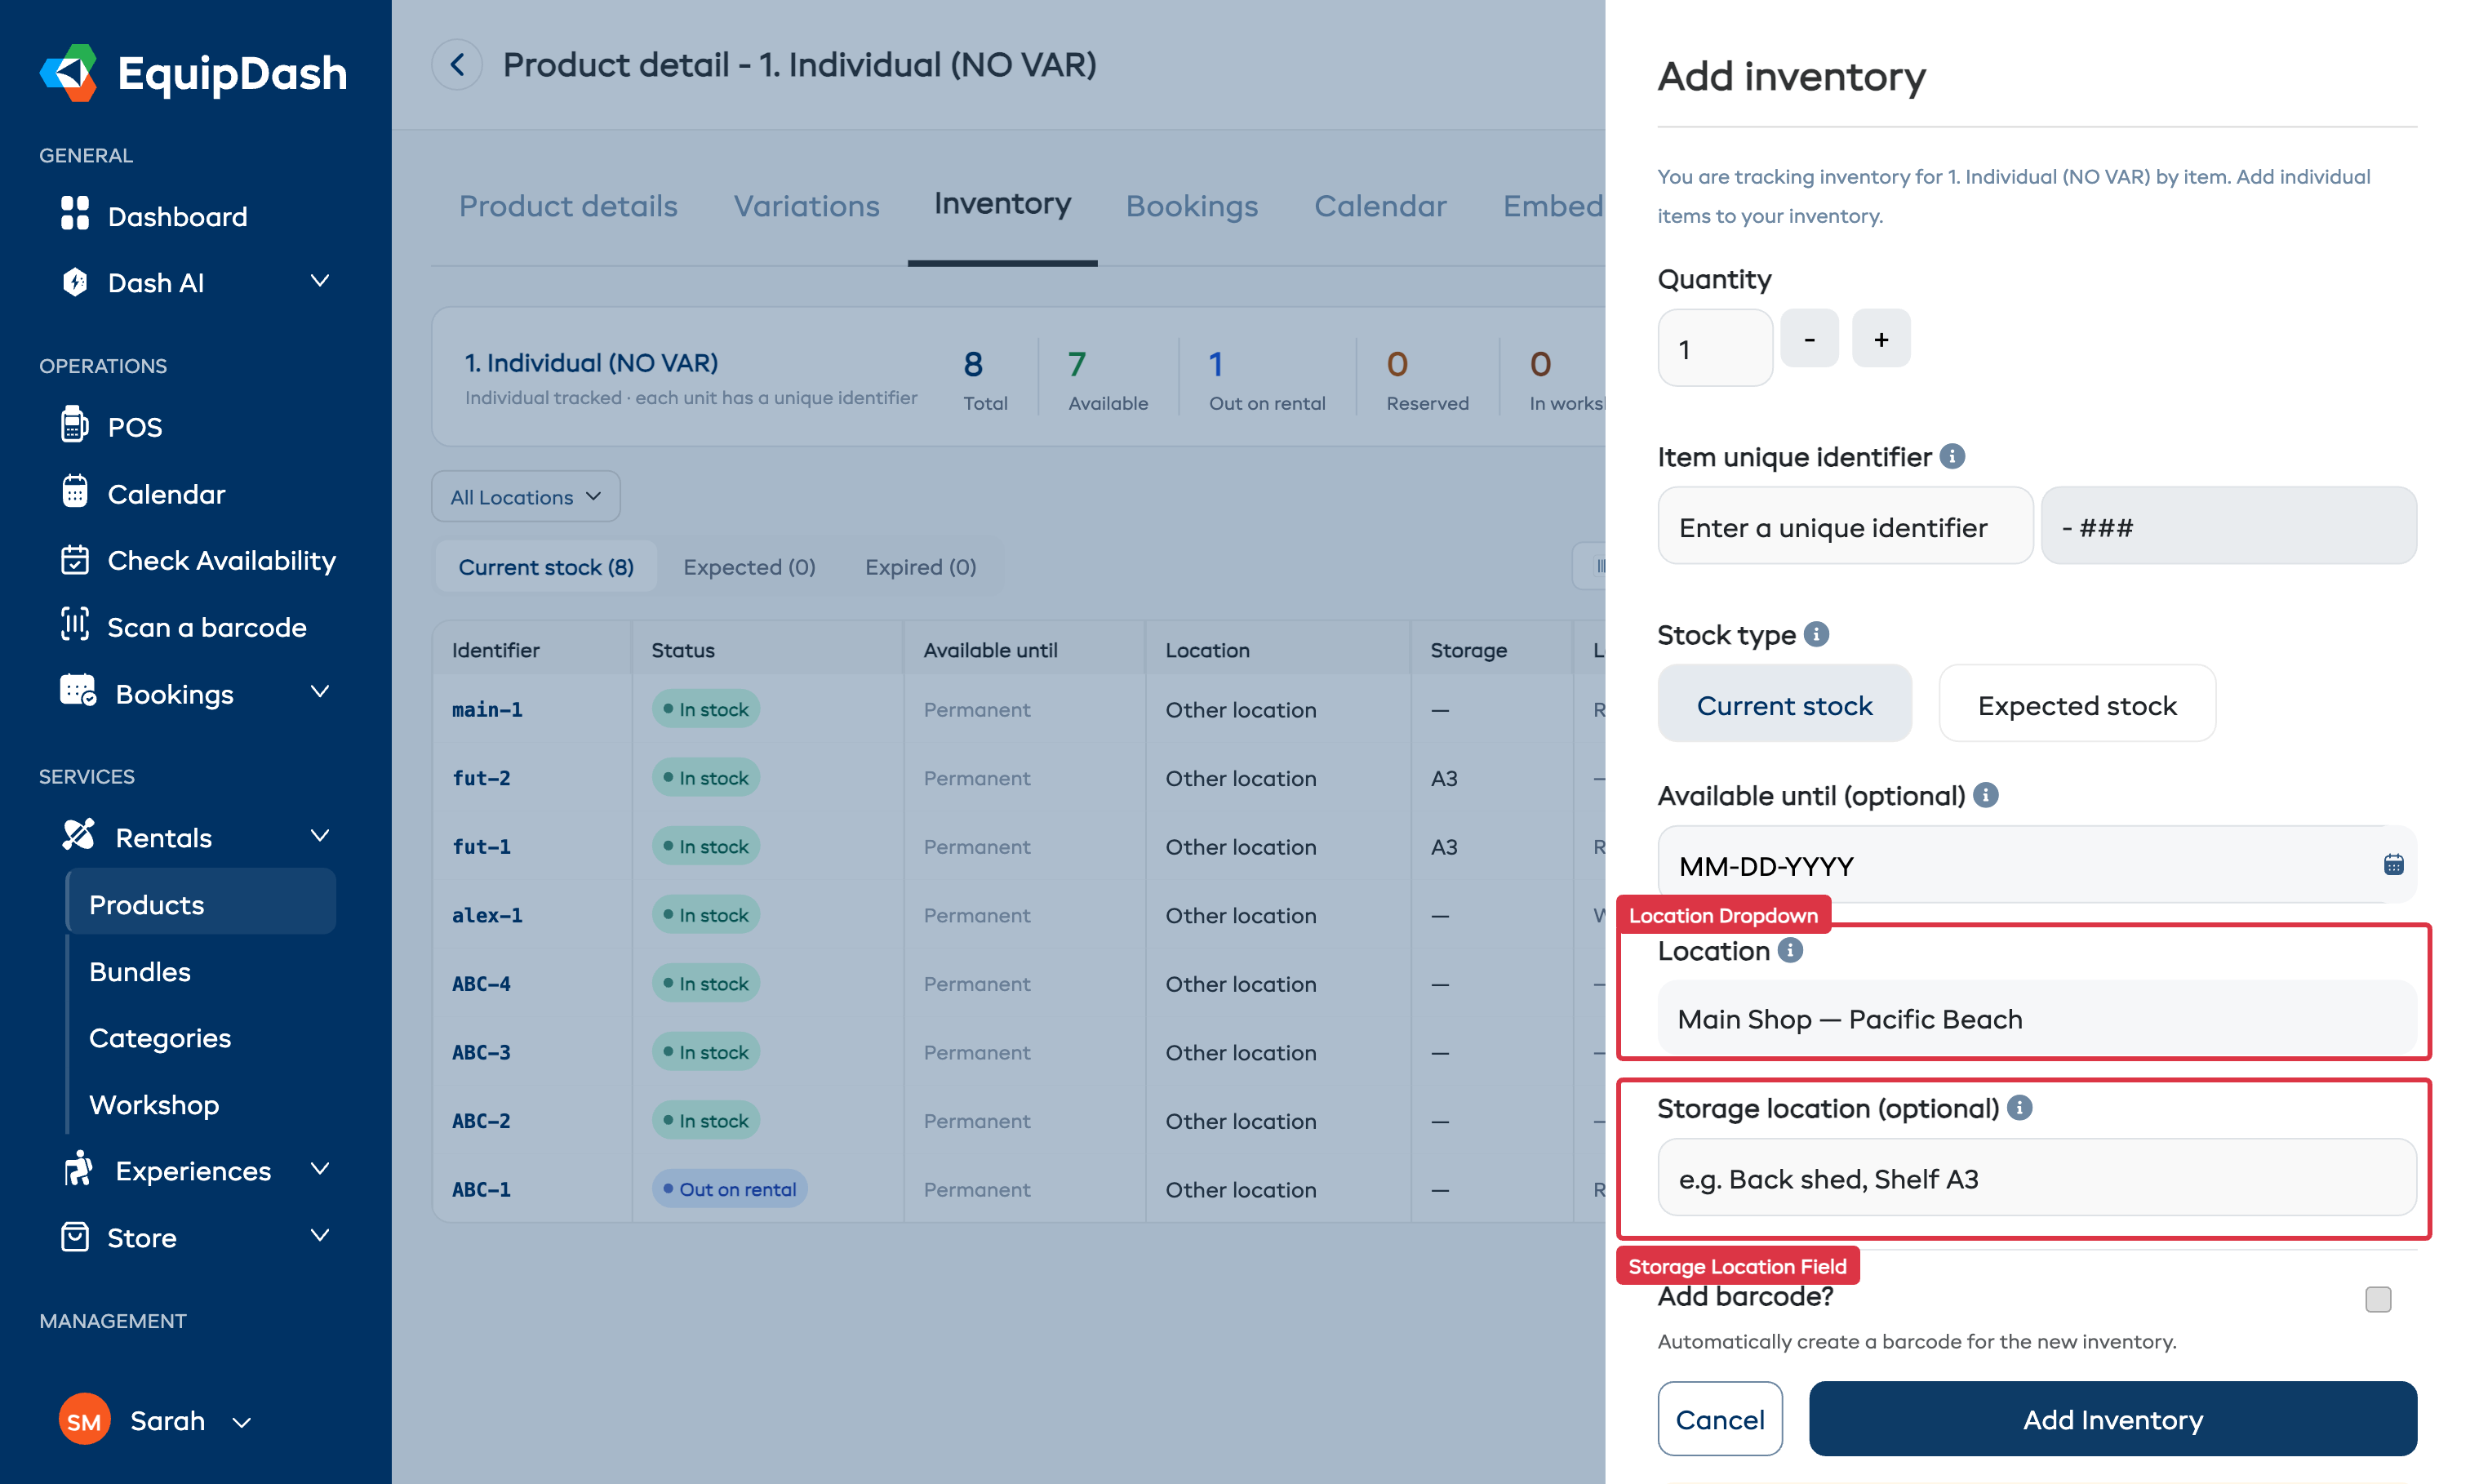
Each individual item is assigned to the selected location. You can see the location in the Location column on the inventory table.
For group-tracked products
- Go to Rentals > Products and open the product.
- Click the Inventory tab, then click Add Inventory.
- Fill in the quantity and other fields as usual.
- Select a Location from the dropdown.
- Optionally enter a Storage location (free text).
- Click Add Inventory.
The stock count is now tied to that location. You can add separate stock entries for each location.
If you are adding inventory for the first time, the location defaults to your default location. You only need to change it if the items are at a different site.
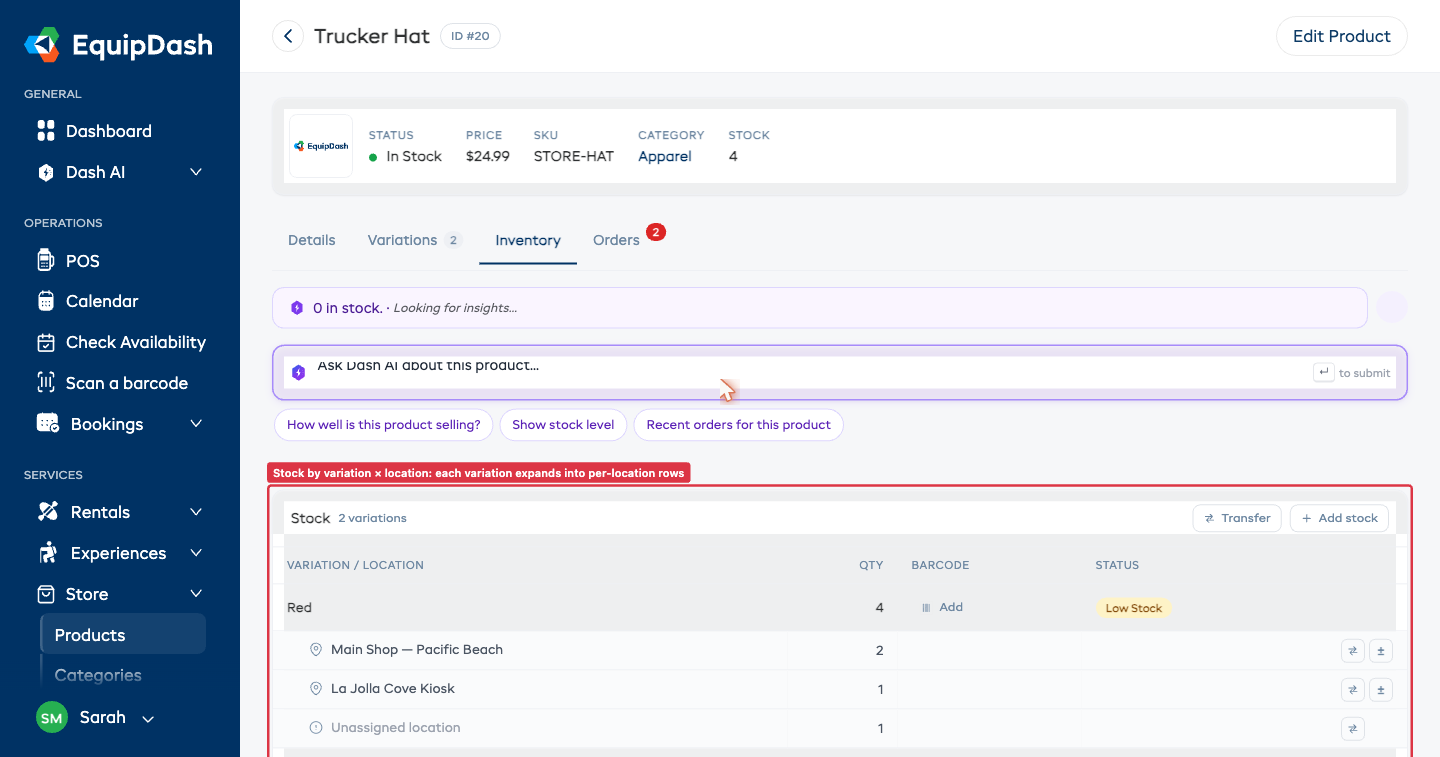
Assigning Store Product Inventory to a Location
Store products follow the same location assignment pattern as rental products.
For group-tracked store products, each location gets its own inventory record. The merged Stock card on the Inventory tab shows variation rows with indented sub-rows for each location, so you can see at a glance how much stock is at each site for each variation.
- Go to Store > Products and open the product.
- Click the Inventory tab, then click + Add stock in the Stock card header.
- Pick the Variation (if the product has variations).
- Pick a Location from the dropdown.
- Enter the Quantity and click Add Stock.
When a booking is created in the POS, store product stock is filtered by the selected pickup location -- only products with available stock at that location are shown.
Filtering Inventory by Location
On the product's Inventory tab, use the Location filter dropdown above the inventory table to view stock at a specific site. This is useful when you need to quickly check what is available at a particular location.
The filter applies to both the summary cards and the inventory table below.
Other areas with location filters
Location filter dropdowns are available across the application:
| Area | Where to find the filter |
|---|---|
| Calendar | Location dropdown above the calendar grid |
| Bookings list | Location filter in the filter bar (Rentals, Experiences, and All Bookings) |
| Fulfillment board | Location dropdown next to the date picker |
| Reports (Rental, Experience, Store) | Location filter in the report filter bar |
| Availability report | Location dropdown next to the period dropdown |
| Check Availability modal and panel | Location dropdown within the availability checker |
Moving Inventory Between Locations
If you physically move stock from one site to another, log the move in EquipDash so per-location counts stay accurate.
For group-tracked store products, use the Transfer action on the Inventory tab. Two starting points:
- Transfer in the Stock card header opens an empty Transfer form -- pick variation, source, destination, and quantity yourself.
- The transfer icon (↔) on any location sub-row that has stock opens the form pre-targeted at that variation and source location, so you only need to pick the destination and quantity.
The form shows how many units are available at the source location and caps the Quantity field to that maximum. EquipDash writes two entries to the inventory log -- one decrement at the source and one increment at the destination -- so you can see both sides of the move. The variation's total stock does not change; only the per-location split. For full details, see Inventory Management — Transferring stock.
For item-tracked products (rentals or store products with item-level tracking), open the inventory entry and edit its Location directly:
- Open the product and go to the Inventory tab.
- Click the edit icon on the item you want to move.
- Change the Location to the new site and click Save.
For item-tracked rentals, locations are also updated automatically when an item is returned to a different location.
Plan Requirements
| Feature | Plan |
|---|---|
| Single location (included by default) | All plans |
| Two or more locations | Pro plan |
If you are on the Starter or Growth plan and try to add a second location, you will see a prompt to upgrade. Visit Settings > Billing to change your plan.
Related Guides
- Locations Settings -- Adding and managing locations.
- Inventory Units -- Managing individual inventory items.
- Pickup & Return Locations -- How locations work during bookings.
- Booking Widget -- How customers pick a location when booking.
- Upgrading Your Plan -- Unlocking multi-location support.