Experience Manifests & Check-In
Manifests give you a complete overview of your experience sessions for any day, showing who's booked, who's checked in, and the status of each participant. You can also scan tickets to check in guests quickly.
Accessing Manifests
Navigate to Experiences > Manifests in the sidebar. You can also access a session's manifest from:
- Experience Calendar — click "View manifest" on any session
- Booking Detail — click the start time link in the items table
Manifests Overview Page
The manifests page shows all experience sessions for a selected date.
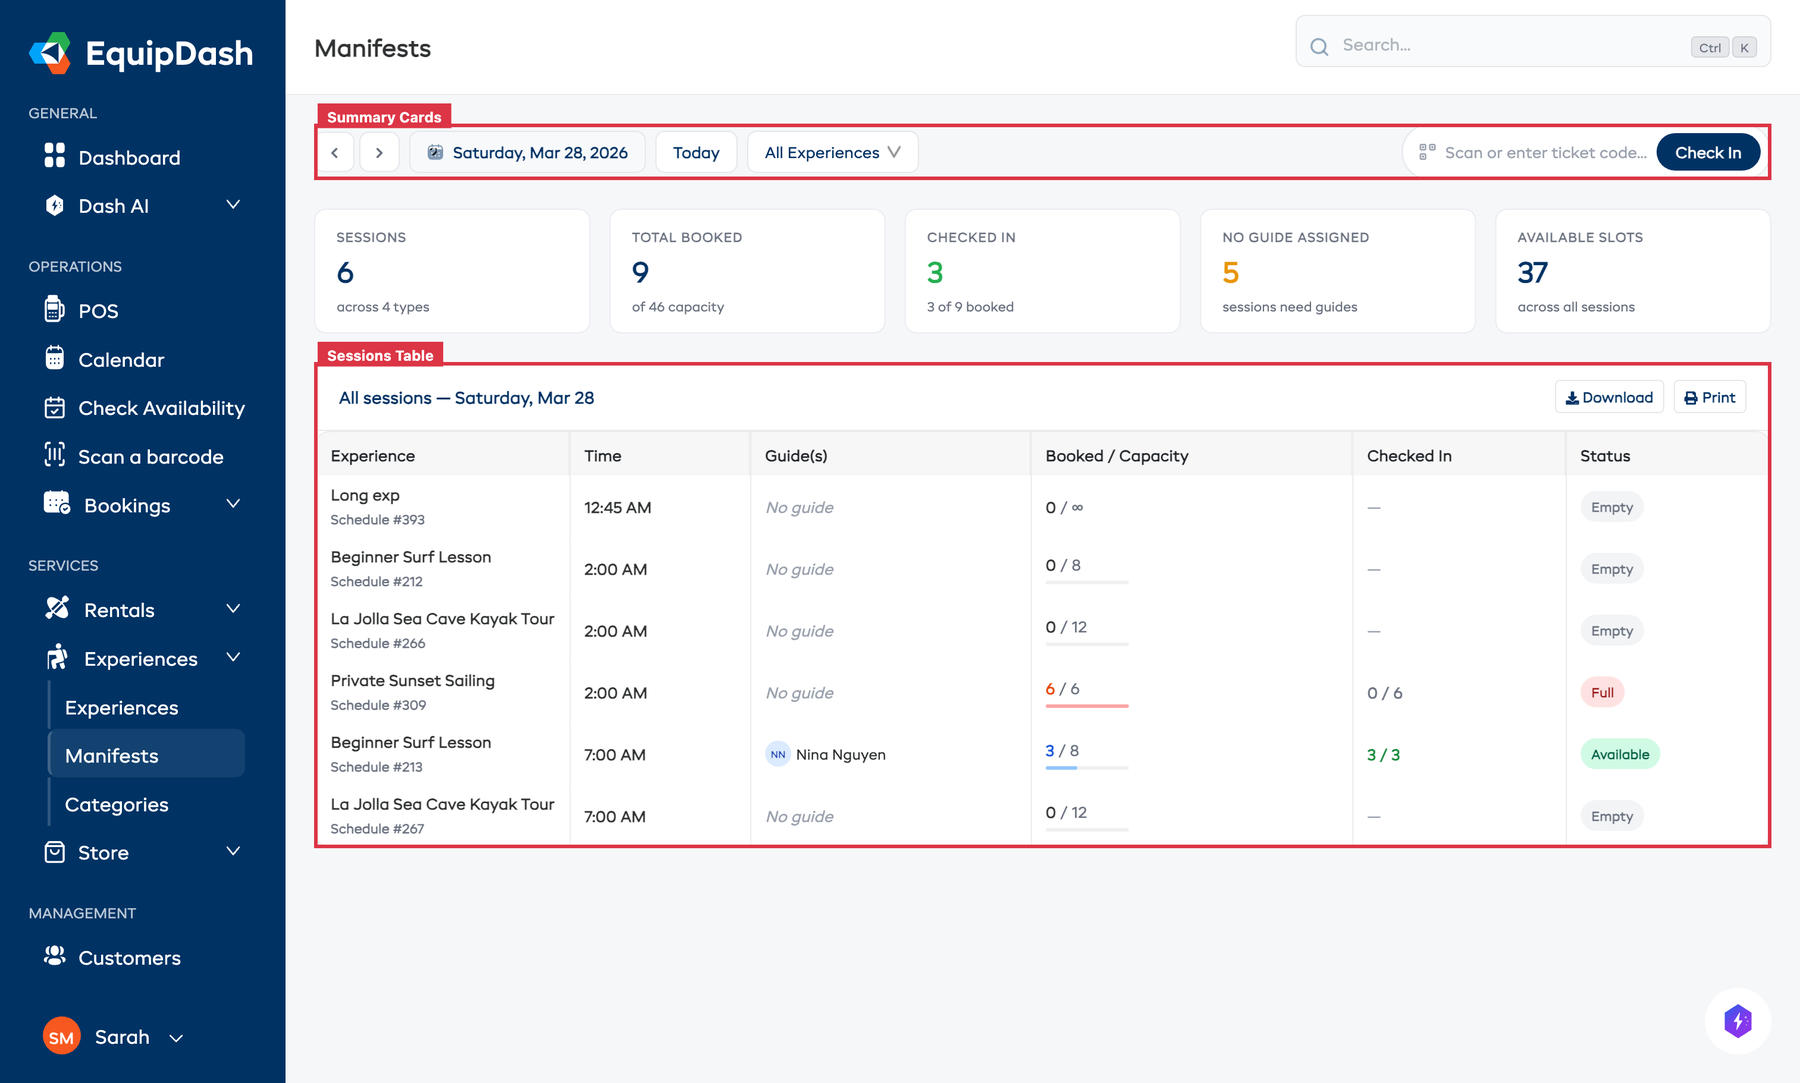
Toolbar
- Date navigation — use the arrow buttons or date picker to change the date
- Today button — jump back to today's sessions
- Experience filter — filter sessions by a specific experience (with search)
- Scan ticket — click to open the ticket scanner modal
Summary Cards
Five cards at the top show key stats for the selected date:
| Card | Description |
|---|---|
| Sessions | Total experience sessions scheduled |
| Total Booked | Number of participants booked across all sessions |
| Checked In | How many participants have been checked in |
| No Guide Assigned | Sessions that still need a guide |
| Available Slots | Remaining capacity across all sessions |
Sessions Table
Each session row shows:
- Experience name and schedule ID
- Time the session starts
- Guide(s) assigned (or "No guide" if none)
- Booked / Capacity with a visual progress bar
- Checked In count
- Status — Empty, Available, or Full
Click any row to open the full manifest for that session.
Session Manifest (Detail Page)
Click into a session to see the full manifest with participant details.
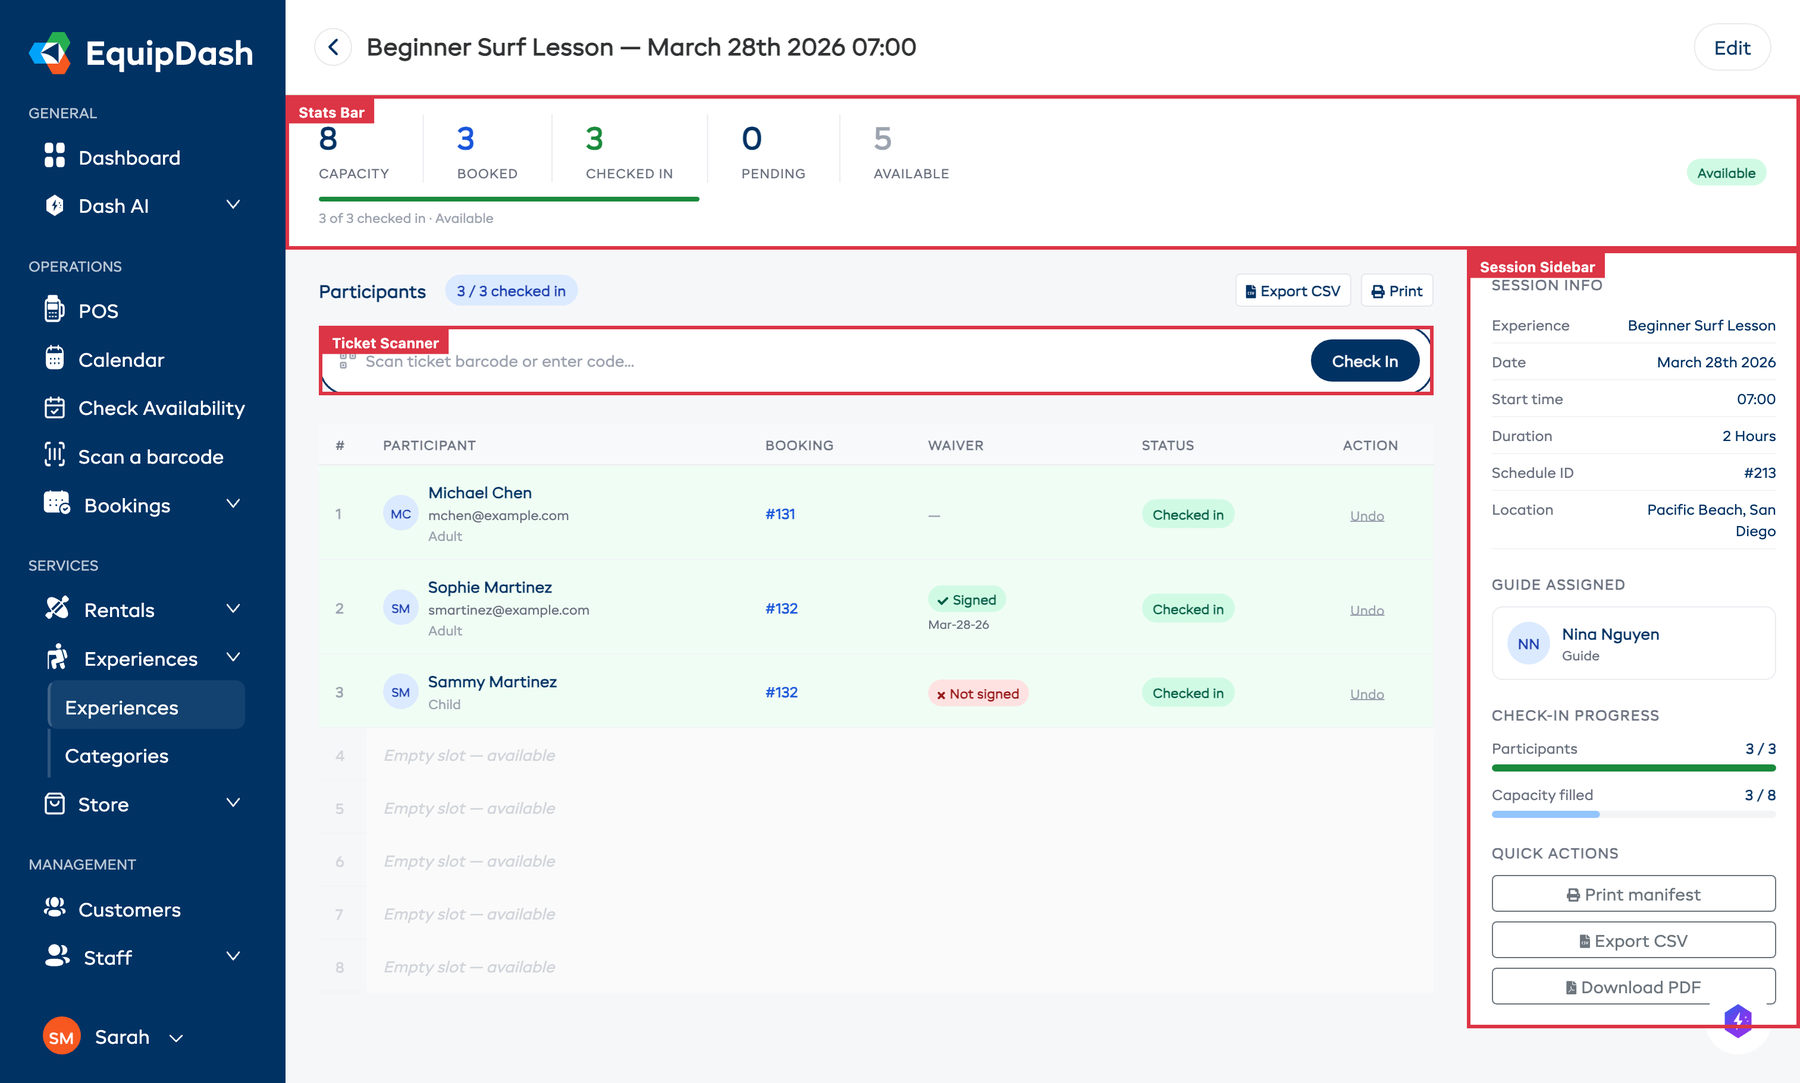
Stats Bar
Shows at-a-glance numbers: Capacity, Booked, Checked In, Pending, and Available, with a progress bar.
Participant Table
Each participant row shows:
| Column | Description |
|---|---|
| Participant | Name, email, and rate category (Adult, Child, etc.) |
| Booking | Link to the booking (click to view full booking details) |
| Waiver | Signed, Pending, or Not signed (Inline Waivers) |
| Comments | Per-participant comments collected at checkout (Participant Comments) |
| Custom fields | Values for any participant-scoped custom fields (Custom Fields on Widget) |
| Status | Checked in or Not checked in |
| Action | Check in button, or "Undo" link if already checked in |
All times on the manifest show the timezone label (e.g. 09:00 PDT) using your configured timezone display style.
Empty slots are shown at the bottom to visualise remaining capacity.
Session Info Sidebar
The right sidebar shows:
- Session Info — experience name, date, time, duration, location, schedule ID
- Guide Assigned — shows the assigned guide, or click "+ Assign a guide" to open the edit modal
- Check-in Progress — visual bars for participant check-in and capacity filled
- Quick Actions — Print manifest, Export CSV, Download PDF
Checking In Participants
There are three ways to check in participants:
1. Scan a Ticket
Click the "Scan ticket barcode or enter code..." bar to open the scanner modal.
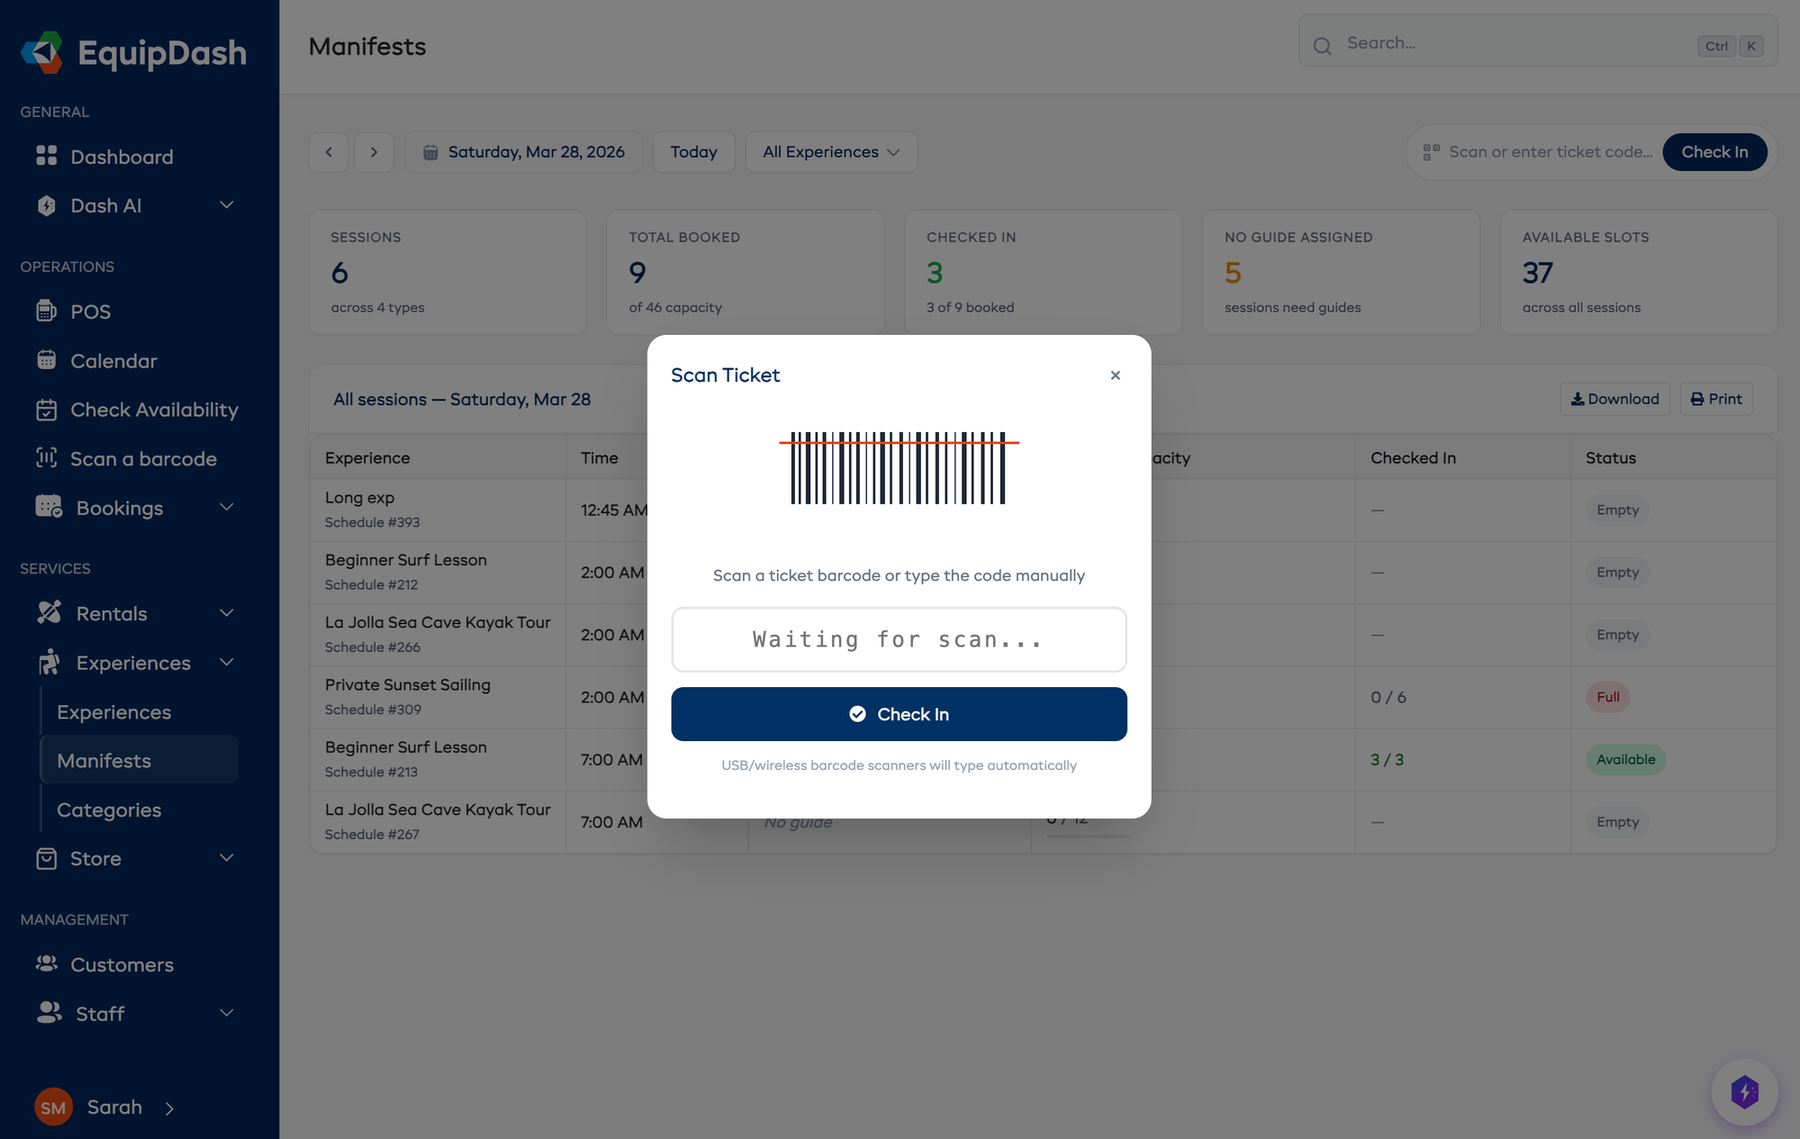
You can:
- Scan a QR code using a USB or Bluetooth barcode scanner — it types the code automatically
- Type the code manually (e.g.,
EQTK-A3F8X9B2) and press Enter or click Check In
After a successful scan, you'll hear an audio confirmation tone and the participant is marked as checked in.
2. Manual Check-In
Click the Check in button next to any participant in the table.
3. Check All In
Click Check all in to mark all participants as checked in at once (you'll be asked to confirm).
Experience Tickets
Tickets are automatically generated when an experience booking is created:
- One ticket per participant with a unique QR code
- Tickets are included in the booking confirmation email with the QR code
- Customers can also download a PDF ticket from the ticket status page
Ticket Format
Each ticket code follows the format EQTK-XXXXXXXX (e.g., EQTK-A3F8X9B2). The QR code encodes a URL that can be scanned by any QR reader.
Downloading Tickets
From the Booking Detail page, click Action > Download Tickets to download a PDF with all tickets for the booking. Each ticket is on a separate page with the experience name, date, time, guest name, rate category, and QR code.
Exporting & Printing
Export CSV
Click Export CSV to download a spreadsheet with all participant data including name, email, phone, rate category, booking reference, waiver status, and check-in status.
Download PDF
Click Download PDF to save a formatted PDF manifest.
Print
Click Print to open a clean, print-optimised view of the manifest in a new tab, ready to print with Ctrl+P / Cmd+P.
URL Parameters
The manifests page supports URL parameters for direct linking:
?date=03-28-2026— open manifests for a specific date?experience=5— filter to a specific experience
Example: /experiences/manifests?date=03-28-2026&experience=5