Creating an Experience
Creating an experience in EquipDash is done through a three-step wizard. You will set up the basic details, configure pricing, and then fill in additional settings like duration, location, and availability management.
Before You Start
Before creating your first experience, you may want to:
- Set up rate categories if you plan to charge different prices for adults, children, seniors, etc. See Rate Categories.
- Set up seasons if you want to offer seasonal pricing. See Seasonal Pricing.
- Create experience categories to keep things organized. See Experience Categories.
- Add staff members if you want to assign guides. See Adding Staff.
Opening the Experience Wizard
- Click Experiences in the sidebar, then select Experiences.
- Click the Add Experience button in the top-right corner of the page.
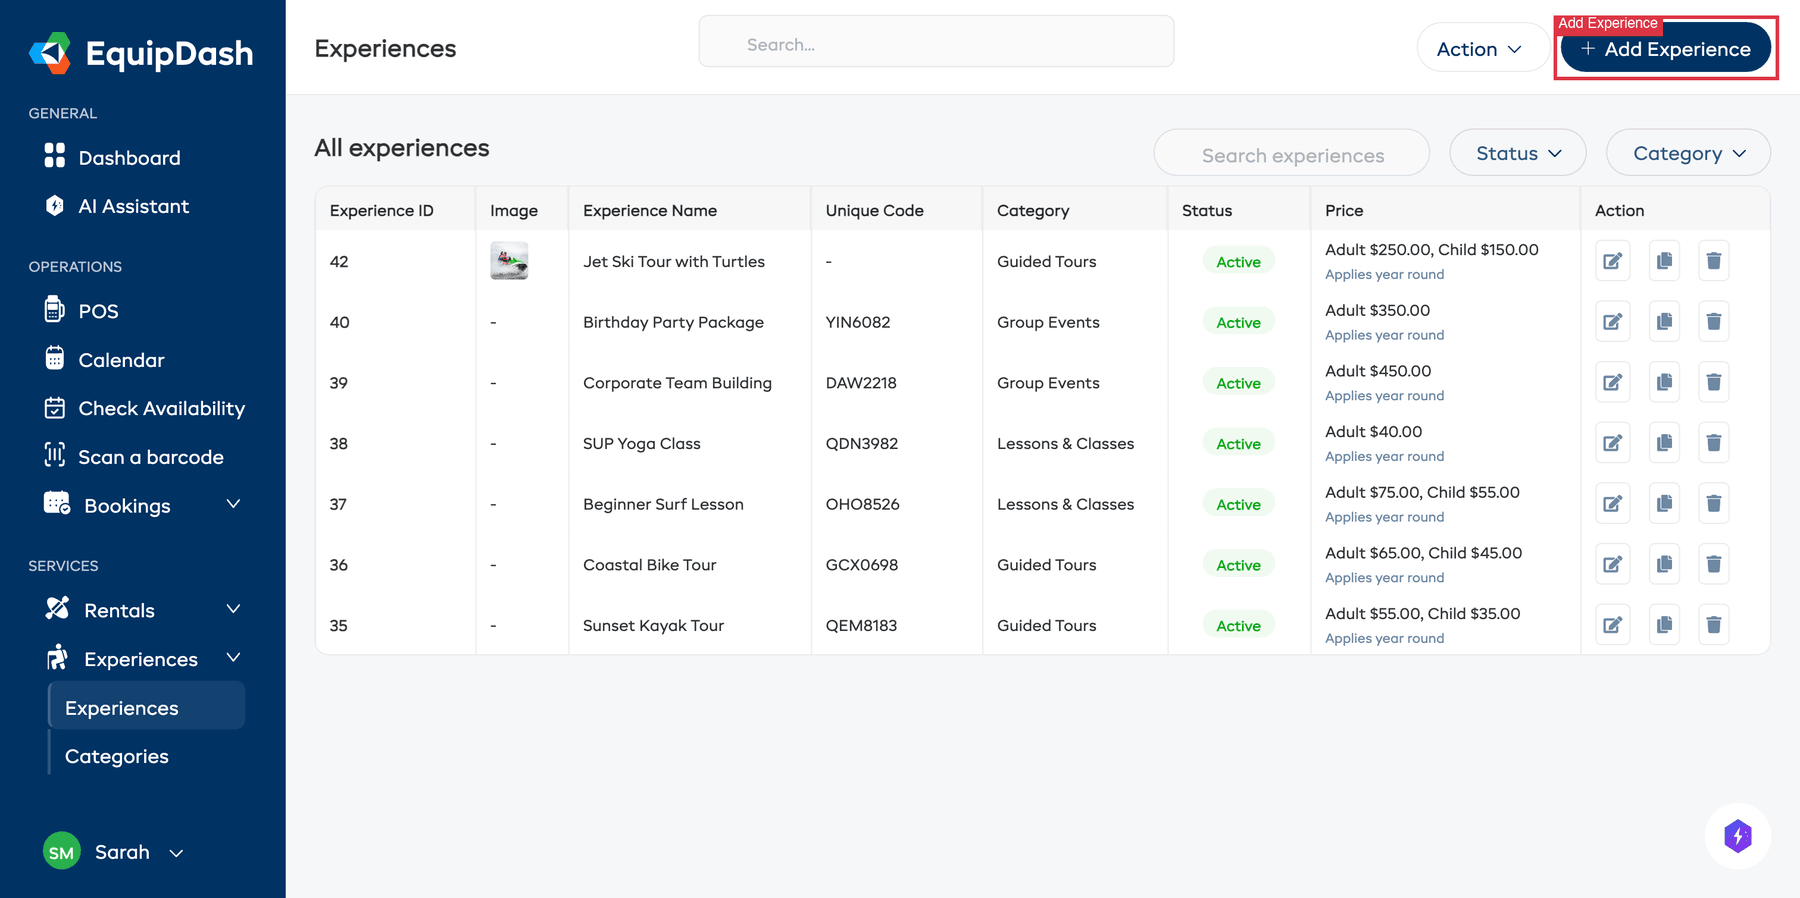
The experience wizard will open as a slide-out panel on the right with three steps.
Step 1: Experience Details
In the first step, you provide the core details about your experience.
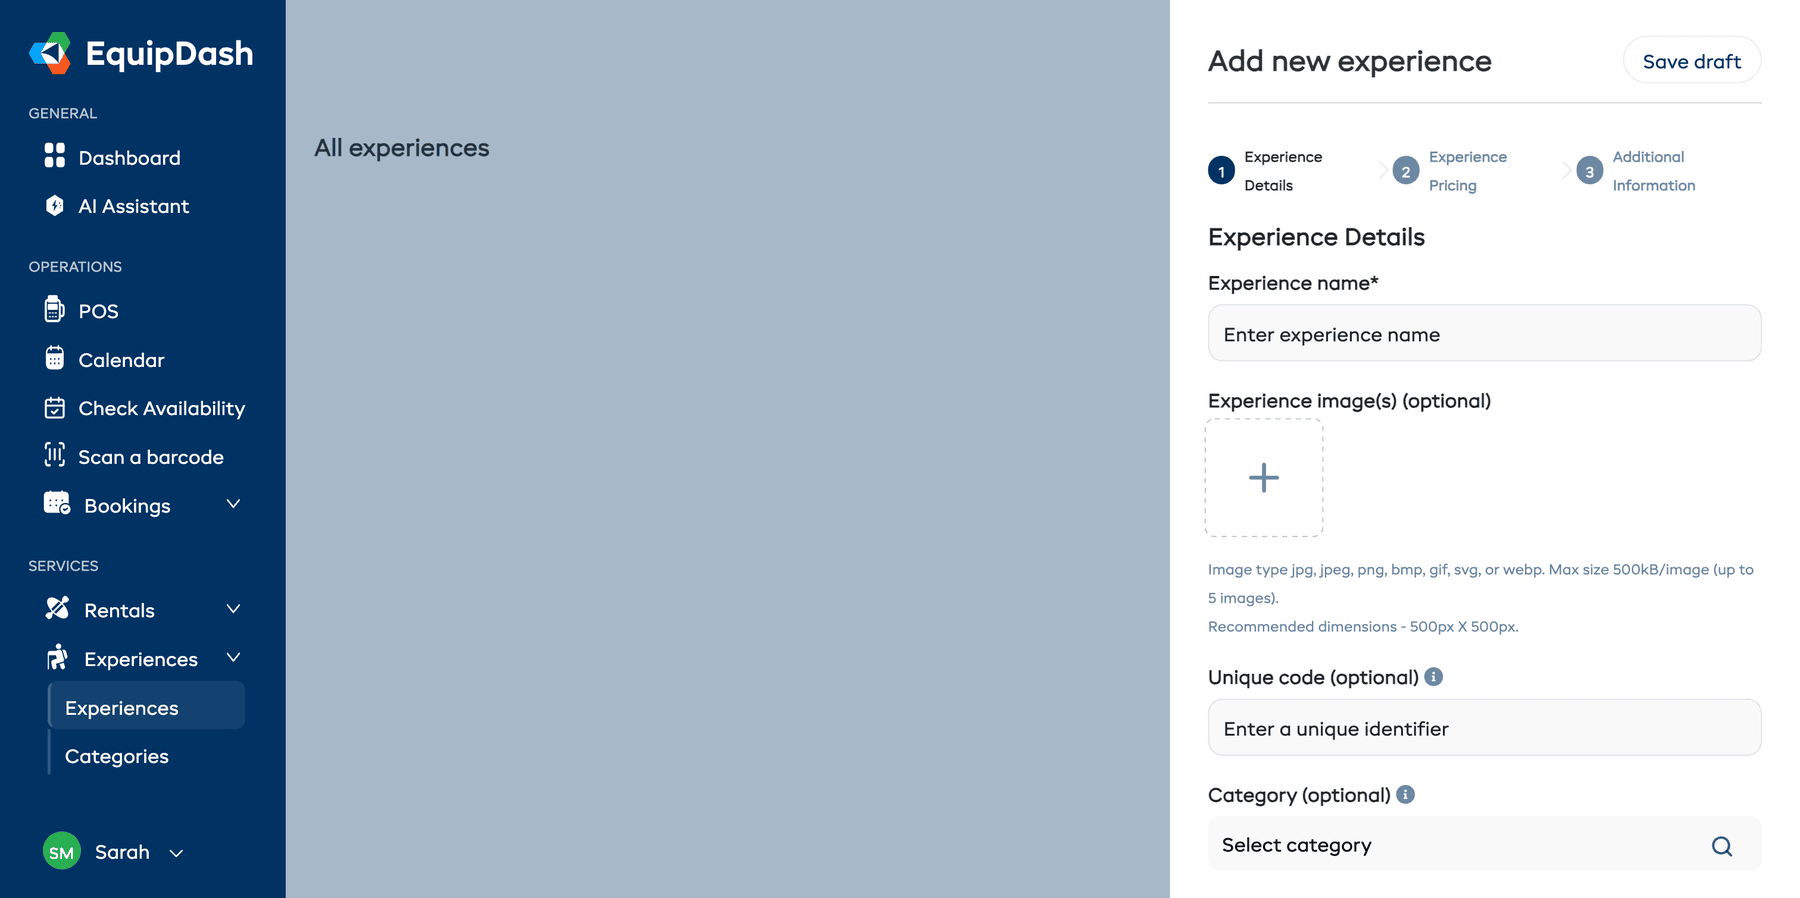
- Enter a Name for the experience (e.g. "Sunset Kayak Tour"). This is what customers will see.
- (Optional) Upload up to 5 images. Click an image thumbnail to set it as the default image that shows first.
- (Optional) Enter a Unique Code — a short internal reference like "SKT-01". This must be unique across all your experiences.
- (Optional) Select a Category by typing in the search box and choosing from the dropdown. If you have not created categories yet, you can skip this and add one later.
- Click Next to continue to Step 2.
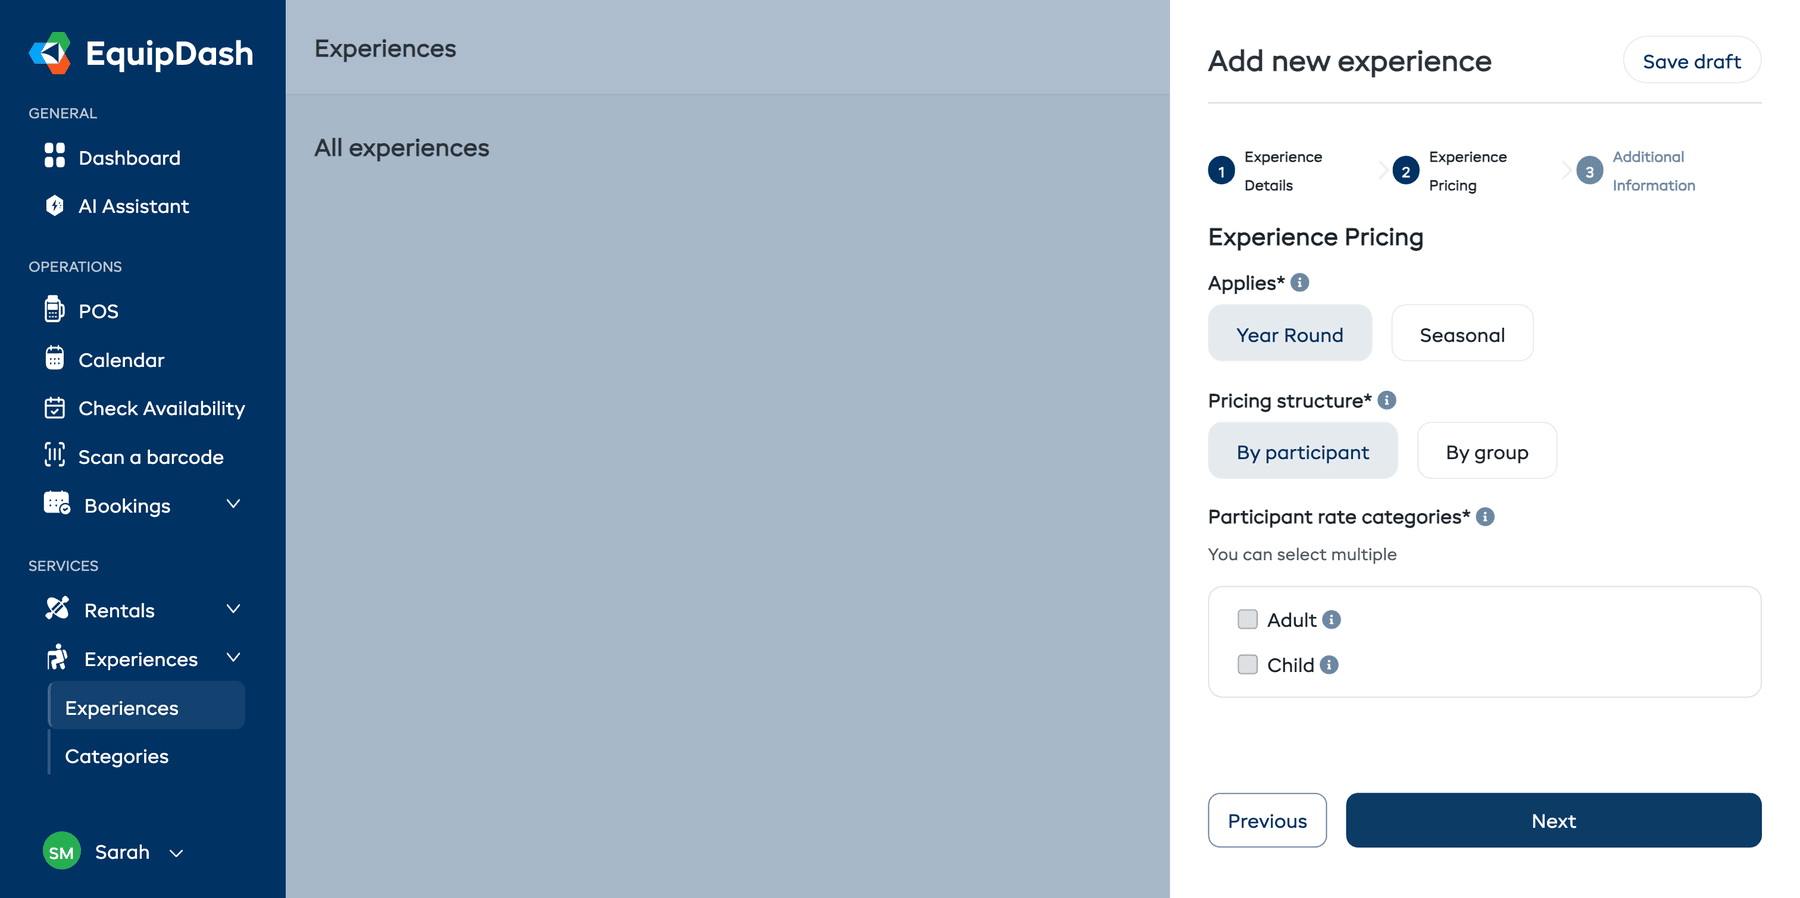
Step 2: Experience Pricing
In the second step, you configure how the experience is priced.
Let Dash suggest prices for you
At the top of Step 2 you'll see a Suggest prices button. Click it and Dash AI will research competitor pricing for similar experiences in your area, then suggest competitive rates — including whether to charge By Participant or By Group, and proposing extra rate categories (e.g. Senior, Student) if competitors use them.
Click Apply to form to drop the suggested values into the pricing fields. Dash auto-switches the Applies and Pricing Structure toggles to match its recommendation.
See the full guide: Suggest Prices with Dash AI.
Applies
Choose when your pricing applies:
- Year Round — One set of prices applies all year.
- Seasonal — Different prices for different seasons (requires seasons to be configured in Settings). See Seasonal Pricing.
Pricing Structure
Choose how you charge:
- By Participant — Each person pays individually. You select which rate categories to use (e.g. Adult, Child) and set a price for each. See Rate Categories.
- By Group — A single flat price covers the whole group, up to a maximum number of participants.
Entering Prices
Depending on your selections above, you will see different pricing fields:
- Year Round + By Participant — Select one or more rate categories using the checkboxes, then enter a price for each.
- Year Round + By Group — Enter the group price and the maximum number of participants included.
- Seasonal + By Participant — Select the seasons and rate categories, then enter prices for each combination.
- Seasonal + By Group — Select the seasons, then enter a group price and max participants for each.
Once you have entered your pricing, click Next to continue to Step 3.
Step 3: Additional Information
The final step covers descriptions, capacity, availability, duration, and other settings.
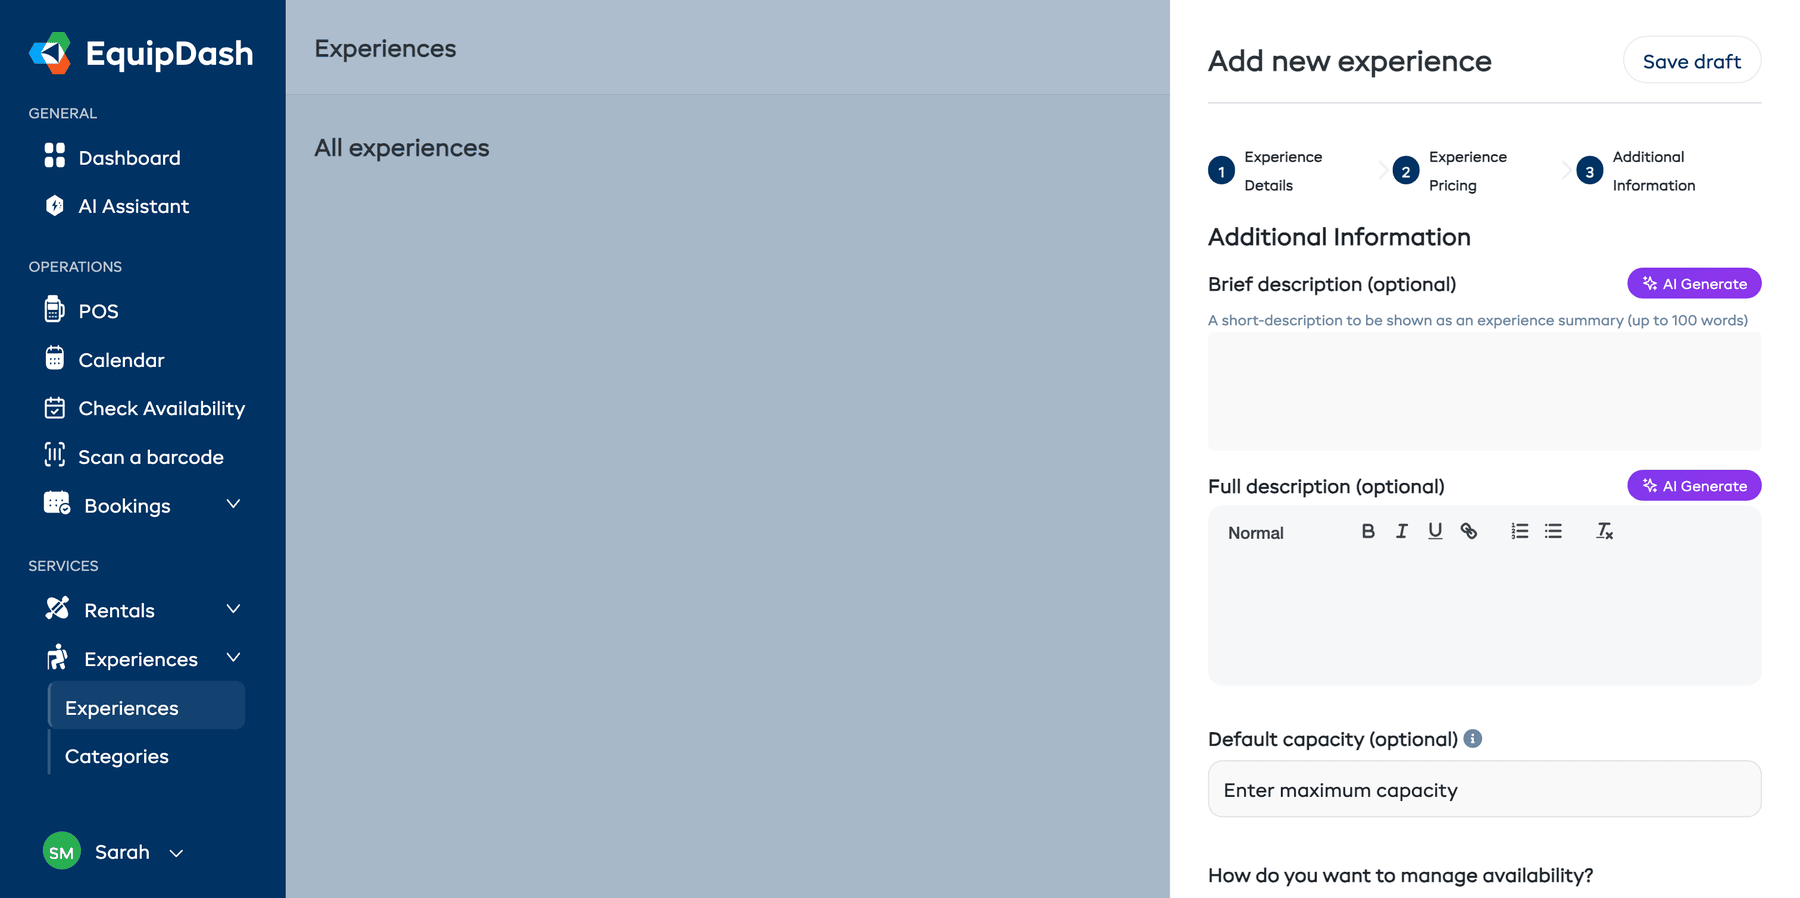
- (Optional) Enter a Brief Description — a short summary (up to 100 words) shown in listings. You can use the AI Generate button to have EquipDash draft one for you.
- (Optional) Enter a Full Description using the rich text editor. This appears on the experience detail page in the booking widget. An AI Generate button is also available here.
- (Optional) Set a Default Capacity — the default number of participant spots per session.
- Choose the Availability Management method:
- Manually create dates/times — You add sessions individually from the experience detail page.
- Recurring schedule based on days/dates/times — You define a recurring schedule and EquipDash generates sessions automatically.
- (Optional) Set the Experience Duration — how long the experience takes (e.g. 2 Hours, 90 Minutes).
- (Optional) Enable Minimum Booking Notice and set how far in advance customers must book (e.g. 24 Hours, 2 Days).
- (Optional) Enable Require Participant Details if you want customers to provide details for each participant when they book.
- (Optional) Enter a Location — the meeting point or venue.
- Click Add Experience to create the experience, or click Save Draft at the top of the panel to save it without making it visible to customers.
After Creating the Experience
Once your experience is created, you will be taken back to the Experiences page. From there you can:
- Click into the experience to view its detail page, where you can add availability sessions, view bookings, and edit details.
- Set up availability — If you chose Manual, you will need to add sessions. If you chose Recurring, you will need to configure the schedule. See Setting Up Availability.
- Assign guides to individual sessions. See Assigning Guides.
You can save an experience as a Draft if you are not ready to make it available yet. Draft experiences are not visible in the booking widget. You can change the status to Active later from the experience detail page.
Related Guides
- How Experiences Work
- Managing Experiences
- How Experience Pricing Works
- Rate Categories
- Setting Up Availability
- Experience Categories
- Suggest Prices with Dash AI — Let Dash research competitor pricing and pre-fill Step 2.