Viewing & Managing Bookings
Once bookings start flowing in, you need an easy way to find, review, and act on them. This guide covers the bookings table and the booking detail page.
The Bookings Table
Navigate to Bookings > Rentals or Bookings > Experiences from the sidebar. The table lists all your bookings with the most recent ones first.
Table Columns
| Column | Description |
|---|---|
| Booking # | The unique booking reference number. |
| Booking date | When the booking was created. |
| Customer | The name of the customer. Click to jump to their profile. |
| Status | The current booking status, shown as a color-coded badge. |
| Pick up date | The scheduled pickup date and time. |
| Return date | The scheduled return date and time. |
| Price | The total booking price. |
| Payment status | Payment status -- Paid, Unpaid, Partially Paid, Refunded, or Partially Refunded. |
| Action | Quick action buttons for pickup and return. |
Sorting
Click any column header to sort the table by that column. Click it again to toggle between ascending and descending order.
Searching
Type in the Search bookings bar to filter by:
- Booking ID
- Customer name
- Customer email
Results update instantly as you type.
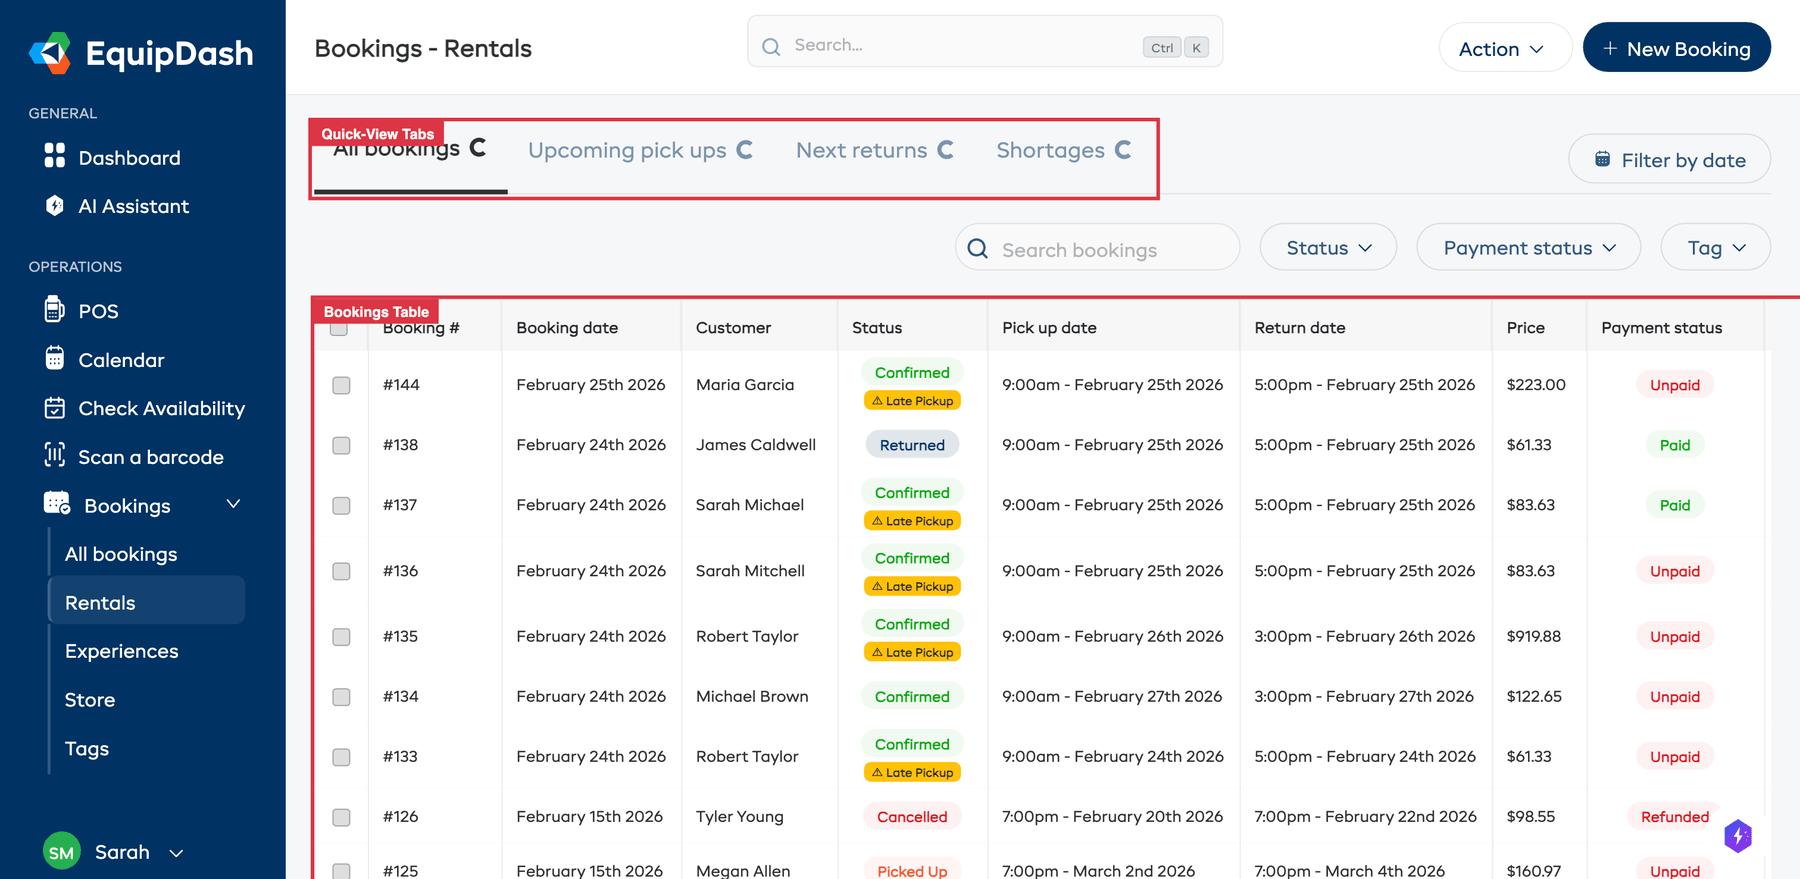
Quick-View Tabs
The tabs above the table give you quick views into different booking states:
- All bookings -- every booking
- Upcoming pick ups -- bookings with upcoming pickup dates
- Next returns -- bookings due to be returned soon
- Shortages -- bookings with inventory shortage issues
Each tab shows a count of bookings in that state.
Filtering by Status
Use the Status dropdown above the table to filter by a specific booking status:
- Confirmed -- upcoming bookings
- Picked Up -- rentals currently out with customers
- Returned -- rentals that have been returned
- Completed -- finished bookings
- Cancelled -- canceled bookings
Filtering by Date
- Click the Filter by date button above the table.
- Select the date range you want to filter by.
- Click Apply.
The table updates to show only bookings that fall within your selected range.
Filtering by Tag
If you use booking tags, select a tag from the Tag dropdown to see only bookings with that tag.
Filtering by Payment Status
Use the Payment status dropdown to filter by Paid, Unpaid, Partially Paid, Refunded, or Partially Refunded.
The Booking Detail Page
Click any booking row to open its detail page. This is where you manage everything about a single booking. The page is built around a two-column layout: the main column on the left has the booking content, and a sticky right rail keeps the Payment summary in view while you scroll.
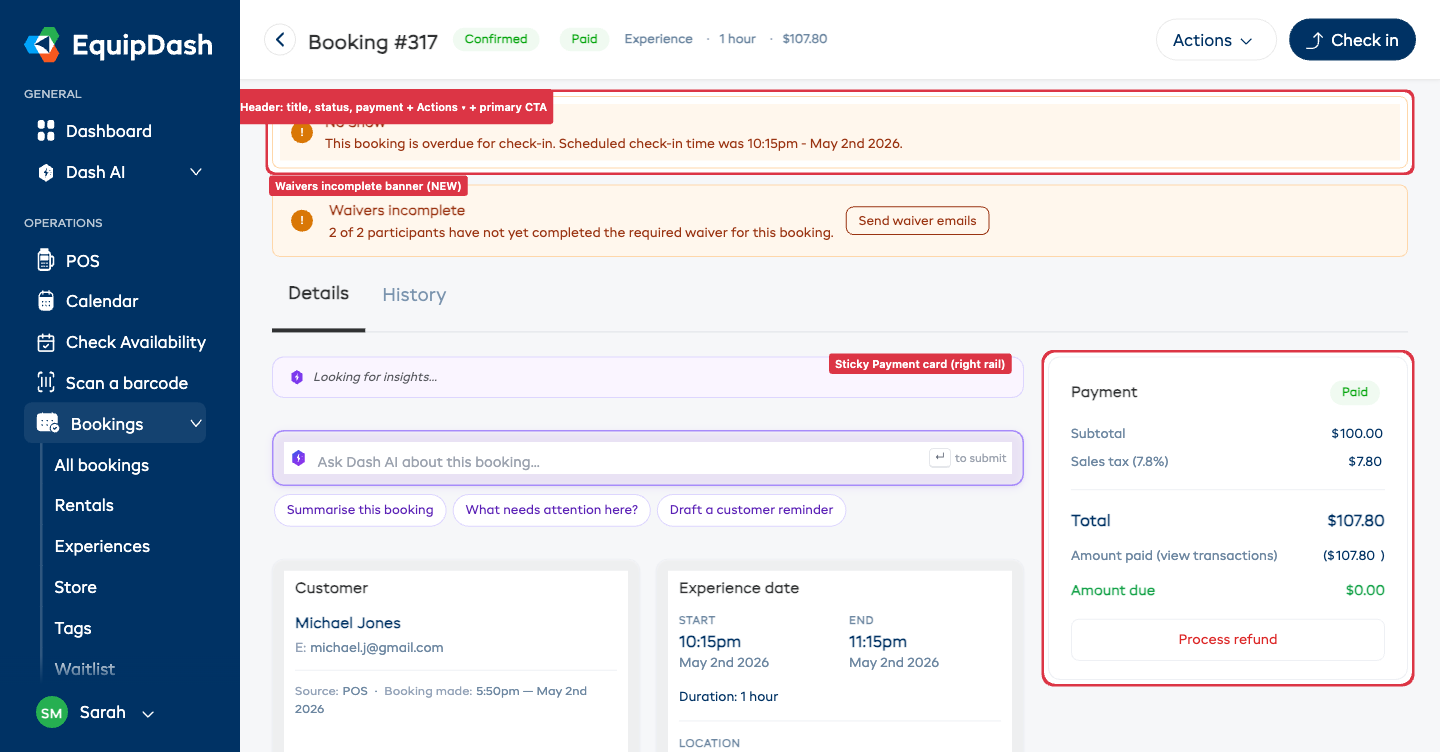
Page Header
The header is one compact strip across the top:
- The booking number (e.g. Booking #144)
- A status pill (e.g. Confirmed, Picked Up, Cancelled) and a payment pill (Paid, Unpaid, Partially Paid, Refunded)
- An Archived badge if the booking has been archived
- A short meta strip: booking type · duration · total (hidden on smaller screens to keep the header tidy)
- An Actions ▾ dropdown — Edit, Download Packing Slip, Download Invoice, Download Tickets (experience bookings), Cancel booking, and Archive / Restore booking (when applicable)
- A primary action button that adapts to where the booking is in its lifecycle: Pick up, Return, Check in, or Mark as completed
Banners
Important alerts stack just below the header, so you see them immediately:
- No Show — the booking is overdue for check-in or pickup
- Inventory Shortage — one or more booked items don't have enough stock for the dates
- Waivers incomplete — one or more participants haven't yet completed the required waiver. A Send waiver emails button on the banner sends the request emails in one click. (See Inline Waivers.)
Details Tab
The Details tab is the default view. The main column contains, top to bottom:
- Dash AI insights & quick prompts — context-aware summaries and suggested actions for this booking
- Customer — name, email, phone, source, and "booking made" timestamp
- Rental period / Experience date / Order details — pickup and return (or start and end) date and time, duration, and pickup / return location (rentals and store products only)
- Cancellation (if cancelled) — the cancellation reason and any notes added at cancellation
- Custom Fields — any booking-level custom fields configured for your supplier
- Items in booking — the table of products / experiences / store products with quantities, unit prices, totals, and pickup / return status
- Condition Reports (rentals) — pickup and return condition photos and notes per inventory unit
- Booking participants — one row per participant with inline editing:
- Inline ticket-type select for experience bookings (assign to a rate option without leaving the page)
- Edit pencil to update first name, last name, email, notes, and any participant-scope custom fields in one save
- × remove for non-booker participants (the booker can't be removed)
- Waiver pill per applicable form — Signed (links to the response) or Pending (with a Send waivers action)
- + Add at the top of the card opens the bulk participants form (POS-style with customer autocomplete)
- Booking notes — notes from your team. Add new notes inline using the textarea at the bottom of the card.
- Booking tags — chips for every tag applied. Click the × on a chip to remove. Click + Add to open a popover and pick more tags.
- Email actions — Send confirmation, Send reminder, Send cancellation (cancelled bookings), and Send waivers (when waivers incomplete)
The right rail contains the Payment card and stays visible as you scroll:
- Subtotal, discount, taxes, total
- Amount paid (view transactions) — click to expand an inline ledger of every payment, refund, deposit movement, and voucher use
- Amount due — green when £0, red when there's a balance
- Add payment (if there's a balance) and Process refund (if anything has been paid)
- Security deposit row — collapsible, with Place hold / Charge deposit / Release / Capture buttons appropriate to the deposit's current status
History Tab
The History tab shows a chronological timeline of every action taken on the booking, titled Booking History. Each entry includes:
- A description of the action (e.g. "Booking #144 was created")
- A status badge
- The date and time
Quick Actions from the Detail Page
From the booking detail page you can:
- Edit the booking — via Actions ▾ → Edit
- Move dates without editing items — click Move dates on the rental period or experience date card (faster than the full edit flow for date-only changes)
- Cancel the booking — via Actions ▾ → Cancel booking
- Archive the booking — via Actions ▾ → Archive booking (past or cancelled bookings)
- Add a payment — Add payment in the right rail
- Send a payment link — via the payment modal
- Process a refund — Process refund in the right rail
- Manage fulfillment — via the primary Pick up / Check in / Return button in the header
- Add notes — type into the textarea at the bottom of the Booking notes card
- Manage tags — use the + Add popover or click × on a chip to remove
- Download a packing slip, invoice, or tickets — via Actions ▾