Booking Fulfillment
Fulfillment is the process of getting items into your customer's hands and back again. For rental bookings, this means managing pickups and returns. For experience bookings, it means checking participants in.
Before the handover, the booking's Gear tab shows everything to pull off the shelf for it - across every date, with the site each item comes from - and prints as a tick-off sheet.
Rental Fulfillment Flow
A rental booking follows this fulfillment path:
Confirmed --> Picked Up --> Returned
Marking Items as Picked Up
When a customer arrives to collect their rental:
- Open the booking from the bookings table.
- Click the Pick up primary button in the top-right of the booking detail page header (it sits next to the Actions ▾ dropdown).
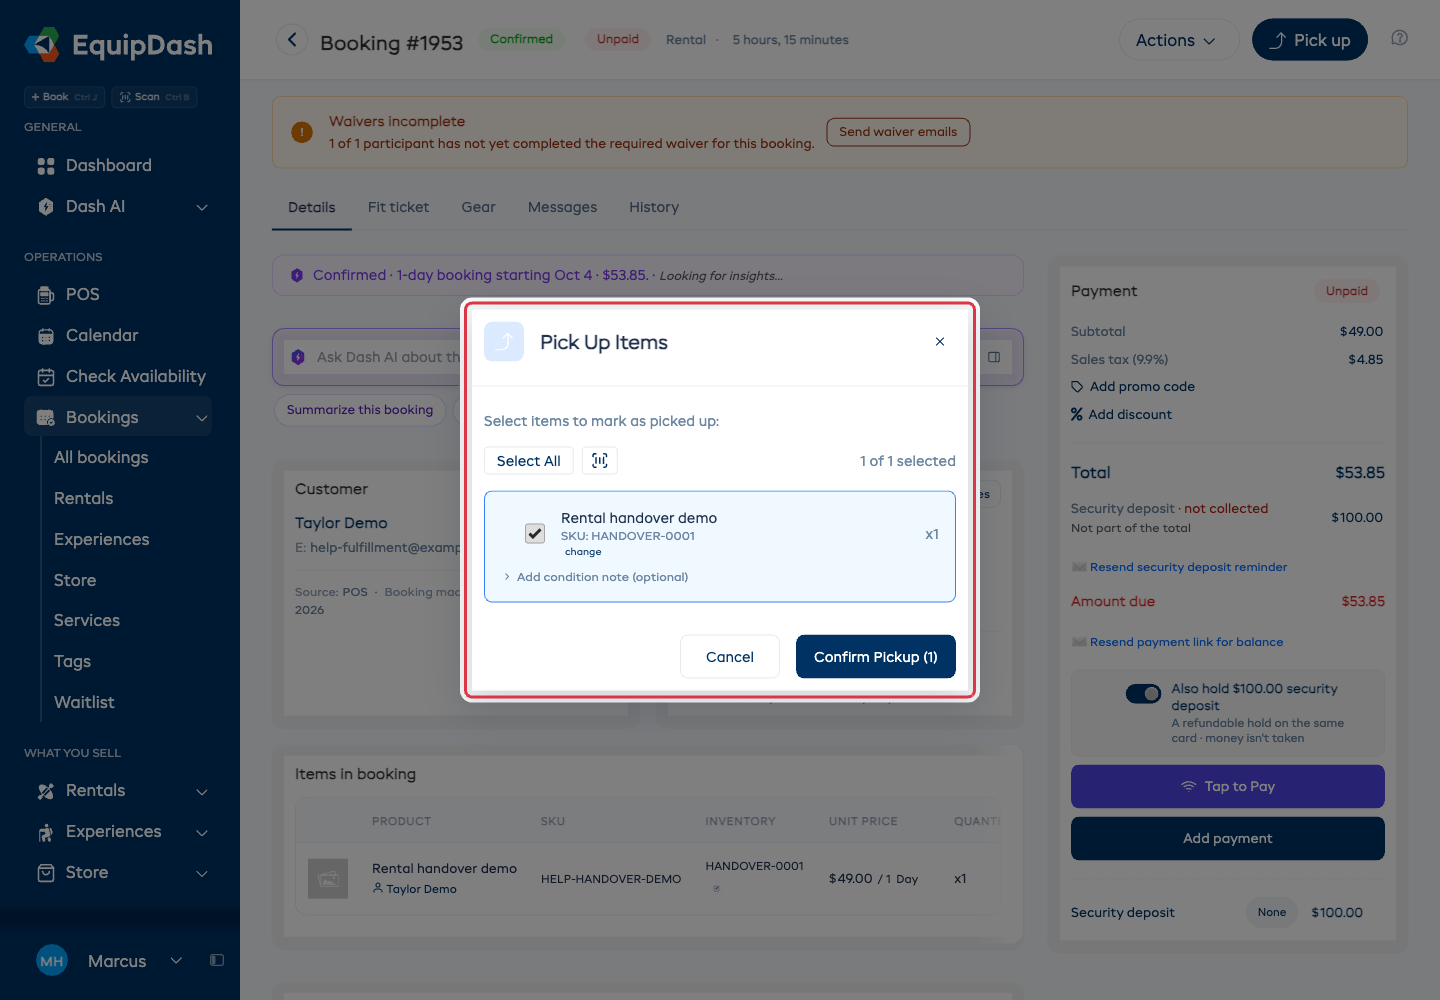
- The pickup modal shows all items in the booking. By default, all items are selected.
- If the customer is only picking up some items (partial pickup), uncheck the items they are not taking.
- If you use barcodes, you can scan each item's barcode to confirm it.
- Review the selected items and click Confirm Pickup.
The booking status changes to Picked Up and the pickup time is recorded.
You can require staff to complete an equipment checklist before an item can be picked up. See Booking Checklists.
On a multi-participant rental (e.g. a family hiring several items on one booking), assign each item to a participant on the booking detail page first - see Assigning Items to Participants. The packing slip (Actions ▾ → Download Packing Slip) then lists the assigned participant beside each item, so your counter staff hand the right gear to the right person.
Logging Item Condition at Pickup
You can optionally record the condition of each inventory-tracked item during pickup. This documents pre-existing wear or damage before the customer takes the item, protecting your business in case of disputes.
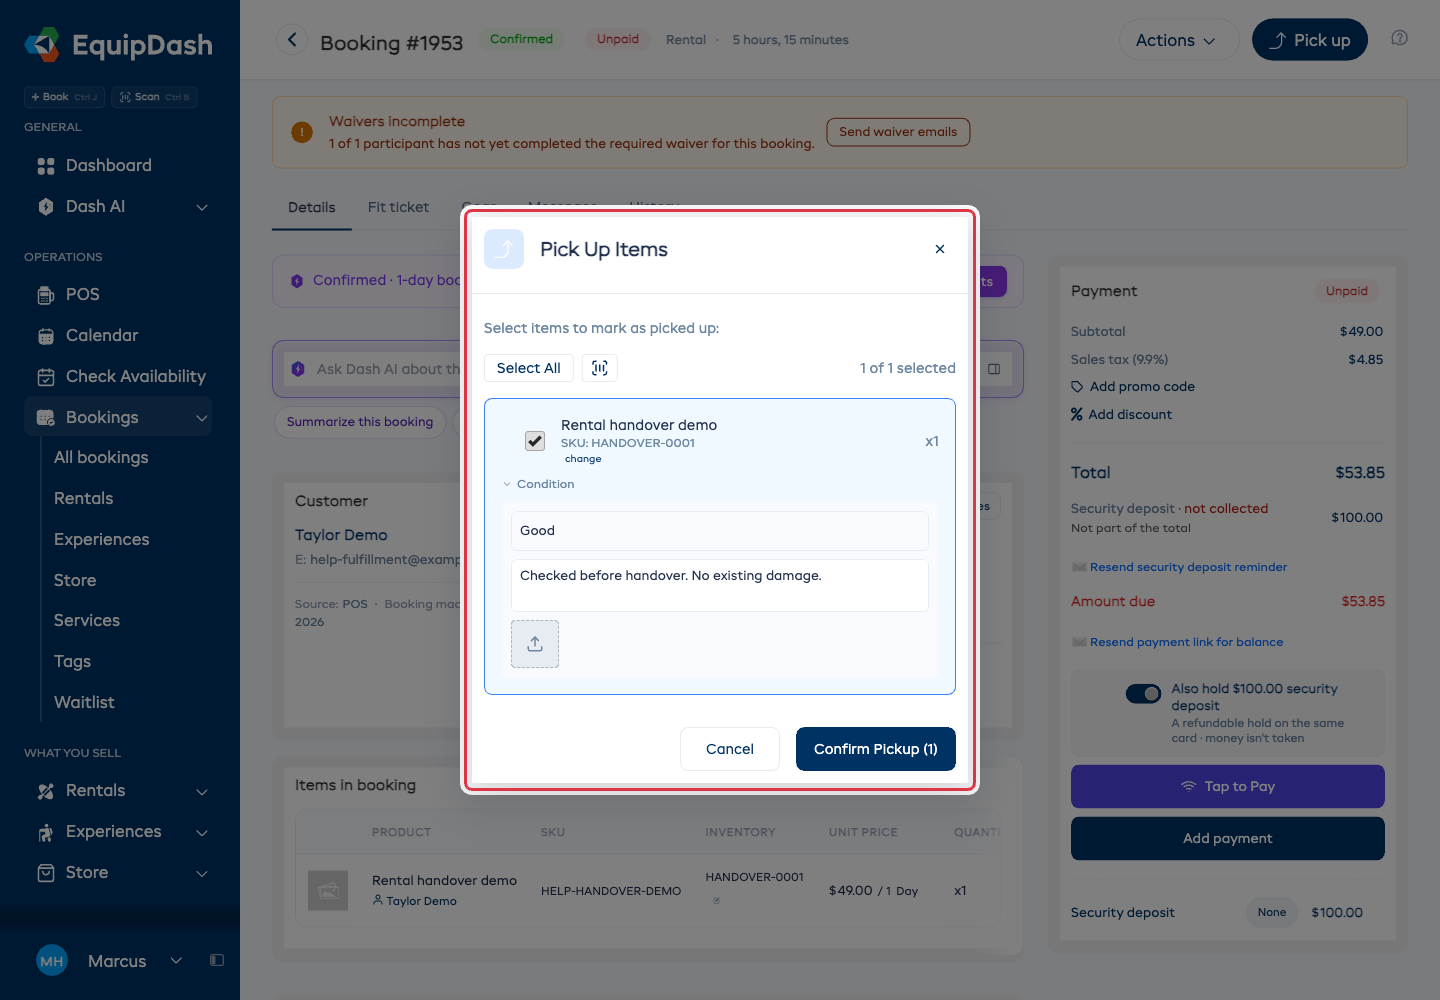
- In the pickup modal, click Add condition note (optional) below the item. The expanded section is labeled Condition.
- Select a Condition rating from the dropdown: Excellent, Good, Fair, Poor, or Damaged.
- Add any notes describing the condition (optional).
- Upload up to 5 photos as visual evidence (optional, but required if condition is Poor or Damaged).
- Click Confirm Pickup to complete the pickup with the condition report attached.
Condition logging is entirely optional on pickup. You can skip it for any or all items.
Inventory Assignment
During pickup, EquipDash assigns specific inventory units to the booking. If you have multiple units of the same product (e.g. 10 kayaks), the system selects available units automatically. You can also manually reassign inventory units if needed:
- In the pickup modal, click the Change link next to an item's assigned inventory unit.
- Search for or select a different available unit.
- Confirm the change.
Marking Items as Returned
When the customer brings items back:
- Open the booking.
- Click the Return primary button in the header (it replaces the Pick up button once items have been collected).
- The return modal shows all picked-up items. By default, all are selected.
- If the customer is only returning some items, uncheck the ones still out.
- Scan barcodes if applicable.
- Review and click Confirm Return.
The booking status changes to Returned and the return time is recorded.
Settle up when the gear comes back
If the booking still owes money or holds a security deposit, the return window has a Settle up section, so the money is done when the gear is back. It shows to staff who can take payments.
- Still to pay shows what the customer owes. Take payment opens straight after you confirm the return.
- Deposit held (or Deposit taken) shows the deposit, with three choices: Give it back, Keep some or Later. Keep some asks how much to keep for damage; the rest is recorded as given back. Later leaves the deposit as it is.
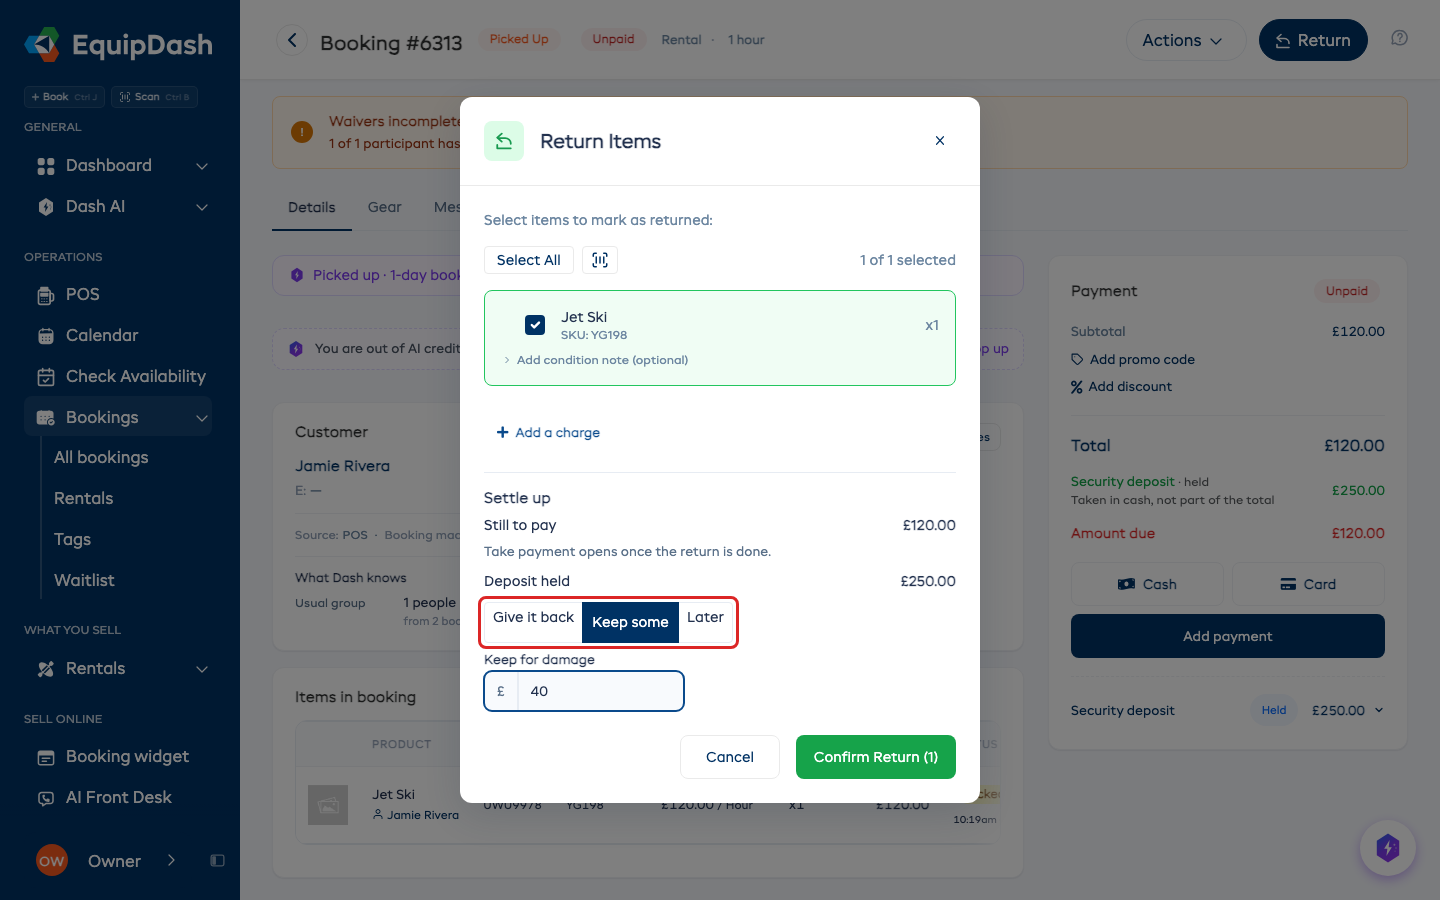
A returned booking that still has money to sort out stays on Today under To settle up, with a Settle up button. The return window works the same on Today and on the booking page.
Logging Item Condition at Return
You can log the condition of each item as it comes back. This is how you catch new damage and trigger automatic workshop routing for damaged items.
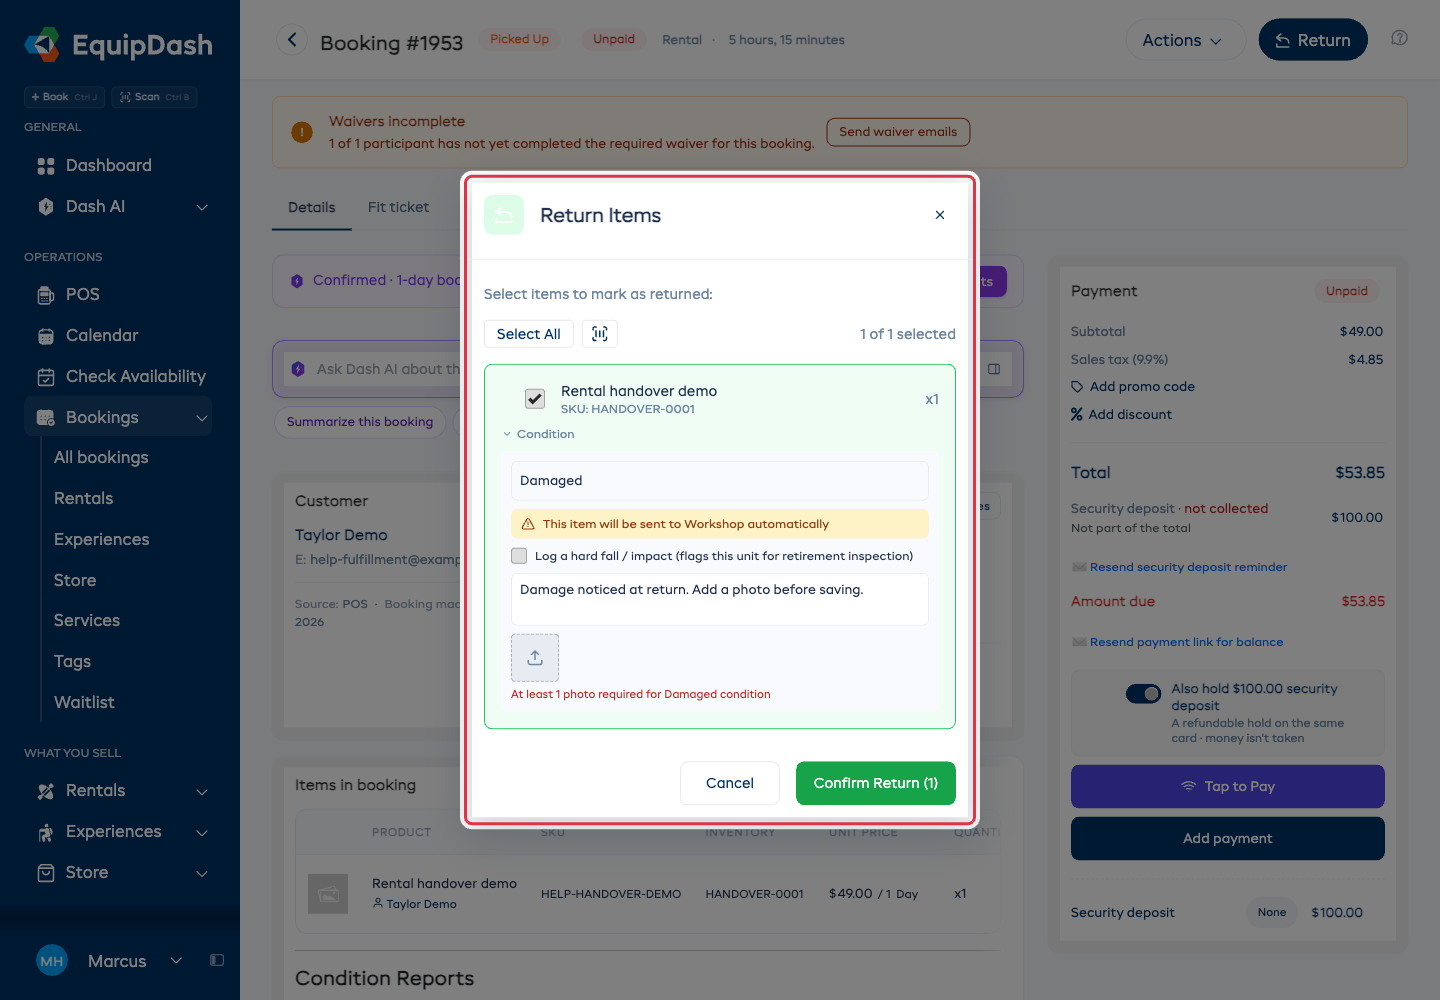
- In the return modal, click Add condition note (optional) below the item, or Condition (required) if your shop requires a report. The expanded section is labeled Condition.
- Select a Condition rating. If you select Damaged, a warning appears: "This item will be sent to Workshop automatically."
- Add notes describing any damage or issues.
- Upload photos -- at least one photo is required if the condition is Poor or Damaged.
- Click Confirm Return.
If an item is returned as Damaged, it is automatically sent to the workshop with the reason "Returned Damaged." The item is removed from available inventory until the workshop job is completed.
Your admin can make condition reporting mandatory on return. Go to Settings > Rentals and enable Require condition report on return. When enabled, staff must select a condition for every inventory-tracked item before confirming a return.
Viewing Condition Reports on a Booking
After condition reports are logged, they appear in a Condition Reports section on the booking detail page, grouped by pickup and return. Each report shows the item name, condition badge, notes, and photo thumbnails. Click any photo to view it full-size.
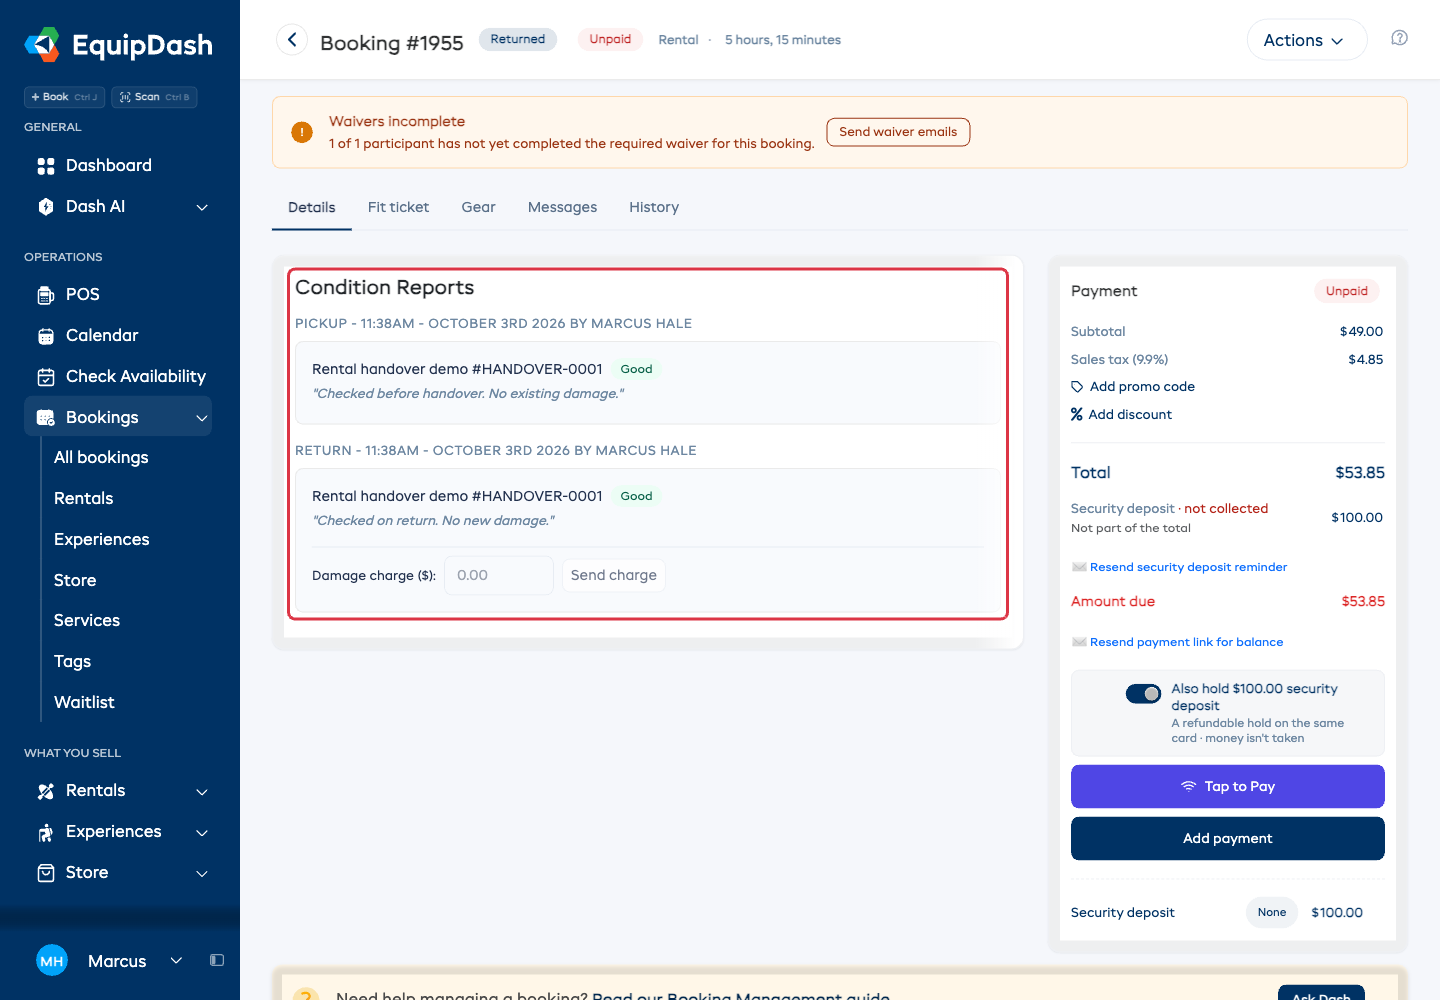
Reports the customer sent in
On the Growth and Pro plans you can ask customers to take the pickup photos themselves, on their own phone, before they collect. Those reports land in the same Condition Reports section, carrying a violet Customer badge under a "by Customer" heading, so you can always tell who logged what.
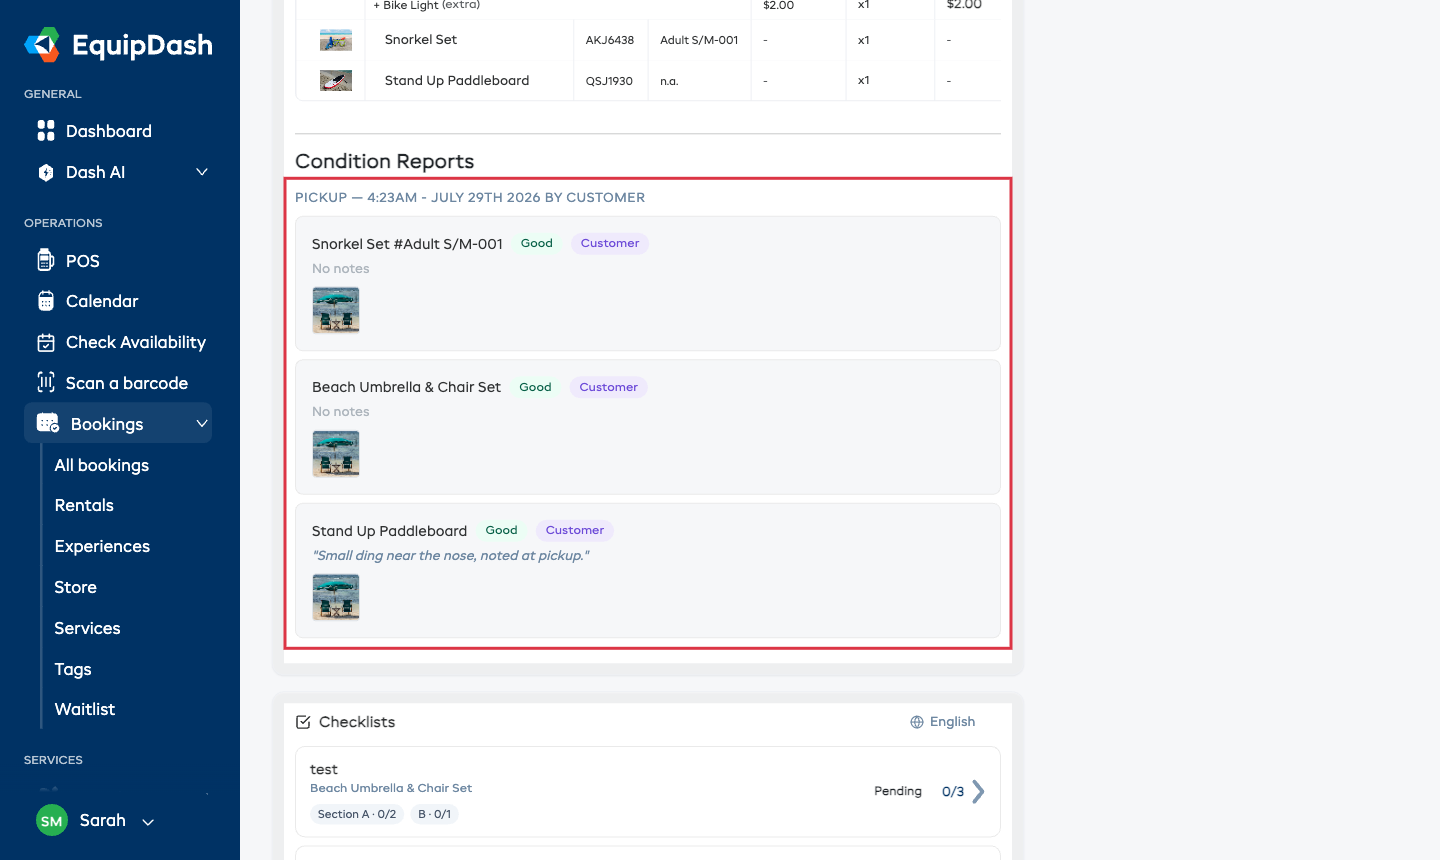
A customer submitting at pickup marks those items Picked Up - that's contactless pickup, no counter visit needed. A customer submitting at return changes nothing; your team confirms the return exactly as above. The staff path always stays available either way. See Customer Condition Photos.
Partial Pickup and Return
EquipDash supports partial fulfillment:
- Partial pickup -- the customer takes some items now and comes back for the rest later. The booking stays in Picked Up status and tracks which items have been collected.
- Partial return -- the customer returns some items but keeps others. You can process the return for just the items handed back.
The booking detail page shows a status summary for each item, so you always know which items are out and which are back.
Undoing a Pickup or a Return
Pressed the wrong button, or marked the wrong booking? You can put a booking back a step without editing it or starting over.
Undoing a Pickup
Use this when a booking was marked as picked up but the items never left the shop.
- Open the booking.
- Click Actions ▾ in the top-right of the booking detail page.
- Click Undo pickup.
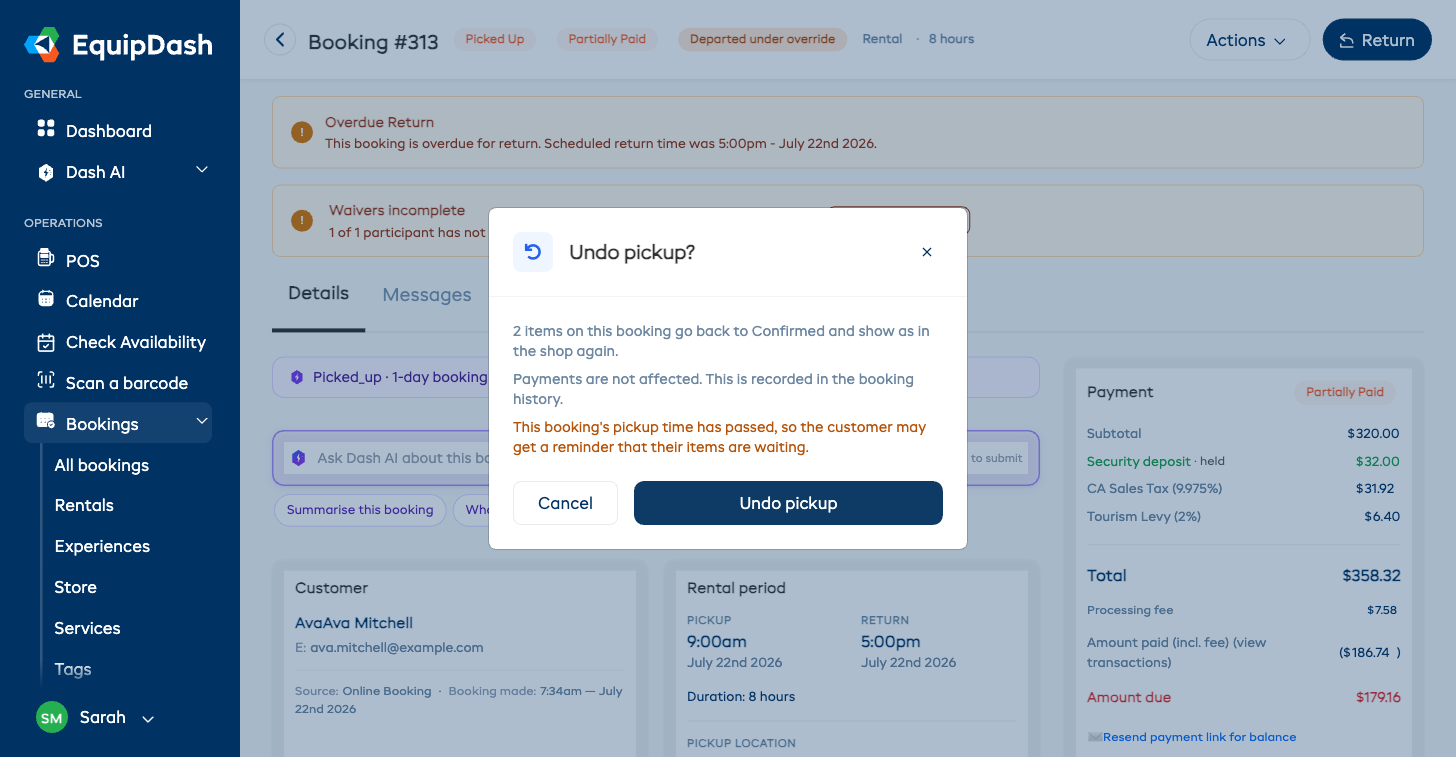
- Read the confirmation -- it tells you how many items will move -- then click Undo pickup to go ahead, or Cancel to leave the booking as it is.
The booking goes back to Confirmed and the items show as in the shop again.
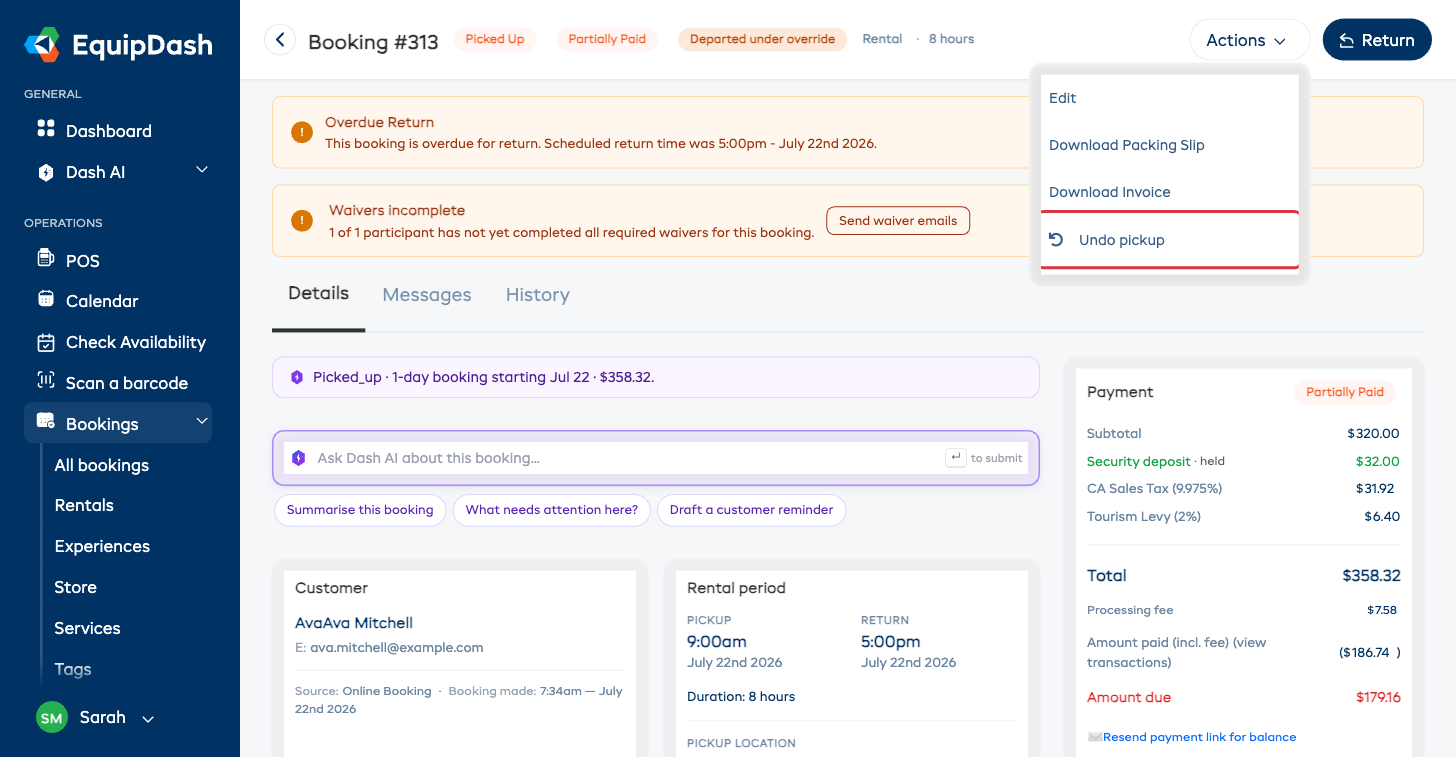
The confirmation tells you exactly what will change before anything happens, including anything you need to know about first.
Undoing a Return
Use this when items were marked as returned but they are actually still with the customer.
- Open the booking.
- Click Actions ▾ in the top-right of the booking detail page.
- Click Undo return.
- Read the confirmation, then click Undo return to go ahead, or Cancel to leave the booking as it is.
The booking goes back to Picked Up and the items show as out with the customer again. The original pickup time is kept, so nothing about the handover is lost.
Undo return appears as soon as any item is back, so if one item was scanned in by mistake during a partial return, you can undo it without touching the rest of the booking.
What an Undo Does Not Change
- Payments are never affected. An undo does not charge, refund, or release anything.
- Cleaning and repair jobs stay open. If an item was sent to the workshop on its way back, that job stays open, and the item cannot be handed out again until the work is finished. The confirmation names any items this applies to.
- The customer may get a reminder. If the booking's pickup time has already passed, undoing the pickup can mean the customer is reminded that their items are waiting. The confirmation tells you when that will happen.
Every undo is written to the booking's History tab, showing who did it and when -- see Booking Notes & History.
Undoing needs the same permission as doing pickups and returns, so staff without it do not see the options at all. Service and workshop bookings do not have them -- those follow their own drop-off and collection steps.
On the Mobile App
The same undo is in the EquipDash mobile app. Open the booking, stay on the Details tab and scroll to Pickup and Return, then tap Undo pickup or Undo return. Unlike marking a pickup or a return, an undo needs a connection -- it cannot be saved up and sent later while you are working offline.
Experience Check-In
For experience bookings, the fulfillment process is simpler:
- Open the experience booking.
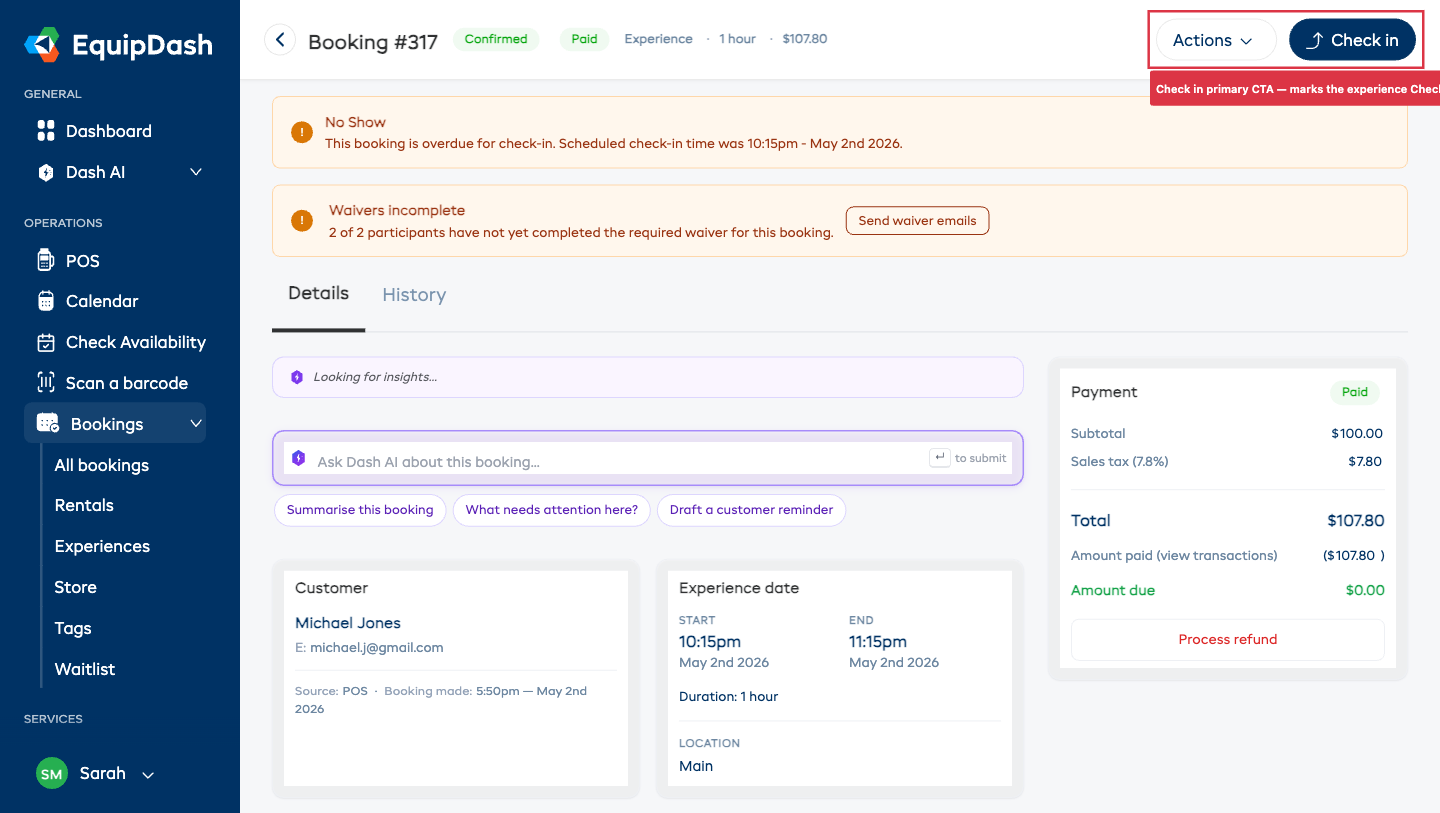
- Click the Check in primary button in the header when the customer or participants arrive.
- The booking status changes to Checked In.
You can also click Mark as completed to mark the experience as finished.
You can require staff to complete a readiness checklist before an experience can be checked in - for example "life jackets aboard" or "safety brief given". It opens automatically from the Check in action on both the booking detail page and the manifest. See Booking Checklists.
Experience bookings are automatically marked as Completed one day after the scheduled end time.
A booking on several days
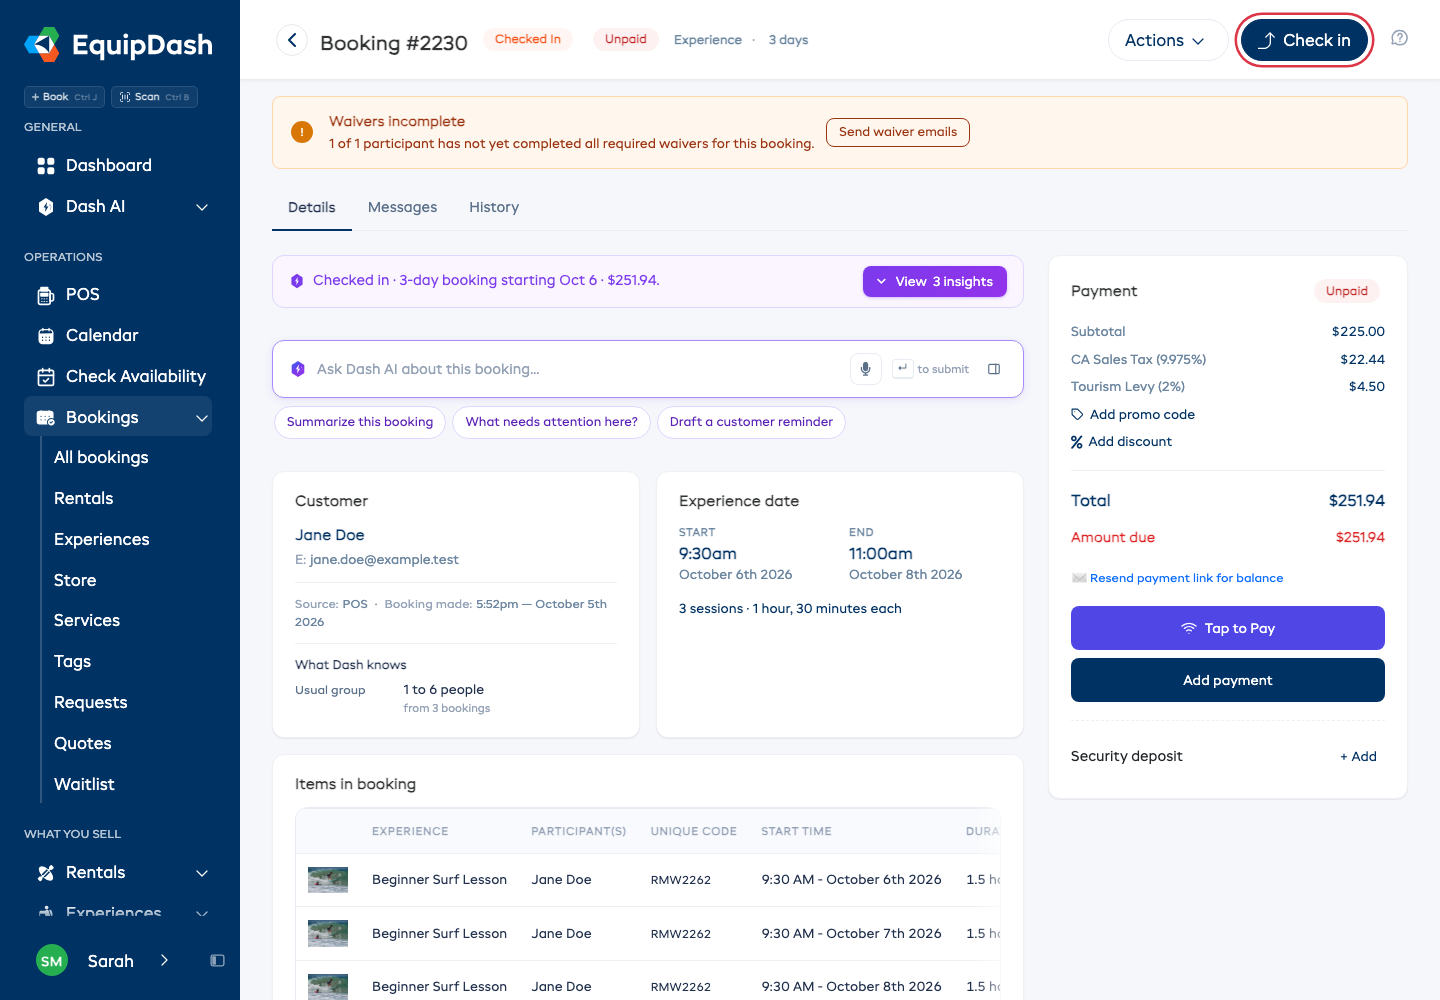
When one booking has the same activity on several days, like one lesson on three dates, each day is checked in on its own. This works the same for sessions at set times and for open-window activities.
- Check in checks in the day that's due: today, or the next day still to come. The other days stay booked, and Check in comes back for the next one.
- On a day's manifest, a ticket scan or the mobile app, check-in and undo act on that day only.
- A missed day is a no-show for that day only. Once no day is still to come, the button is Complete, and the booking still names the day that was missed.
- The customer gets your usual reminder before each day.
Undoing a Check-In or a Completion
Marked an experience booking as completed, or checked in, by mistake? Put it back a step the same way as a pickup.
- Open the booking.
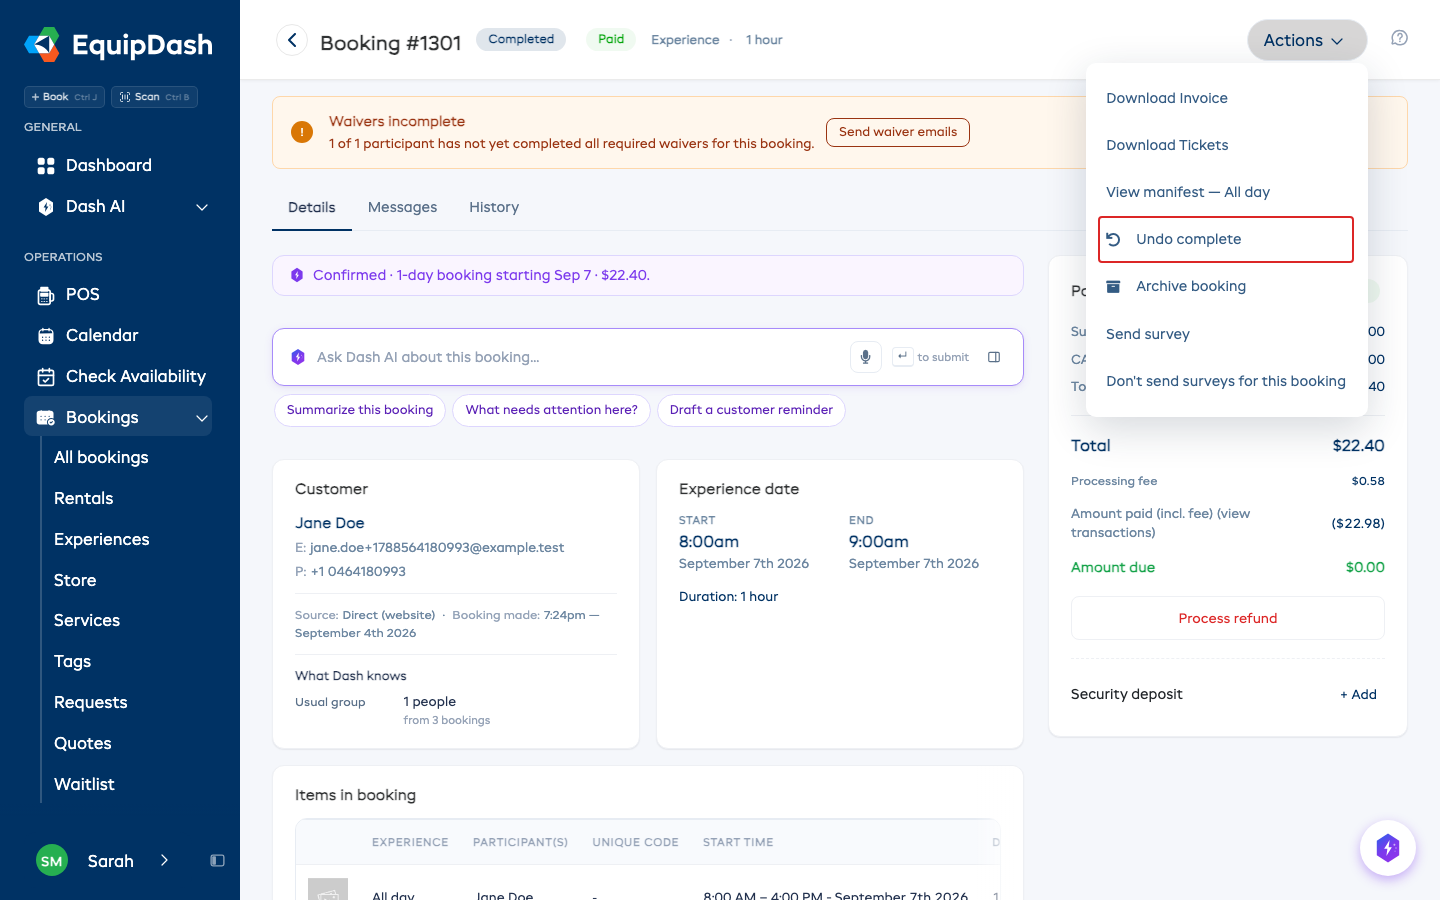
- Click Actions ▾ in the top-right of the booking detail page.
- Click Undo complete (or Undo check-in if the booking is checked in).
- Read the confirmation, then click the button to go ahead, or Cancel to leave the booking as it is.
Undo complete puts the booking back to Checked In. Undo check-in puts it back to Confirmed, and everyone on the manifest shows as not checked in again. To go from Completed all the way back to Confirmed, undo the completion first, then the check-in.
- Payments are never affected.
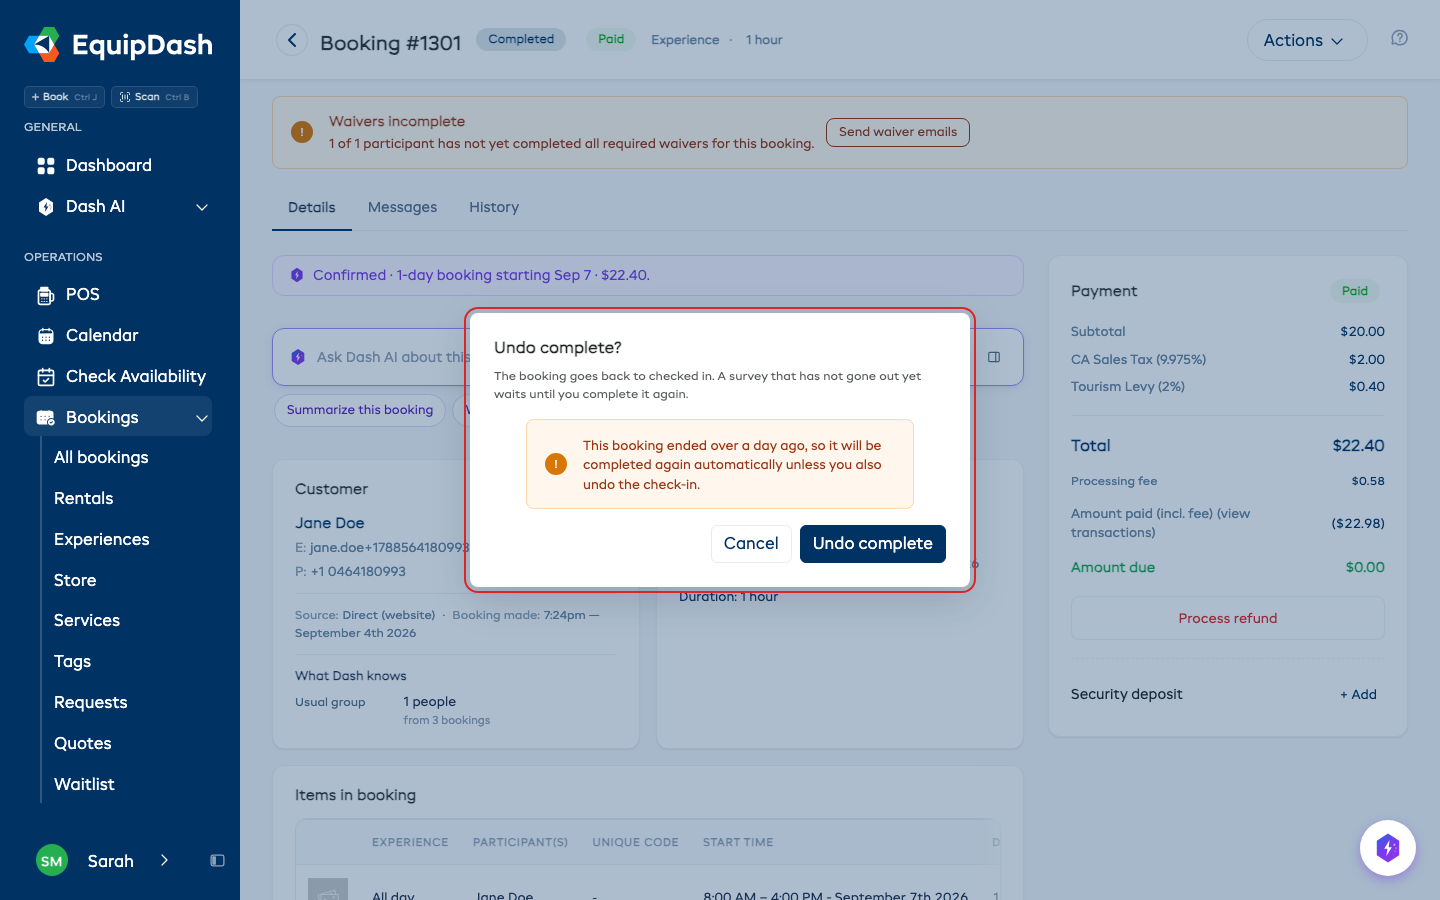
- Surveys wait. A survey or review request that has not gone out yet is held back, and goes out once you complete the booking again. One that was already sent cannot be recalled.
- Older bookings complete again on their own. An experience that ended more than a day ago is completed automatically while it is checked in, so the confirmation warns you. Undo the check-in as well if the customer never came.
Both undos are written to the booking's History tab, and need the same permission as checking in. On a booking with rental items and an experience, only the experience part moves. In the mobile app, open the booking and scroll to Check-in on the Details tab.
Late Pickups
If a customer has not picked up their items by the scheduled pickup time, the booking is flagged as overdue. You will see:
- A Late Pickup warning banner at the top of the booking detail page (e.g. "This booking is overdue for pickup. Scheduled pickup time was 9:00am - February 25th 2026").
- A Late Pickup warning badge on the booking in the bookings table.
- An overdue notification sent to your team (if enabled in notification settings).
Late Returns
If a rental is not returned by the scheduled return time:
- The booking is flagged as overdue for return.
- An overdue notification is sent to your team.
- You can track all overdue returns from the bookings table by filtering for Picked Up status and sorting by end date.
- The items keep counting as out until you mark them returned, so they are not offered to anyone else in the meantime. See Understanding Availability.
Security Deposits and Returns
If the booking has a security deposit, settle it in the return window: Give it back if everything is in good condition, or Keep some if there is damage or loss. Choose Later to decide on the booking page afterwards.
Deliveries and Collections
A booking your van takes out and brings back uses the van's words. The button in the header reads Delivered on the way out and Collected on the way back, never Pick up. If a collection is running late, a Not collected yet banner shows when it was due, with its own Collected button. Getting it back is your van's job, so the customer is never sent a late return reminder.
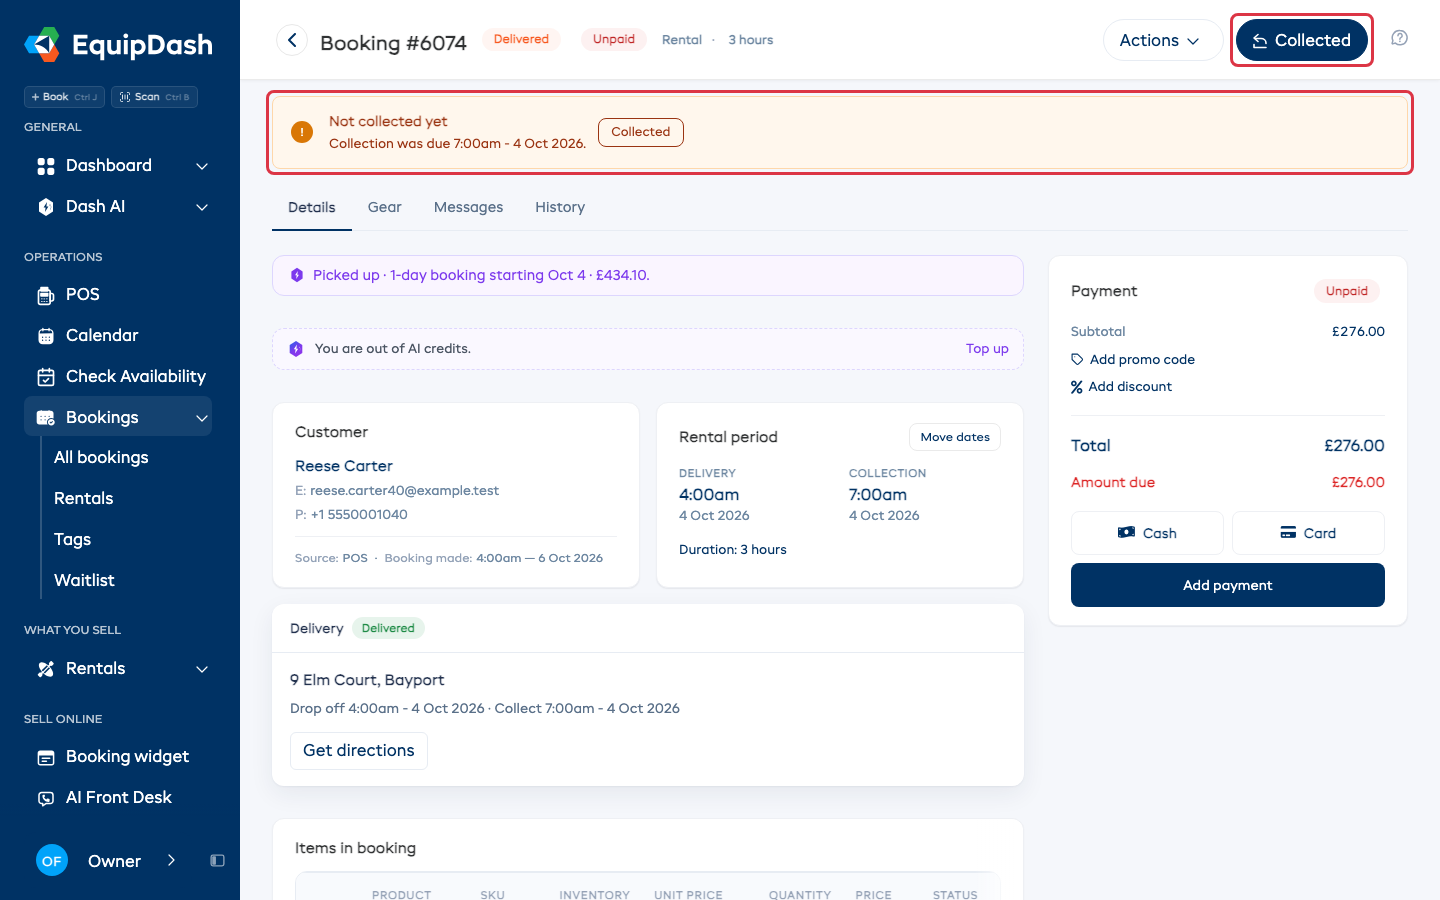
The Return window is still there for condition reports and damage charges. For the day's stops, see Delivery.
Related Guides
- Viewing & Managing Bookings
- The Gear List -- what to pull off the shelf for a booking, and from which site
- Booking Checklists -- require a safety checklist before pickup or check-in
- Customer Condition Photos -- let customers photograph gear at pickup and complete the pickup themselves
- Security Deposits
- Barcode Scanning
- Bookings Overview
- Inventory Units -- view condition history per item
- How the Workshop Works -- damaged items are auto-sent here