Creating a POS Booking
The Point of Sale (POS) is your go-to tool for creating bookings in person. Whether a customer walks in to rent some gear, books an experience over the phone, or grabs a store add-on at the counter, the POS gives you a fast, single-page flow with everything in view at once.
The POS was rebuilt in May 2026 to be cart-style, AI-assisted, and modal-free. If you've used the older POS, the building blocks are the same — they just live in different places now.
Opening the POS
The POS lives at one URL — /bookings/new — and handles every booking type. You can open it from:
- POS in the sidebar (under Operations)
- The + New Booking button on any bookings table page
POS Layout

The page is split into two areas:
- Left side — the Dash AI bar at the top, the booking-type pill selector, then the working area: dates and product grid for rentals, time chips and experience cards for experiences, or the store grid.
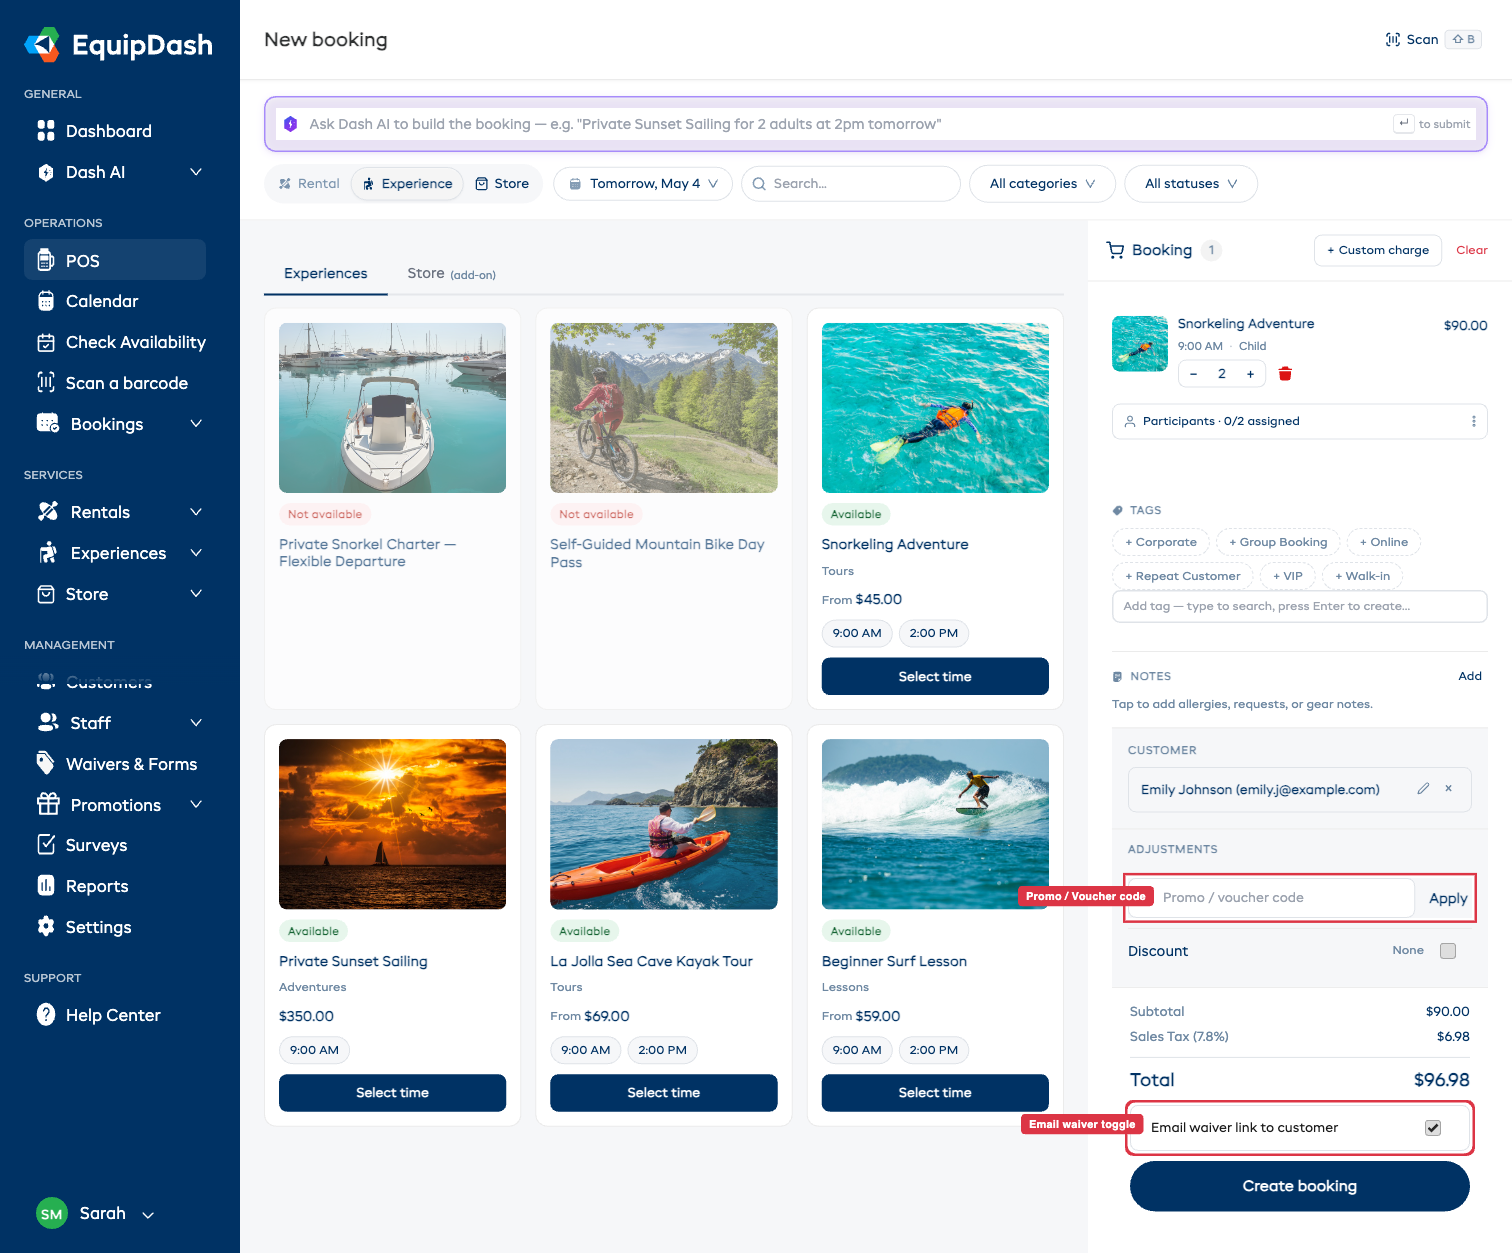
- Right side — the Booking cart — your running total. As you add items the cart fills with a row per item (with a quantity stepper and remove button), then sections for Tags, Notes, Customer, Adjustments (promo code + discount toggle), totals, the Email waiver link to customer toggle (only when applicable), and Create booking.
The Rental, Experience, and Store pills only appear when their module is enabled. If you only have one module enabled, the pill row is skipped entirely. See Modules.
Build a booking with Dash AI (optional)
Above everything else is the Dash AI bar:
Ask Dash AI to build the booking — e.g. "Private Sunset Sailing for 2 adults at 2pm tomorrow"
Type a plain-English booking description and press ↵. Dash parses it, picks the right products / experiences / sessions, sets the dates and quantities, and pre-fills the cart so you only have to confirm. You can still tweak everything by hand afterwards. See Dash AI on POS for prompt patterns.
If you'd rather build manually, just ignore the bar and pick a booking type below it.
Creating a Rental Booking (POS)
Step 1 — Pick the booking type
- Click the Rental pill (or the Rental tile if the cart is empty).
The Rental view shows a Period strip (Multi-day / Same-day), pickup + return date and time, a location dropdown, and three sub-tabs: Rentals, Bundles, and Store (add-on).
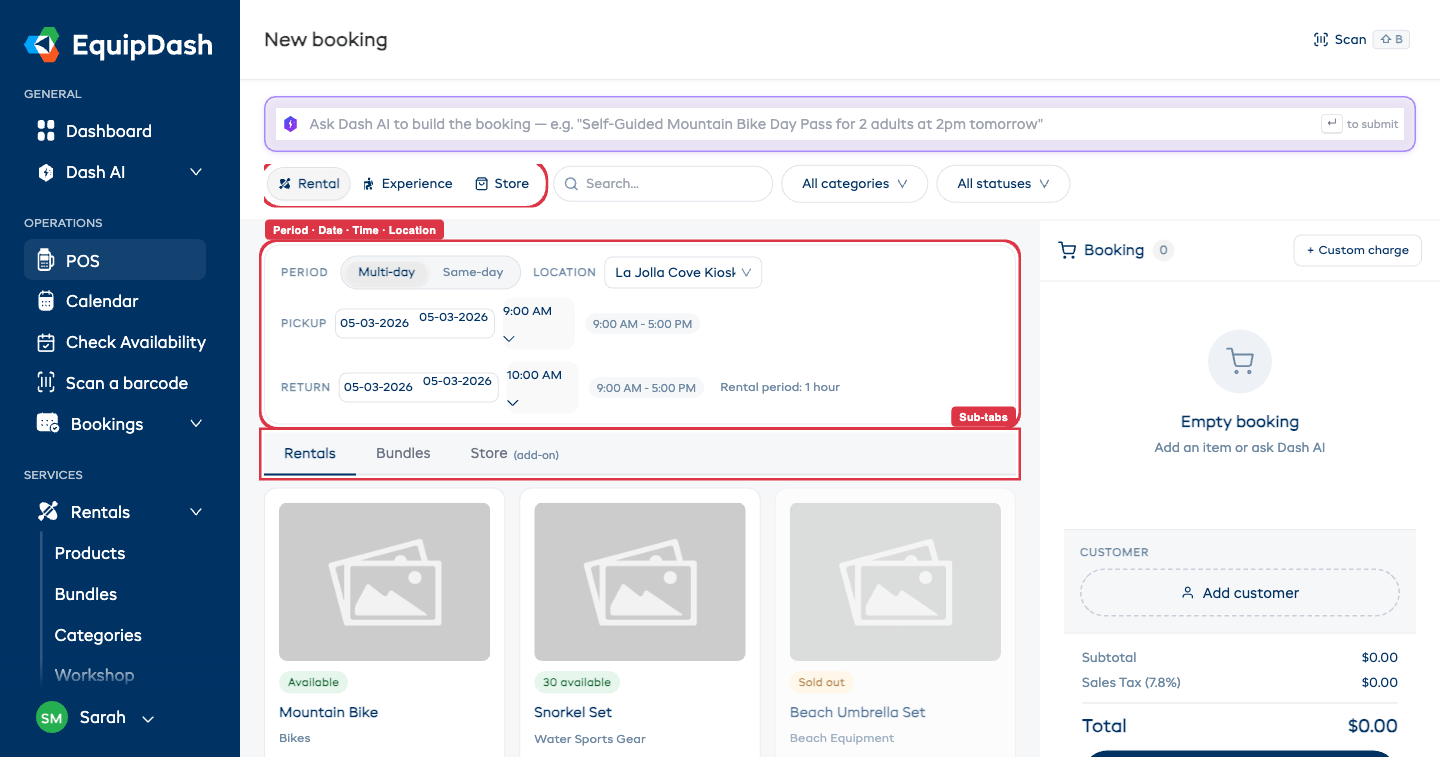
Step 2 — Set dates
- Pick a Pickup date and time.
- Pick a Return date and time. Toggle Same-day in the Period strip if it's a one-day rental.
- The product grid updates immediately to show what's available for that window.
Step 3 — Find the product
- Use the Search box at the top to filter by name, SKU, or description.
- Use All categories or All statuses to narrow further.
- Switch sub-tabs to browse Bundles or pick up Store (add-on) items in the same booking.
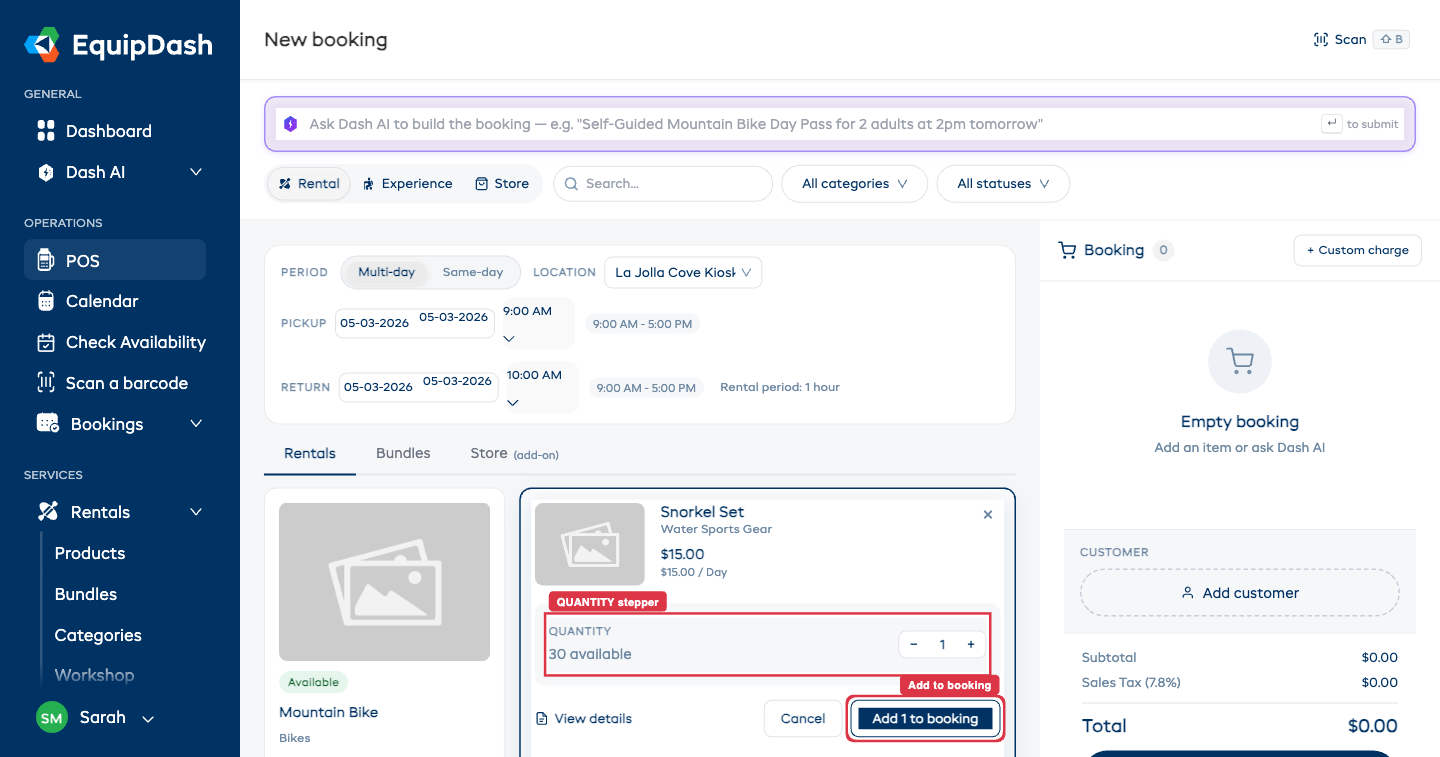
Step 4 — Add it to the cart
- Click a product card.
- The card expands inline showing price, QUANTITY stepper, and an Add N to booking button. (For products with variations, set quantities per variation.)
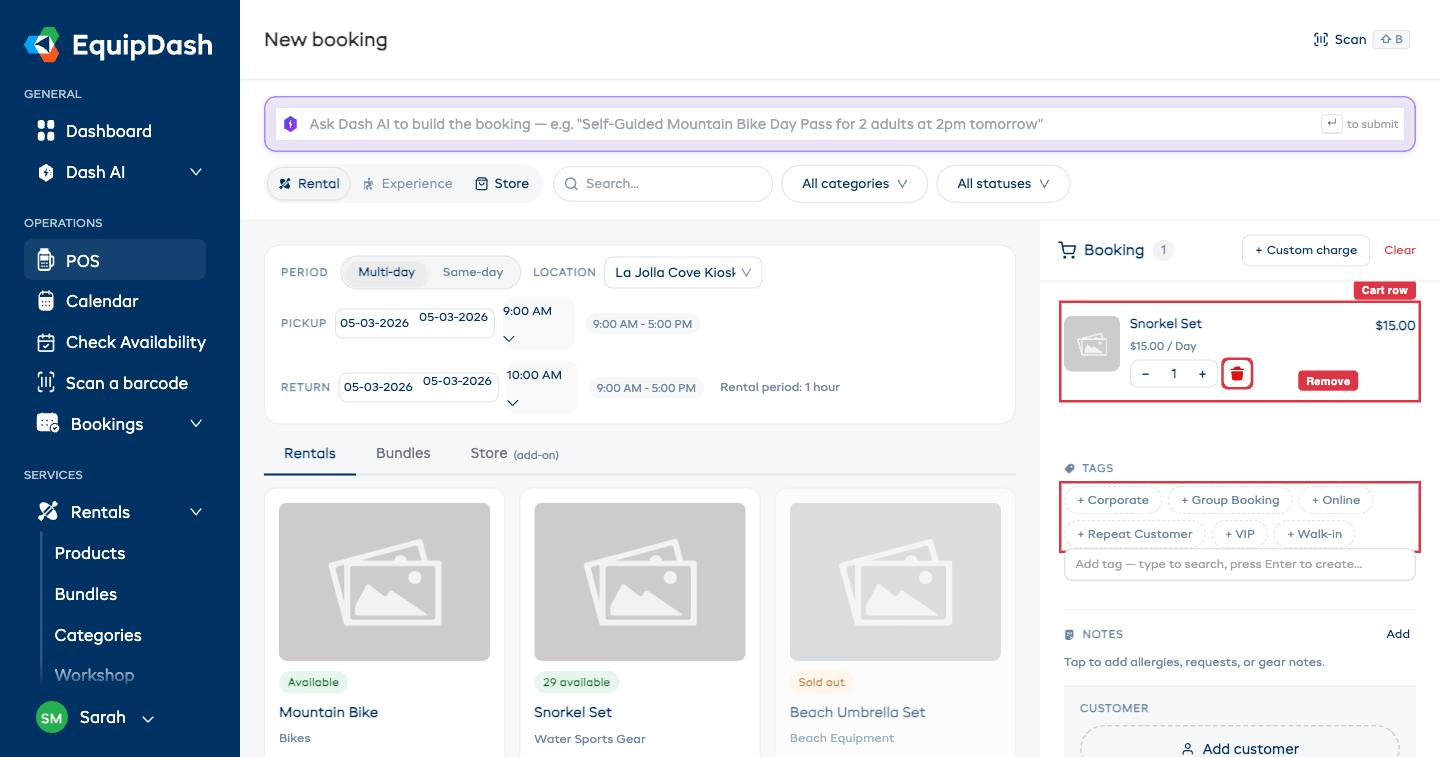
- Click Add N to booking. The item appears in the right-rail Booking cart with its own row, stepper, and trash icon.
Repeat for each product. The cart row's stepper lets you change quantity later; the red trash icon removes it.
If a product is fully booked and you have the waitlist enabled, the Add button becomes Add to Waitlist.
Step 5 — Add a customer
- In the right-rail CUSTOMER section, click Add customer.
- The customer search drops in inline. Type a name, email, or phone — matching customers appear instantly.
- Click an existing customer to assign them, or fill in First name / Last name / Email and press Save to create a new customer on the fly.
Step 6 — Tags, notes, adjustments (optional)
The cart includes everything you might want to capture at booking time, no modals:
- Tags — click any of the predefined chips, or type in Add tag and press Enter to create a new one.
- Notes — tap the Notes area to add allergies, requests, or gear notes.
- Promo / voucher code — under ADJUSTMENTS, type the code and click Apply.
- Discount — toggle the Discount switch to apply a custom % or amount discount.
- Custom charge — click the + Custom charge link at the top of the cart for a one-off line item.
Step 7 — Email waiver toggle (when applicable)
If at least one item in the cart requires a waiver — directly, via its category, or via an apply-to-all-products / apply-to-all-experiences flag — an Email waiver link to customer toggle appears just above Create booking. It's on by default. Leave it on to email the customer their waiver link automatically; flip it off if they're signing on a tablet at the counter.
If no cart item requires a waiver, the toggle is hidden.
Step 8 — Confirm
- Review the cart: items, customer, totals.
- Click Create booking.
- The booking is created with status Confirmed, inventory is reserved, and you're taken to the booking detail page where you can add a payment or send a payment link.
Creating an Experience Booking (POS)
Step 1 — Pick the booking type
Click the Experience pill at the top.
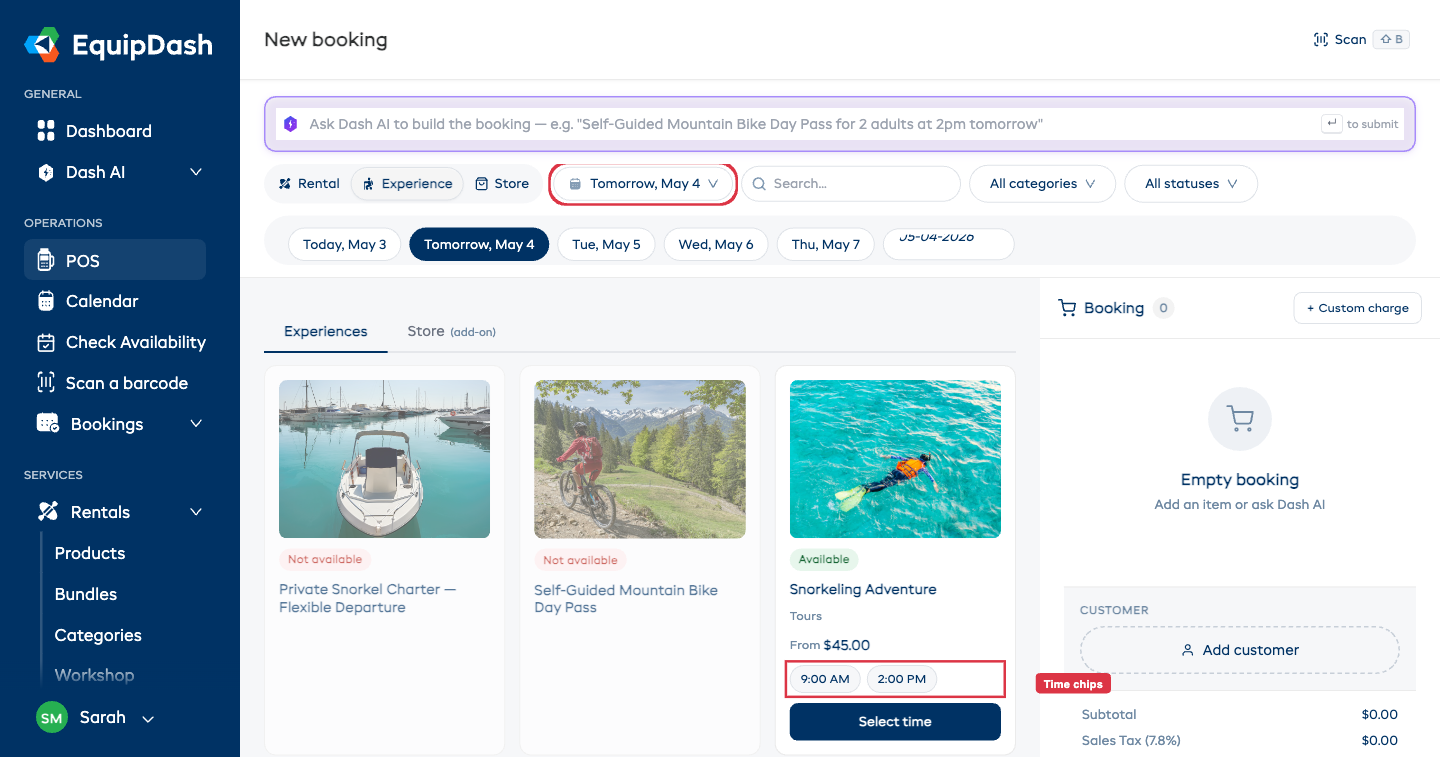
Step 2 — Pick a date
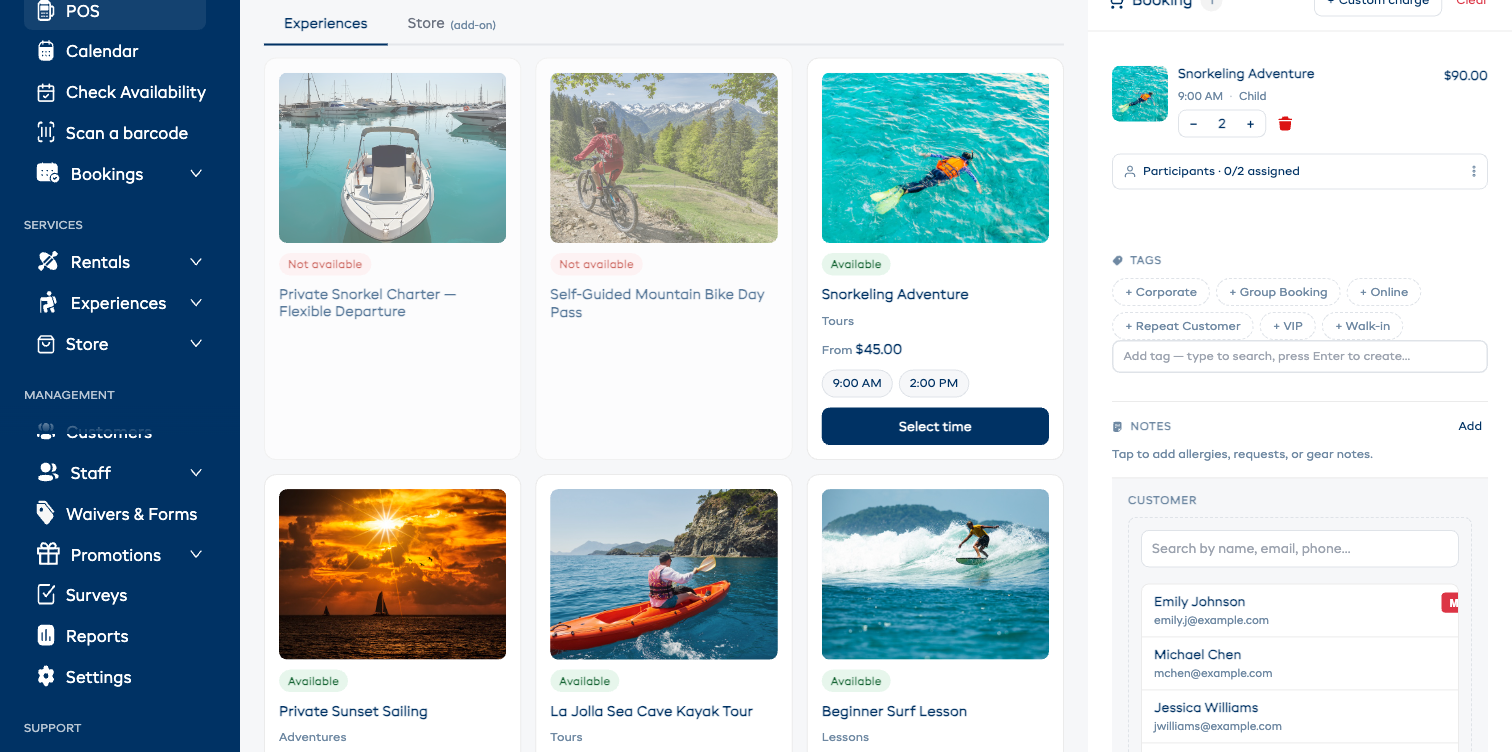
Use the date dropdown above the grid. Each experience card shows that day's available time chips inline (e.g. 9:00 AM, 2:00 PM) — no extra clicks to discover sessions.
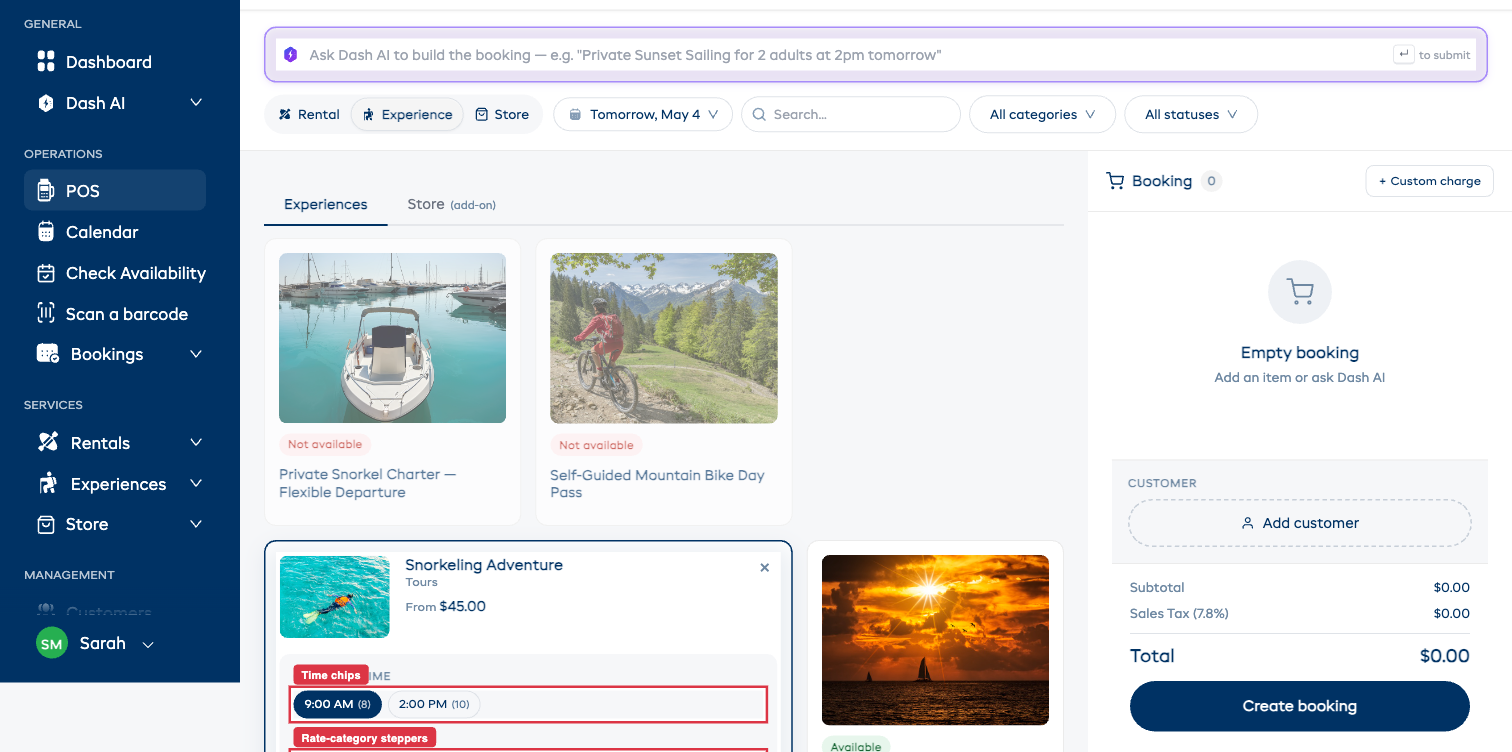
Step 3 — Pick a session and rate categories
- Click the time chip (or the Select time button on the card).
- The card expands inline with CHOOSE A TIME chips highlighted, and a PARTICIPANTS section listing each rate category (Adult, Child, etc.) with a price and a stepper.
- Set the per-rate quantities. The Add N to booking button activates once you have at least one participant.
Step 4 — Add to cart
Click Add N to booking. The experience appears in the cart with its session time, rate label, quantity stepper, and a Participants · 0/N assigned chevron right below it.
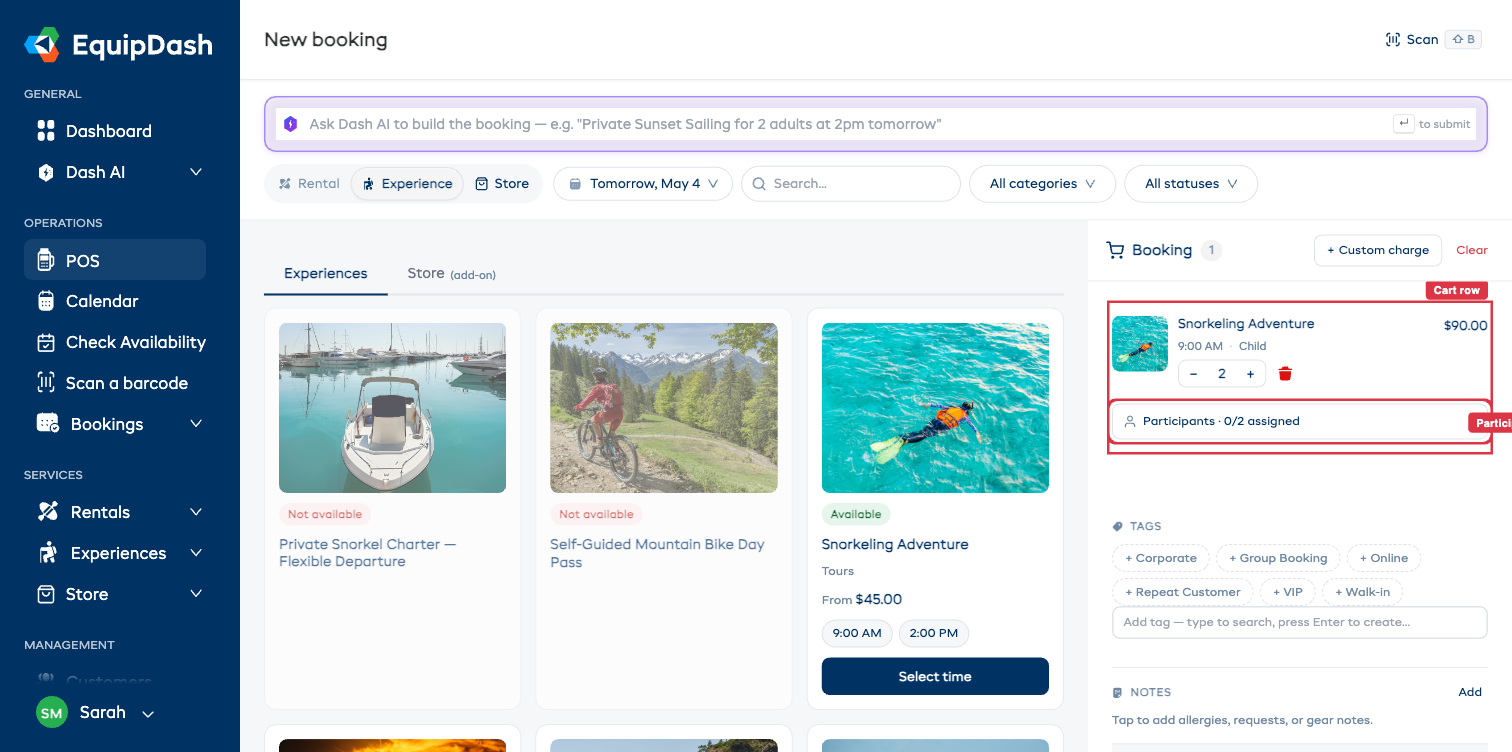
Step 5 — Capture participant details inline (when needed)
Click the Participants · N/M assigned chevron to expand. Each seat gets its own First name / Last name / Email row right inside the cart — no modal, no jumping pages. Click + details on any seat to add custom-field info (height, helmet size, dietary requirements — whatever you've configured).
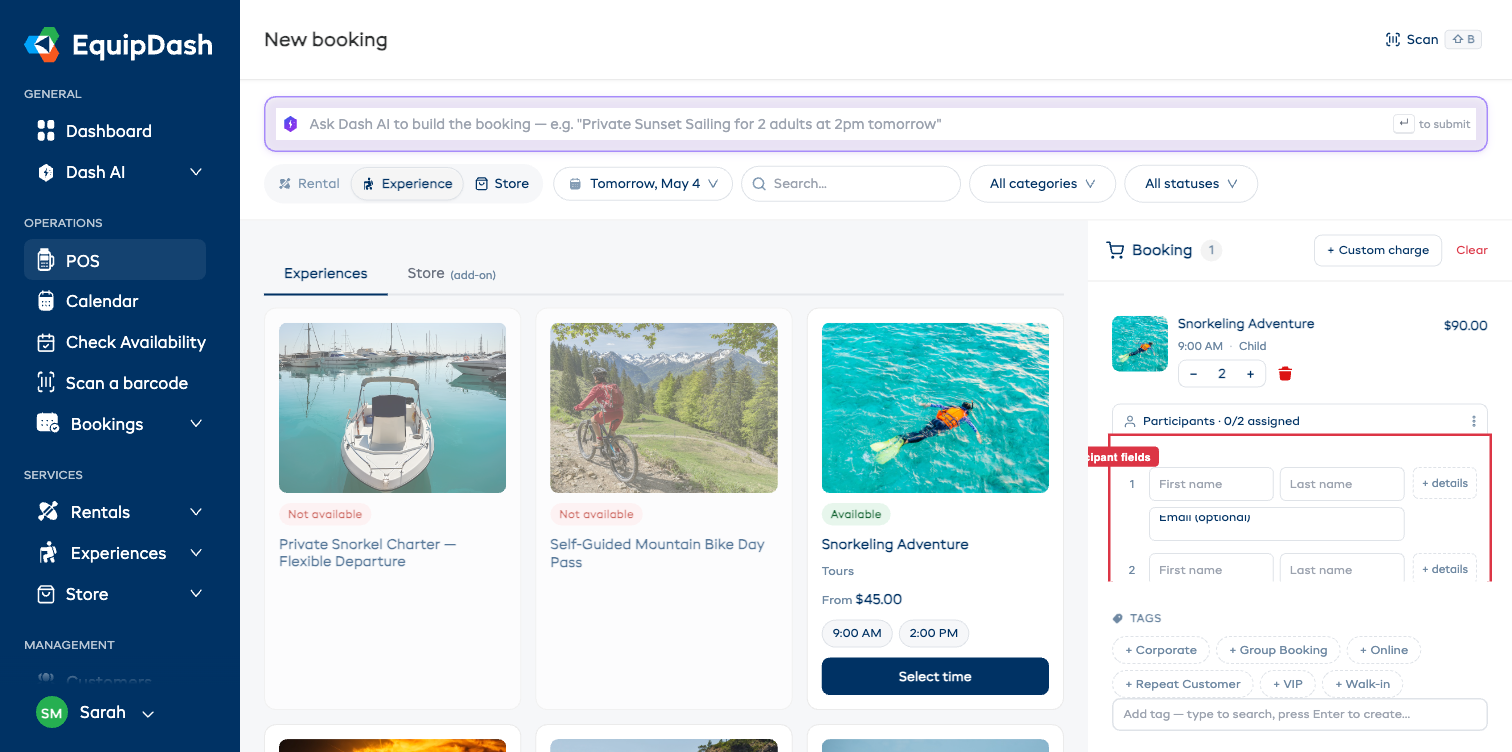
Participant capture is only required when the experience (or rental product) is configured with participants required. For products that don't require it, the Participants section is skipped entirely.
Step 6 — Customer + adjustments + create
Same as for rentals — add the lead customer, apply promo codes / discounts, leave the waiver toggle on (or off), and click Create booking.
Creating a Store-only Booking (POS)
The Store pill creates a product-only order with no rental period — see Adding Store Products to Bookings for the full walkthrough.
You can also pick up store products as add-ons to a Rental or Experience booking via the Store (add-on) sub-tab inside those flows.
After Creating the Booking
Once confirmed:
- The booking shows up in the bookings table and the calendar.
- A confirmation email is sent to the customer (if email notifications are enabled).
- Inventory is reserved (rentals) or seats are held (experiences).
- Waivers go out automatically if the toggle was left on.
- You're taken to the booking detail page to add payments, mark pickup, manage fulfillment, and so on.