Completing Workshop Items Growth+This feature requires the Growth+ plan or higher
Once an item has been repaired, cleaned, or serviced, you mark it as complete in the workshop. This returns the item to your available inventory so it can be booked again.
There are two ways to return items from the workshop:
Method 1: From the Workshop Detail Page
- Go to Rentals > Workshop in the left sidebar.
- On the In Workshop tab, click on a workshop entry to open its Workshop Detail page.
- If the job has checklists attached, work through them first (see Completing Checklists below).
- Click the Mark complete & return to stock button (green) in the top-right corner.
- Confirm the completion in the dialog.
The item will be returned to available inventory immediately.
Method 2: Using the Barcode Scanner
- On the Workshop page, click the Return Item button in the top-right corner.
- Scan the item's barcode using the barcode scanner within the form.
- EquipDash will identify the item, verify it is currently in the workshop, and prompt you to confirm completion.
- Confirm the return.
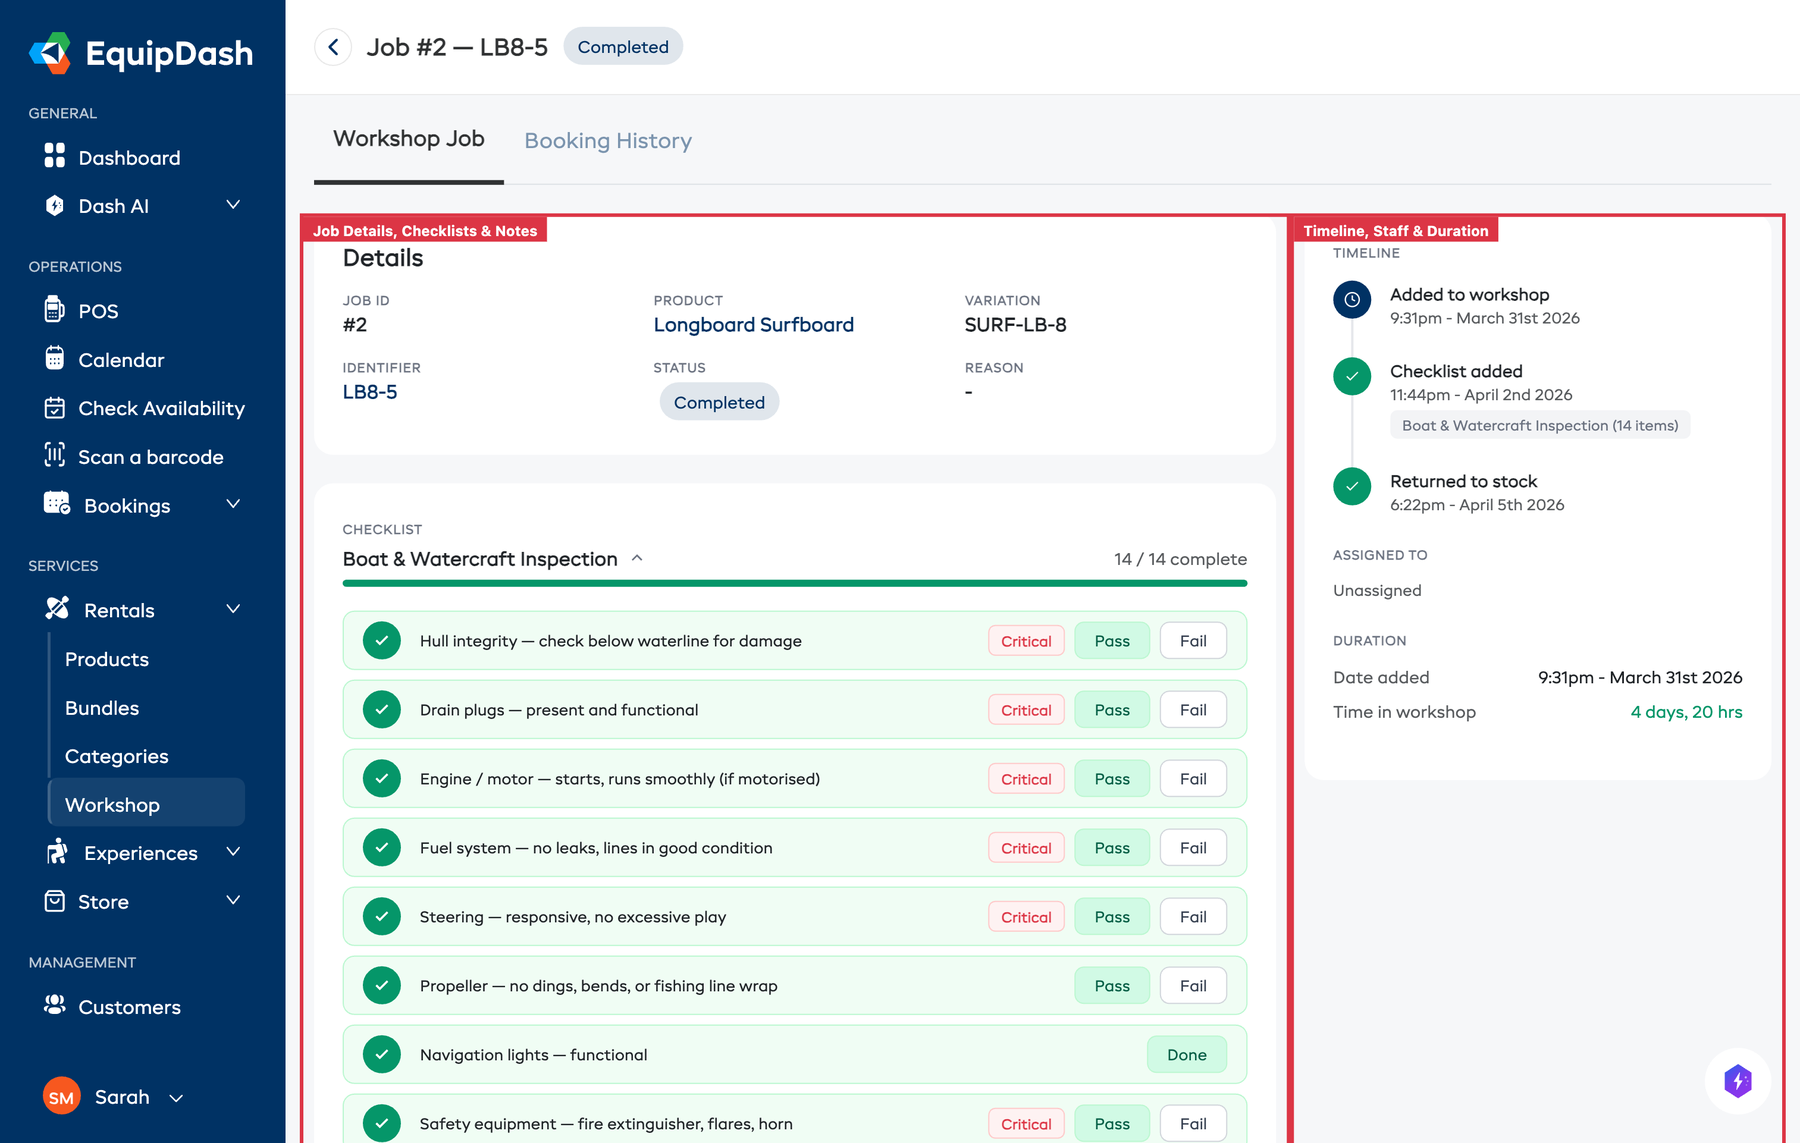
The Workshop Detail Page
The workshop detail page uses a two-column layout to give you a complete view of a workshop job:
Left column:
- Details card -- Job ID, Product, Variation, Identifier, Status, and Reason.
- Checklists section -- All attached checklists with their items and progress (see below).
- Notes section -- A running log of notes with an inline Add a note... input and Post button.
Right column:
- Timeline -- A vertical timeline with a connecting line showing when the item was added, key events, and when it left the workshop.
- Assigned To -- Staff members assigned to the job, shown with avatars.
- Duration -- How long the item has been (or was) in the workshop.
The page header shows Job #X -- IDENTIFIER with a status pill, a + Add Checklist button (white), and the Mark complete & return to stock button (green).
The detail page also has tabs for Workshop Job and Booking History, so you can quickly check the item's rental history without leaving the page.
Completing Checklists
If the workshop job has checklists attached, you should work through them before returning the item. Each checklist is collapsible -- click its name to expand or collapse the item list.
Each checklist shows:
- A CHECKLIST label, the template name, and the completion count (e.g., "8/12 complete").
- A progress bar showing how far through you are.
- A trash icon to remove the checklist from the job if it is not needed.
Working Through Checklist Items
Each item type has its own interaction:
| Item Type | How to Complete |
|---|---|
| Checkbox | Click Mark done to check it off |
| Pass/Fail | Click Pass or Fail inline |
| Text | Click Enter to open a modal and type your notes |
| Numeric | Click Enter to open a modal and enter a reading |
| Photo | Click Upload to upload a photo with an optional caption |
Items marked as Critical display a badge so your team knows they require extra attention.
To add a note to any individual checklist item, click the speech bubble icon next to that item.
Adding More Checklists
If you need to attach an additional checklist to the job:
- Click the + Add Checklist button in the page header.
- Select the template you want to attach.
- The checklist appears immediately and your team can start completing items.
Critical Failures
When a critical pass/fail checklist item is marked as Fail, EquipDash takes extra precautions:
- A critical failure alert appears on the workshop job, warning that the item has unresolved safety issues.
- The alert blocks the return to stock button, preventing the item from going back into circulation.
- An Override button is available on the alert for situations where you have assessed the risk and decide to proceed anyway.
Critical failures are designed to prevent unsafe equipment from reaching customers. Only use the Override button if you have fully assessed the situation and are confident the item is safe to return.
What Happens After Completing
- The inventory unit's status changes from In Workshop back to Available.
- The item is included in availability calculations again and can be assigned to new bookings.
- The workshop log entry is updated with the completion date.
- The item moves from the In Workshop tab to the Left Workshop tab.
- All completed checklists are saved as part of the item's maintenance history.
Auto-Complete
If you set a scheduled end time with Set expected completion enabled when sending the item to the workshop, EquipDash can automatically mark the item as complete when that time arrives. This is useful for routine maintenance with predictable turnaround times.
Viewing Completed Items
- On the Workshop page, click the Left Workshop tab.
- You will see a history of all items that have been through the workshop, including:
- The product and inventory unit
- When the item was sent and when it was completed
- The reason and notes
- Checklist completion summary
- Who performed the action
Related Guides
- How the Workshop Works -- Overview of the workshop feature.
- Sending Items to Workshop -- Sending items for maintenance.
- Workshop Checklists -- Creating templates and managing checklists.
- Workshop Activity Log -- Full history of workshop actions.