Workshop Checklists Growth+This feature requires the Growth+ plan or higher
Workshop checklists give you a structured way to inspect equipment during maintenance. Instead of relying on memory or loose notes, your team follows a consistent set of checks every time an item goes through the workshop. Completed checklists are saved as part of each item's maintenance history, so you always have a record of what was inspected and what was found.
Why Use Checklists
- Consistency -- Every team member follows the same inspection steps, regardless of experience level.
- Accountability -- Each completed item records who did it and when.
- Safety -- Critical checks can block an item from being returned to inventory until they pass.
- History -- Build a full maintenance record for each piece of equipment over time.
The Checklists Page
To access the checklists management page:
- Go to Rentals > Workshop.
- Click the Checklists button in the top-right corner of the Workshop page.
This takes you to the checklists page, which has two tabs:
- My Checklists -- Templates you have created or duplicated. You can search, view, edit, and delete these.
- Prebuilt Templates -- Ready-made templates from EquipDash covering common equipment types. You can search, filter by category, view, and duplicate these.
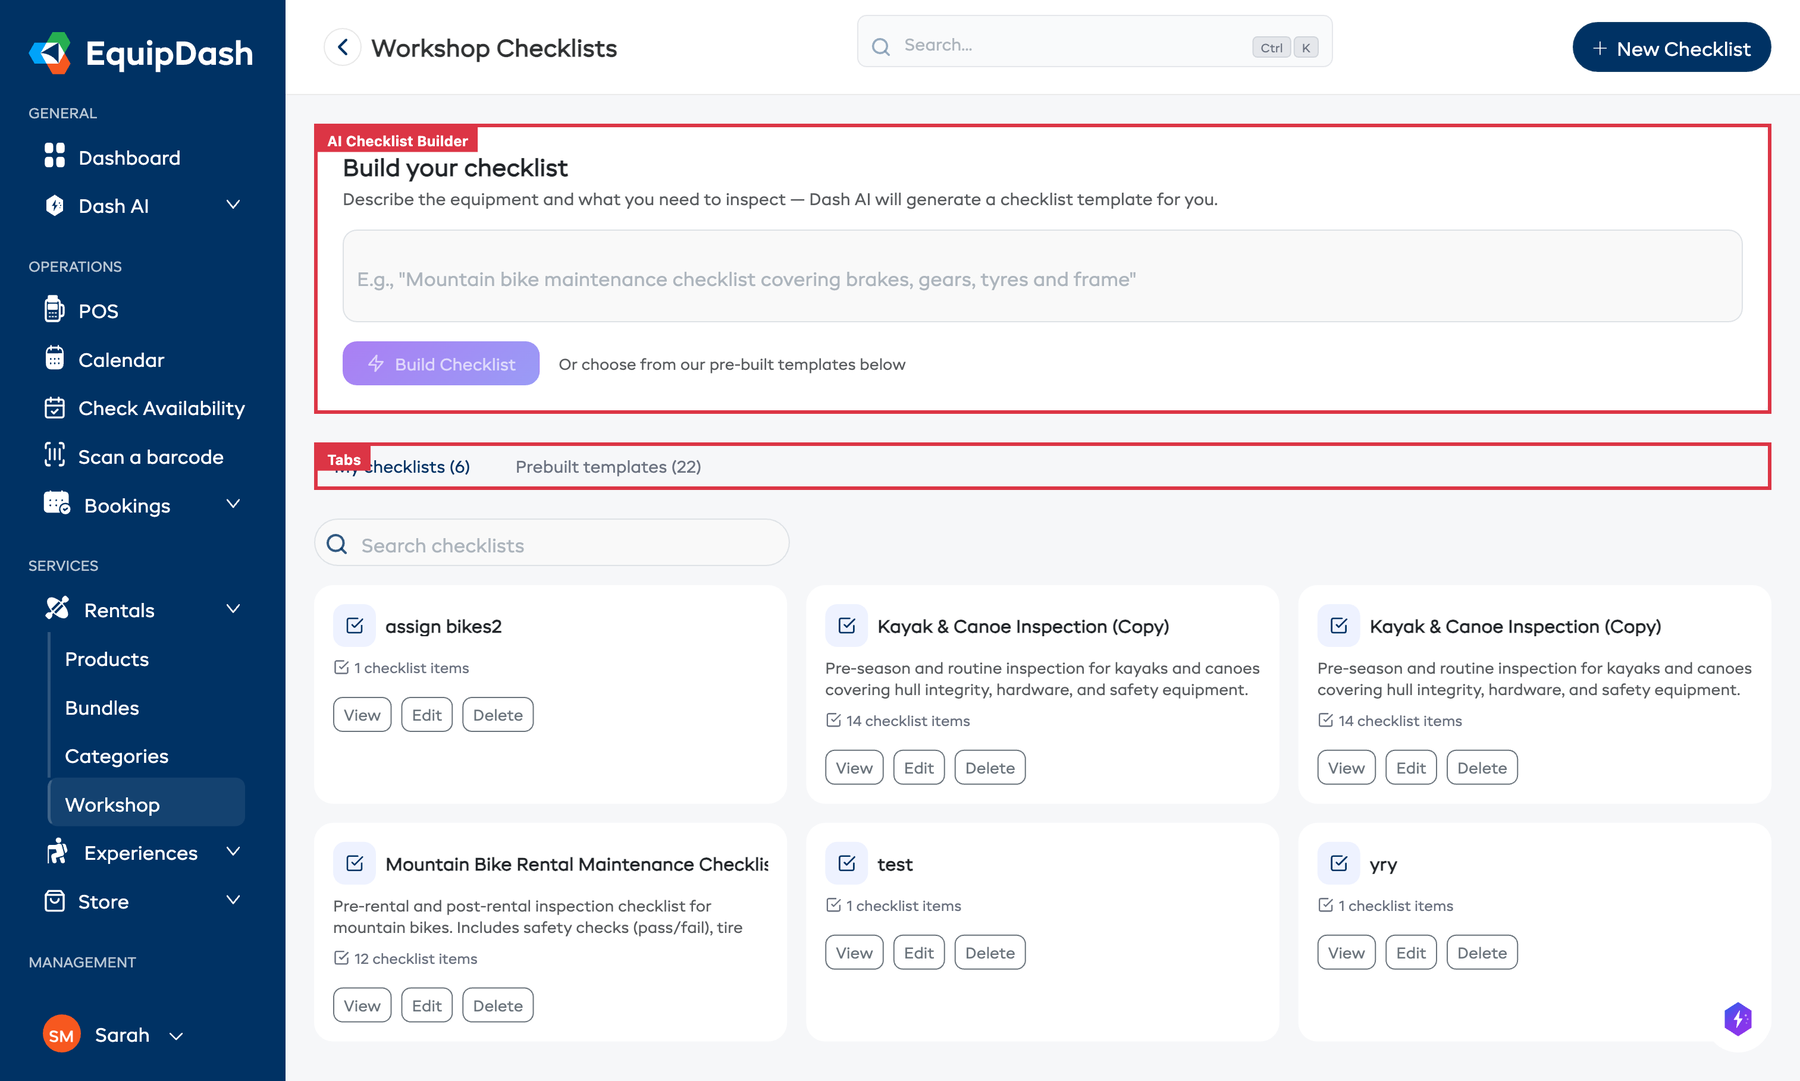
Each template card shows the template name, description, and item count. Custom templates have View, Edit, and Delete buttons. Prebuilt templates have View and Use Template buttons.
AI Checklist Builder
At the top of the checklists page, you will find the Build your checklist section. Describe the equipment and what you want to check, then click the Build Checklist button. EquipDash's AI will generate a complete checklist template based on your description, which you can then review and customise.
The AI builder is a great starting point if none of the prebuilt templates fit your equipment. Describe something like "pre-rental check for inflatable hot tubs" and the AI will generate a relevant set of inspection items.
Checklist Templates
Checklists are created from templates. A template defines the list of checks to perform for a particular type of equipment. There are two kinds of templates:
- Prebuilt templates -- EquipDash includes 22 ready-made templates across 10 equipment categories. These cannot be edited or deleted, but you can duplicate them to create your own version.
- Custom templates -- Templates you create yourself, tailored to your specific equipment and processes.
Prebuilt Templates
The following prebuilt templates are available to all suppliers:
| Category | Templates |
|---|---|
| Kayaks & Canoes | Kayak & Canoe Inspection, Kayak & Canoe Post-Rental Check |
| Bicycles | Bicycle Safety Check, Bicycle Pre-Rental ABC Check |
| Paddleboards | Paddleboard (SUP) Inspection, Paddleboard Post-Rental Check |
| Surfboards | Surfboard Inspection, Surfboard Post-Rental Check |
| Ski & Snowboard | Ski & Snowboard Equipment Check, Ski & Snowboard End-of-Season Service |
| Camping & Hiking | Camping Gear Inspection, Camping Gear Post-Trip Check |
| Climbing Gear | Climbing & Safety Gear Inspection, Climbing Gear Retirement Assessment |
| E-Bikes & E-Scooters | E-Bike & E-Scooter Check, E-Bike Battery & Electrical Health Check |
| Boats & Watercraft | Boat & Watercraft Inspection, Boat Pre-Season Launch Check |
| General | General Equipment Maintenance, General Post-Rental Return Check, General Pre-Season Preparation, General Damage Assessment |
Each prebuilt template includes a comprehensive set of checks designed by industry best practices, including critical safety items.
On the Prebuilt Templates tab, you can filter by category using the category pill filters at the top. Click a category to show only templates for that equipment type.
Creating a Custom Template
If the prebuilt templates do not cover your equipment, or you want a checklist tailored to your workflow:
- Go to Rentals > Workshop and click Checklists.
- On the My Checklists tab, click Create Template.
- A multi-step sidebar opens:
Step 1 -- Basic Details:
- Enter a Name for the template (e.g., "Drone Pre-Flight Check").
- Optionally enter a Description.
Step 2 -- Checklist Items:
- Add items to your checklist. For each item, set the:
- Label -- What the check is (e.g., "Brake pads -- check wear").
- Type -- How the result is recorded (see Checklist Item Types below).
- Critical toggle -- Whether this is a safety-critical item.
- Use the delete icon to remove items you do not need.
- Drag items to reorder them.
Step 3 -- Apply to Products: Choose how this template is automatically attached when items are sent to the workshop:
- None -- The template is available but will not be attached automatically. You can still add it manually to any workshop job.
- All Products -- Automatically attach this checklist whenever any product is sent to the workshop.
- Individual Products -- Select specific products. The checklist will only be auto-attached for those products.
- By Category -- Select product categories. The checklist will be auto-attached for any product in those categories.
- Click Save.
Your custom template will appear on the My Checklists tab and can be used on any workshop job.

Duplicating a Template
To customise a prebuilt template or copy an existing custom template:
- On the Prebuilt Templates tab, find the template and click Use Template. Or on the My Checklists tab, open the template detail and click Duplicate.
- A new custom template is created as a copy.
- Edit the duplicate to add, remove, or change items as needed.
Editing a Custom Template
You can edit a custom template from two places:
- From the checklists listing -- Click Edit on the template card.
- From the template detail page -- Click the Edit button.
The same multi-step sidebar opens, allowing you to update the name, description, items, and product assignments.
Viewing a Template
Click View on any template card (or click the template name) to open the template detail page. This shows:
- The template name and description.
- A read-only list of all checklist items with their types and critical flags.
- For prebuilt templates, a Duplicate to Edit option to create your own version.
Deleting a Custom Template
To delete a custom template:
- On the My Checklists tab, click Delete on the template card.
- Confirm the deletion.
The template is archived and will no longer appear when attaching checklists to workshop jobs.
Prebuilt templates cannot be edited or deleted. To customise one, duplicate it first using the Use Template button.
Checklist Item Types
Each item on a checklist has a type that determines how your team records the result:
| Type | How It Works | Example |
|---|---|---|
| Checkbox | A simple tick -- click Mark done | "Rinse with fresh water" |
| Pass/Fail | Click Pass or Fail inline -- used for safety-critical inspections | "Brake pads -- check wear" |
| Text | Click Enter to open a modal and type a free-text note | "Document any damage found" |
| Numeric | Click Enter to open a modal and type a number -- useful for measurements | "Tire pressure (PSI)" |
| Photo | Click Upload to upload a photo with an optional caption | "Photo of hull condition" |
When creating or editing a template, choose the type that best fits the kind of information you need for each check.
Assigning Templates to Products
You can assign one or more checklist templates to products so they are automatically attached when items are sent to the workshop. There are three ways to do this:
From the template (recommended)
When creating or editing a template, Step 3 -- Apply to Products lets you choose:
- None -- Manual attachment only.
- All Products -- Attach to every product automatically.
- Individual Products -- Pick specific products from a list.
- By Category -- Pick product categories; any product in those categories will get the checklist.
How auto-attach works
When you send an item to the workshop, EquipDash checks whether the item's product matches any template assignments:
- Templates set to All Products are attached.
- Templates assigned to the item's specific product are attached.
- Templates assigned to the item's product category are attached.
All matching checklists are attached automatically. You can still add or remove checklists on individual workshop jobs as needed.
How Checklists Work During a Workshop Job
Viewing checklists on a job
- Open a workshop job by clicking an entry on the In Workshop tab.
- In the left column of the detail page, you will see all attached checklists.
- Each checklist is collapsible -- click its name to expand or collapse the item list.
- Each checklist header shows:
- A CHECKLIST label and the template name.
- The completion count (e.g., "8/12 complete").
- A progress bar.
- A trash icon to remove the checklist.
Adding a checklist to a job
- Click the + Add Checklist button in the detail page header.
- Select the template you want to attach.
- The checklist appears immediately and your team can start completing items.
Completing checklist items
Work through each item using the controls described in Checklist Item Types above. Each completed item records who completed it and when.
To add a note to any individual checklist item, click the speech bubble icon next to that item. Notes provide extra context -- for example, "replaced brake cable, used 2mm cable" on a pass/fail item.
Progress Tracking
As you complete items, the checklist shows your progress:
- Pending -- No items have been completed yet.
- In Progress -- Some items are completed, but not all.
- Completed -- All items are done and all pass/fail items passed.
- Completed with Failures -- All items are done, but one or more pass/fail items were marked as Fail.
If a workshop job has multiple checklists, the workshop table shows a combined progress count (e.g., "12/18") with a progress bar.
Resetting an Item
If you need to redo a check, you can reset a completed item back to incomplete. This clears the recorded value, notes, and any uploaded photo for that item.
Critical Failures and What They Mean
Some checklist items can be marked as critical when you create a template. Critical items are safety-related checks that must pass before equipment should be returned to customers. These items display a Critical badge in the checklist.
When a critical pass/fail item is marked as Fail:
- The checklist status shows Completed with Failures.
- A critical failure alert is displayed on the workshop job, warning that the item has unresolved safety issues.
- The Mark complete & return to stock button is blocked, preventing the item from going back into circulation.
- An Override button is provided on the alert for cases where you have assessed the risk and decide to proceed.
- A warning icon appears next to the checklist progress in the workshop table.
Critical failures are designed to prevent unsafe equipment from being rented out. Your team should resolve the underlying issue and re-inspect the item before returning it from the workshop. Only use the Override button if you are confident the item is safe.
Workshop checklists are for maintenance and servicing — confirming gear is safe to return to inventory. They are a separate library from Booking Checklists, which run at handover (rental pickup or experience check-in) to confirm gear is ready to go out to a customer. The two libraries are kept apart, so a maintenance checklist is never offered as a handover gate and vice versa.
Staff Assignment
Each workshop job can have one or more staff members assigned to it. Assigned staff appear in the Assigned To section of the detail page with their avatars.
To assign or unassign staff:
- Open the workshop job detail page.
- In the right column, find the Assigned To section.
- Click to assign or remove staff members.
Staff assignment helps your team know who is responsible for each job and provides accountability in the maintenance history.
Maintenance History
Every completed checklist is saved as part of the inventory item's maintenance history. This gives you a full record of every inspection an item has been through.
To view an item's maintenance history:
- Go to Rentals > Products and open the relevant product.
- Navigate to the Inventory tab and click on the specific inventory unit.
- The Maintenance History section shows all completed checklists for that item, including:
- The checklist template name
- The date it was completed
- The overall status (passed or completed with failures)
- A summary of checked items
This history is useful for:
- Tracking recurring issues -- Spot patterns like a specific item repeatedly failing the same check.
- Compliance and audits -- Demonstrate that equipment is regularly inspected, with pass/fail results and photos as evidence.
- Replacement decisions -- See the full service history when deciding whether to repair or retire an item.
Related Guides
- How the Workshop Works -- Overview of the workshop feature.
- Sending Items to Workshop -- How to send items for maintenance.
- Completing Workshop Items -- Returning items to available inventory.
- Workshop Activity Log -- Full history of workshop actions.
- Inventory Units -- Managing individual inventory items.
- Booking Checklists -- The separate handover checklists run at rental pickup and experience check-in.