Inventory Units
Inventory units are the individual physical items behind your products. While a product is what the customer books, inventory units are the actual items you hand over. Tracking them properly means you always know how many are available, which ones are out on rental, and which need maintenance.
How Do You Want to Track Inventory?
Whenever you switch inventory tracking on, EquipDash asks this one question and offers two cards that preview what you get. Pick whichever matches how you work.
Just track the total
Just track the total keeps one pooled count of how many you have. It is best when the items are interchangeable and it does not matter which one a customer walks away with.
- You set a stock quantity (e.g., 20).
- EquipDash deducts from the count when bookings are made.
- You do not track which specific item goes to which customer.
Track each item
Track each item gives every unit its own identity. It is best when each one has its own serial number or its own condition, and you need to know exactly which one went out and came back.
- Each unit gets its own code (e.g., "A-001"), and EquipDash numbers a run of them for you.
- You can assign specific units to bookings.
- Each unit has its own status, activity log, and booking history.
Where you choose it
It is the same two cards, in the same words, everywhere the question comes up:
- Rentals > Products > Add Product, on Step 3: Additional Information, once you switch Inventory tracking on.
- The Edit Product panel, on the same step.
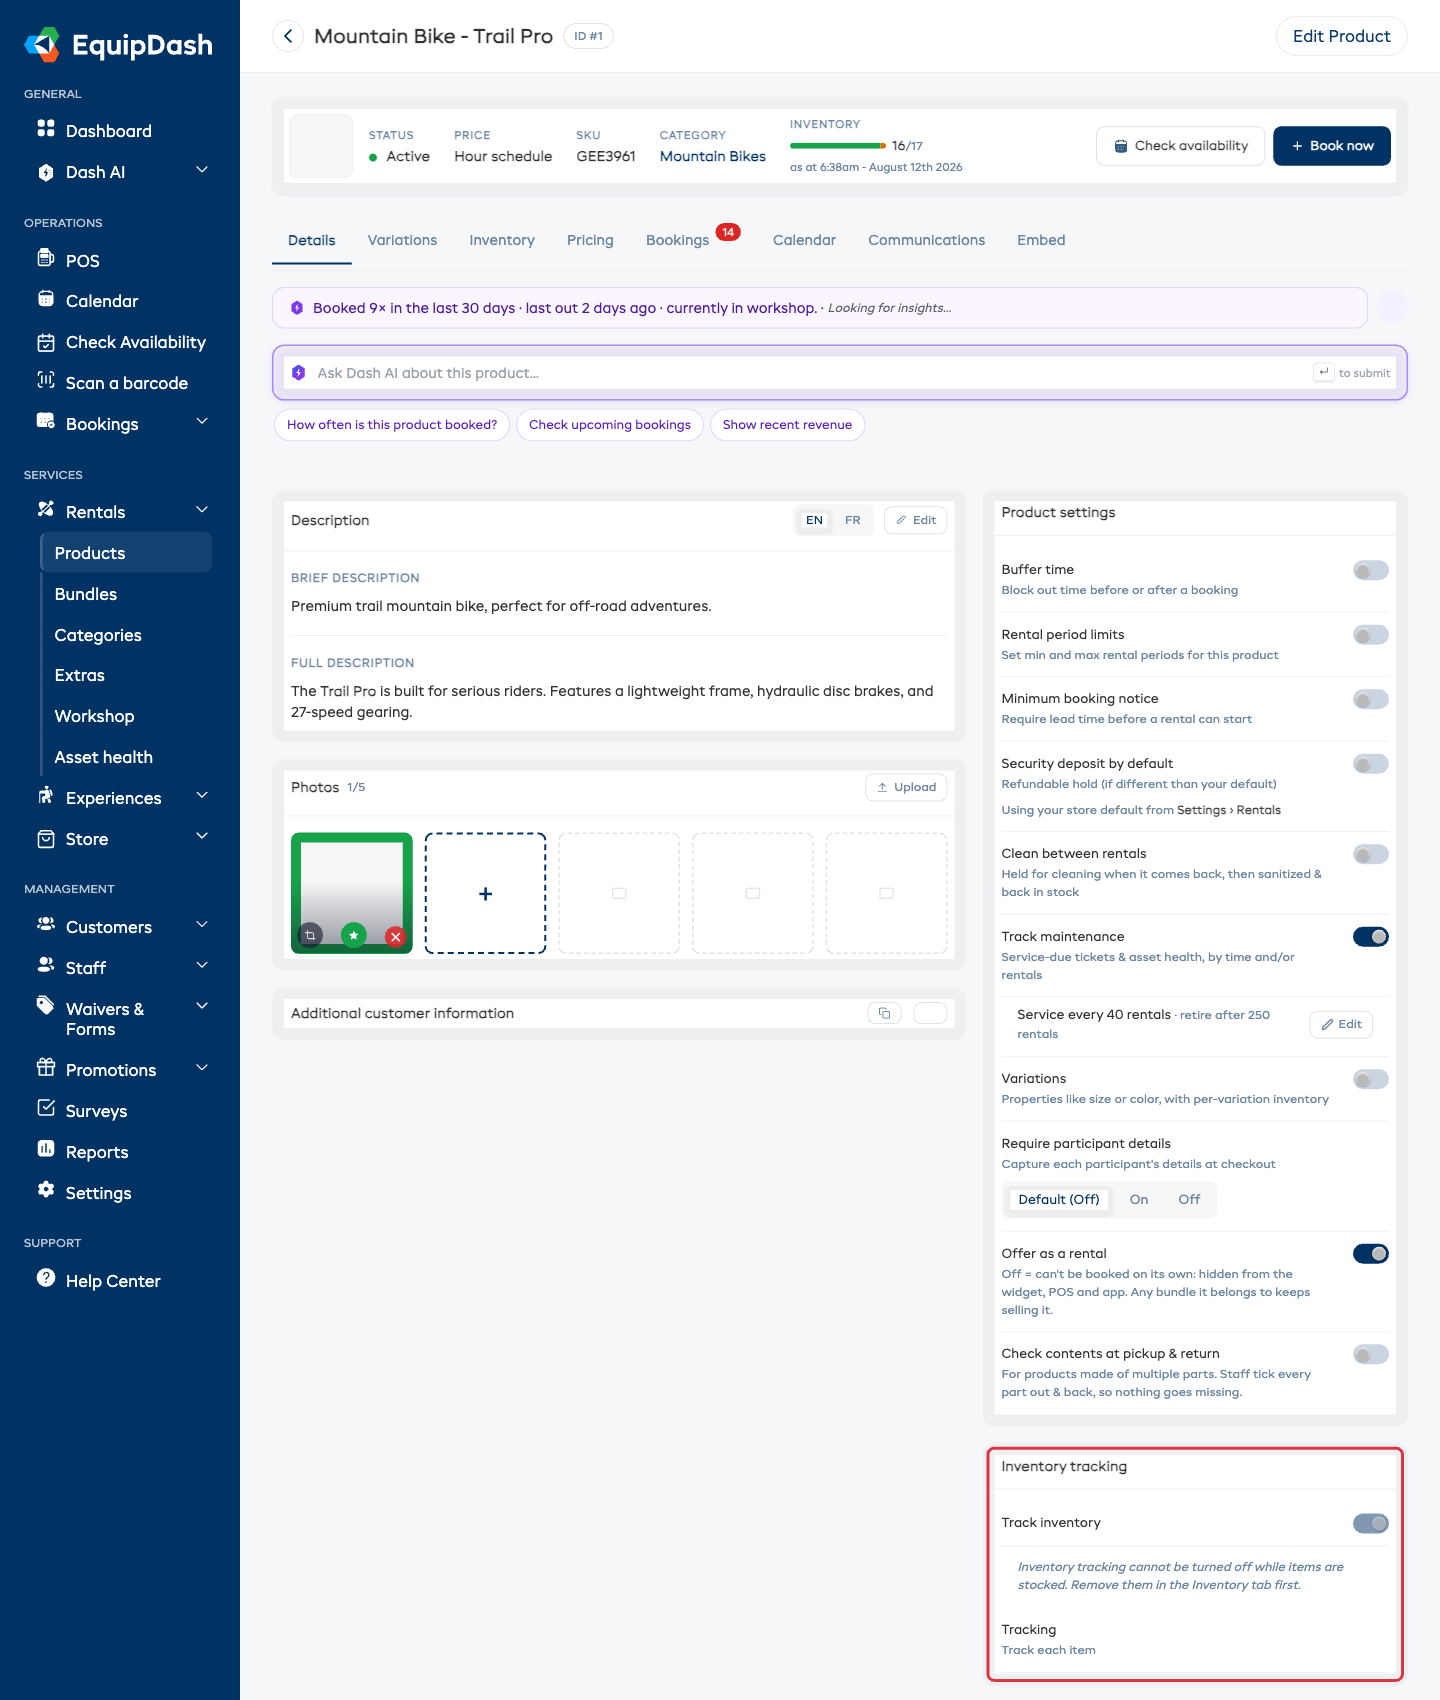
- The Inventory tracking card on the Details tab of the product detail page. The card shows your current answer beside Tracking, with an Edit button while the product still has no stock.
- The setup wizard, when you add your very first item.
If you can source extra units at short notice, Advanced settings at the bottom of Step 3 also has Keep taking bookings when sold out? -- it lets the product carry on selling past your stock and flags the booking so you know to find the extra item. See Understanding Availability.
You can only change your answer while the product has no stock. Once items exist, the two cards turn read-only and tell you why -- remove your items from the Inventory tab first if you need to switch. The two answers count stock in different ways, so switching would reinterpret everything you have already added.
Viewing Inventory
Go to Rentals > Products, click on a product name, and open the Inventory tab on the product detail page.
When you track the total
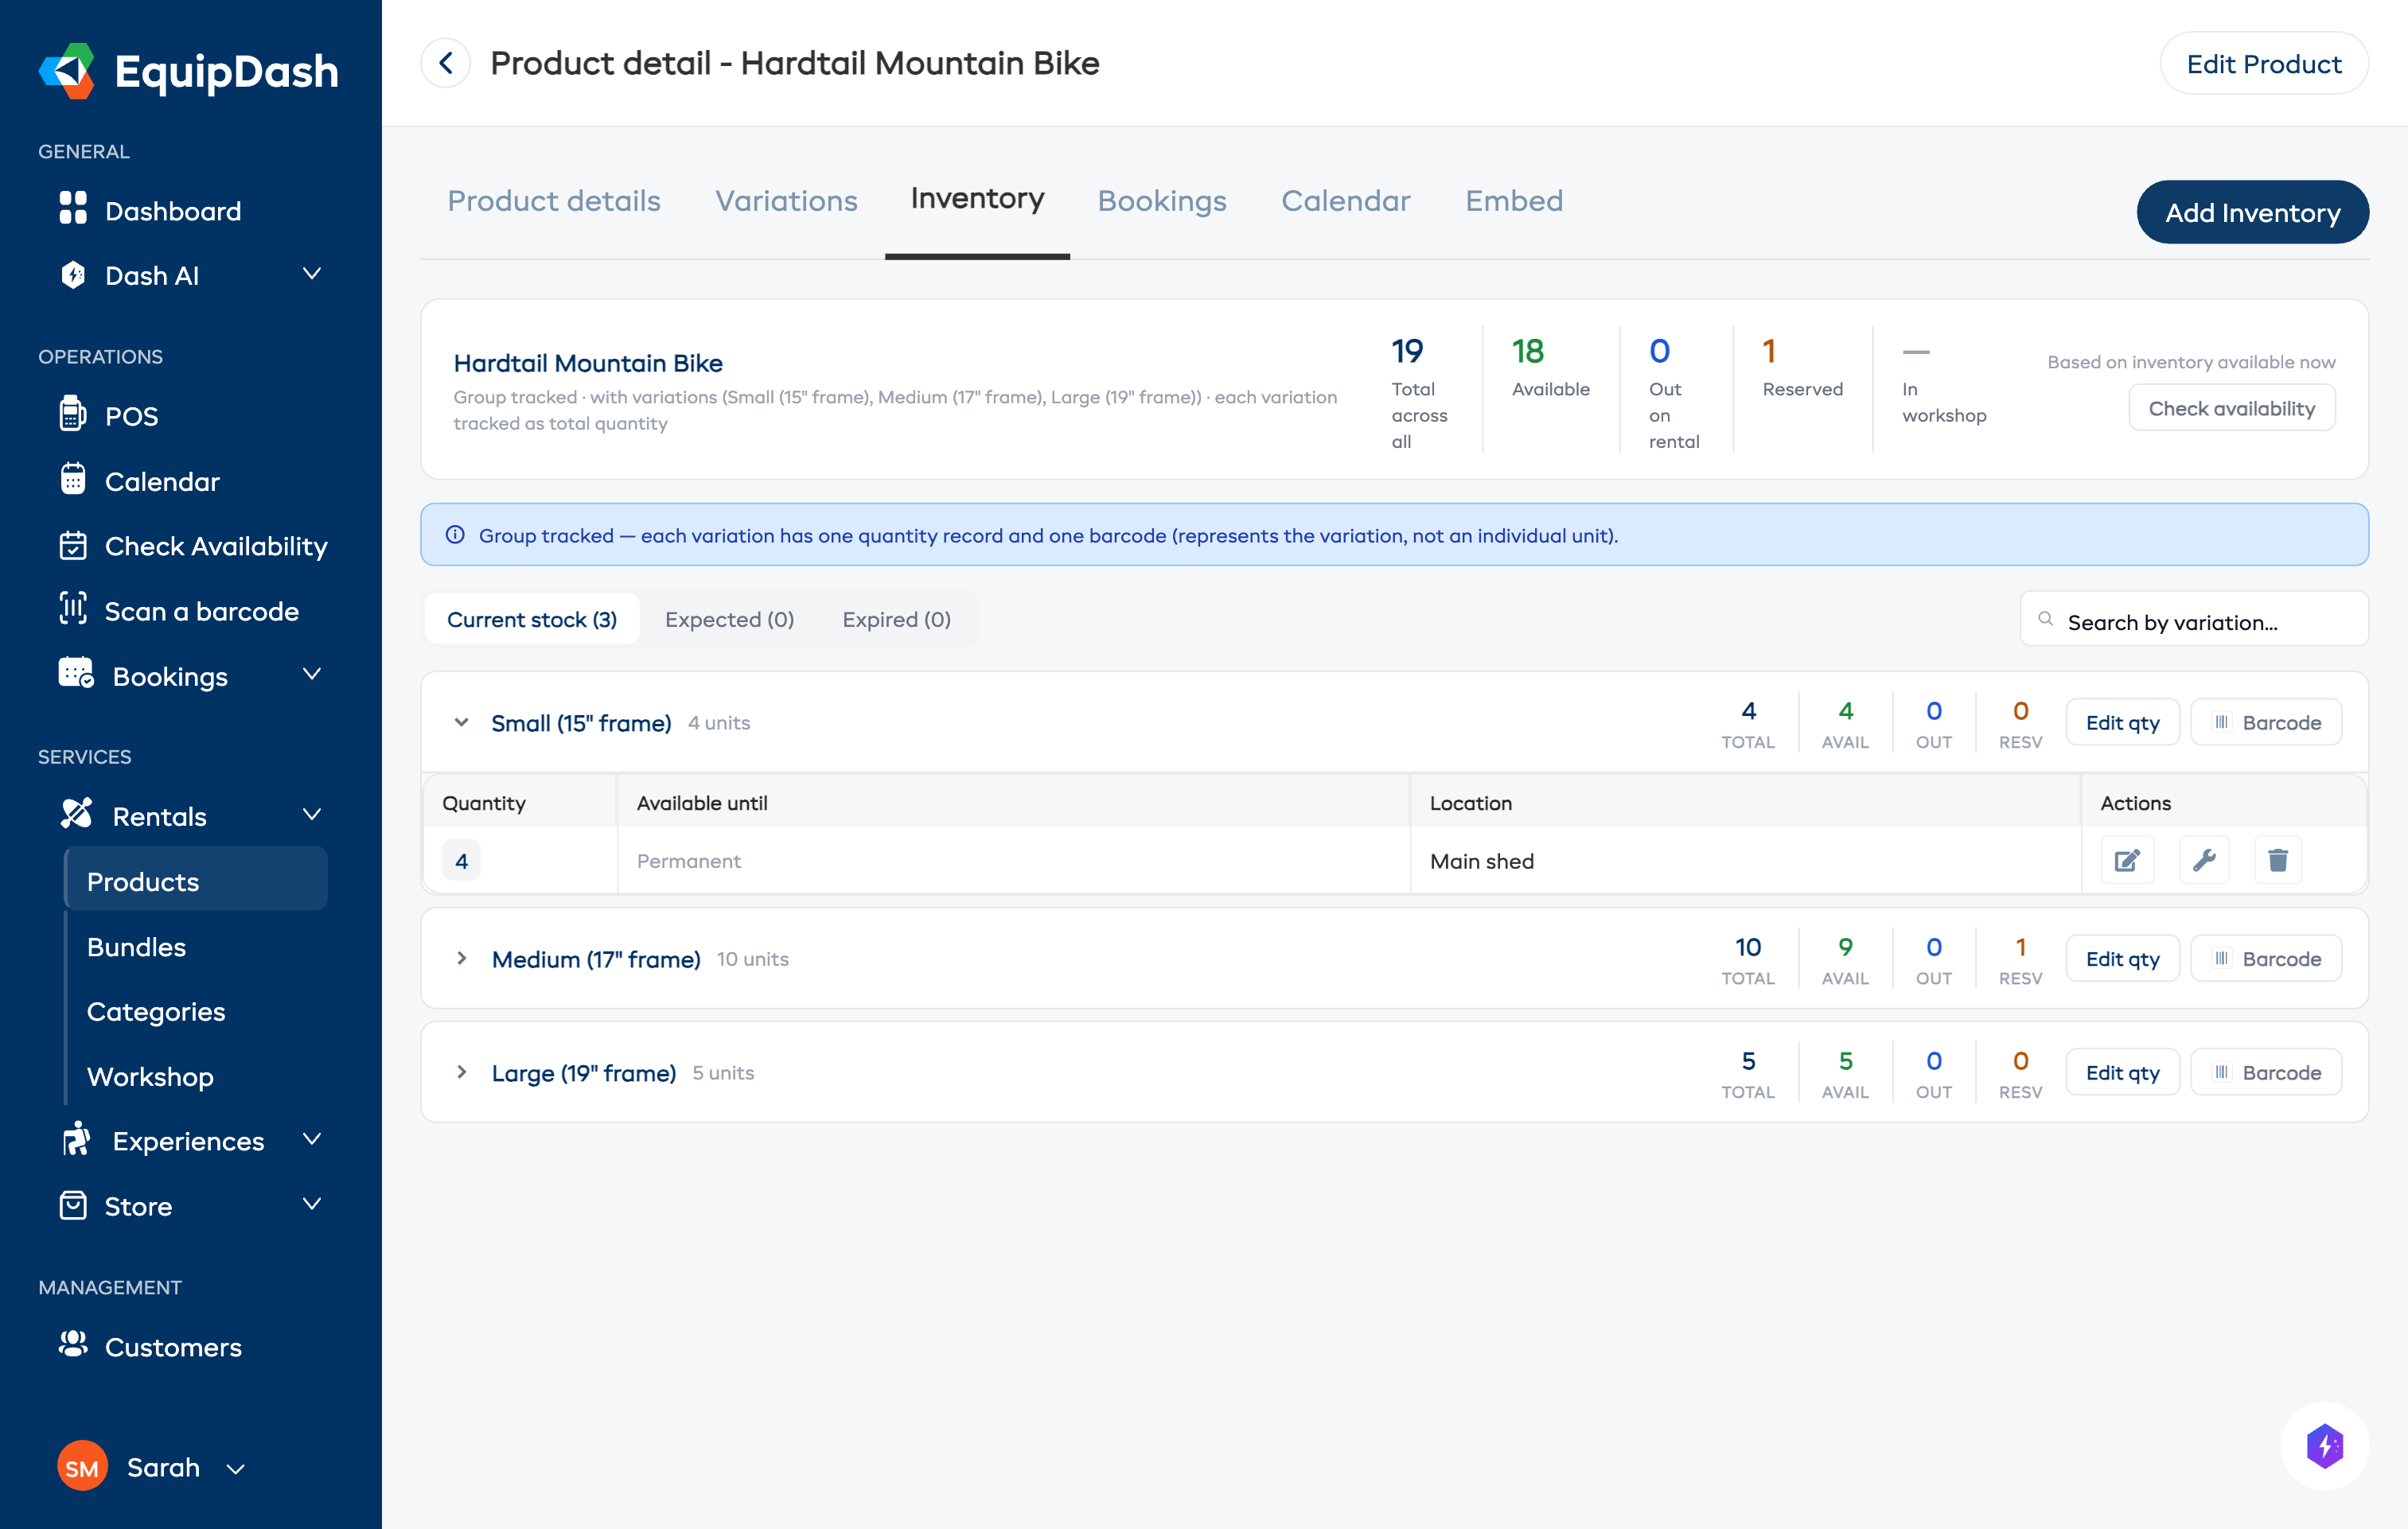
For products where you track the total, the Inventory tab shows summary cards for each variation (or the product as a whole if there are no variations). Each card displays the Total, Available, Reserved, Picked up, and In workshop counts. Below the cards, a table lists each inventory entry with its status, quantity, and available-until date.
When you track each item
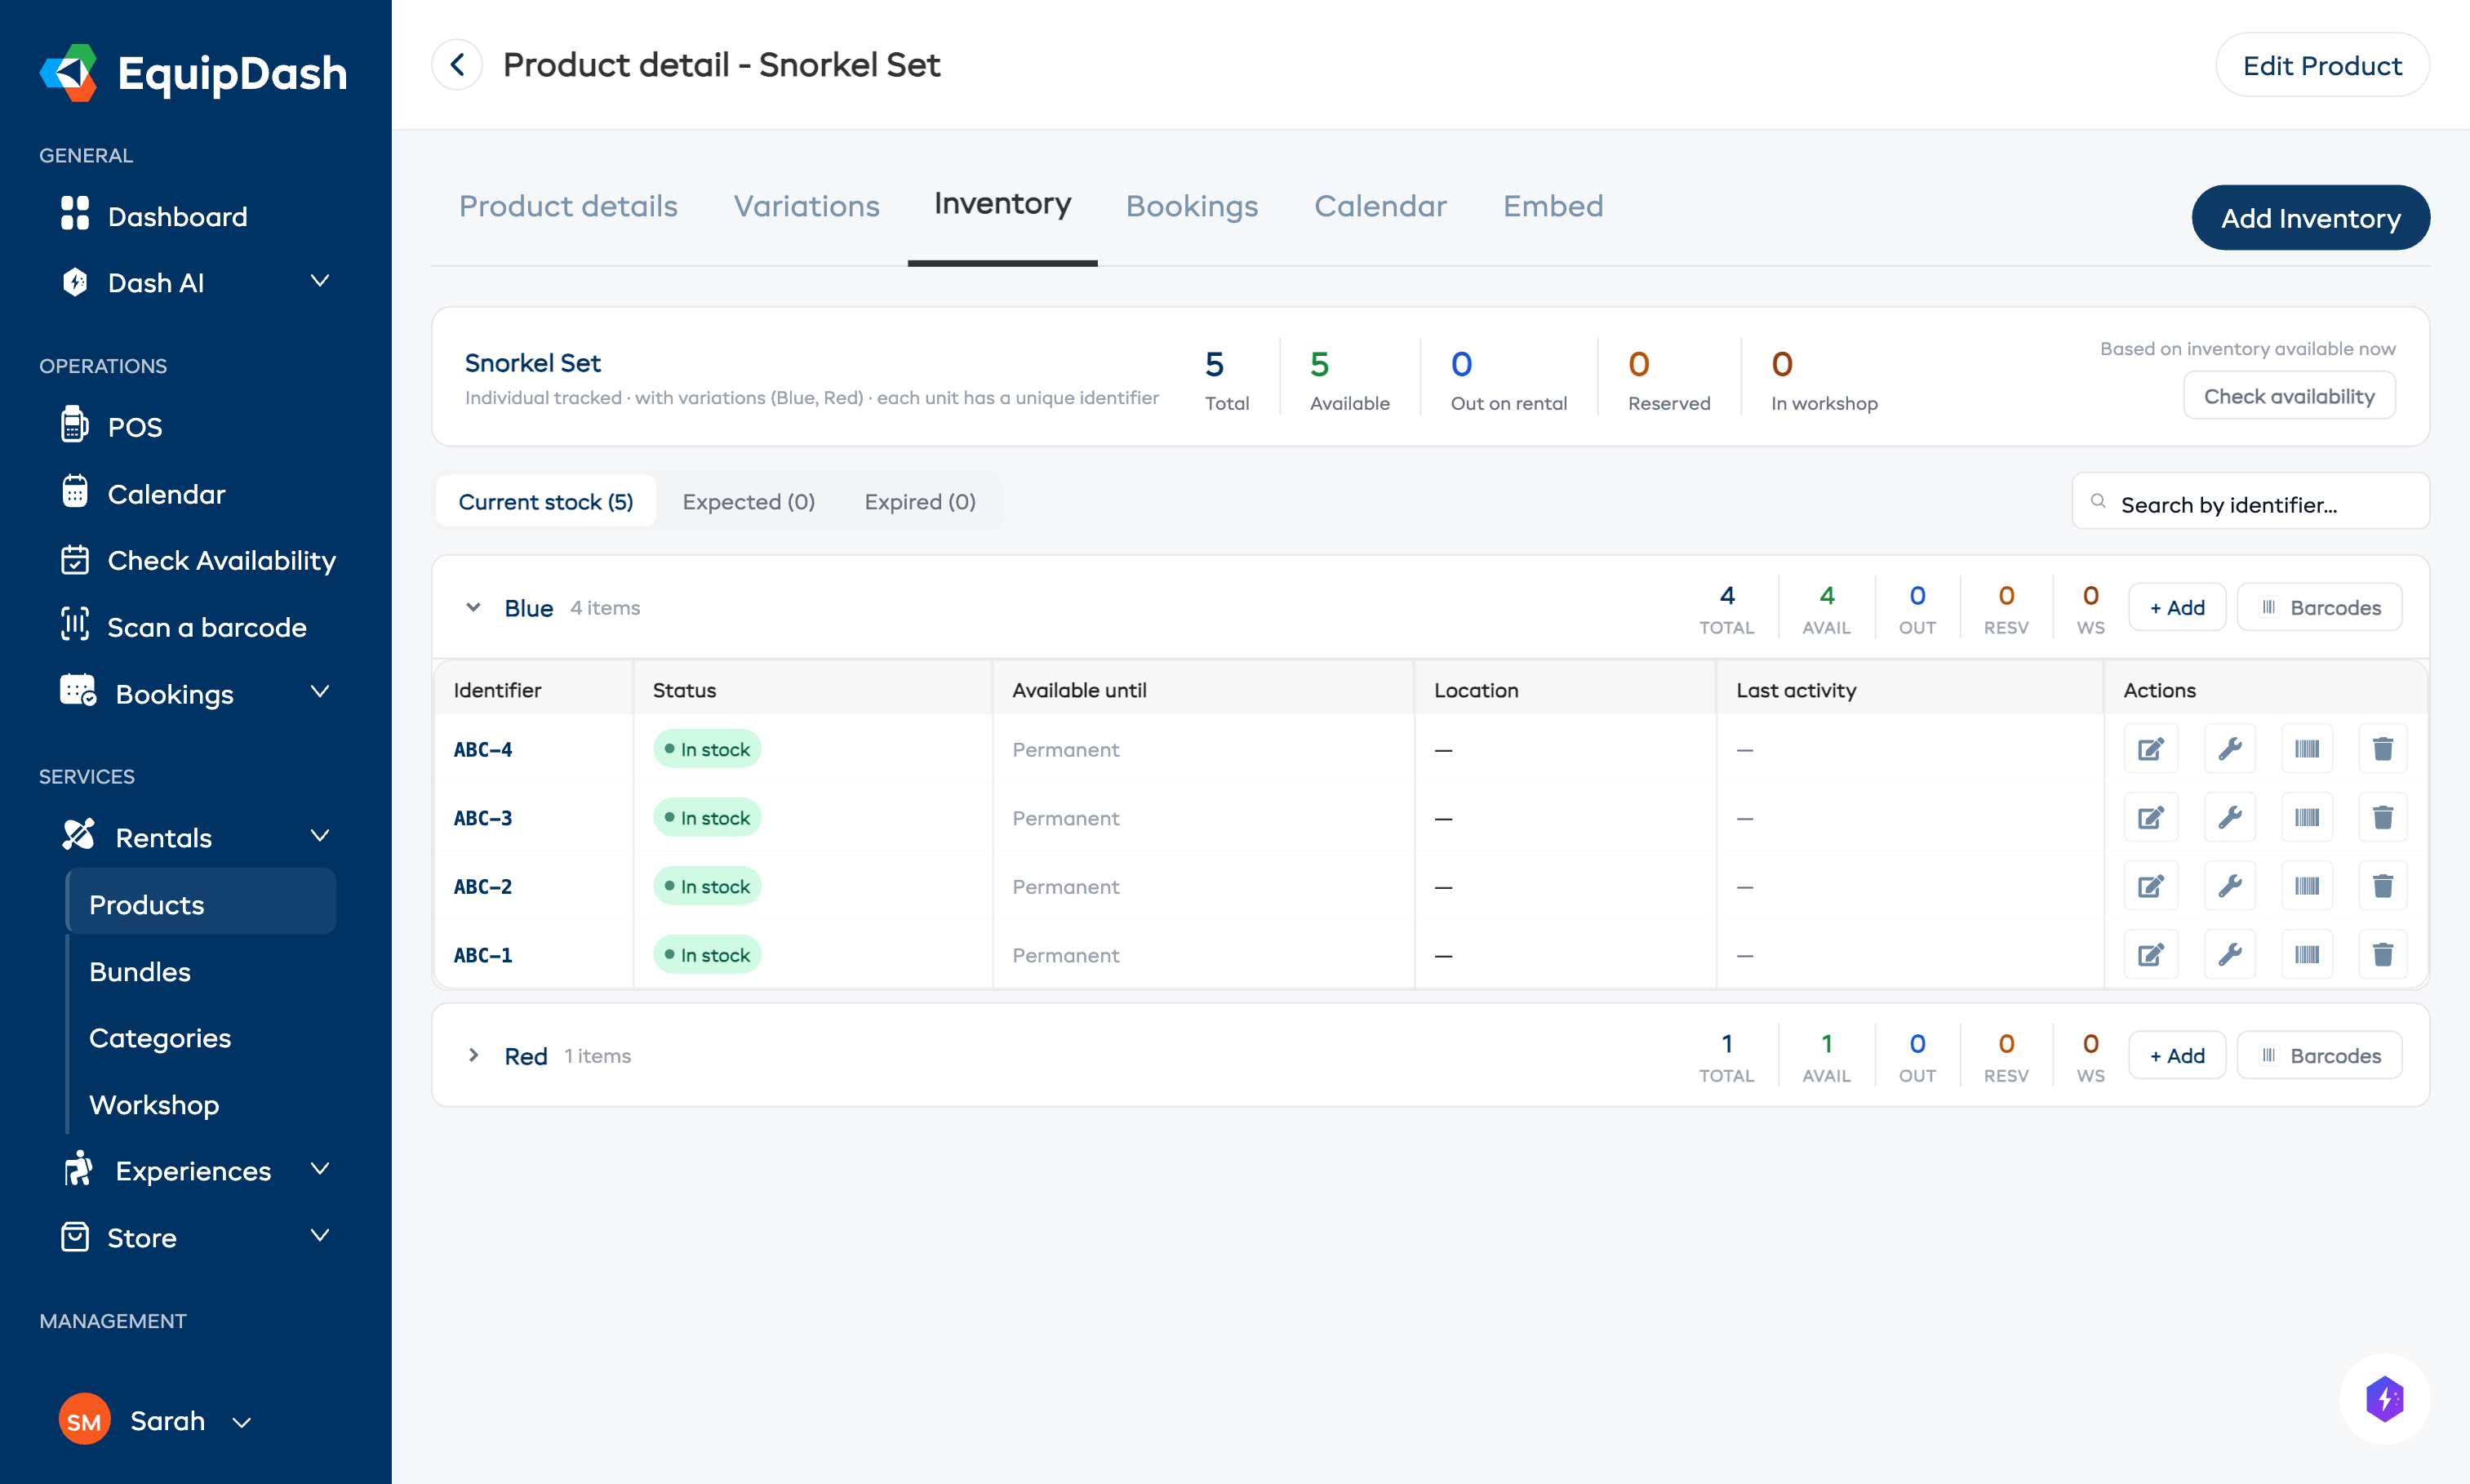
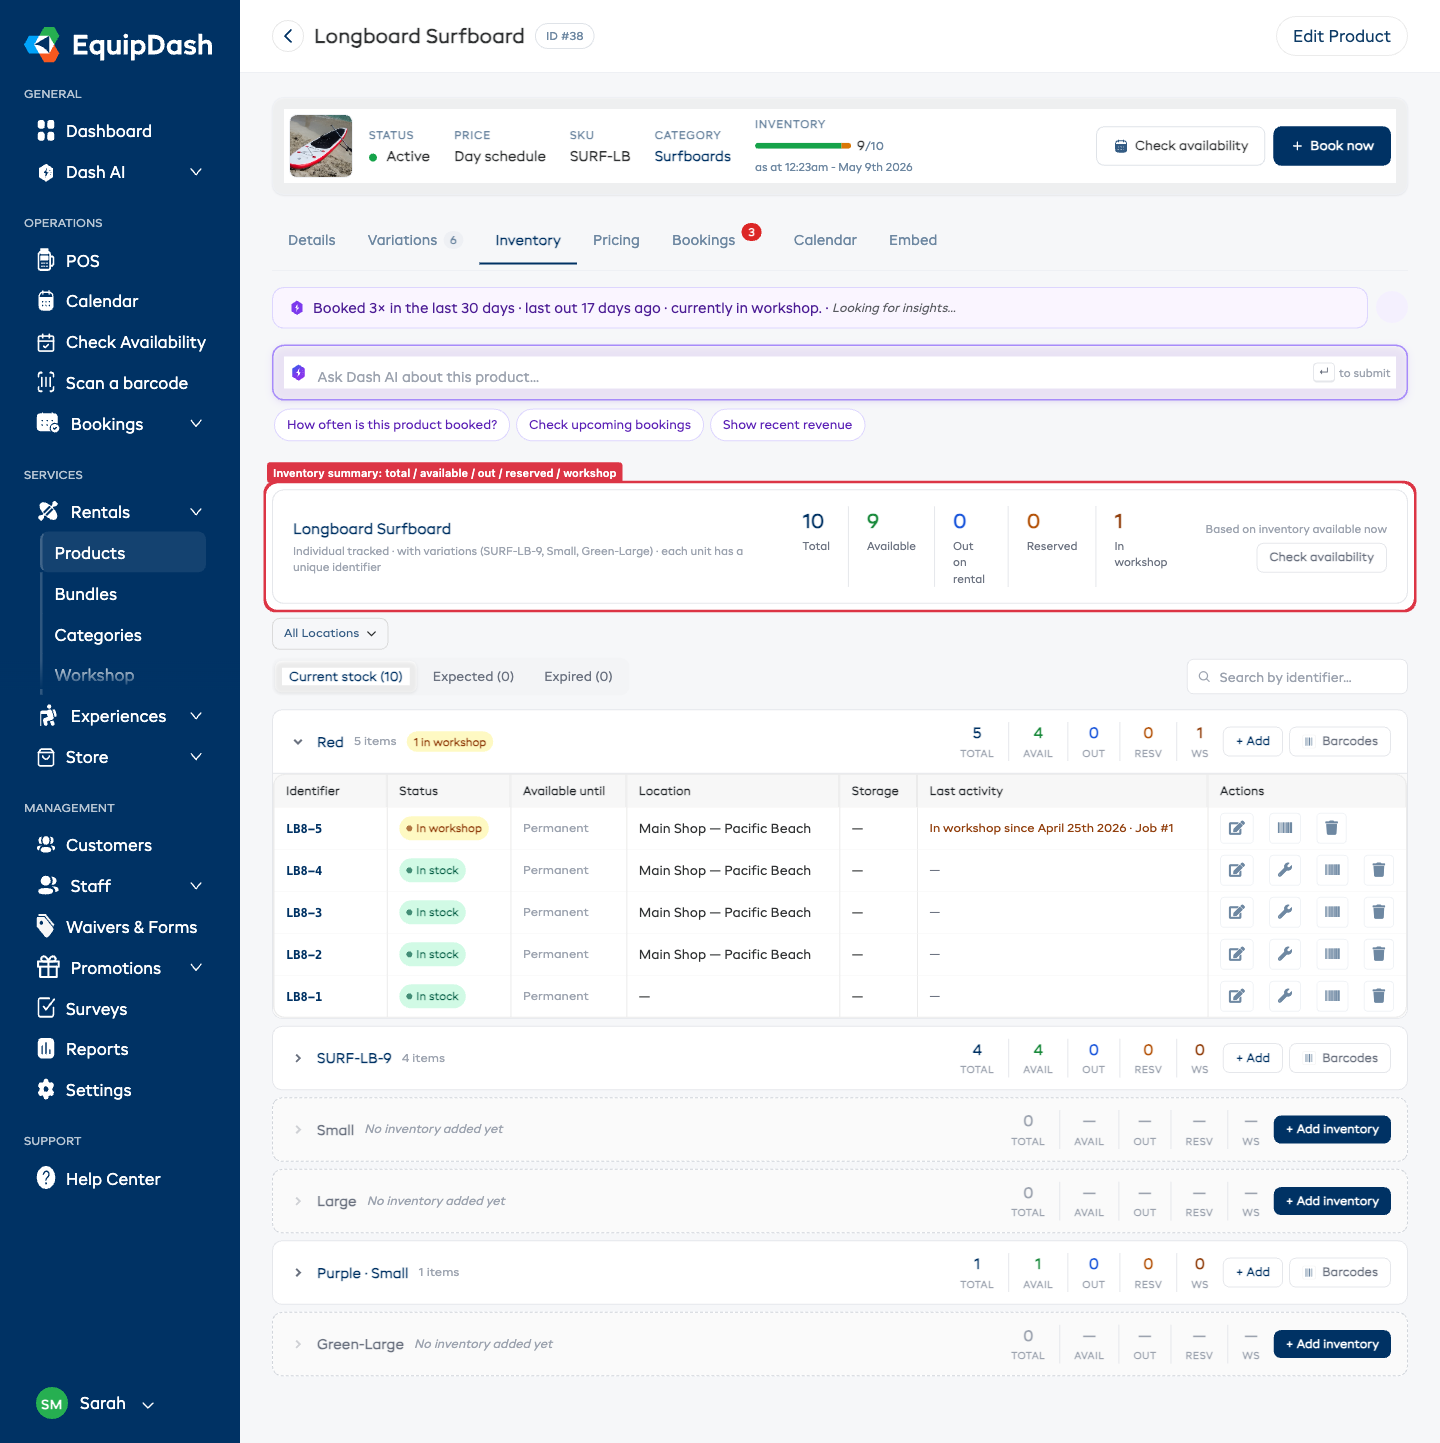
For products where each item is tracked, the Inventory tab shows a summary card with total counts, and below it a table listing every individual item. Each row shows the item's Identifier, Variation, Status, Available until, Location, and action buttons for editing, managing barcodes, and deleting.
Adding Inventory
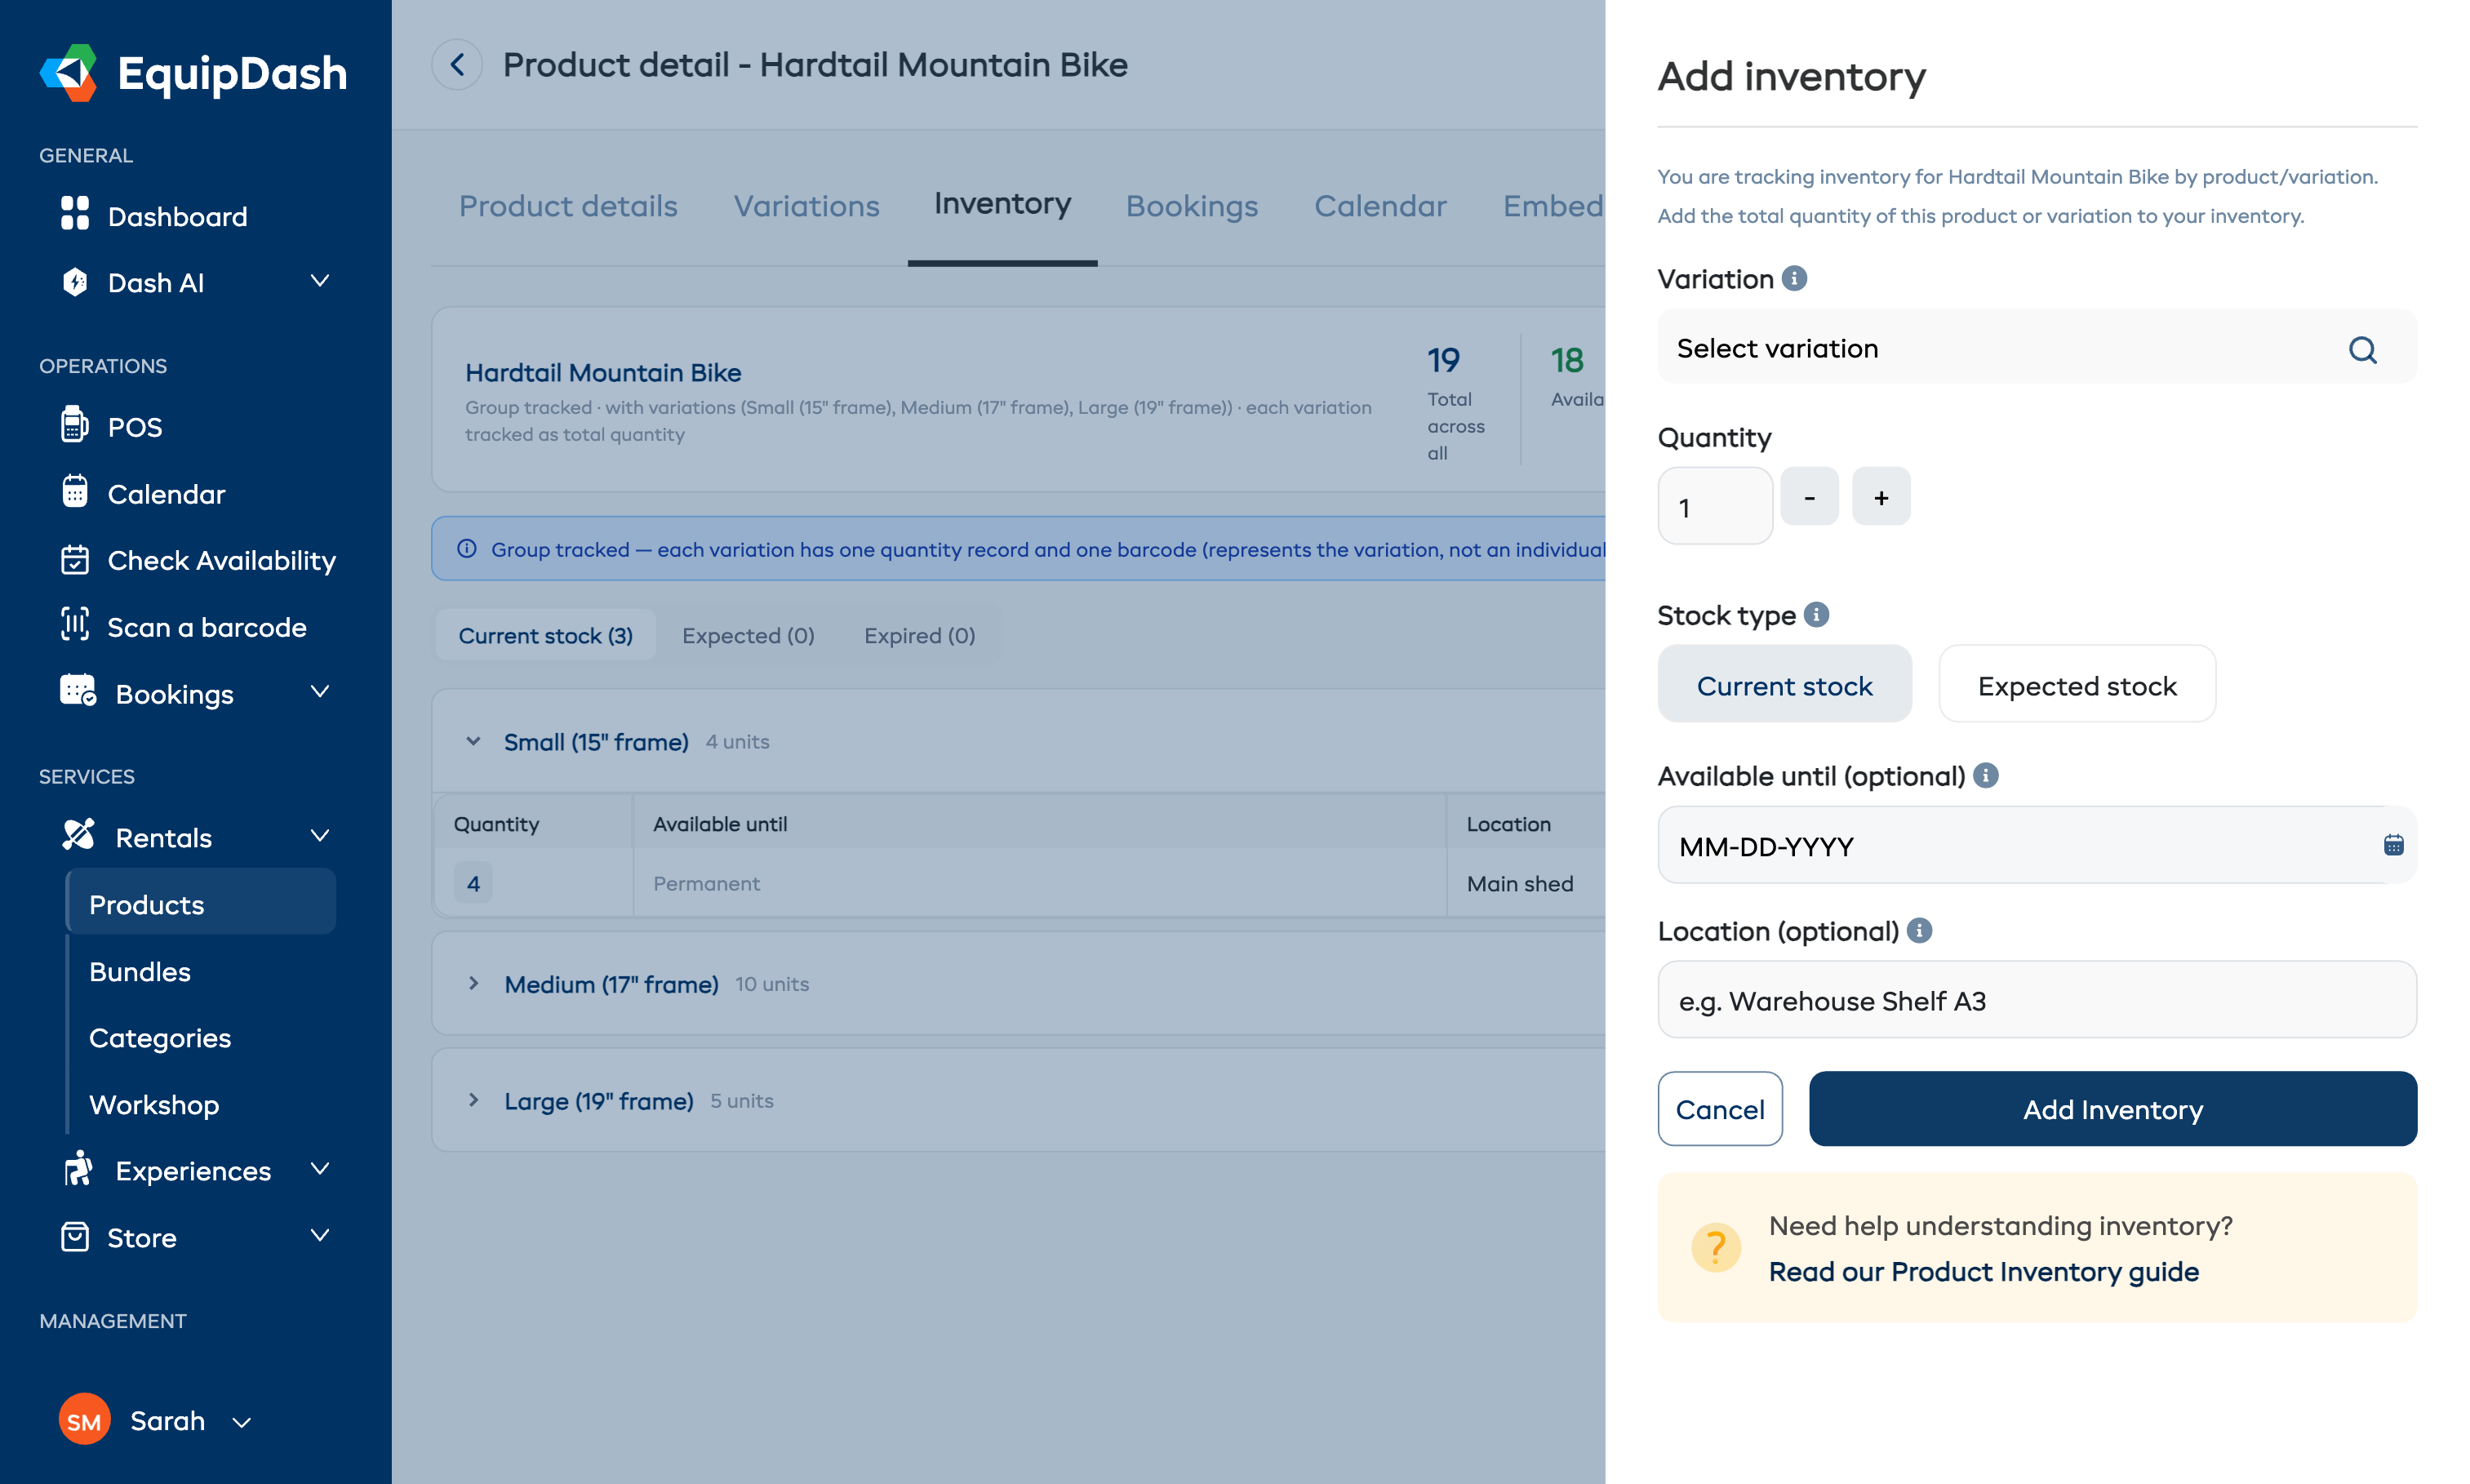
On the Inventory tab, each variation row has an inline + Add button on the right (and a + Add inventory button at the top of the table for products without variations). The form that appears depends on the answer you gave to How do you want to track inventory?
Adding to a pooled count
- If the product has variations, select the Variation from the dropdown.
- Set the Quantity (the number of units to add).
- Choose the Stock type: Current stock (available now) or Expected stock (arriving later).
- Optionally set an Available until date if the stock is temporary (e.g., seasonal rentals).
- Optionally enter a Location (e.g., "Warehouse Shelf A3").
- To record what you paid, open Advanced settings at the bottom of the panel and fill in the Purchase cost per item and the Purchase date -- see Recording what an item cost.
- Click Add Inventory.
Adding individual items
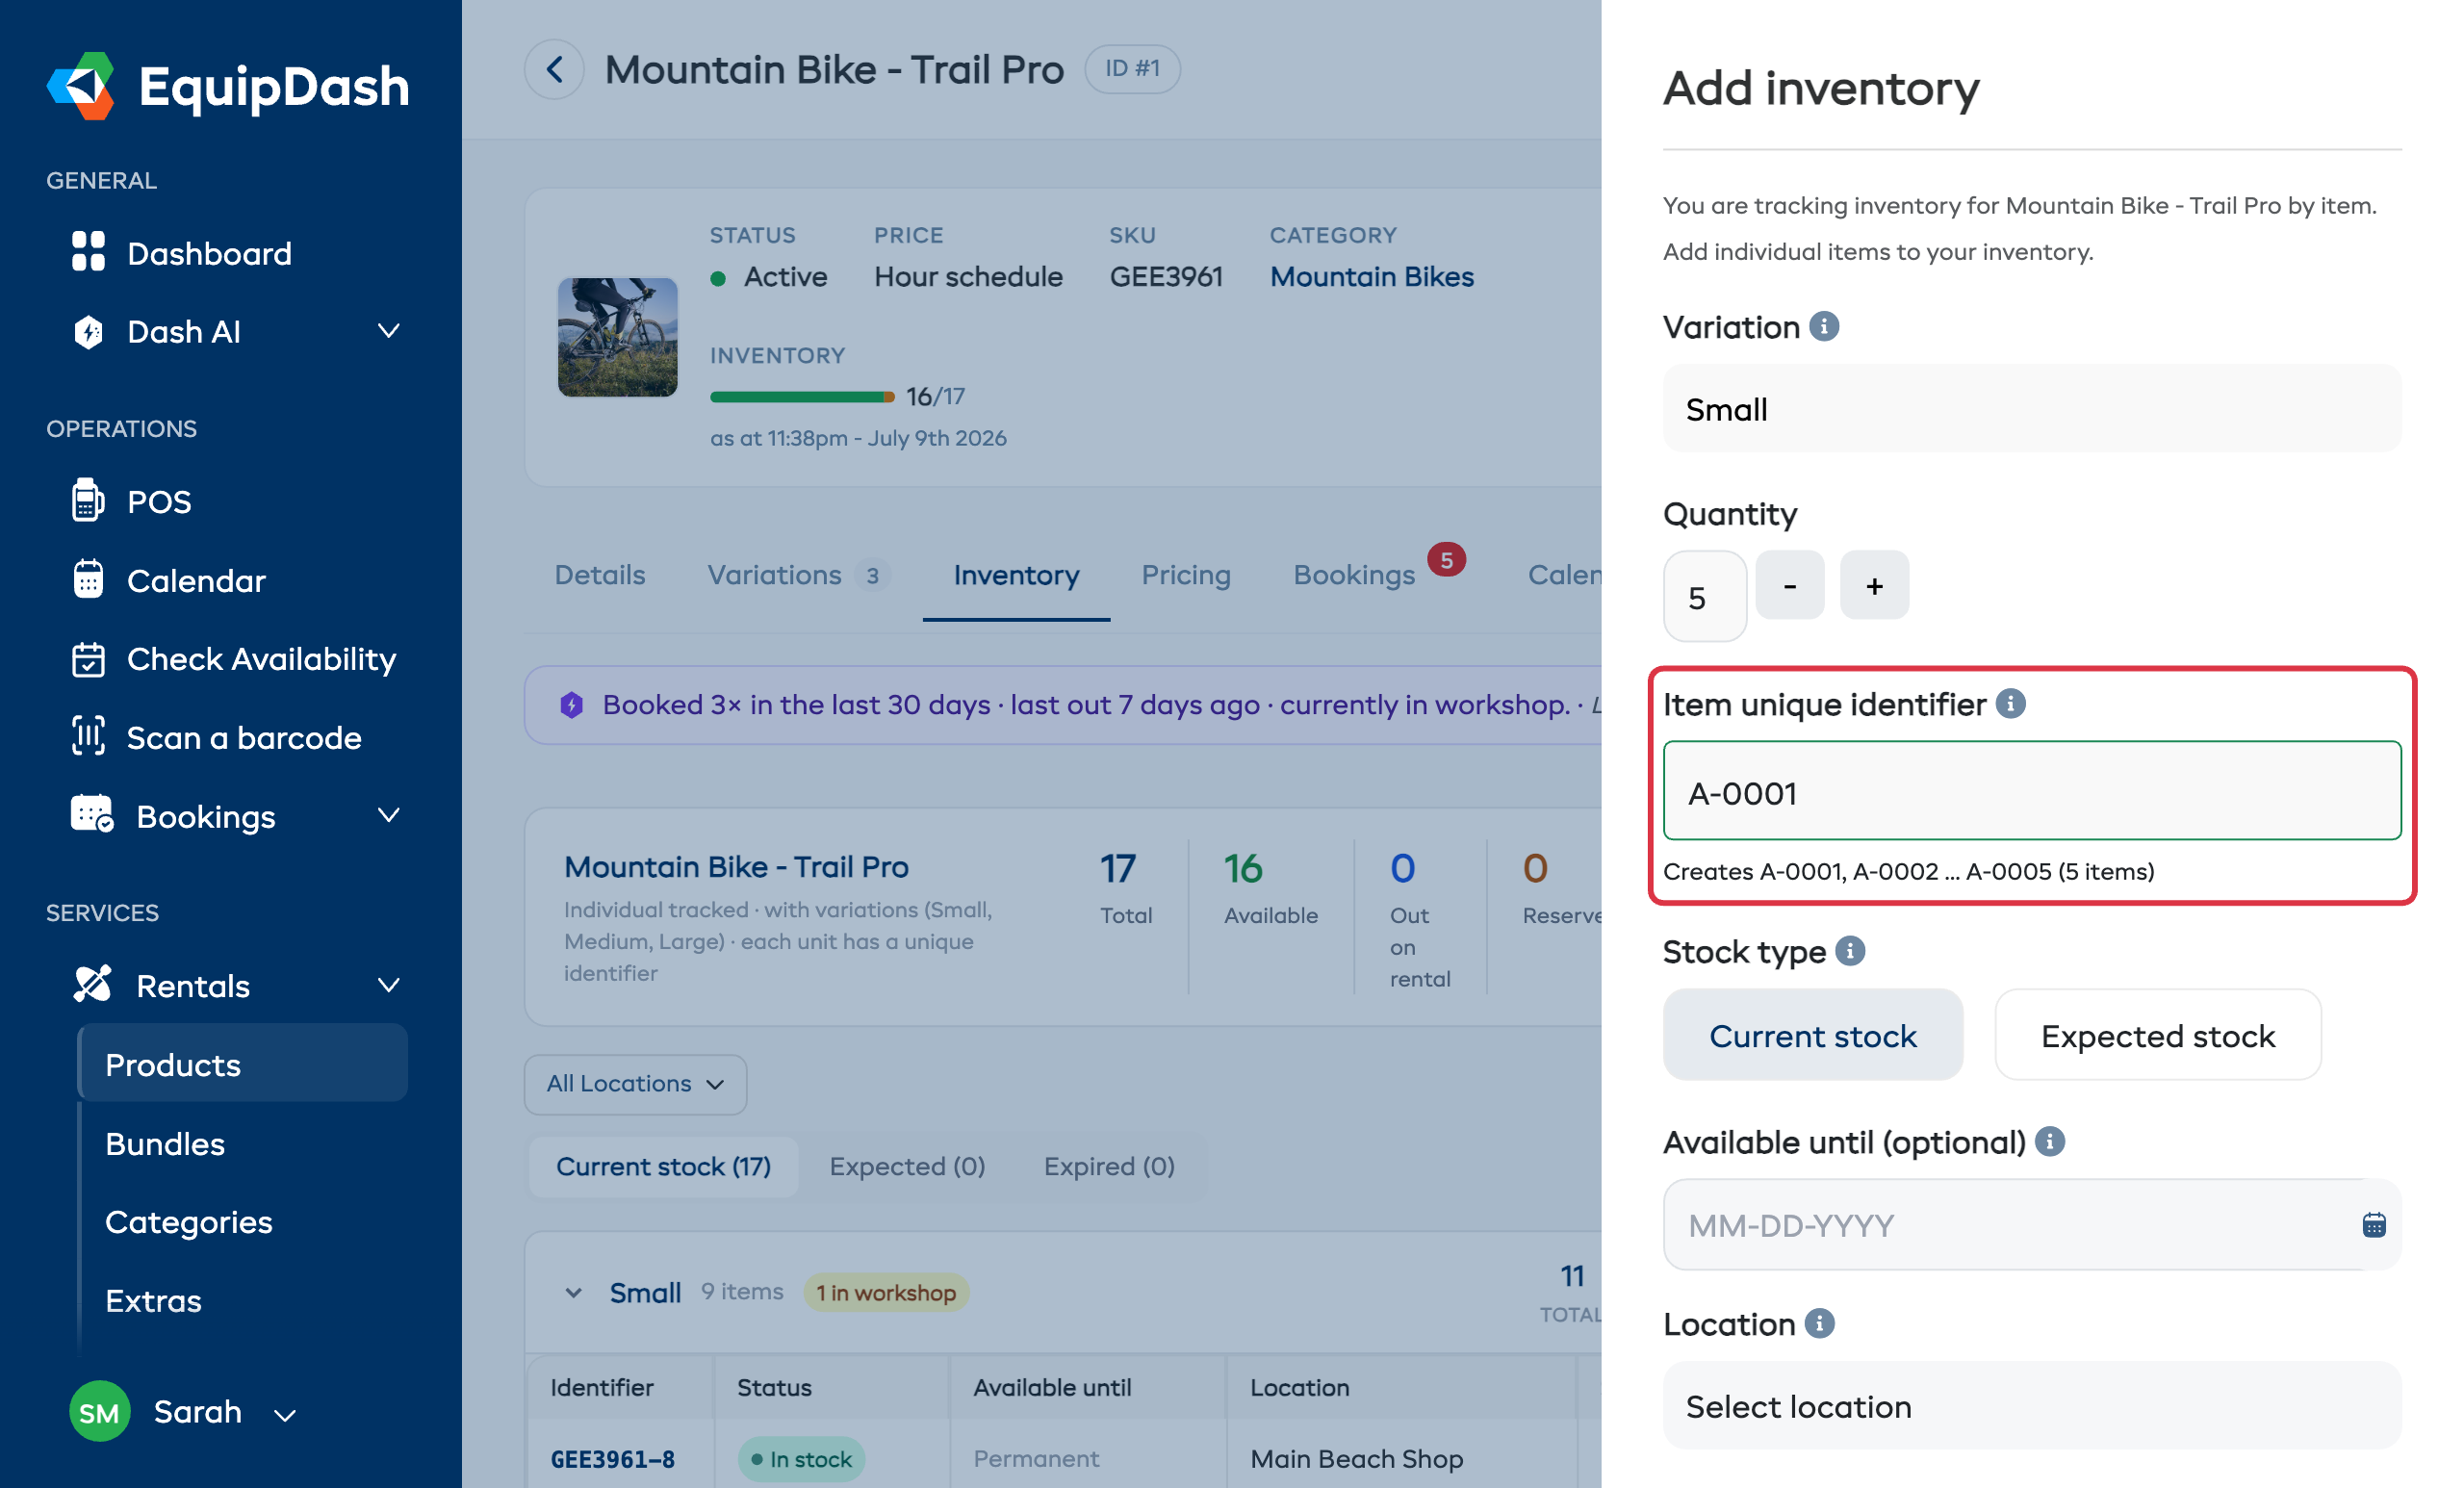
You give each item its own code. There are two ways to do it, and a live preview under the field always shows exactly what will be created:
- Let EquipDash number them. Type the code for your first item (e.g.
A-0001) and set a Quantity. EquipDash numbers the rest for you, keeping whatever padding you typed --A-0001,A-0002,A-0003, and so on. A single item (quantity 1) is saved exactly as you typed it, with no number added. - Type each code yourself. Paste a list of exact codes, one per line -- handy for real serial numbers from a spreadsheet. Each line becomes one item, saved exactly as written.
A number is only ever added when it's needed to keep two items apart. If a code is already in use, EquipDash tells you and leaves it out rather than creating a duplicate.
- Enter the Item unique identifier -- one code, or paste one per line. Check the preview shows what you expect.
- Set the Quantity when you're numbering a run from a single code.
- Choose the Stock type: Current stock or Expected stock.
- Optionally set an Available until date.
- Optionally enter a Location.
- Optionally toggle Add barcode? to automatically create a barcode for each new item.
- To record what you paid, open Advanced settings at the bottom of the panel and fill in the Purchase cost and the Purchase date -- see Recording what an item cost.
- Click Add Inventory.
Recording What an Item Cost
Most people never touch these, so they are tucked out of the way. In both the Add inventory and the Edit inventory panel, scroll to the very bottom and click Advanced settings -- it is the last thing in the panel, below every other field. Two optional fields open up:
| Field | What to enter |
|---|---|
| Purchase cost | What one of these cost you. Just the amount -- your currency symbol is already there |
| Purchase date | When you bought it. Leave it blank if you are not sure |
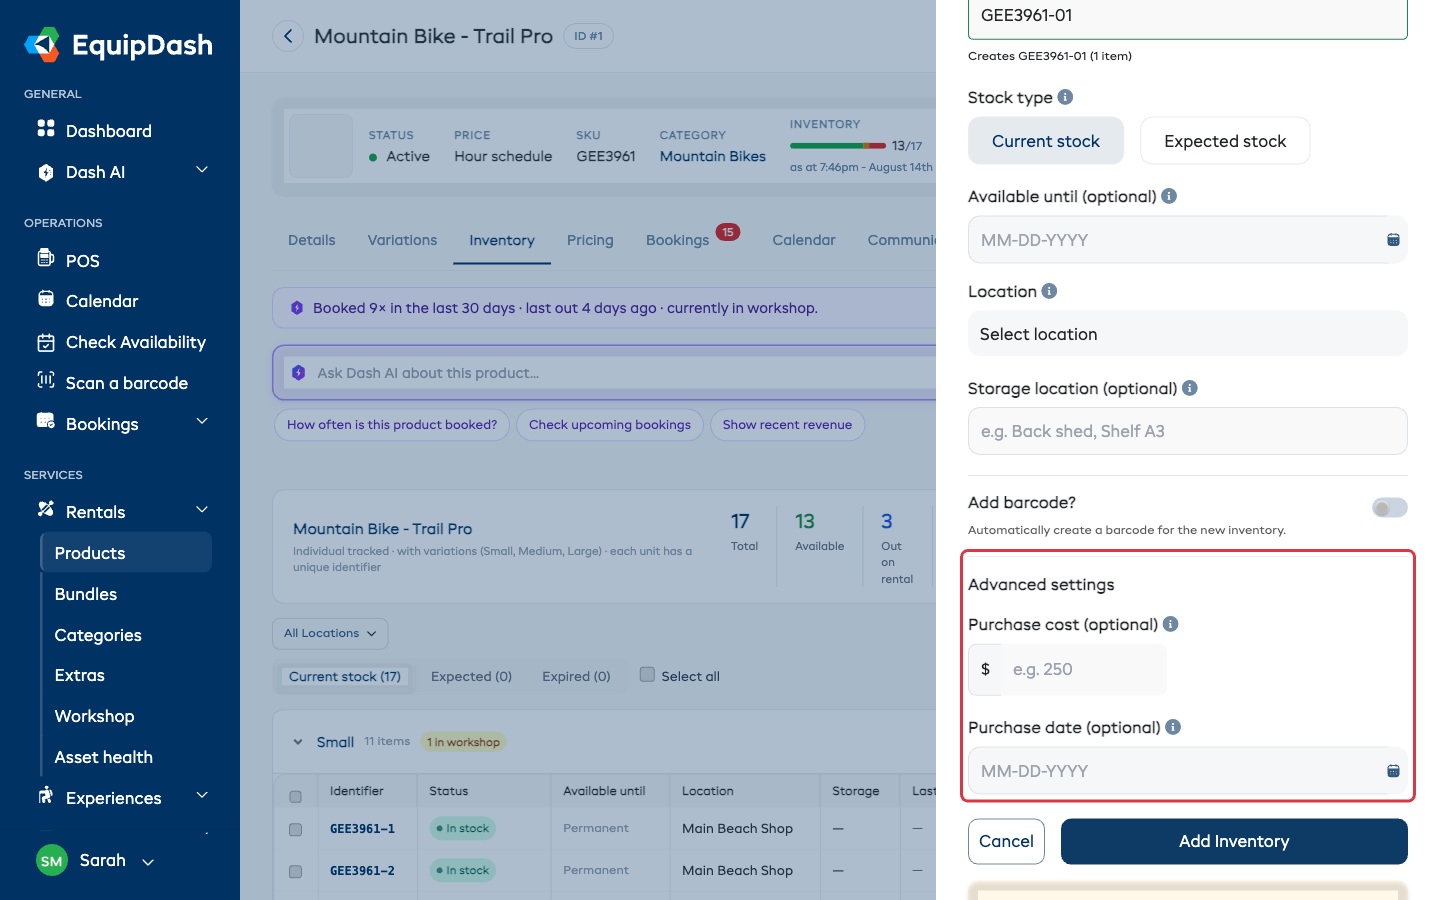
Click Advanced settings again to fold it away. When an item already has a cost recorded, the section opens by itself, so you never have to go looking for a figure you have already entered.
Both are optional, and neither affects your prices, your availability, or anything a customer sees. They feed the Return on investment report, which shows you whether an item has earned back what you paid for it yet.
Enter the cost of one item, not the whole batch. On products where you track each item, that is simply what that item cost. On products where you just track the total, the field reads Purchase cost per item, so a pool of 8 at 60 each is an outlay of 480.
Leaving the cost blank means "not recorded". The report shows a dash for it and never says the item has paid for itself. It is never treated as free.
You can add or change these at any time -- click the edit icon on an item in the Inventory tab and fill them in. Adding them later does not lose any history: the report works out what each item has earned from your existing bookings.
Updating Several Items at Once
For item-tracked products you can change many units in one go instead of editing them one at a time.
- On the Inventory tab, tick the checkbox next to each item you want to change. The checkbox at the top of a table selects everything in that group, and Select all in the toolbar selects every item shown on the page.
- Click Actions -- the button shows how many items are selected -- and pick what to do.
- Fill in the details and click Update (or Confirm when deleting).
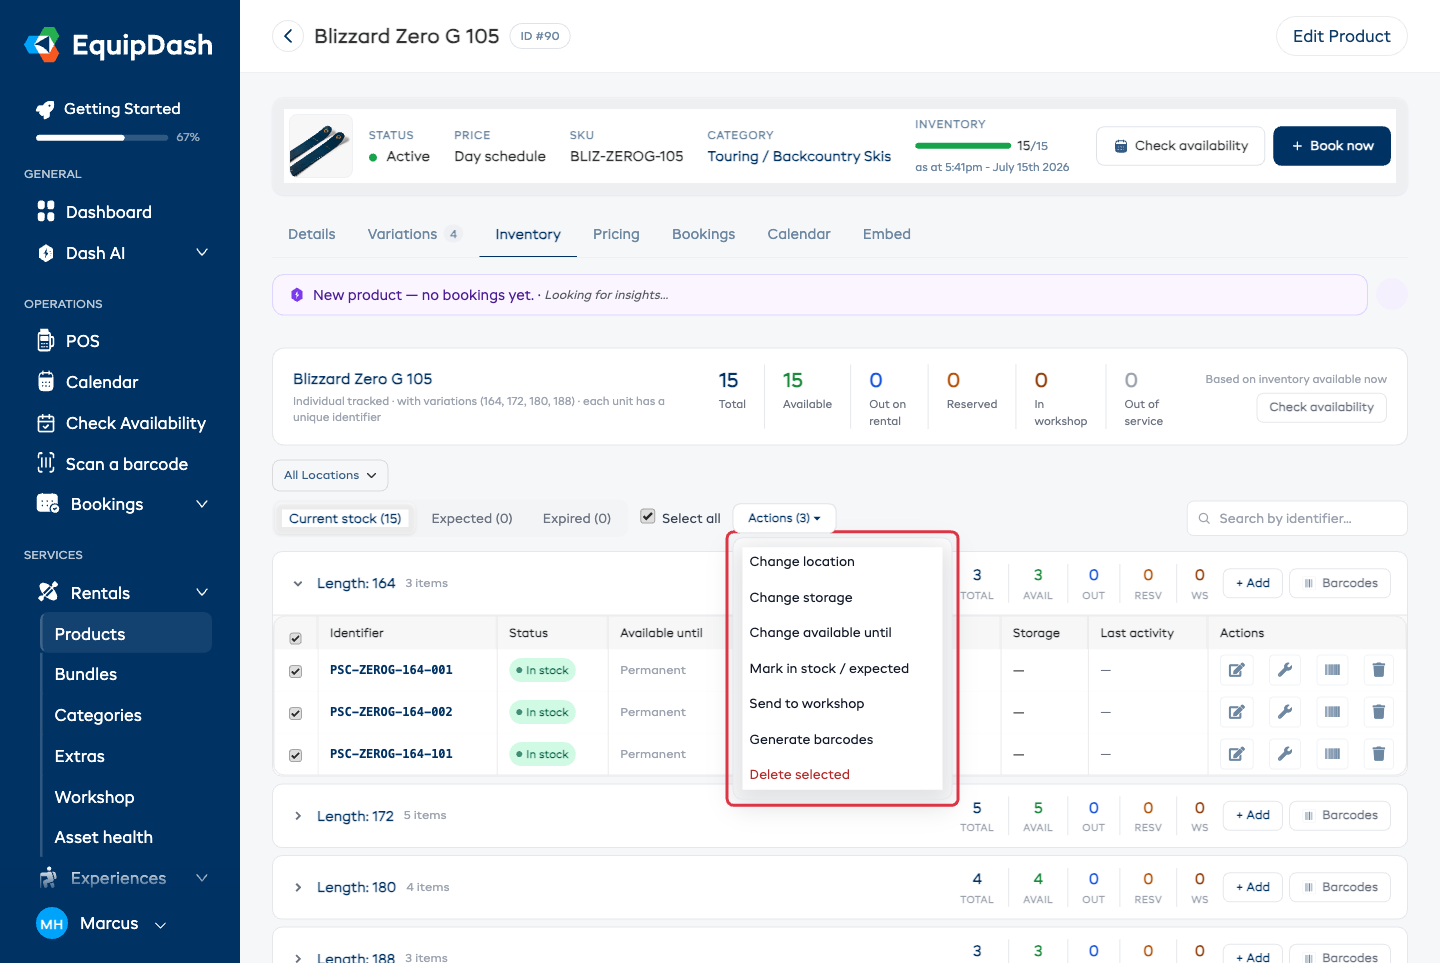
| Action | What it does |
|---|---|
| Change location | Moves the selected items to another of your locations. |
| Change storage | Sets the storage spot for the items (e.g., "Rack B, Shelf 3"). Leave the field empty to clear it. |
| Change available until | Sets the date the items stop being available to book, or choose No end date to keep them available permanently. |
| Mark in stock / expected | Switches items between in stock now and expected -- arriving on a later date. |
| Send to workshop | Sends every selected item to the workshop with the same notes, reason, and schedule. Items already in the workshop are skipped. |
| Generate barcodes | Creates a barcode for each selected item that does not have one yet. |
| Delete selected | Deletes the selected items. Bookings holding a deleted item are moved to another available item, or flagged for you to review. |
After the change, a message confirms how many items were updated and whether any were skipped (for example, items that were already in the workshop).
Inventory Unit Statuses
When you Track each item, every unit can be in one of these statuses:
| Status | Meaning |
|---|---|
| Available | The item is in stock and ready to rent |
| Reserved | The item has been assigned to an upcoming booking |
| Picked Up | The item is currently out with a customer |
| In Workshop | The item is undergoing maintenance or repair |
The status is updated automatically as bookings progress, or you can manually change it.
Inventory Unit Detail Page
Click on an inventory unit's identifier to open its detail page. Here you can see:
- The unit's identifier and variation (if applicable)
- Its current status
- A list of bookings associated with this unit (Bookings tab)
- A complete activity log showing every status change, workshop entry, and booking assignment (Activity Log tab)
- A condition reports history showing every condition assessment logged at pickup and return (Condition Reports tab)
- An availability checker to see when the item is free (Availability tab)
- Options to send to workshop or edit the unit
Condition Reports
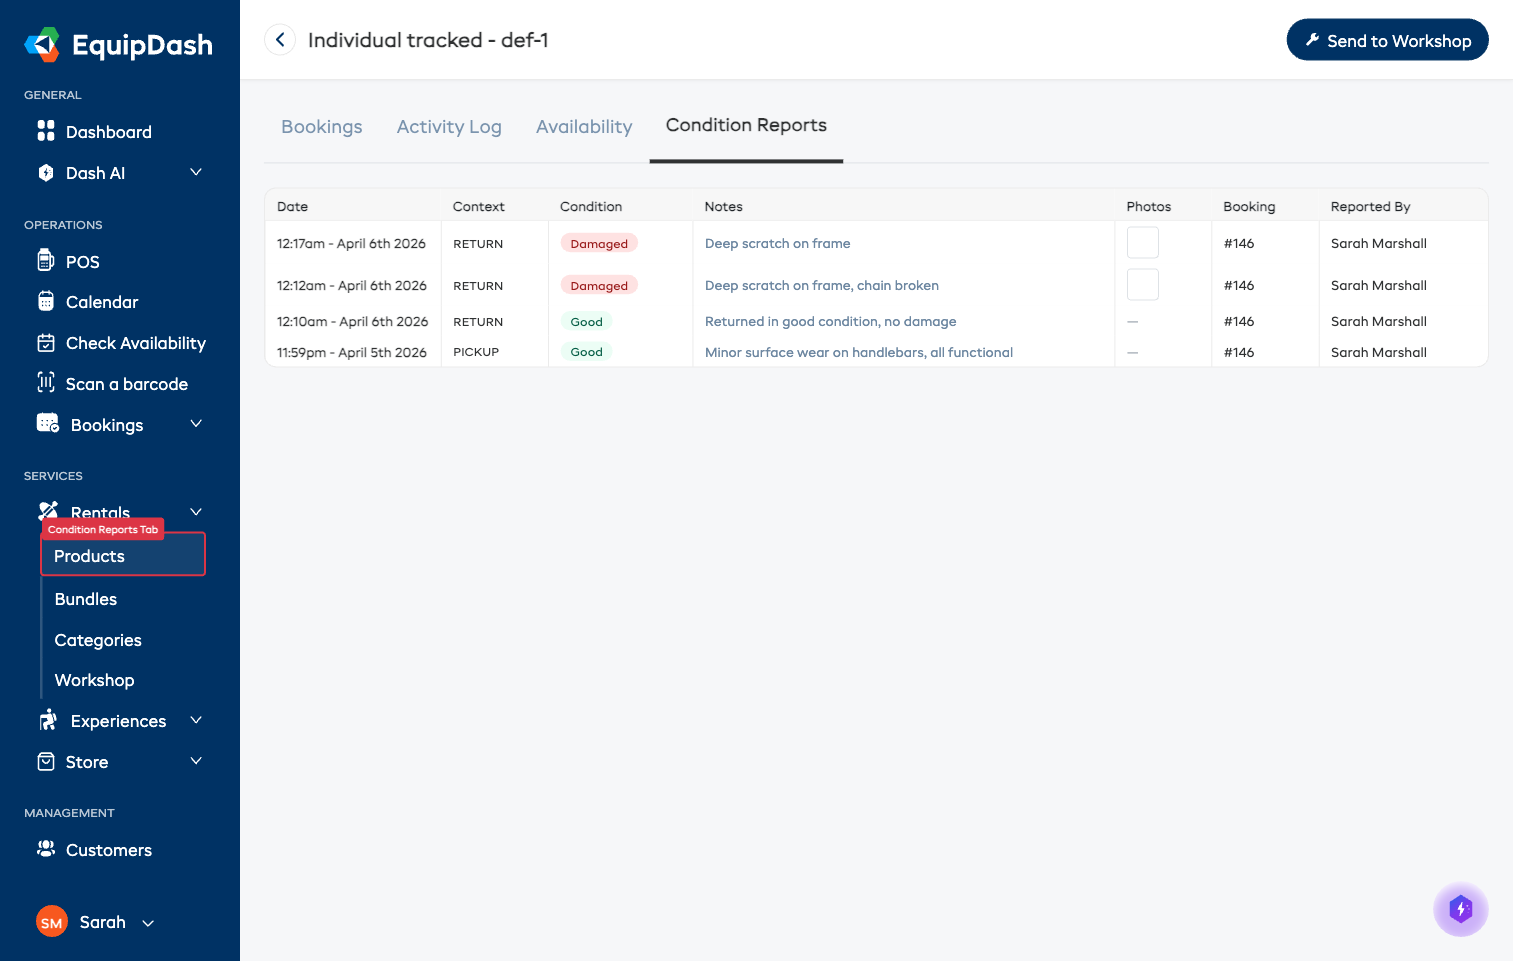
For item-tracked products, every condition assessment logged during pickup and return is stored against the specific inventory unit. Open the Condition Reports tab on the inventory unit detail page to see:
- Date the condition was logged
- Context -- whether it was at pickup or return
- Condition rating -- Excellent, Good, Fair, Poor, or Damaged
- Notes describing the condition
- Photos taken as evidence (click to view full-size)
- Booking reference linking back to the booking
- Staff member who logged the report
This history is useful for:
- Spotting items that get damaged frequently
- Tracking an item's condition over its lifetime
- Supporting insurance claims with documented evidence
- Identifying customers who consistently return items in poor condition
Maintenance History
For item-tracked products, each inventory unit keeps a record of every workshop visit. On the unit's detail page, the activity log shows when the item was sent to the workshop, what checklists were completed during each visit, and when it was returned to available inventory.
If your team uses workshop checklists, completed checklist results are stored against the unit -- giving you a full maintenance history over time. This is useful for spotting items that need frequent repairs or verifying that routine inspections have been carried out.
Editing and Removing Inventory Units
- To edit a unit, click the edit icon on the inventory table or the detail page. You can update the identifier, and add or change the purchase cost and purchase date.
- To remove a unit, use the delete action. This is only possible if the unit has no upcoming bookings.
- To change or delete several units in one go, see Updating Several Items at Once.
Removing an inventory unit is permanent. If the unit has historical bookings, those records will no longer reference a specific unit.
Related Guides
- Return on Investment Report -- Seeing whether an item has earned back what it cost.
- Creating a Product -- Setting up inventory tracking during product creation.
- Product Variations -- Tracking inventory per variation.
- Booking Fulfillment -- Logging condition at pickup and return.
- How the Workshop Works -- Sending items for maintenance.
- Setting Up Barcodes -- Assigning barcodes to inventory units.
- Understanding Availability -- How inventory affects availability, and how to keep selling when you are sold out.