Product Pricing
Every rental product needs pricing to tell EquipDash how much to charge. Pricing has two settings: when prices apply (year-round or seasonal) and how prices are calculated (flat or schedule-based).
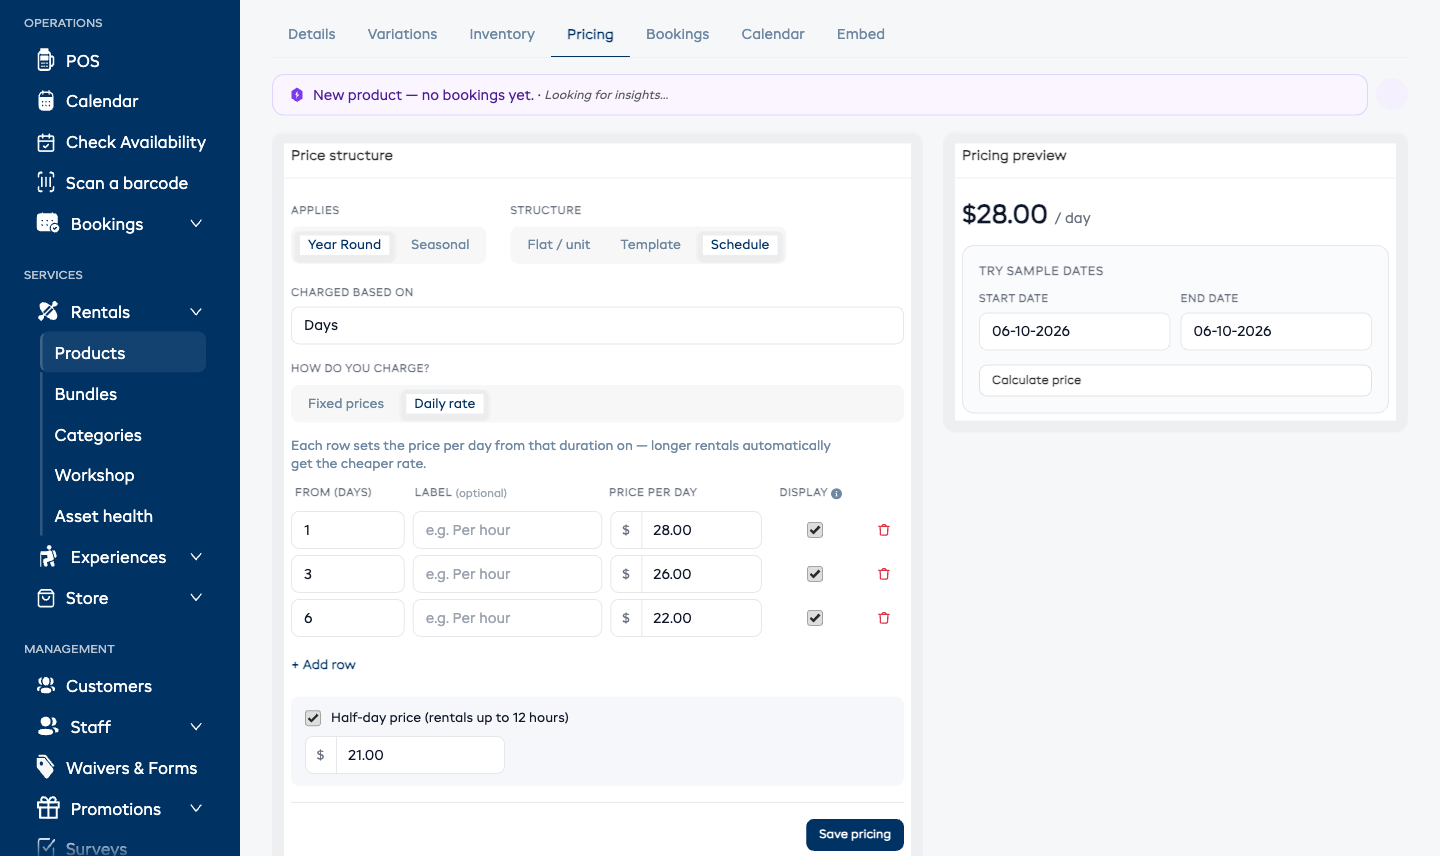
The Pricing tab on the product detail page is where you edit pricing inline, with a live preview pane on the right that shows what the customer will be charged for any sample date range.
Pricing Options at a Glance
| Setting | Options | Description |
|---|---|---|
| Applies | Year Round, Seasonal | Whether the same prices apply all year or change by season |
| Price structure | Flat / Unit Based, Schedule Based | Whether you charge a single rate or tiered rates |
| Per unit (flat) | 15 Minutes, Half Hour, Hour, Day, Week | The billing interval for flat rates |
| Charge based on (schedule) | Minutes, Hours, Days, Weeks | The base unit for schedule-based tiers |
| How do you charge? (schedule) | Fixed prices, Daily rate | Whether each schedule row is a total price for that duration, or a per-day rate that gets cheaper for longer rentals |
Opening the Pricing Tab
- Go to Rentals > Products and click the product name.
- Click the Pricing tab on the product detail page.
The left side of the tab is the Price structure card (the inline edit form). The right side is the Pricing preview card, where you can punch in any pickup and return date to see exactly what EquipDash would charge a customer.
Setting Up Flat Pricing
Flat pricing charges a single rate per time unit. For example, $10/hour, $50/day, or $200/week.
- On the Pricing tab, set Applies to Year Round.
- Set Structure to Flat / unit.
- Enter the Price amount.
- Select the Per unit dropdown (15 Minutes, Half Hour, Hour, Day, or Week).
- Click Save pricing.
Example
If you set a price of $50/day and a customer rents for 3 days, the total will be $150.
Setting Up Schedule-Based Pricing
Schedule pricing lets you set custom prices for different durations. For example, $45 for 1 day, $120 for 3 days, $200 for 7 days. This is ideal when you want to offer better deals for longer rentals.
- On the Pricing tab, set Structure to Schedule.
- Select the Charged based on unit (Minutes, Hours, Days, or Weeks).
- Add pricing tiers — each tier row has a duration, an optional Label, and a Price. Click + Add row to add more tiers. Durations can be fractional (for example
1,1.5,2hours) — a rental rounds up to the nearest tier it fits, so a 75- or 90-minute rental is charged your1.5-hour tier. - Optionally turn on Additional charge for time above the schedule to bill for time beyond your last tier, in a unit you choose — see Charging for extra time below.
- Click Save pricing.
How tiers work
When a customer books a product with schedule pricing, EquipDash finds the best combination of tiers. For example, if your tiers are 1 day = $45, 3 days = $120, and 7 days = $200, a 5-day rental would be charged as 3 days ($120) + 2 days at the daily fallback rate, rather than 5 × the 1-day price.
Charging in minutes
For sub-hour or non-round durations, set Charged based on to Minutes and enter whole-number tiers like 30, 60, and 90. Minute tiers price exactly — a 90-minute rental is charged the 90 tier, not rounded up to the next hour. On the customer price schedule they read as friendly durations — 30 minutes, 1 hour, 1h 30m — rather than a raw minute count.
Charging for extra time above the schedule
Your schedule covers set durations, but customers sometimes keep an item longer than your longest tier. Turn on Additional charge for time above the schedule (the toggle below the tier rows) to set a rate for that extra time — and choose the unit it's billed in.
The overflow unit is independent of the schedule, so it always reads the way you charge:
- A minute schedule (30 / 60 / 90 min) can charge overflow per hour.
- A weekly schedule can charge overflow per day.
- An hourly schedule can charge overflow per hour — the usual case.
Enter the amount and pick the unit — for example $10 per hour. Each started unit is charged: if a rental runs 90 minutes past your top tier and you bill per hour, that counts as 2 hours.
Leave this off and EquipDash instead repeats your schedule to cover the extra time.
Daily Rates That Get Cheaper for Longer Rentals
Many rental shops price like this: $28 a day, but only $26 a day if you rent 3 or more days, and $22 a day from 6 days. The customer always pays the rate times the number of days — a 4-day rental is 4 × $26 = $104, a 10-day rental is 10 × $22 = $220.
To set this up:
- On the Pricing tab, set Structure to Schedule and pick Days under Charged based on.
- Under How do you charge?, choose Daily rate. (The default, Fixed prices, keeps the classic behavior where each row is a total price.)
- Each row now reads "From X days → price per day". Add a row for each price break:
| From (days) | Price per day |
|---|---|
| 1 | $28.00 |
| 3 | $26.00 |
| 6 | $22.00 |
- Click Save pricing.
The last row's rate applies to any longer rental automatically, so there is no separate "additional charge" to configure. The customer booking page shows the rates as easy-to-read ranges — "1–2 days $28.00 / day", "3–5 days $26.00 / day", "6+ days $22.00 / day".
If a rate would ever make a longer rental cheaper in total than a shorter one, EquipDash shows a heads-up under the table so you can double-check the numbers before saving.
Half-day price
With Days selected, you can also offer a Half-day price — a lower flat price for shorter rentals. Tick Half-day price, set Half-day length to how many hours a half day covers for you (for example 4, 6 or 8 — it defaults to 12), and enter the amount. It appears as "Half day" at the top of the customer price schedule. A rental up to that many hours is charged the half-day price; anything longer is charged as a full day. The half-day option works with both Fixed prices and Daily rate.
Naming your tiers (optional)
By default the customer price schedule lists each tier by its raw duration — 1, 12, 24. The Label column lets you give a tier a friendlier name. Type a label like Per hour, Half day, or Full day and the price schedule shows the label, adding the exact duration in brackets when it adds context — Per hour (1 hour), Half day (12 hours). When the label already says the duration (a 2 Days tier, or a Full day on a 1-day tier), the bracket is dropped and it simply reads 2 Days or Full day. Leave the label blank and just the duration number is shown.
Labels are display only — they change how the tier reads to customers, never how it's priced. They appear everywhere the price schedule does (the booking widget and your point-of-sale screens), and are perfect for products where durations have well-known names, like a 1-hour / half-day / full-day rental.
Choosing Which Tiers Show on the Booking Page
Long schedules can clutter the customer booking page. On the Pricing tab, each tier row has a Display checkbox (hover the ⓘ next to the column heading for a reminder of what it does) that controls whether the tier appears in the price-schedule table on the widget. Uncheck the tiers you'd rather keep tucked away — for example, show only your most popular durations and hide the in-between ones.
- Tiers are shown by default, so existing products are unaffected.
- The customer page lists only the tiers you've left checked, with a View full price schedule link that expands the complete list for anyone who wants it.
- This is display only. Hidden tiers are still bookable and priced exactly the same — a customer can choose any duration and always pays the correct rate. You're only deciding what the price table shows at a glance.
If you uncheck every tier, the booking page falls back to showing the full schedule rather than an empty table.
Pricing Preview
The right side of the Pricing tab is a live preview pane:
- Pick a Start date and End date in the Try sample dates fields.
- Click Calculate price.
- EquipDash shows the calculated total at the top of the pane, broken down by tier.
This is a great way to verify your pricing is working as expected before going live — and to spot-check tier combinations after you change a tier.
Using a Pricing Template
If you have created reusable pricing templates in Settings > Rentals, you can apply one to a product instead of configuring pricing manually.
The Use Pricing Template toggle is available on the Pricing tab once a product has been created. It does not appear during initial product creation.
- Toggle Use Pricing Template on.
- Select a template from the dropdown.
- Optionally enter a Base Price that the template will use as its reference rate.
- The template's pricing structure will be applied to the product.
See Pricing Templates for more on creating and managing templates.
Changing Pricing Later
You can update pricing at any time:
- Open the product's Product Detail page.
- Click the Pricing tab.
- Edit the price form on the left and click Save pricing.
Existing bookings will keep their original pricing. Only new bookings will use the updated rates.
Related Guides
- How Pricing Works -- Overview of the pricing model.
- Pricing Templates -- Creating reusable pricing templates.
- Seasonal Pricing -- Setting up seasonal rates.