Booking Checklists
A booking checklist is the list of things your staff check as a booking happens. The simplest checklist is a single list completed at handover — "life jackets aboard", "brakes work", "fuel topped up". When one applies, the relevant Pick up or Check in action opens the checklist, your team works through it, and a failed critical item blocks the handover until it is resolved or overridden.
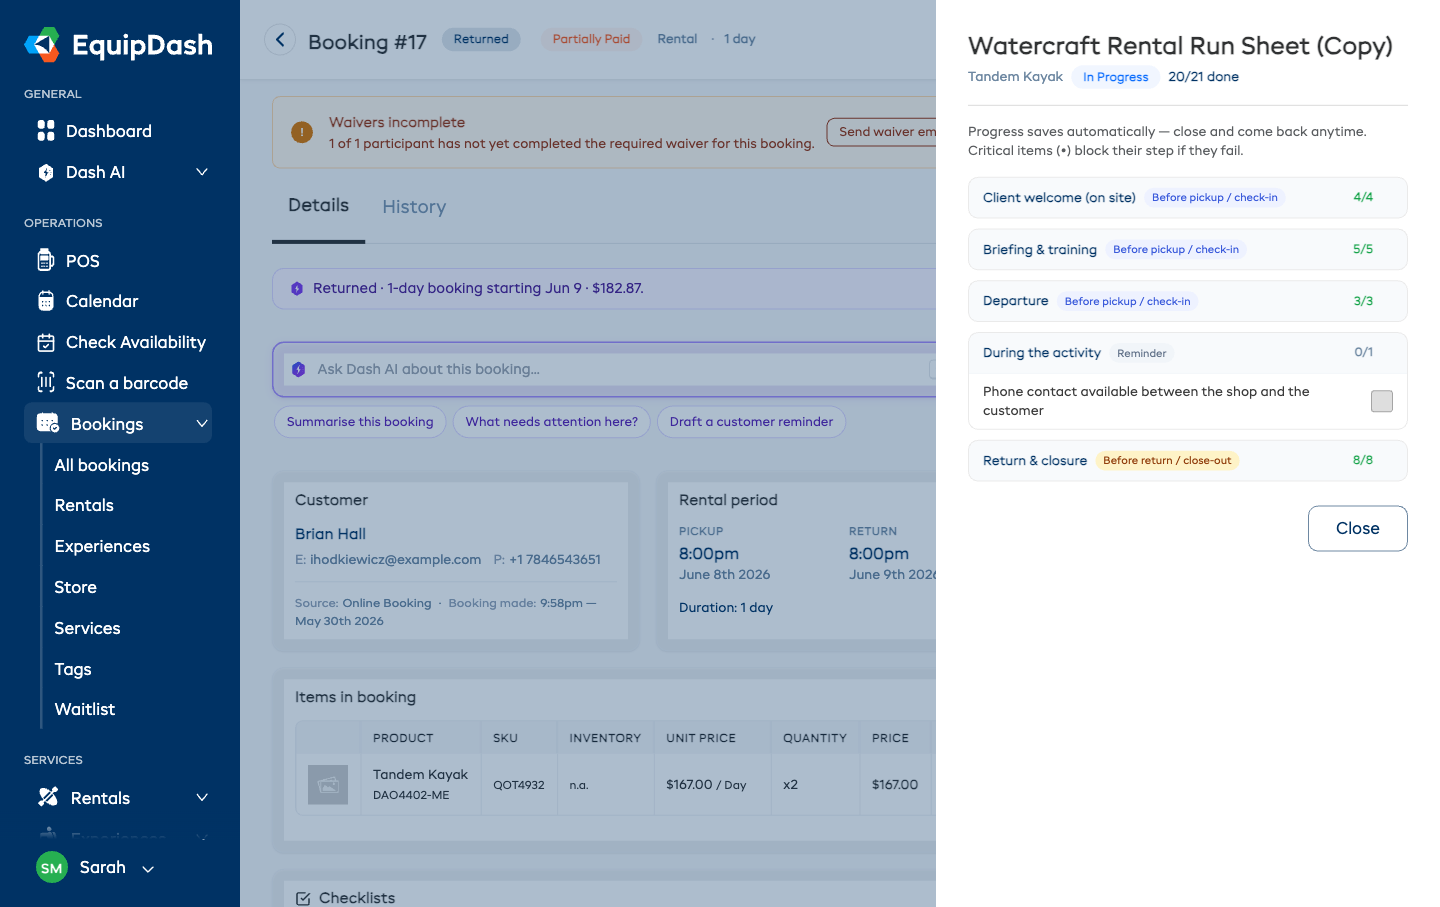
For operations with more steps — a jet-ski rental desk, a guided tour — a checklist can also be a run sheet: items grouped into sections that follow the booking from start to finish ("Client welcome", "Briefing & training", "Departure", "Return & closure"). Staff open it from the booking at any time, tick things off as the day progresses, and come back later — progress saves automatically. Each section controls what it blocks: items before pickup / check-in must be done before the customer takes the gear, items before return / close-out before the booking is closed, and reminder sections never block anything.
Booking checklists are built and managed entirely in one place — Settings → Booking checklists — and you decide which products and experiences each one applies to. There is no per-product or per-experience checklist toggle to remember: set up the checklist once, choose what it covers, and it runs automatically everywhere it should.
Booking checklists are entirely internal. Customers never see the checklist, the gate, or any override. It is a tool for your counter and front-of-house staff — it is not part of the booking widget or any customer-facing email.
These are two different things:
- Booking checklists (this page) run at handover — pickup or check-in — to confirm the gear is ready to go out to a customer.
- Workshop checklists run during servicing — to confirm gear has been maintained and is safe to put back into inventory.
They live in separate places and have separate libraries, so a maintenance checklist can never be picked as a handover gate, and vice versa.
Where Booking Checklists Live
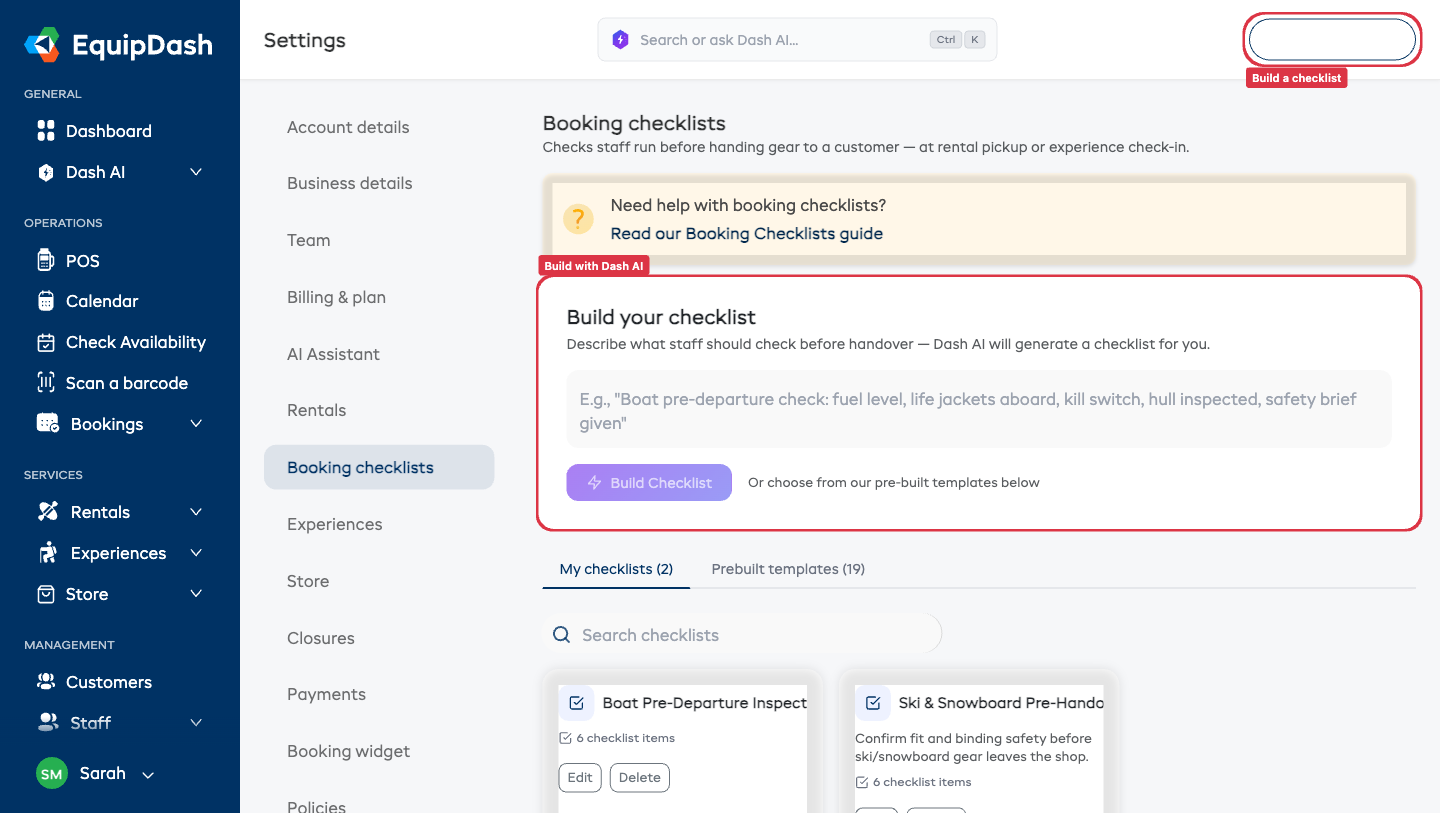
Go to Settings → Booking checklists. This is the home for everything: building checklists, using prebuilt templates, and choosing what each one applies to.
The page has two tabs:
- My checklists — checklists you have created, built with AI, or duplicated from a prebuilt template.
- Prebuilt templates — ready-made checklists from EquipDash covering common gear and activity types. Duplicate one to make it your own.
Creating a Checklist
- Go to Settings → Booking checklists.
- Click New Checklist in the top-right. A step-by-step panel opens.
Step 1 — Details
- Enter a Checklist name (for example, "Boat pre-departure check").
- Optionally add a Description explaining when staff should run it.
- Click Next.
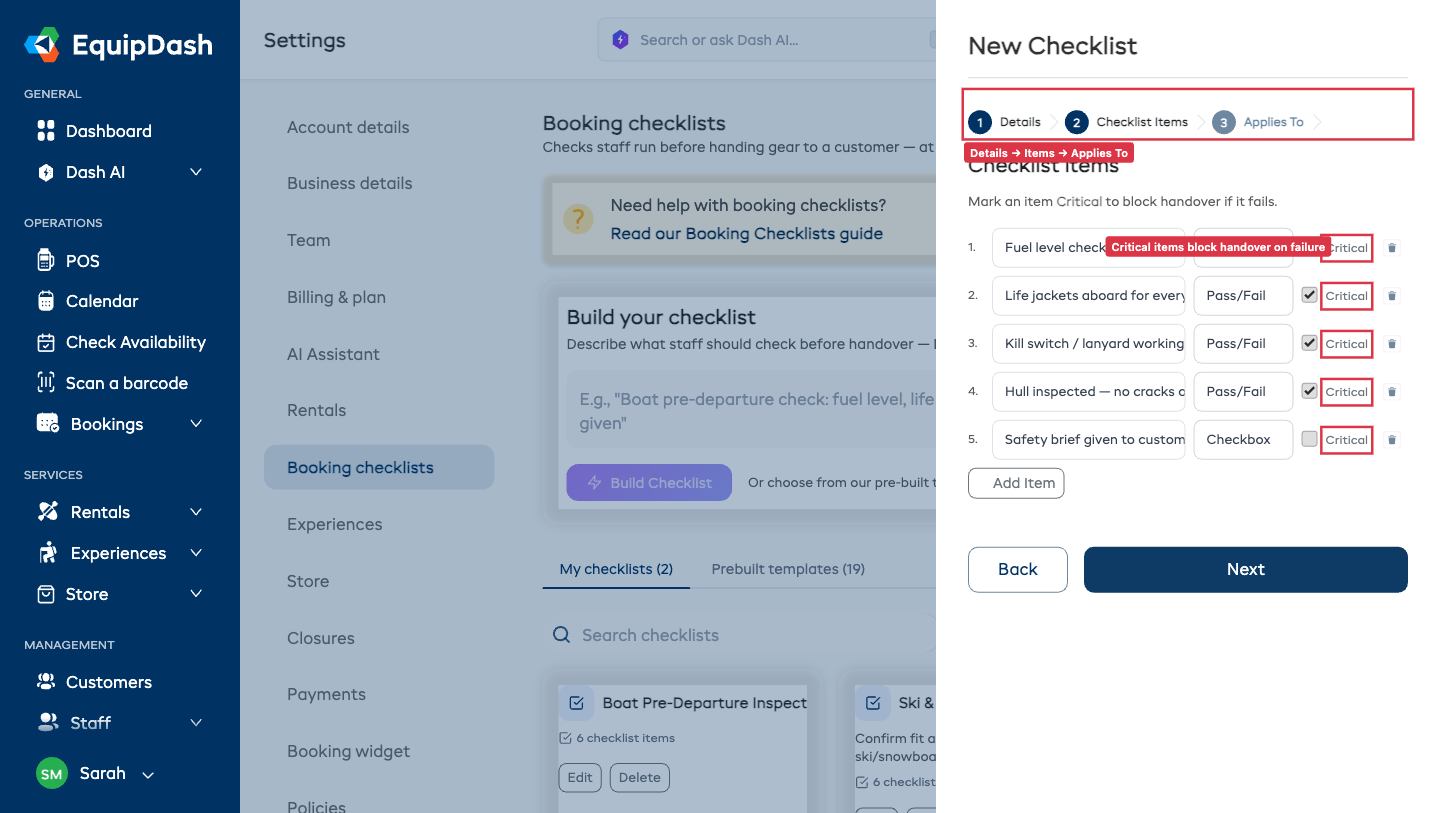
Step 2 — Checklist items
Add each thing your staff should check. For every item you set:
- A label — what the check is (for example, "Life jackets aboard for every passenger").
- A type — how the result is recorded (see Item Types below).
- On Pass/Fail items, a Must pass tick — whether a failure should block that step.
Use Add Item to add more rows, the arrows to reorder, and the delete icon to remove one. Click Next when done.
Grouping items into sections (run sheets)
For checks that span the whole booking, click Group into sections. Each section gets:
- A name — in your words: "Client welcome (on site)", "Briefing & training", "Return & closure".
- A Must be done before choice with exactly three options:
- Before pickup / check-in — these items must be complete before the customer takes the gear or the experience is checked in.
- Before return / close-out — these must be complete before the booking is marked returned or completed.
- Reminder only — never blocks anything; the section is your team's notes-to-self ("ask for a review", "monitoring during the activity").
Use Add Section for more sections, the arrows to reorder them, and the section delete icon to remove one (its items move into the neighboring section).

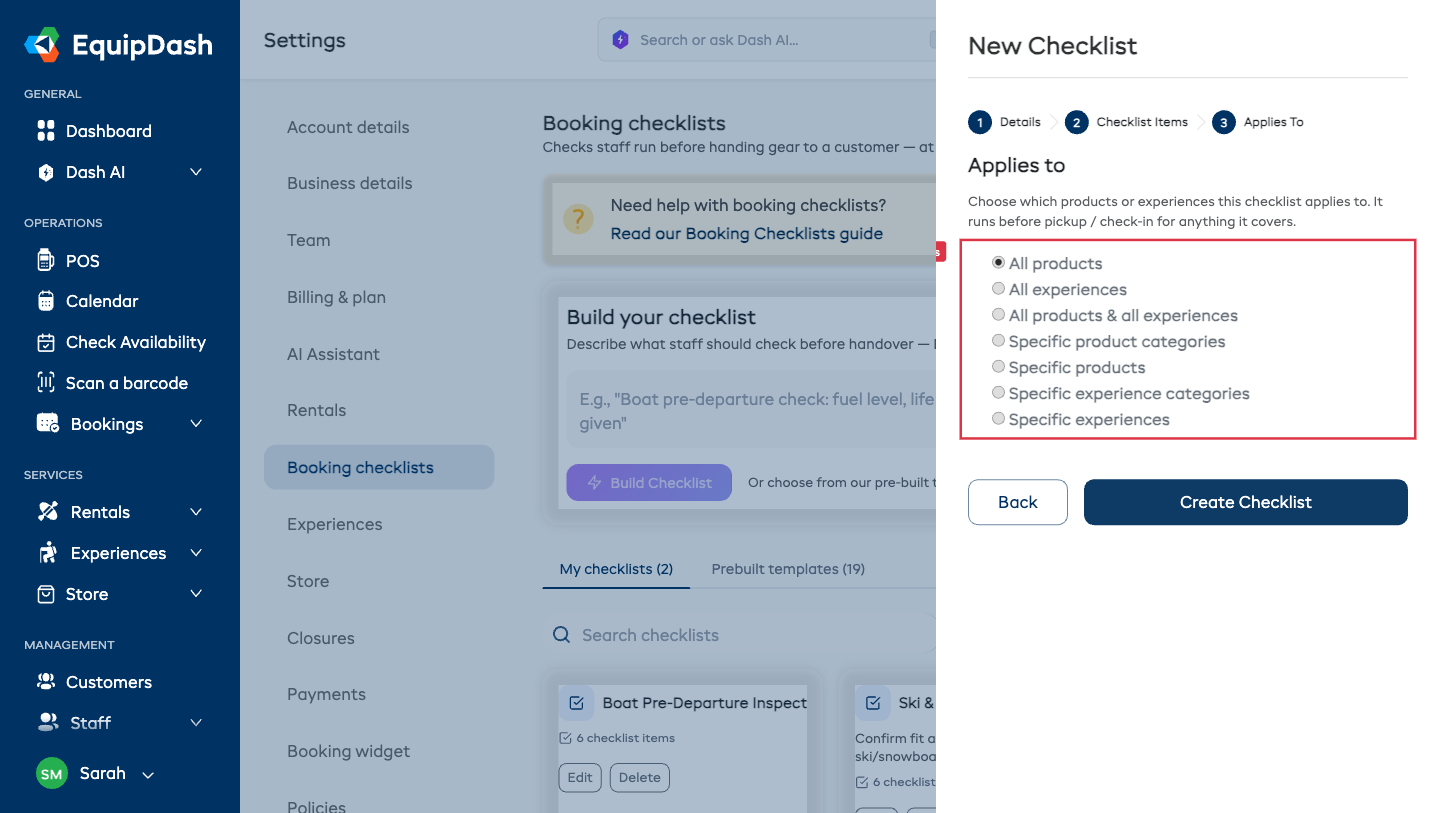
Step 3 — Applies to
Choose which products or experiences this checklist covers. This is the same "Applies to" control used on the Policies page, so it will feel familiar:
- All products
- All experiences
- All products & all experiences
- Specific product categories
- Specific products
- Specific experience categories
- Specific experiences
Pick the option that fits, choose the specific items where relevant, then click Create Checklist. The checklist now runs automatically before pickup or check-in for everything it covers.
Because checklists are scoped by "Applies to", you do not visit each product to switch a checklist on. If the same check applies to your whole boat category, set Applies to → Specific product categories and pick that category — every product in it is covered, including ones you add later.
Item Types
Each checklist item has a type that decides how staff record the result:
| Type | How staff record it | Example |
|---|---|---|
| Pass/Fail | Tap Pass or Fail inline — best for safety checks | "Brakes — squeeze test" |
| Checkbox | Tap Mark done | "Fuel topped up" |
| Text | Type a short free-text note | "Note any visible damage" |
| Numeric | Type a number | "Tire pressure (PSI)" |
| Photo | Upload a photo with an optional caption | "Photo of hull condition" |
Must-Pass (Critical) Items
When you build a checklist, you can tick Must pass on any Pass/Fail item. These critical items are shown with a red dot (•) when staff run the checklist.
- A must-pass item that fails blocks its step — the booking cannot be picked up / checked in (or returned / closed, for items in a "Before return / close-out" section) while it is failed.
- A Pass/Fail item without the tick is still recorded as pass or fail, but a failure does not block the step. Use these for things you want noted but that should not stop the customer leaving.
A step also stays blocked until every item it covers has been completed: on a flat checklist that is every item; on a sectioned run sheet it is the items in the sections anchored to that step. Reminder sections never block anything.
Prebuilt Templates
If you would rather start from a ready-made checklist, open the Prebuilt templates tab. EquipDash includes a library of booking checklists covering common gear and activities, including:
| Category | Templates |
|---|---|
| General | General Pre-Rental Handover, Damage & Condition Sign-Off, Safety Briefing & Waiver Confirmation |
| Boats & Watercraft | Boat Pre-Departure Inspection, Jet Ski / PWC Pre-Departure Check, Charter / Day Boat Pre-Boarding |
| Ski & Snowboard | Ski & Snowboard Pre-Handover Fit Check, Backcountry Safety Gear Issue |
| Bicycles | Bike Pre-Ride Safety Check (ABC) |
| E-Bikes & E-Scooters | E-Bike Pre-Ride Check |
| Kayaks & Canoes | Kayak / Canoe Pre-Launch Check |
| Paddleboards | Stand-Up Paddleboard (SUP) Pre-Launch |
| Surfboards | Surf / Wetsuit Hire Handover |
| Camping & Hiking | Camping Gear Pre-Hire Handover, Hiking & Climbing Gear Pre-Issue |
| Experiences | Guided Tour Pre-Departure Check-In, Adventure Activity Pre-Check-In, Attraction Entry Check-In, Charter Tour Pre-Boarding |
| Run sheets (sectioned) | Watercraft Rental Run Sheet, Guided Tour Run Sheet — full-booking run sheets with Client welcome, Briefing & training, Departure, and Return & closure sections |
To use one, find it on the Prebuilt templates tab and duplicate it into My checklists. You can then edit its items and set its Applies to scope like any checklist you build yourself.
Building a Checklist with AI
At the top of Settings → Booking checklists is the Build your checklist box. Describe what staff should check before handover — for example, "Boat pre-departure check: fuel level, life jackets aboard, kill switch, hull inspected, safety brief given" — and click Build Checklist. Dash AI generates a complete checklist you can review, adjust, and set an Applies to scope for.
Working a Checklist on the Booking
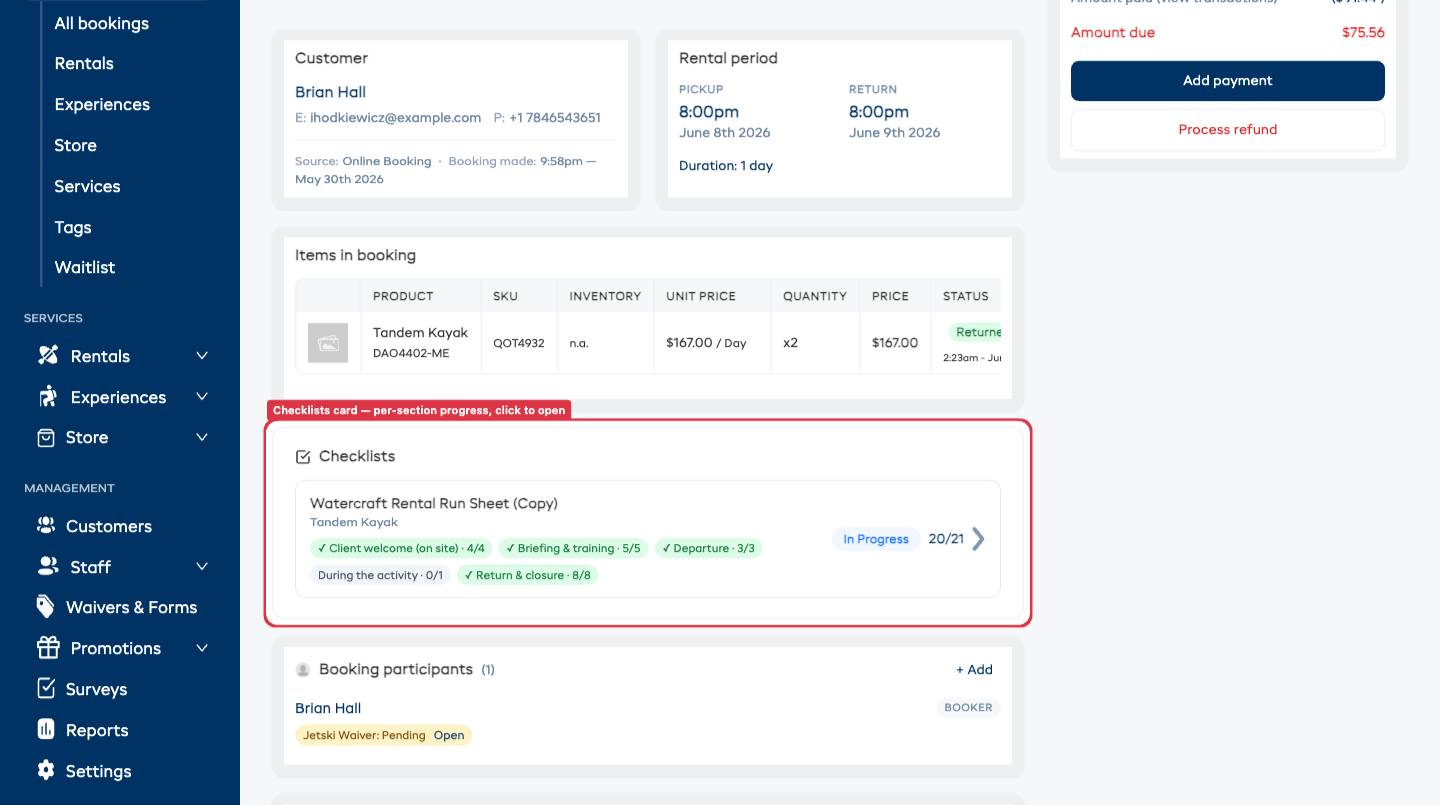
Once a checklist applies to a product or experience, a Checklists card appears on the booking detail page from the moment the booking is confirmed — you do not have to wait for pickup day. The card shows each checklist's progress at a glance, with a per-section breakdown for run sheets ("Client welcome · 4/4", "Return & closure · 0/8").
Click a checklist to open it. Sections expand and collapse, each shows its "Must be done before" badge, and every tick saves automatically — close the page and come back tomorrow, and the progress is exactly where you left it. Whoever ticks an item is recorded on it.
On the manifest, gated experience bookings show a Checklist progress chip next to the check-in status — click it to open and work the checklist.
Working in another language ProThis feature requires the Pro plan
If you offer your booking widget in more than one language (a Pro feature — see Booking Widget Languages), a language menu appears in the top-right of the Checklists card. Switch it and the checklist names, section headings, and every item read in that language — handy when the staff member working the gear is more comfortable in French, Spanish, or any other language you've enabled. The same language menu appears in the pickup, check-in, and return checks.
Checklists translate automatically off your enabled widget languages, so there's nothing extra to set up — build the checklist once in English in Settings → Booking checklists and it's readable in every language you offer. The choice is per staff member and resets to English next time, so it never changes what anyone else sees. Suppliers with only English enabled see no menu and no change.
Running a Checklist at Handover
The checklist also appears automatically at the moment of handover. No extra steps to enable it on the day. For run sheets, the pickup and check-in steps show only the sections that must be done before handover — return and reminder sections stay on the booking's Checklists card.
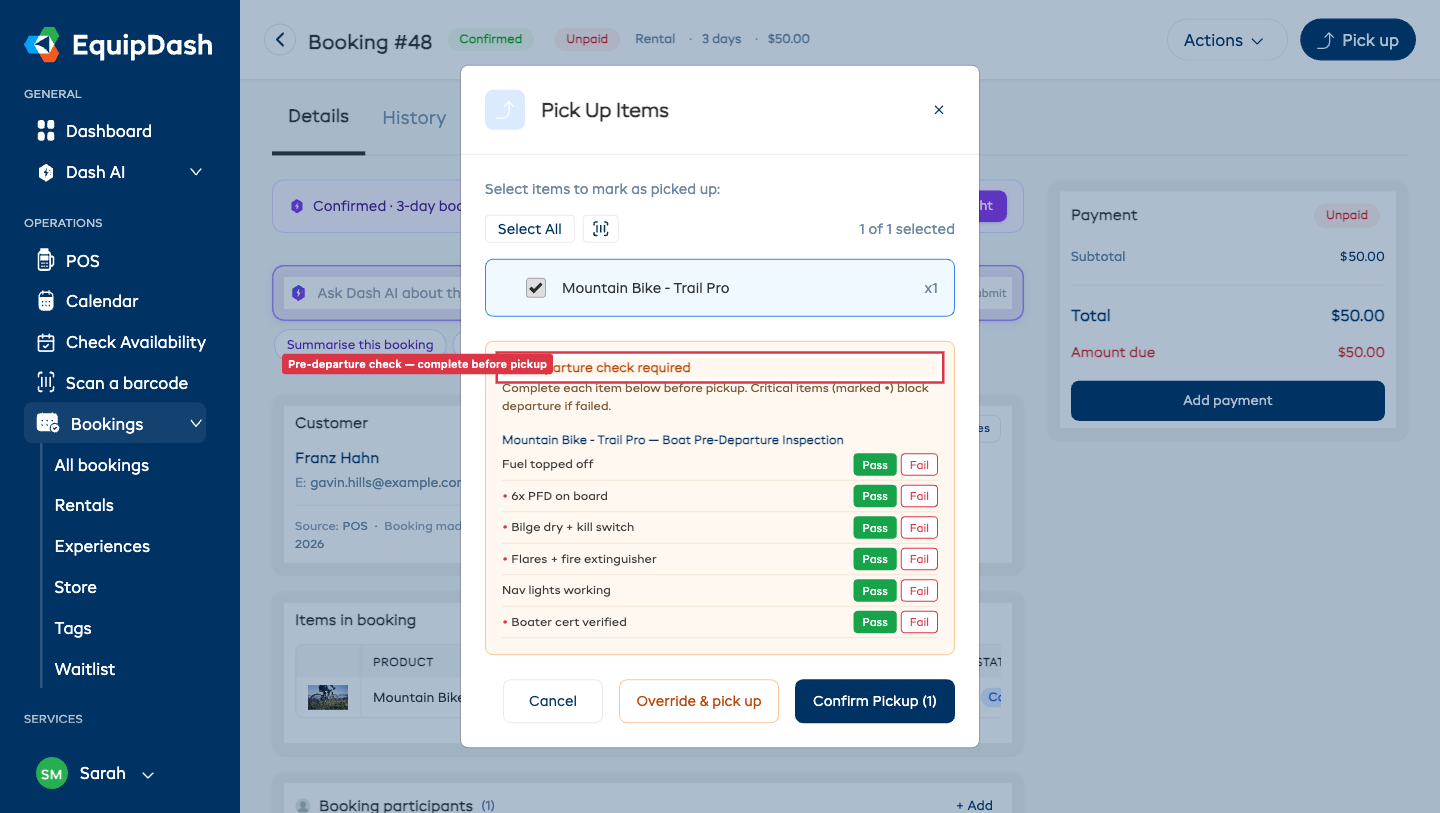
Rental pickup
- Open the rental booking and click Pick up in the header.
- If a booking checklist applies, a Pre-departure check required banner appears in the pickup modal, followed by the checklist for that item.
- Work through every item, marking each Pass or Fail (or completing checkbox / text / numeric / photo items). Critical items are marked with a red dot (•).
- Once every item is complete and no critical item has failed, click Confirm Pickup.
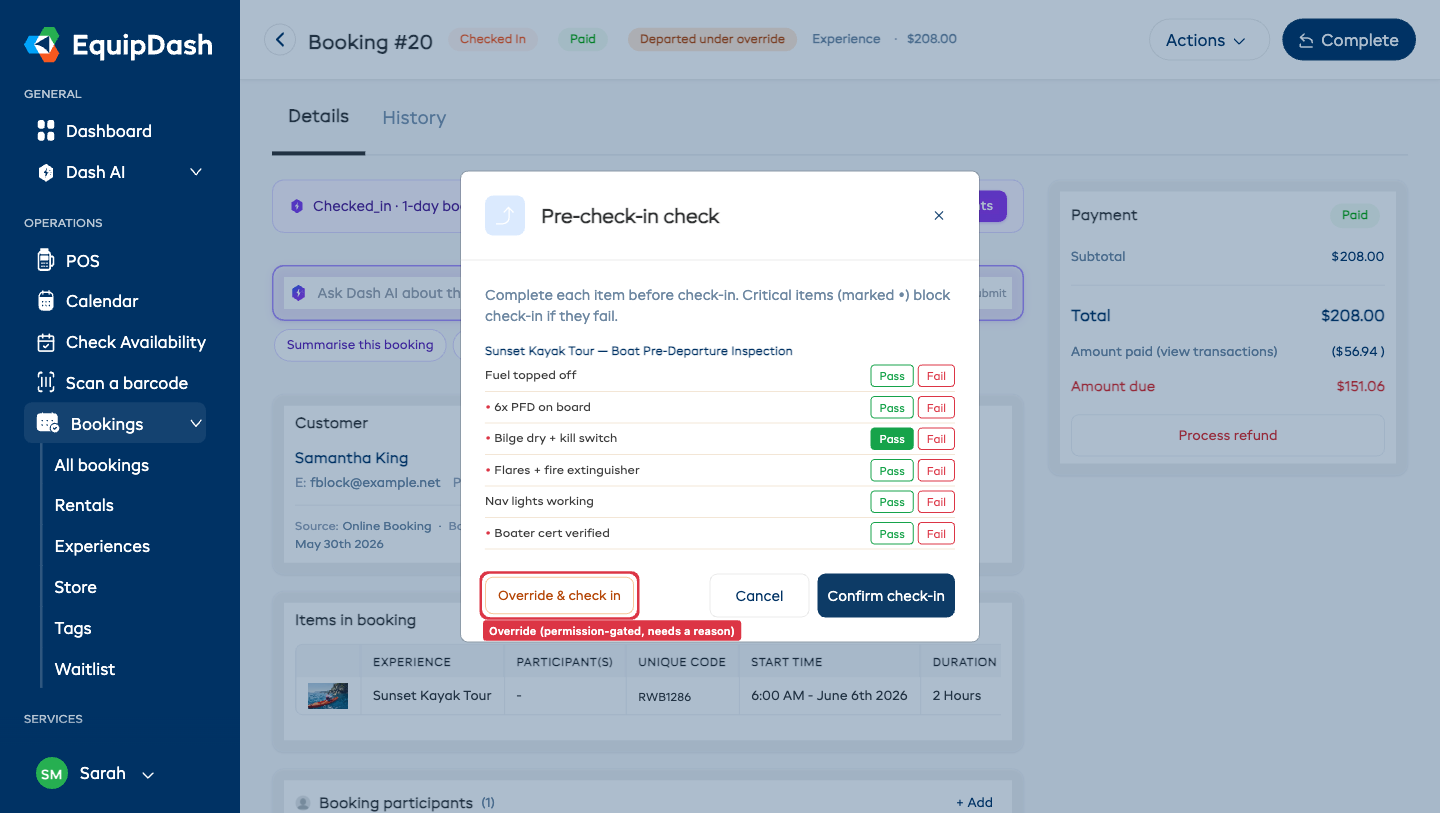
Experience check-in
Experience check-in works the same way, and you can run it from two places:
- Booking detail page — open the experience booking and click Check in in the header.
- The manifest — open the session's manifest and check in a participant or the whole booking from there.
Either way, if a booking checklist applies, a Pre-check-in check opens. Complete each item before check-in; critical items block check-in if they fail.
In both flows, the Confirm action stays blocked — with a message explaining why — until every required item is completed and no critical item has failed.
Return and close-out
Items in a "Before return / close-out" section run when the gear comes back:
- On a rental, the Return modal lists those items ("inspect the hull", "refueled", "deposit returned") so staff tick them as part of the return.
- On an experience, the booking cannot be marked Completed until those items are done — the close-out check for a guided tour ("vehicles inspected", "documents archived").
Reminder-only sections never block a return or completion — they stay visible on the Checklists card so nothing is silently lost, but staff can close the booking with them unticked.
Overriding a Checklist
Sometimes a manager needs to release gear even though a critical item failed or the checklist could not be finished. This is controlled by a permission so only authorized staff can do it.
- Staff who have the Override booking checklist permission see an Override & pick up (rentals) or Override & check in (experiences) button.
- Choosing it requires a written reason, which is saved on the booking.
- After an override, the booking shows a Departed under override badge so anyone reviewing it later can see the gear went out without the checklist passing cleanly.
Staff without the permission do not see an override option at all — for them, a blocked handover stays blocked until the checklist passes.
The override is governed by the Override booking checklist permission, which Admins have by default. To grant it to other roles or specific team members, see Roles & Access.
Where Results Are Recorded
Every completed checklist — and every override, with its reason and who entered it — is recorded on the booking's History tab. This gives you a documented "this was checked before it went out" record for each booking, useful for disputes, incident reviews, and demonstrating a consistent safety process. See Notes & History.
Related Guides
- Booking Fulfillment — the full pickup, return, and check-in process
- Workshop Checklists — the separate maintenance / servicing checklists
- Policies — uses the same "Applies to" control
- Roles & Access — grant the override permission
- Notes & History — where completed checklists and override reasons are recorded