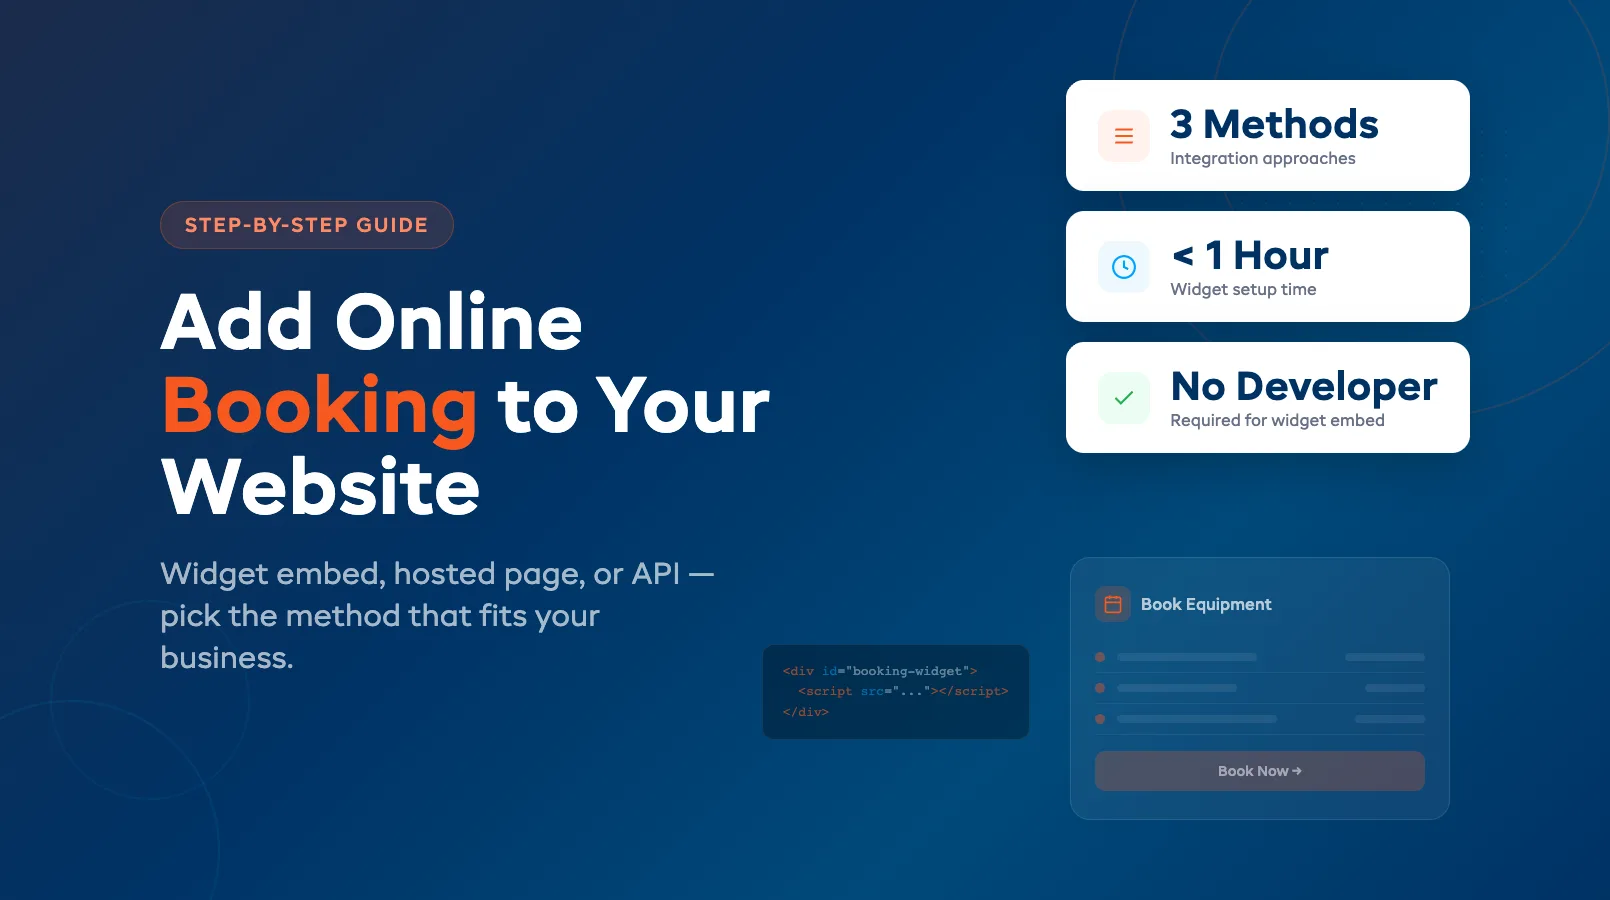
How to Add Online Booking to Your Rental Website
You already have a website. It lists your gear, shows your hours, maybe has a phone number and a contact form. But when a customer lands on your page at 9pm on a Thursday, ready to book kayaks for Saturday morning — they can't. They have to call you tomorrow, hope they remember, and hope you still have availability. Most won't bother. (That after-hours booking window is bigger than you think.)
Adding online booking to your existing rental website doesn't require a rebuild. You don't need a developer on retainer or a six-month IT project. In most cases, you can go from "call us to book" to accepting online reservations in a single afternoon. (Wondering whether online booking replaces your phone entirely? It doesn't — see our online booking vs phone reservations comparison.)
This guide walks through the three main ways to add booking to your rental site — from a simple widget embed to a full API integration — so you can pick the approach that matches your tech comfort level and budget. If you're still choosing a booking platform, read our complete guide to online booking systems for rentals first.
3 Ways to Add Online Booking (Widget, Hosted Page, API)
Not all integrations are built the same. The right approach depends on how much control you want, how your website is built, and how comfortable you are with code.
Here's a quick comparison:
| Method | Difficulty | Setup Time | Customisation | Best For |
|---|---|---|---|---|
| Embed a booking widget | Easy | 30–60 minutes | Moderate (colours, sizing) | Most rental shops |
| Link to a hosted booking page | Easiest | 15 minutes | Limited (branding only) | Shops with basic websites |
| Full API integration | Hard | 2–8 weeks | Complete control | Multi-location or custom builds |
Most independent rental operators go with the widget. It's the sweet spot between ease of setup and professional results. But let's break down all three so you can decide for yourself.

Option 1: Embed a Booking Widget (Easiest)
A booking widget is a small piece of code — usually an iframe or a JavaScript snippet — that you paste into your website. It renders an interactive booking form right on your page. Customers select their gear, pick dates, and pay without ever leaving your site.
How it works in practice:
- Sign up with a booking platform that serves rental operators (EquipDash, Booqable, Checkfront, etc.)
- Set up your products, pricing, and availability rules inside the platform
- Copy the embed code from your dashboard
- Paste it into your website — either in your page builder (WordPress, Squarespace, Wix) or directly into the HTML
- Style it to match your brand colours and fonts
What customers see: A booking form embedded on your page. They select equipment, choose rental dates, see real-time availability, and complete payment — all without redirecting to another site.
Pros:
- Setup takes under an hour for most platforms
- No developer needed
- Booking form lives on YOUR domain (better for trust and SEO)
- Real-time availability prevents double bookings
- Payment processing is handled by the platform
Cons:
- Limited layout customisation (you're working within the widget's design)
- Some widgets load slowly if the booking platform's servers are sluggish
- May not match your site's design perfectly
The key thing to check: Make sure the widget is mobile-responsive. Over 70% of rental searches happen on phones. A widget that looks great on desktop but breaks on mobile will cost you bookings. Test it yourself on your phone before going live.
Option 2: Link to a Hosted Booking Page
If embedding code sounds too technical — or if your website builder doesn't support embeds — you can link customers to a hosted booking page instead.
How it works:
- Set up your products and availability in your booking platform
- The platform gives you a unique URL (e.g.,
yourshop.equipdash.com/bookorbook.yourshop.com) - Add a "Book Now" button on your website that links to that URL
- Customers click through, book on the hosted page, and get a confirmation email
The experience feels like this: Customer visits your website → clicks "Book Now" → lands on a branded booking page (with your logo and colours) → completes the reservation → returns to your site or gets an email confirmation.
Pros:
- Zero technical skill required
- Works with any website (even a single-page site or Facebook page)
- The booking platform handles all the heavy lifting — hosting, security, payment processing
- You can customise the page with your logo, colours, and branding
Cons:
- Customers leave your website to book (some will drop off at the redirect)
- Less control over the booking experience
- The URL doesn't match your domain (unless you set up a custom subdomain)
When this makes sense: If you're running a small operation with a basic website and you just need customers to be able to book online — this gets you there in 15 minutes. You can always upgrade to a widget embed later.
Option 3: Full API Integration (Most Control)
An API integration means your developer builds a completely custom booking experience using the booking platform's API (Application Programming Interface). Every element — the calendar, the product selector, the checkout flow — is coded from scratch on your site.
This is for you if:
- You have a custom-built website (not WordPress/Squarespace)
- You operate multiple locations with complex inventory rules
- You want the booking experience to look exactly like the rest of your site
- You have a developer (or a budget for one)
How it works:
- Your developer reviews the booking platform's API documentation
- They build custom front-end components (calendar, product picker, checkout)
- These components communicate with the booking platform's backend for availability, pricing, and payment processing
- Your website handles the display; the booking platform handles the data
Pros:
- Complete design freedom — the booking flow is indistinguishable from the rest of your site
- Full control over the user experience
- Can handle complex logic (multi-location inventory, custom pricing rules, bundled packages)
Cons:
- Requires a developer (budget $3,000–$15,000 for a basic integration)
- Takes 2–8 weeks to build and test
- You own the maintenance — if the API changes, your developer needs to update your code
- Overkill for single-location shops with straightforward inventory
Reality check: Fewer than 10% of independent rental operators need an API integration. If you're running 1–3 locations with standard equipment rentals, a widget gets you 95% of the functionality at 5% of the cost. Save the API route for when you've outgrown simpler options.
Step-by-Step: Adding Booking to WordPress, Squarespace, and Custom Sites
Let's get tactical. Here's how the widget embed works on the three most common website platforms rental operators use.
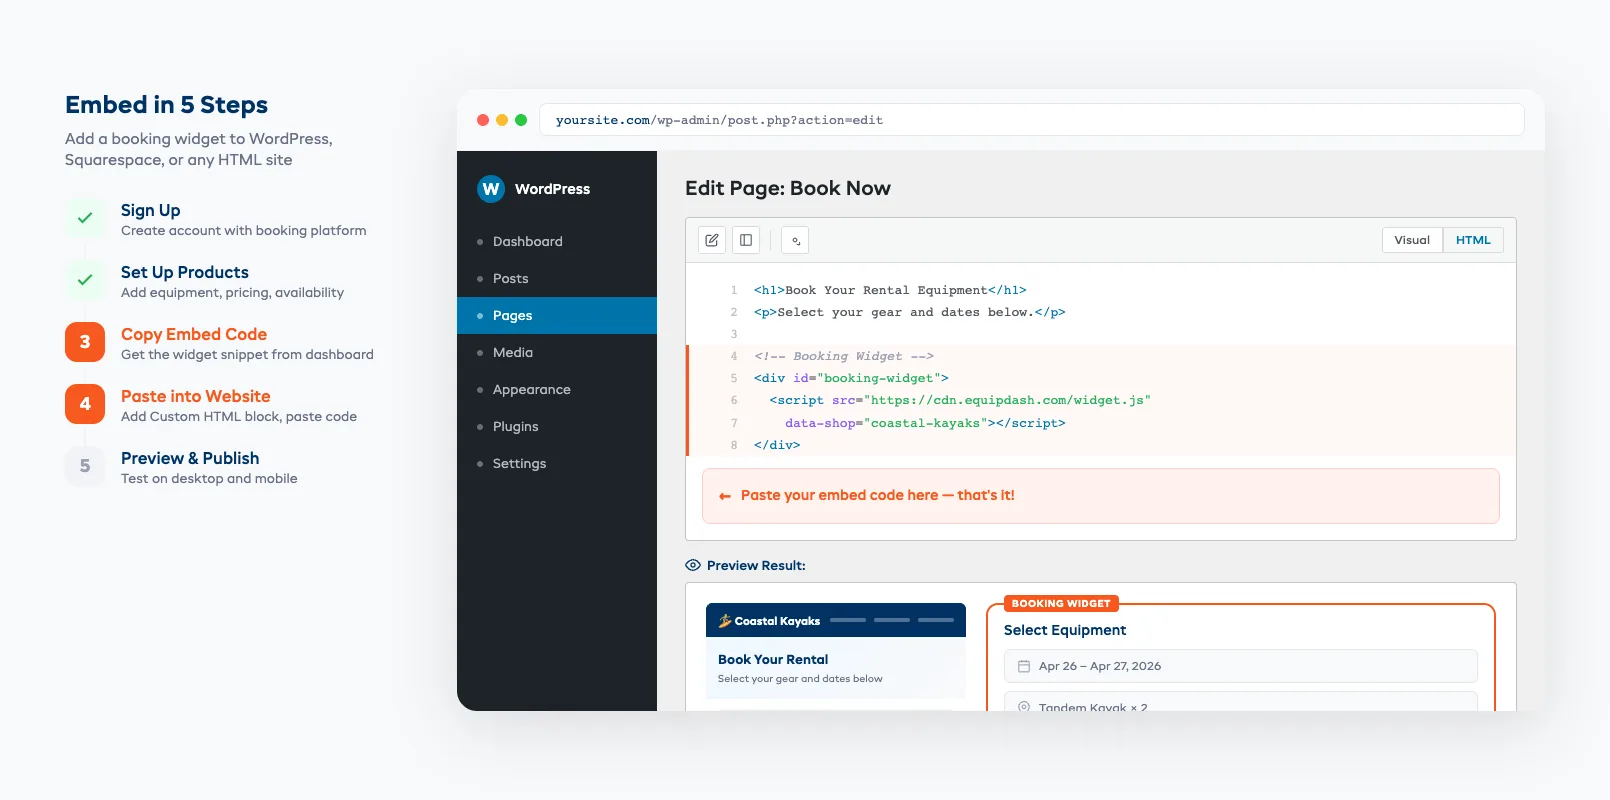
WordPress
WordPress is the most common website platform for rental shops. Adding a booking widget takes about 20 minutes.
- Log into your booking platform and navigate to the widget/embed settings
- Copy the embed code — it's usually an iframe tag or a JavaScript snippet
- In WordPress, open the page where you want the booking form (usually your "Book Now" or "Rentals" page)
- Switch to the HTML/Code editor (in Gutenberg, add a "Custom HTML" block; in Classic Editor, click the "Text" tab)
- Paste the embed code into the block
- Preview the page and check it on both desktop and mobile
- Publish when it looks right
Pro tip: Create a dedicated /book or /rentals page for the widget. Then add "Book Now" buttons across your site that link to that page. This keeps your booking flow focused and reduces distractions.
Squarespace
Squarespace is more restrictive with embeds, but it still works.
- Open the page editor for your booking page
- Add a "Code" block (under the "More" section in the block picker)
- Paste the embed code into the code block
- Toggle off the "Display Source" option so visitors see the widget, not the code
- Save and preview on desktop and mobile
Note: Squarespace's code blocks have some limitations. If your booking widget uses JavaScript (not just an iframe), you may need to add it via the site's Code Injection settings (under Settings → Advanced → Code Injection). Check your booking platform's docs for Squarespace-specific instructions.
Custom HTML Sites
If your site is hand-coded HTML or uses a static site generator:
- Open the HTML file for your booking page
- Paste the embed code where you want the widget to appear (usually inside a
<div>in your main content area) - Upload the file to your web server
- Test on desktop and mobile
That's it. No plugin installation, no compatibility checks. The simplicity of custom HTML sites makes embedding straightforward.
Testing Your Booking Flow Before Going Live
This is the step most operators skip — and it's the one that costs them the most bookings. A broken or confusing booking flow will drive customers straight to your competitor.
Before you announce your new online booking capability, run through this checklist:
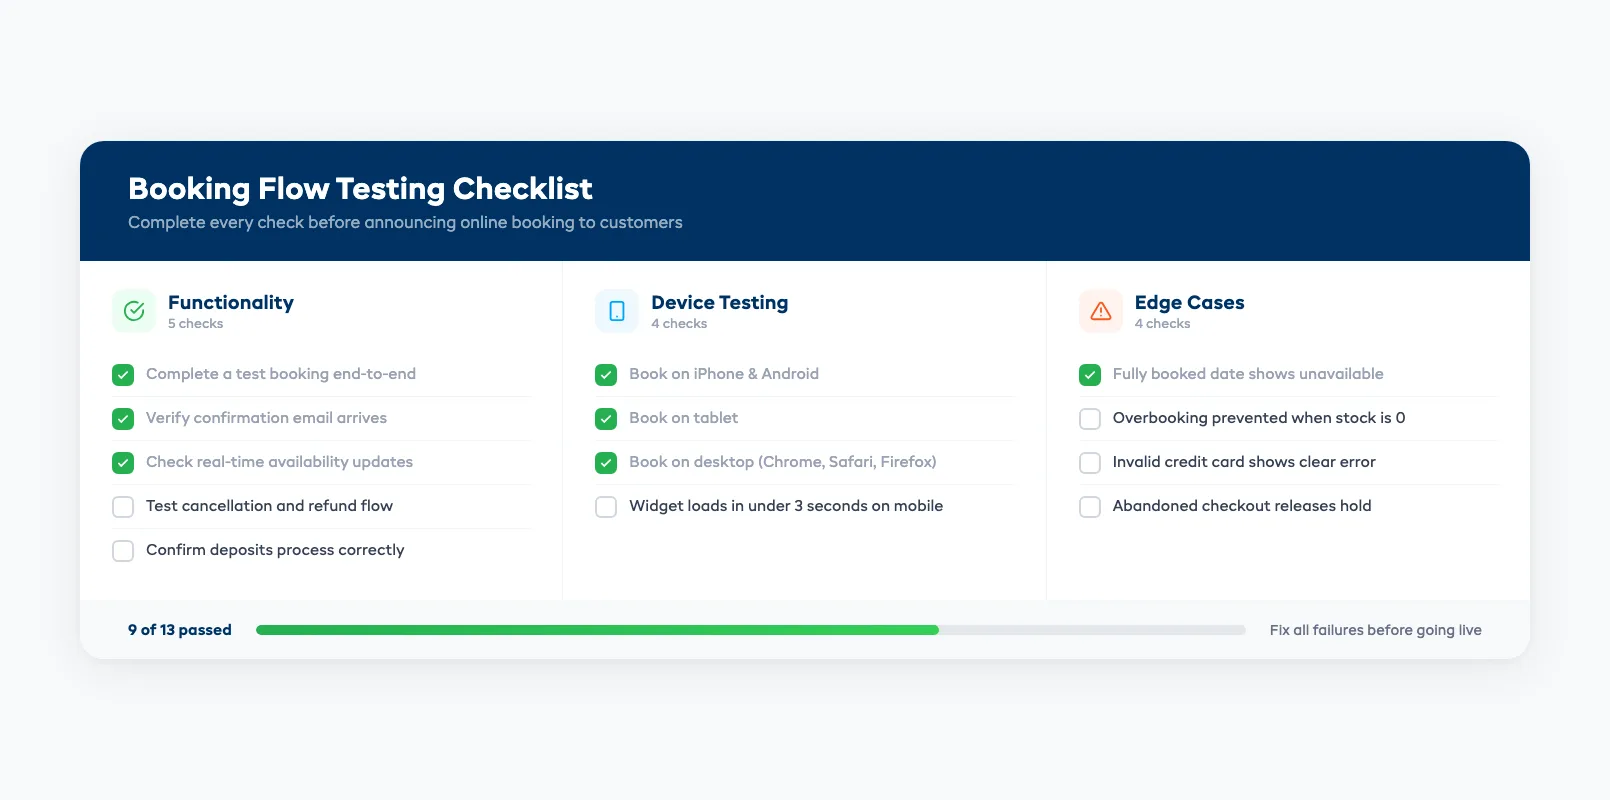
Functionality tests:
- [ ] Complete a test booking from start to finish (select gear, pick dates, enter customer info, process payment)
- [ ] Verify the confirmation email arrives with correct details
- [ ] Check that availability updates in real-time (book a slot, then verify it shows as unavailable)
- [ ] Test the cancellation and refund flow
- [ ] Confirm deposits are processed correctly
Device tests:
- [ ] Complete a booking on your phone (both iPhone and Android if possible)
- [ ] Complete a booking on a tablet
- [ ] Complete a booking on desktop (Chrome, Safari, Firefox)
- [ ] Check that the widget loads in under 3 seconds on mobile
Edge case tests:
- [ ] Try to book a date that's already fully booked — does it show as unavailable?
- [ ] Try to select more items than you have in stock — does it prevent overbooking?
- [ ] Enter an invalid credit card — does it show a clear error message?
- [ ] Check what happens if a customer abandons the booking mid-checkout — does the hold release?
One more thing: Ask someone who isn't tech-savvy to complete a booking without any guidance. If they get stuck, your customers will too. Fix every friction point before going live.
What to Do After Your Booking Page Is Live
Getting the booking form on your site is step one. Driving traffic to it is step two.
Update your Google Business Profile. Add your booking URL as the primary action link. When someone searches "kayak rental near me" and finds your listing, they should land directly on your booking page — not your homepage.
Add "Book Now" buttons everywhere. Your homepage, your equipment pages, your pricing page, your contact page, your Google listing, your Instagram bio, your email signature. Every touchpoint should lead to booking.
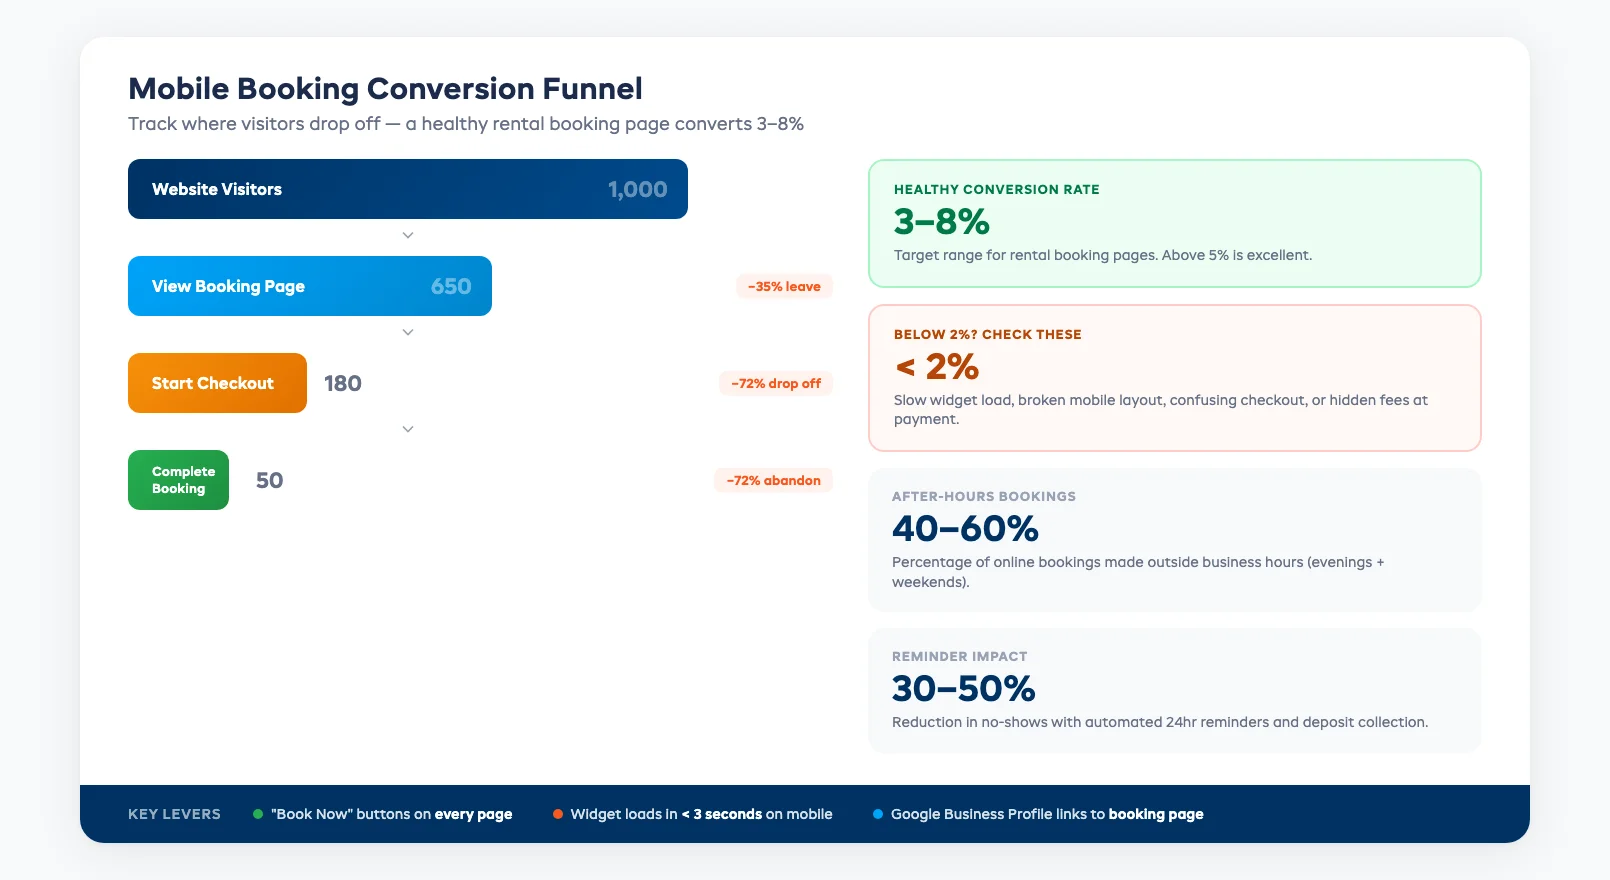
Set up automated confirmations and reminders. Most booking platforms send these automatically. Make sure they include: booking details, rental dates, location address, what to bring, and your cancellation policy. Automated reminders 24 hours before pickup cut no-shows by 30–50%.
Monitor your conversion rate. After a month, check how many website visitors actually complete a booking. A healthy conversion rate for rental booking pages is 3–8%. If you're below 2%, something in your booking flow is creating friction — revisit the testing checklist above.
If you want to see what a purpose-built booking system looks like for tour operators specifically, check out our breakdown of online booking features every tour operator needs.
Frequently Asked Questions
Can I add online booking to my existing website without rebuilding it?
Yes. The whole point of a booking widget is that it drops into your existing site. You paste a snippet of code, and the booking form appears on your page. It works with WordPress, Squarespace, Wix, custom HTML sites, and virtually every other website platform. No rebuild required.
What's the easiest way to start taking bookings online this week?
Link to a hosted booking page. Sign up for a booking platform, set up your products and availability, and add a "Book Now" button to your website that links to your hosted page. Total setup time: under 2 hours. If you want the booking form embedded directly on your site, a widget embed takes a few hours including testing.
Do I need a developer to add online booking?
Not for widget embeds or hosted booking pages. Both are designed for non-technical users. You only need a developer if you want a full API integration with a completely custom booking experience — and most independent rental operators don't need that level of customisation.
How much does it cost to add online booking to my website?
The booking platform subscription is your main cost — typically $29–$149/month depending on features. Widget embeds and hosted pages are included in most plans. API integrations have additional development costs ($3,000–$15,000+). There's no extra cost for the actual website integration with widget or hosted page options.
Will online booking work on mobile devices?
It should — but verify it. Any reputable booking platform provides mobile-responsive widgets. Test the full booking flow on your phone before going live. If the widget doesn't render properly on mobile, contact your booking platform's support or try adjusting the widget dimensions.
What if I already use WordPress — do I need a special plugin?
Not necessarily. Most booking platforms work with a simple embed code pasted into a Custom HTML block. Some platforms offer dedicated WordPress plugins that add extra features (like sidebar widgets or shortcodes), but the embed approach works fine for most operators.
How long does it take for online booking to impact my revenue?
Most operators see a 20–30% increase in bookings within the first 90 days. The biggest gains come from after-hours bookings (customers booking at night and on weekends) and reduced no-shows (thanks to automated deposits and reminders). The sooner you go live, the sooner you stop losing revenue to competitors with online booking.
in one place