Security Deposits
Security deposits protect your business against damage or loss. EquipDash supports two methods for handling deposits: placing a hold on the customer's card (pre-authorization) or charging the deposit upfront.
A security deposit is a refundable amount that protects against damage or loss -- it doesn't count toward the booking total and is returned (or captured) after the rental. It's separate from a booking deposit, which is a partial upfront payment toward the total (for example, 30% now and the rest before the booking). Booking deposits are configured under Online Checkout.
How Security Deposits Work
When a booking includes a security deposit:
- At booking time -- the deposit is collected from the customer (either as a hold or a charge).
- During the rental -- the deposit is held while the customer has your equipment.
- At return -- you either release the deposit back to the customer, or capture it (fully or partially) if there is damage or loss.
Deposit Methods
Your preferred deposit method is set in Settings > Payments > Checkout, Deposits & Card Readers. There are two methods:
| Method | How It Works |
|---|---|
| Hold (Pre-authorization) | A temporary hold is placed on the customer's card. No money is actually charged. The hold is released when you release the deposit, or captured if needed. Holds typically expire after 7 days depending on the customer's bank. |
| Charge | The deposit amount is charged to the customer's card upfront. When items are returned undamaged, you refund the deposit. |
Collecting a Security Deposit
Security deposits are typically collected during the booking flow when the customer pays. If the deposit was not collected at the time of booking:
- Open the booking from the bookings table.
- In the Payment card on the right, find the Security deposit row at the bottom and click it to expand.
- Click Place hold or Charge deposit (depending on your configured method).
- Choose how to take the deposit (see the table below).
- Process the deposit using the selected method.
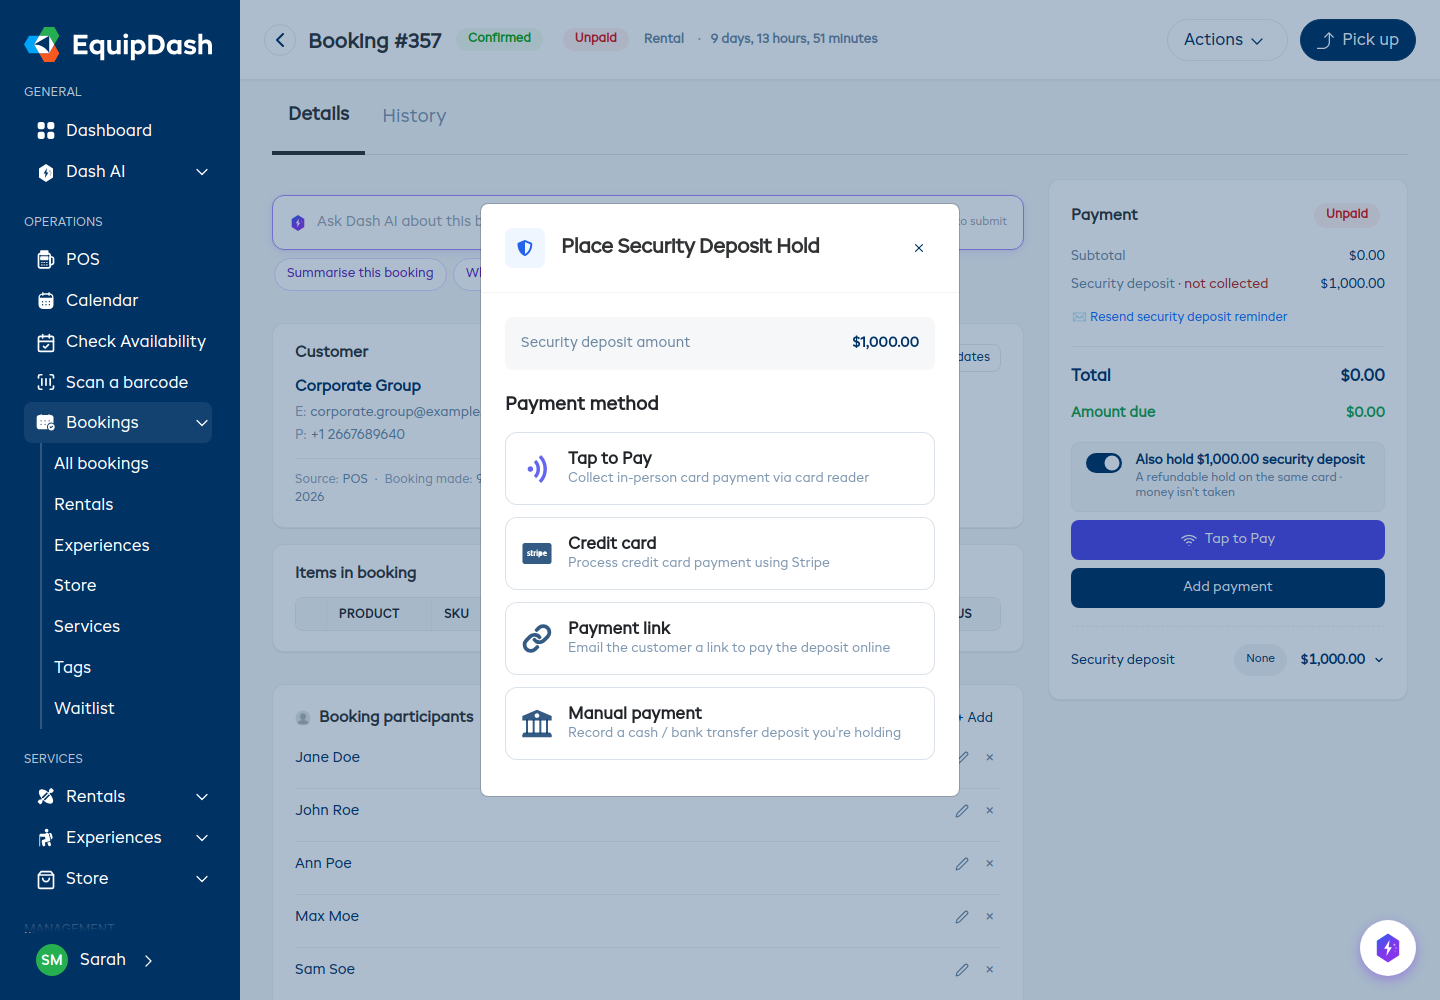
You can take a deposit four ways:
| Method | What happens | Deposit shows as |
|---|---|---|
| Tap to Pay | A card hold or charge collected in person on a card reader. | Held or Charged |
| Credit card | A card hold or charge processed through Stripe. | Held or Charged |
| Payment link | Email the customer a link to pay the deposit by card online. Follows your Hold vs Charge setting -- a hold is placed (released on return) or the deposit is charged (refunded on return). | Held or Charged once paid |
| Manual payment | Record a cash / bank transfer deposit you physically take and hold. No card involved. | Held |
Manual (cash) deposits are for when the customer hands you cash (or pays by bank transfer) and you hold it yourself. Pick Manual payment, choose the method (cash, bank transfer or other), and the deposit is recorded as Held. When the gear comes back you Release it (hand the cash back) or Capture it (keep some for damage) -- no card refund happens because it was never on a card.
Changing the Deposit Amount
While nothing has been collected yet, you can set a custom deposit amount for any booking:
- Expand the Security deposit row in the Payment card.
- Click Edit next to the deposit amount, type the new amount, and click Save.
If a booking was created without a deposit, a + Add button appears on the Security deposit row instead -- click it to add a deposit with any amount you agree with the customer.
Taking the Deposit in Parts (Split Deposits)
For group bookings where each person pays their own security deposit -- for example a company outing with five participants -- you can split one booking's deposit into separate parts. Each part has its own amount and is collected, released, or captured on its own.
Splitting the Deposit
- Open the booking and expand the Security deposit row in the Payment card.
- Click Split deposit.
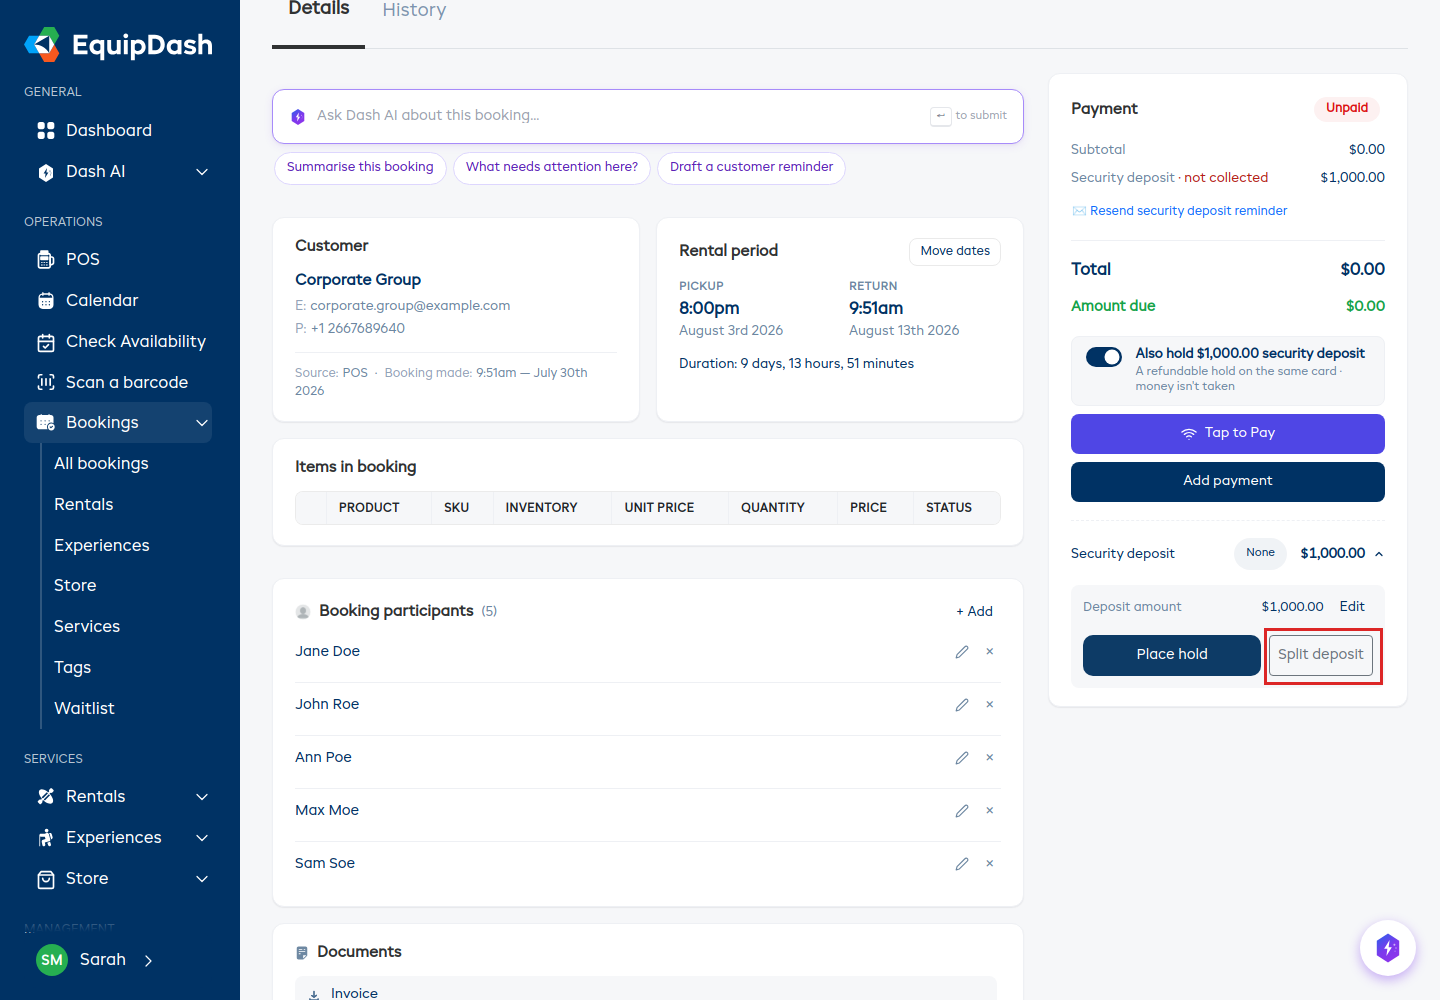
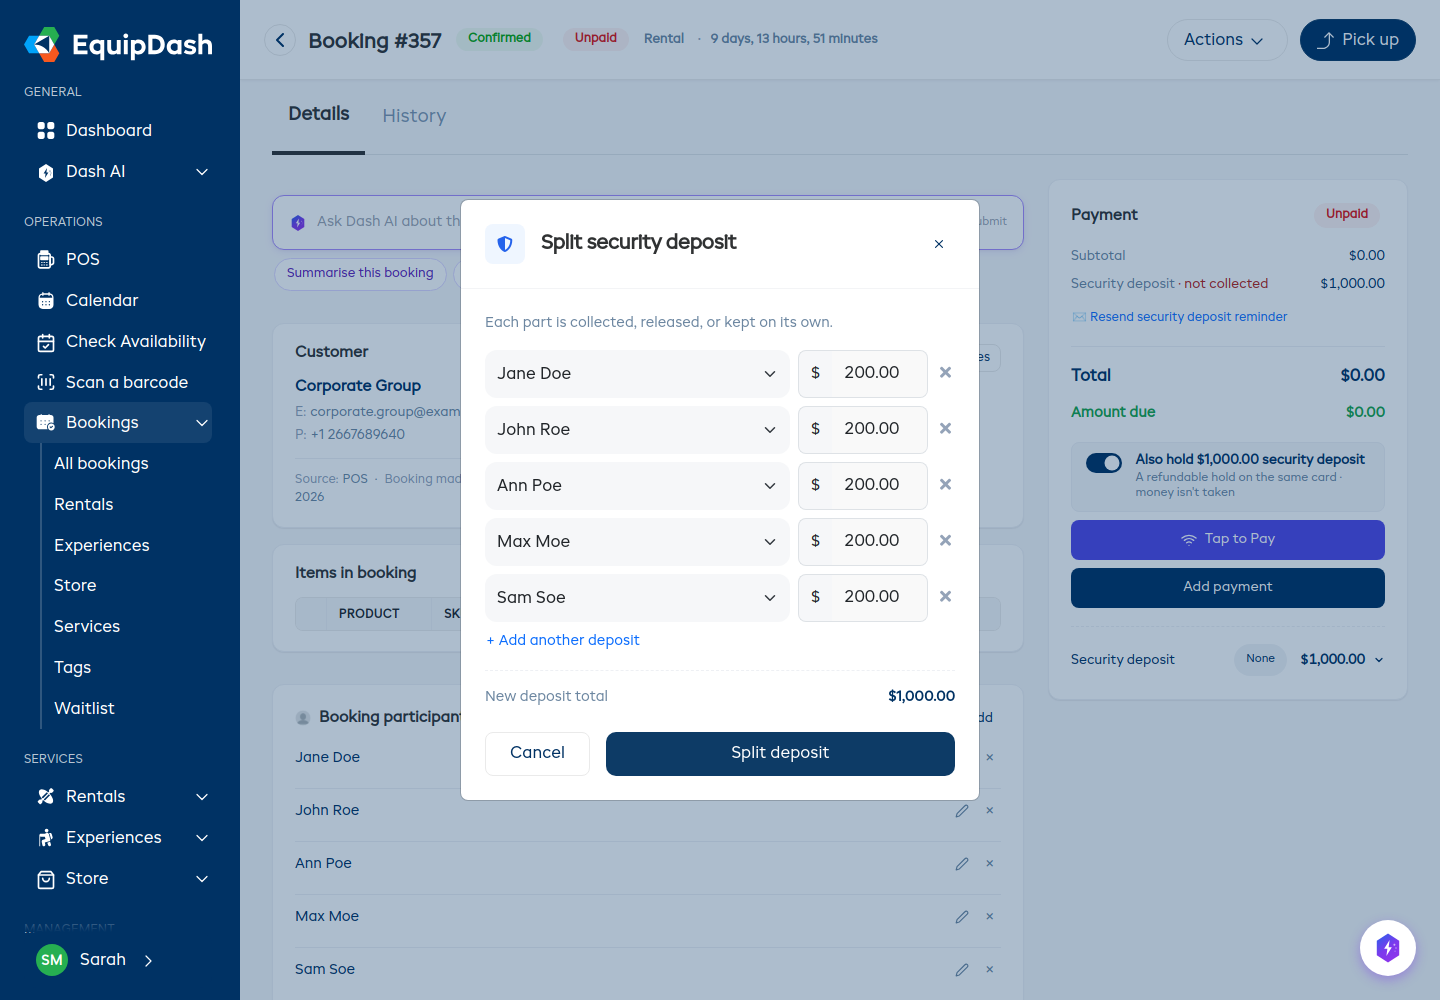
- The window opens with one row per participant and the amount divided evenly between them. Adjust any amount, pick a different person, or type a name for a part that isn't tied to a participant (e.g. a company card).
- Use + Add another deposit to add a part, or the x to remove one.
- Click Split deposit to save.
Collecting Each Part
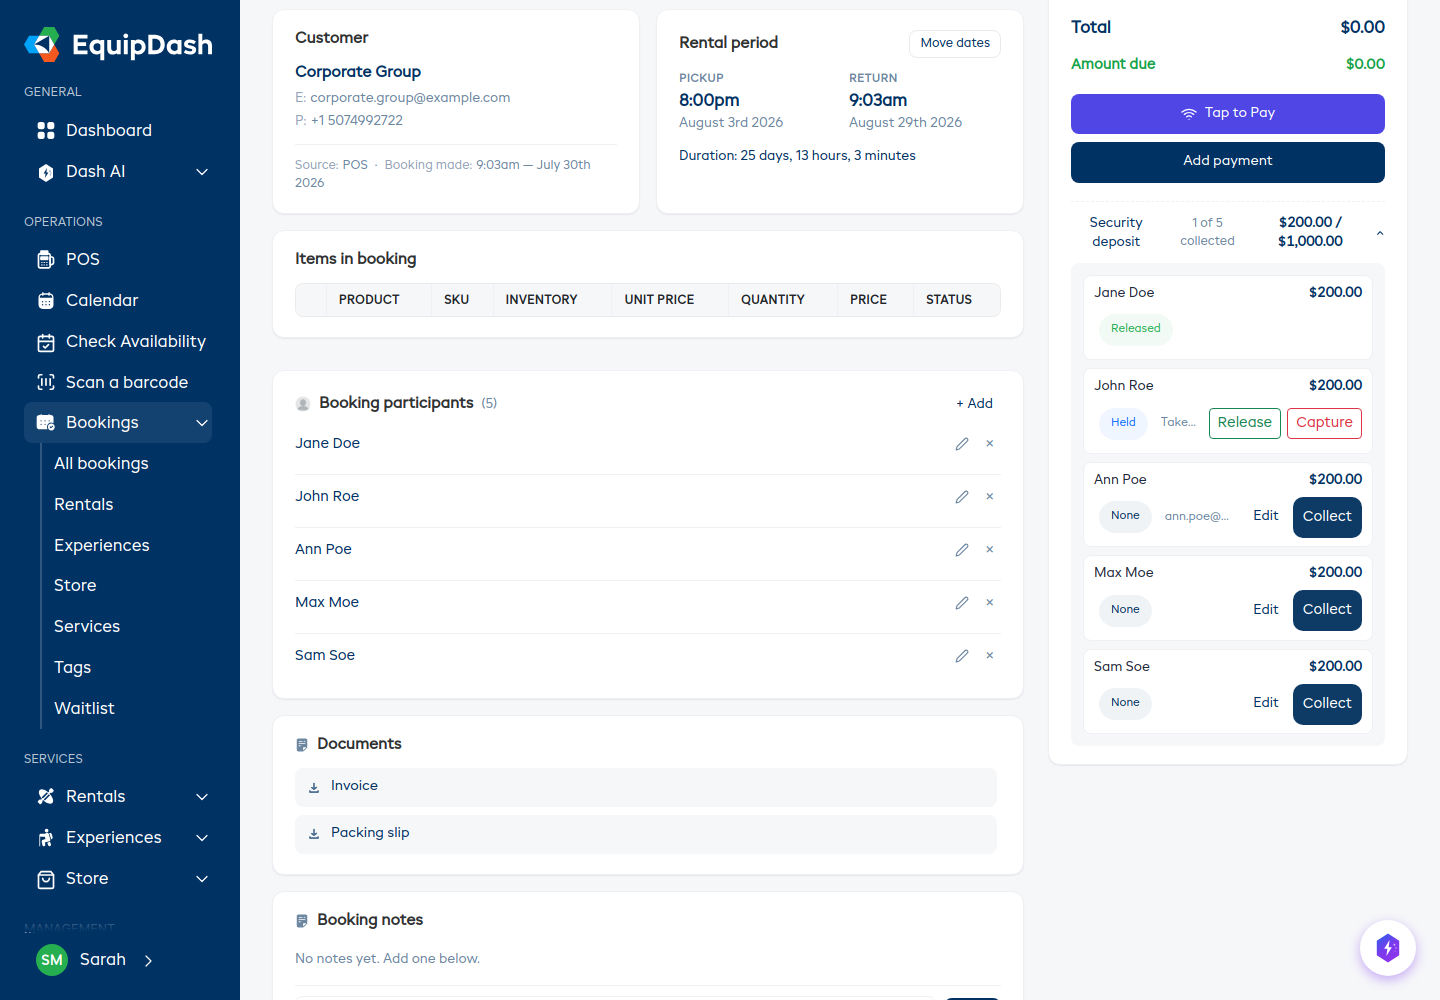
Each part shows its own row with a status and a Collect button. Collecting a part works exactly like collecting a whole deposit -- Tap to Pay, Credit card, Payment link, or Manual payment -- but only for that part's amount. A payment link is emailed to that person's own address when they're linked to a participant.
The row header keeps score for you: 2 of 5 collected with the running amount, so you always know who still owes their deposit. If a card is declined, the note appears on that person's row only.
Returning or Keeping Each Part
When the booking comes back, each part is settled on its own:
- Release or Refund returns one person's deposit without touching the others.
- Capture keeps all or part of one person's deposit (e.g. for damage to their equipment).
You can also change a part's amount with Edit (while it's uncollected), and Undo split puts the deposit back to a single amount as long as nothing has been collected yet.
The rest of EquipDash keeps working as usual -- booking lists and reports show one overall deposit status for the booking, and the booking history names the person on every deposit event.
Deposit Statuses
| Status | Meaning |
|---|---|
| None | No security deposit on this booking. |
| Held | A pre-authorization hold has been placed on the customer's card. |
| Charged | The deposit has been charged to the customer's card. |
| Released | The deposit has been released back to the customer (hold removed or refund issued). |
| Captured | The deposit (or part of it) has been captured due to damage or loss. |
Releasing a Deposit
When items are returned in good condition:
- Open the booking.
- Expand the Security deposit row in the Payment card on the right.
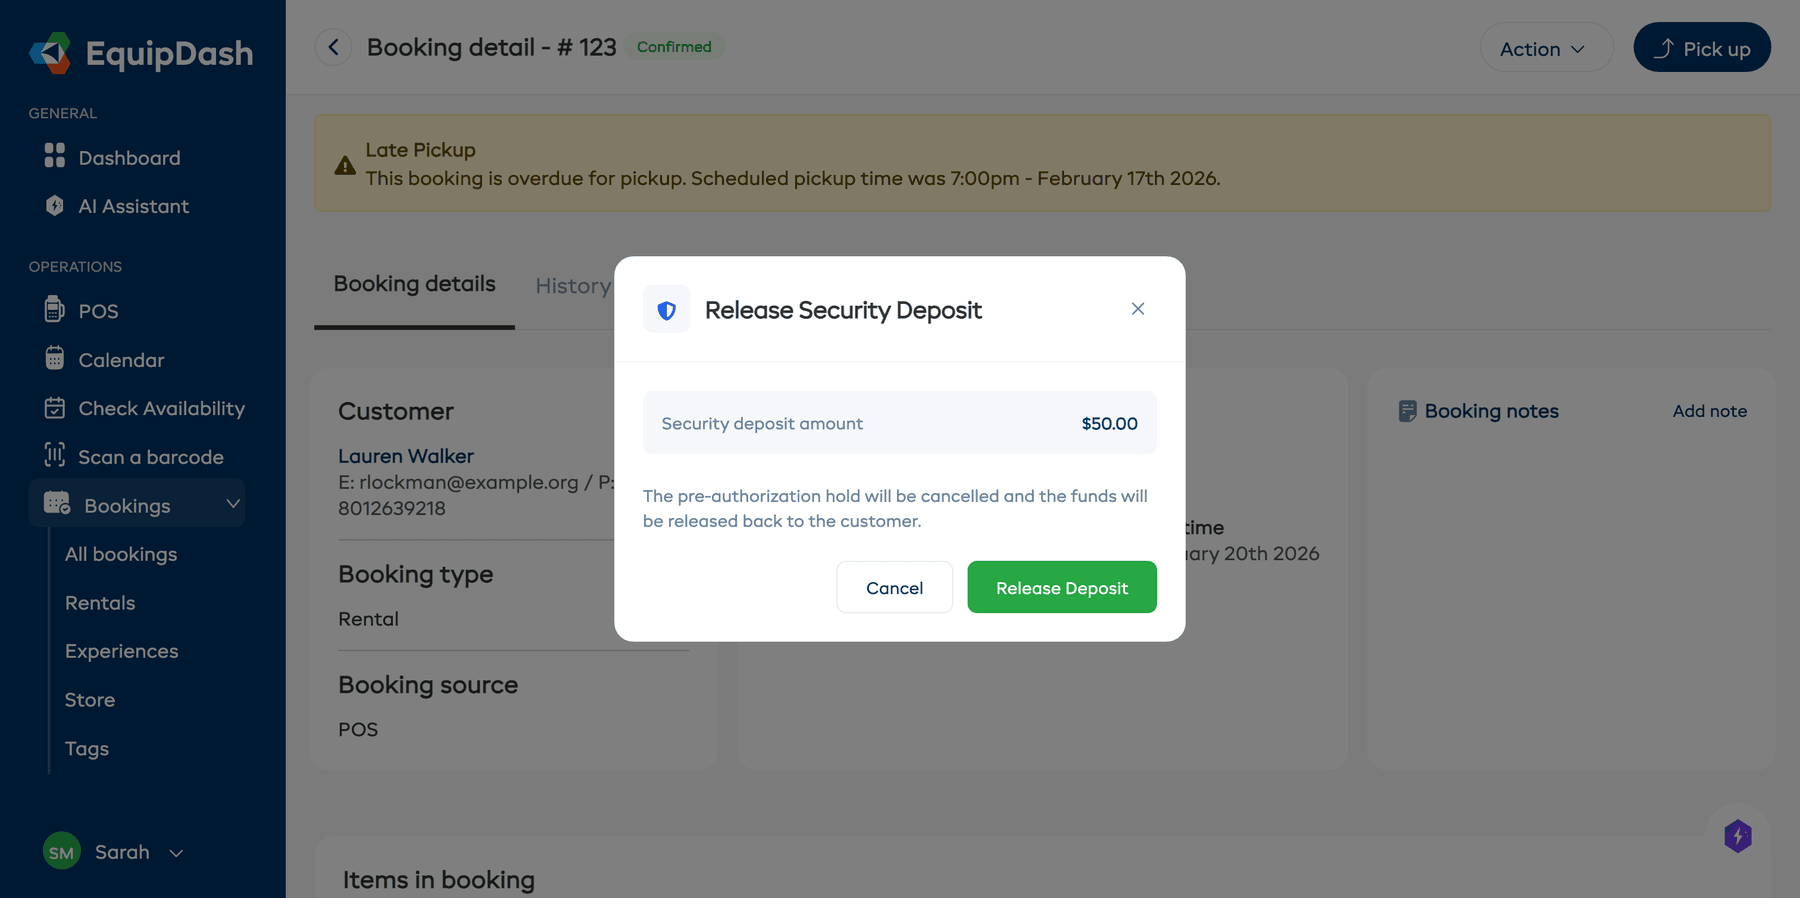
- Click the Release button.
- Review the confirmation message and click Release Deposit.
If the deposit was a hold, the pre-authorization is cancelled and the funds are released back to the customer's card. If the deposit was a charge, the amount is refunded to the customer's card.
Capturing a Deposit
If items are returned damaged or not returned at all, you can capture part or all of the deposit:
- Open the booking.
- Expand the Security deposit row in the Payment card on the right.
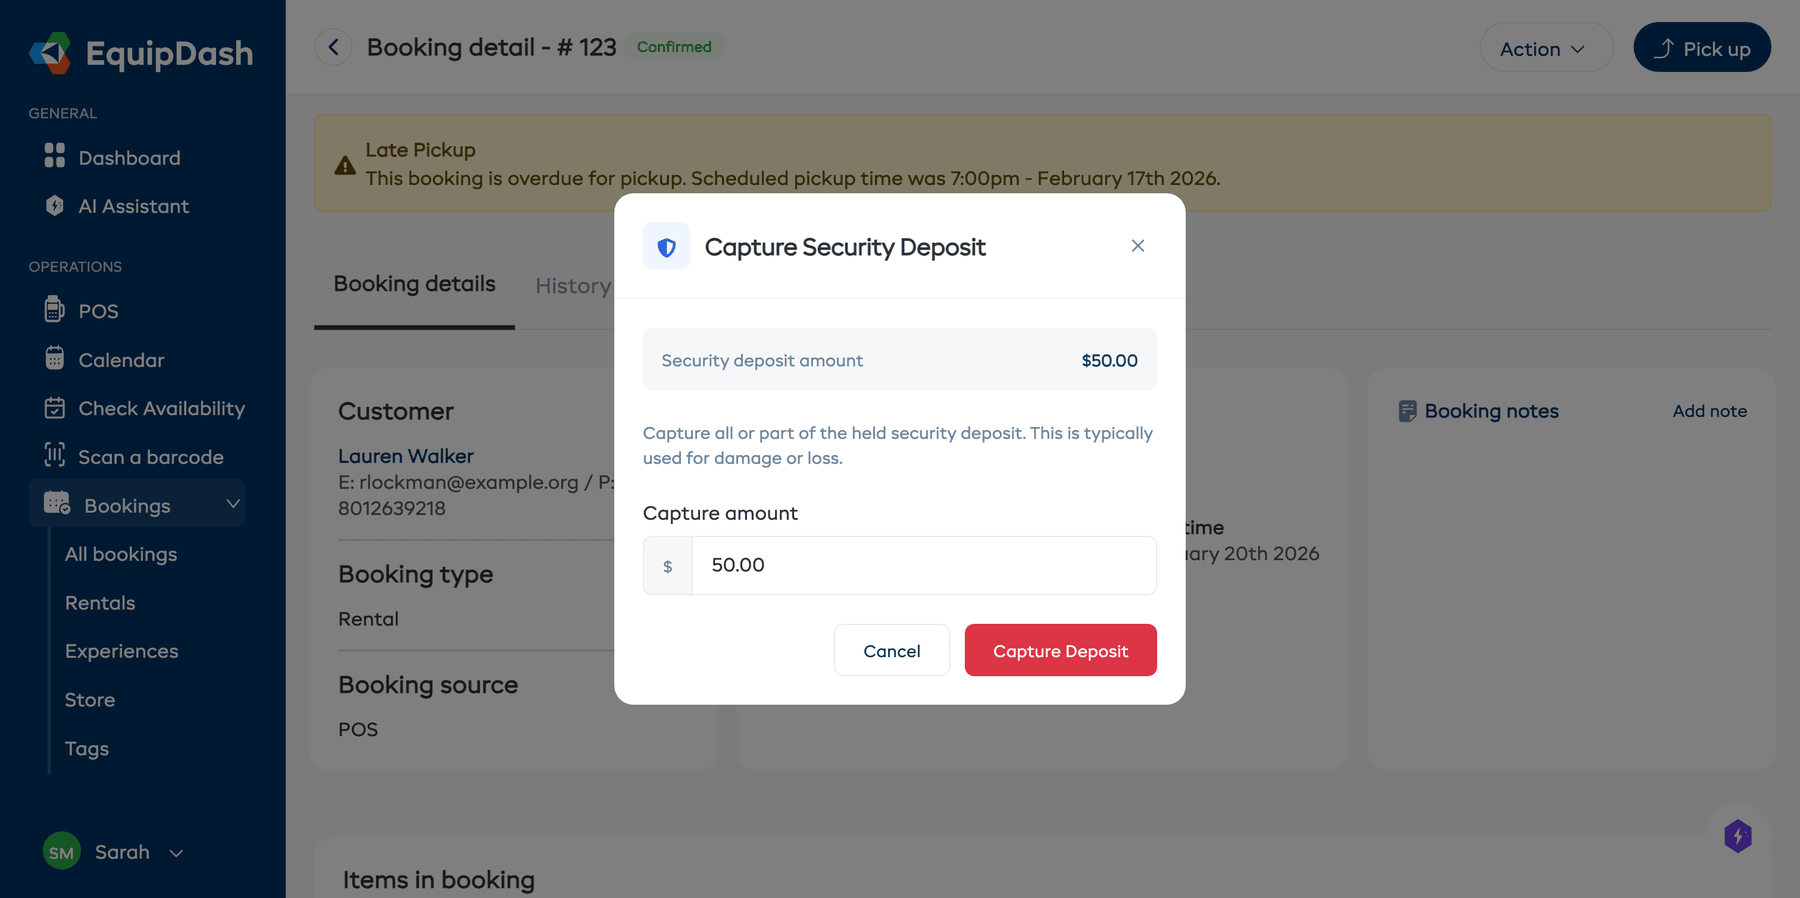
- Click the Capture button.
- Enter the amount to capture in the Capture amount field. This can be the full deposit amount or a partial amount.
- Click Capture Deposit.
The captured amount is transferred to your Stripe account. If you captured less than the full deposit, the remaining amount is released back to the customer.
Setting Up Security Deposits
Security deposits are configured in three places, depending on what you want to control:
- Settings > Payments > Checkout, Deposits & Card Readers -- choose your preferred deposit method (Hold or Charge).
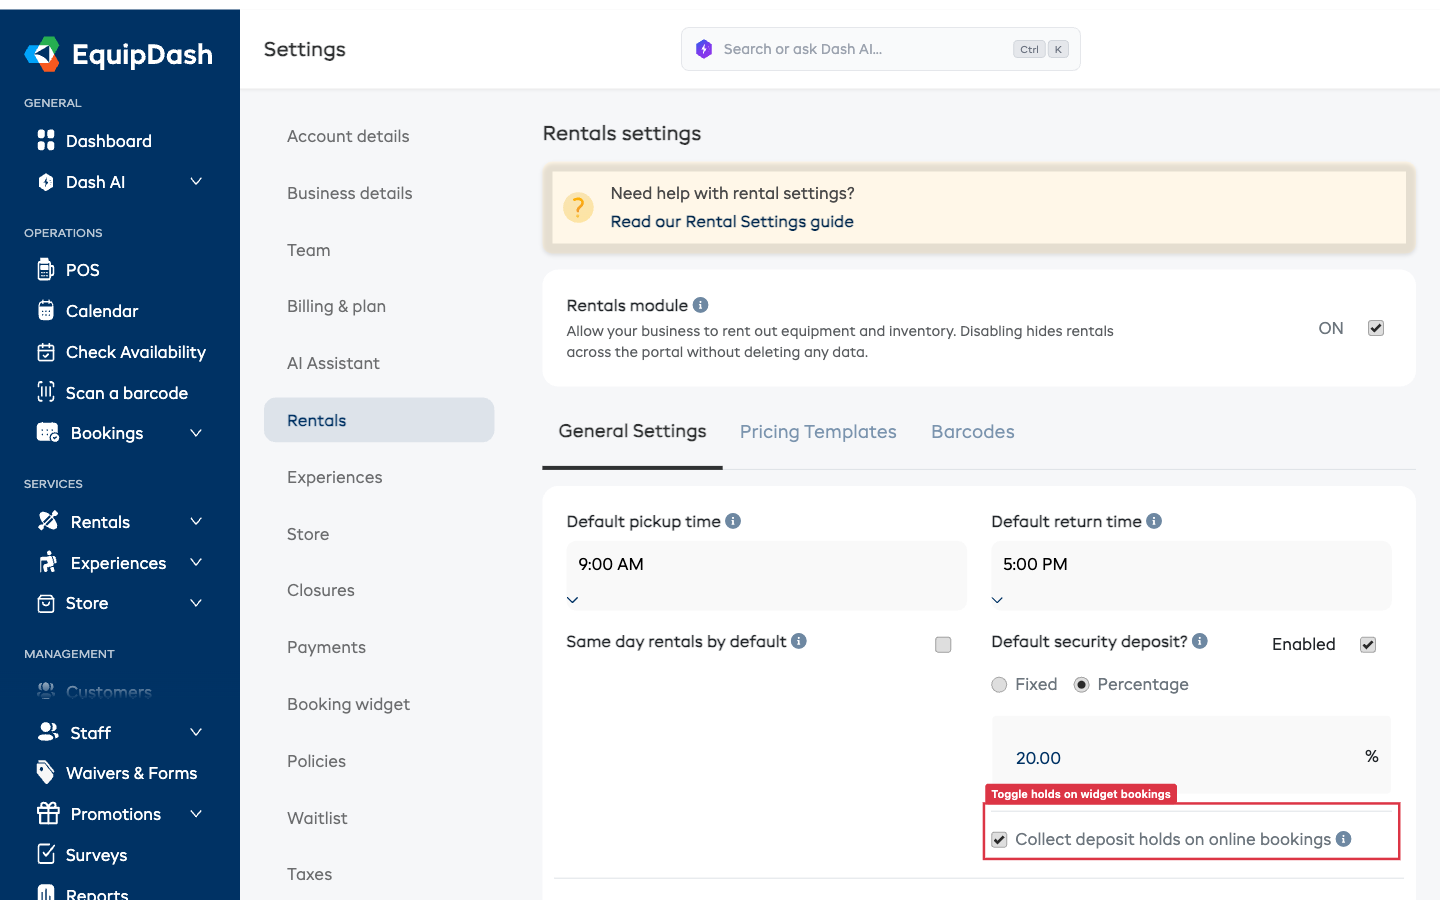
- Settings > Rentals > General Settings -- set the default deposit amount (fixed or percentage) that applies to every rental product, and toggle whether widget bookings collect a hold automatically.
- The product detail page -- override the default on a single product (e.g. a high-value boat) without affecting the rest of your catalog. See Per-Product Security Deposit below.
Per-Product Security Deposit
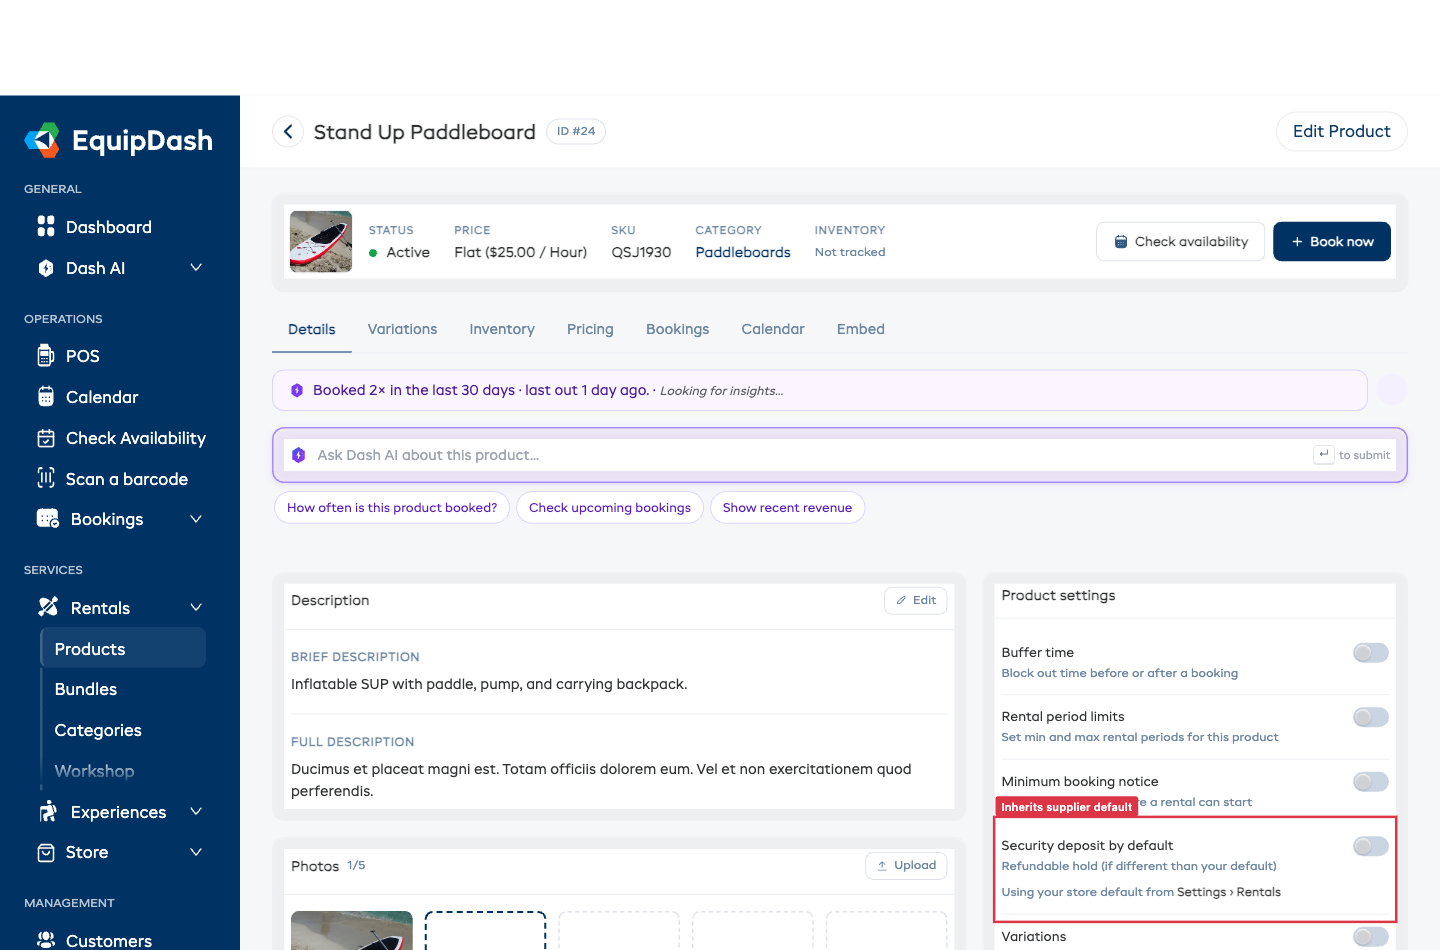
Every rental product has a Security deposit by default toggle on its detail page. The toggle has two states:
- Off (default) -- this product follows your supplier default from Settings > Rentals. 99% of products should stay on this setting.
- On -- this product requires a deposit. You can optionally enter a custom hold amount if a high-value item (e.g. a $750 pontoon) needs a larger hold than your default.
To change the per-product setting:
- Open the product from Rentals > Products and click the product name.
- In the Product settings card on the right of the detail page, find the Security deposit by default row.
- Click the toggle to turn it on. Leave Store default blank to use the supplier default, or click the Edit pencil to set a custom amount.
- The change saves immediately.
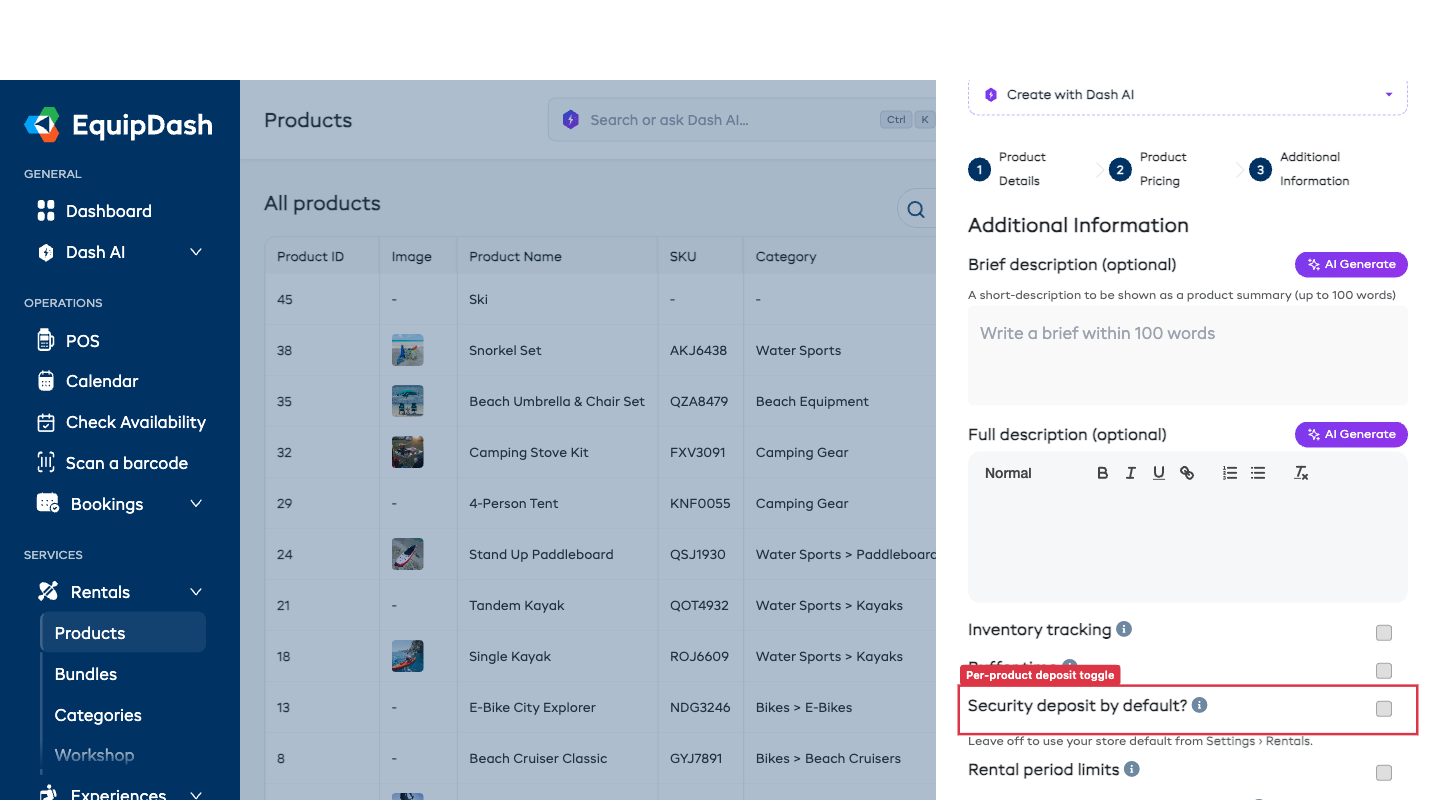
The same toggle also appears in Step 3 (Additional Information) of the Add Product modal when you create a new rental product.
Multi-Item Cart Behavior
When a customer adds several deposit-bearing products to one cart, each per-unit hold is summed into a single booking-level deposit. The widget summary and booking detail both show the combined total.
How the Percentage Default Is Calculated
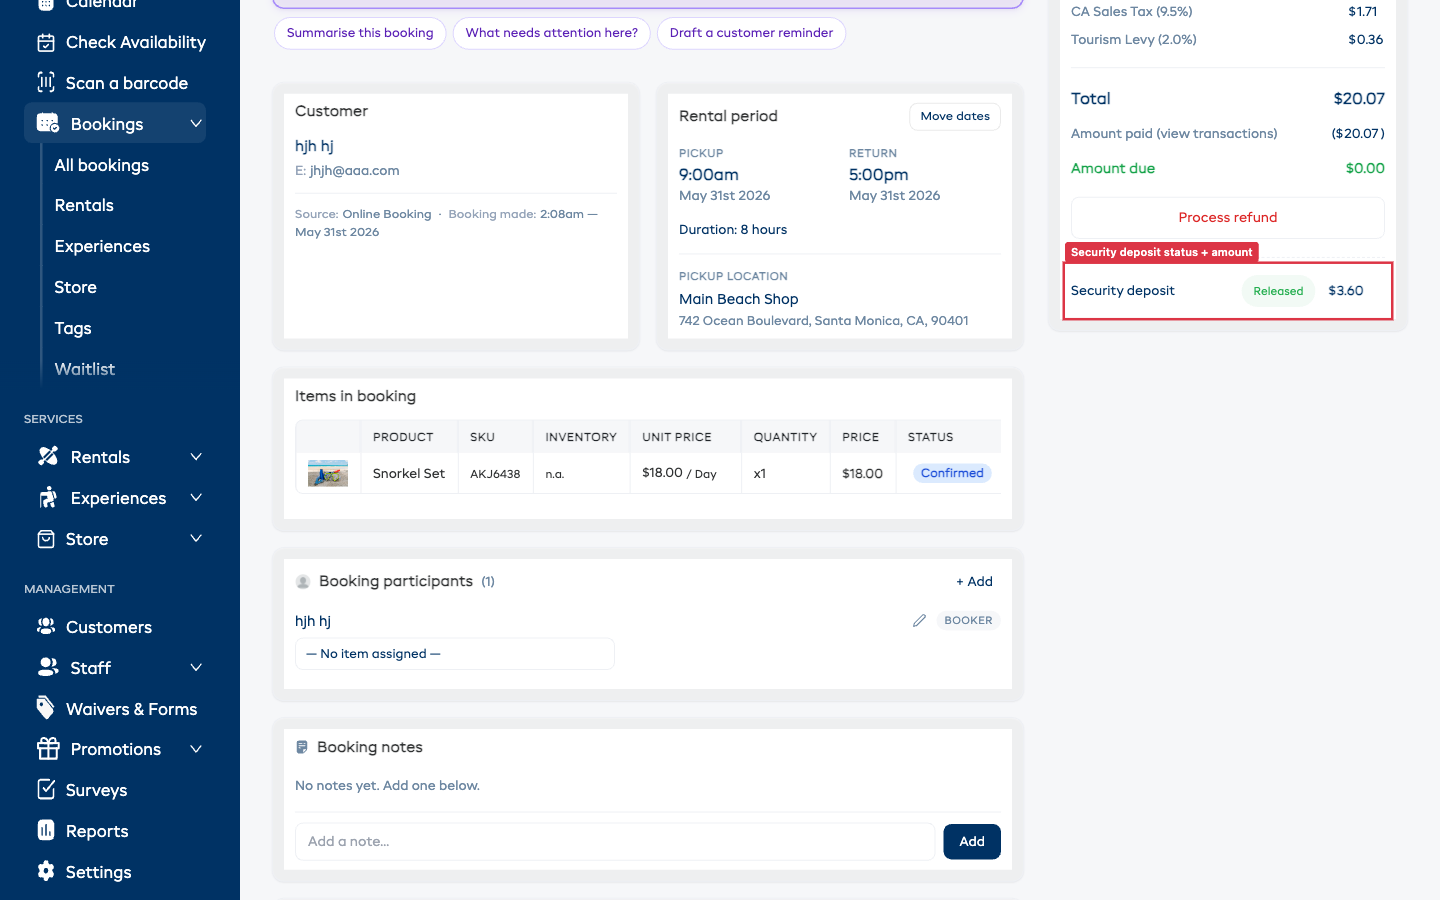
If you set the supplier default to a percentage (e.g. 20%), the percentage applies to the pre-tax subtotal -- not the tax-inclusive total. For example, a cart of $18.00 + $2.07 tax has a 20% deposit of $3.60 (20% of $18.00), not $4.01.
Widget Deposit Holds (Online Bookings)
Customers booking through your website widget can also have a deposit hold placed automatically at checkout, so you do not have to chase them for the hold after the fact.
Turning Widget Holds On
- Go to Settings > Rentals.
- Under Default security deposit, tick Collect deposit holds on online bookings.
- Click Update.
Widget holds are off by default for every supplier -- enabling the checkbox is opt-in.
What the Customer Sees
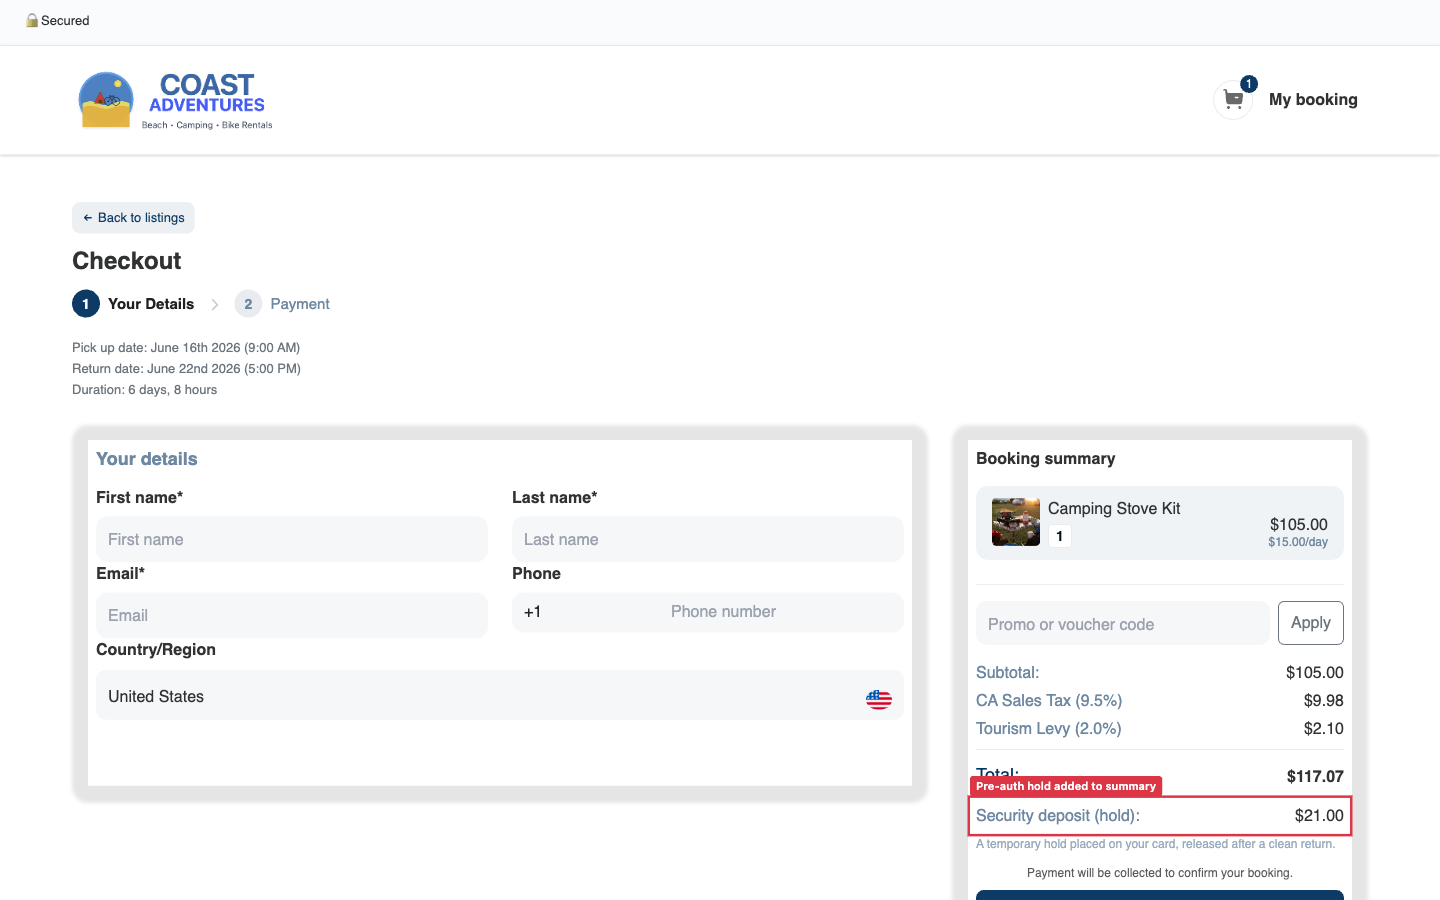
When widget holds are enabled, the checkout summary shows a Security deposit (hold) line under Total, with the helper text "A temporary hold placed on your card, released after a clean return."
When the booking is confirmed, EquipDash collects the deposit on the same card the customer used to pay for the rental, using your Hold vs Charge setting. A hold:
- Is placed automatically and off-session -- most cards do not prompt for a second confirmation.
- Appears as a pending charge on the customer's statement, not a real charge.
- Can later be released or partially captured the same way as in-person holds.
- Is shown on the booking detail page so your team can release or capture it.
The 7-Day Rule (Timing)
A card hold (pre-authorization) only lasts about 7 days before the bank releases it. So a hold placed weeks ahead of a booking would lapse before pickup. EquipDash handles this automatically:
- Booking starts within 7 days -- the deposit is collected at checkout (a hold or a charge, per your setting).
- Booking starts more than 7 days out -- nothing is taken at checkout. EquipDash emails the customer a secure deposit link 7 days before the booking instead. The checkout summary tells the customer this up-front ("we'll email you a secure link 7 days before...").
This applies to both the online checkout and the emailed link, so the timing is consistent however the deposit is collected.
When a Deposit Cannot Be Collected
A small number of cards reject off-session collection (insufficient funds, or a card that needs Strong Customer Authentication). When that happens, EquipDash makes sure you are never in the dark:
- The booking is still created and confirmed.
- Your team gets an email letting you know the deposit was not collected, with the reason.
- The customer is automatically emailed a secure link to pay the deposit on a card with available funds.
- The booking detail page shows a red note with the reason, right under the Security deposit row.
Resending the Deposit Reminder
For a booking within the 7-day window whose deposit is still outstanding, a Resend security deposit reminder action appears under the Security deposit row on the booking detail page. Click it to email the customer the deposit link again. The option disappears once the deposit is paid.
The booking history records every deposit link sent -- and flags the ones EquipDash sent automatically ("Security deposit link sent automatically") versus the ones you sent by hand.
Booking Detail View
The Payment card on the right of the booking detail page shows the deposit amount and current status. Each held or captured deposit also appears as its own row in Payment transactions, with the Stripe PaymentIntent ID for reference.
Important Notes
- Card and payment-link deposits require Stripe to be connected. Manual (cash) deposits do not -- you can record and release them with no Stripe account.
- Pre-authorization holds have a limited duration (typically 7 days). If the hold expires before you release or capture it, you may not be able to capture the funds.
- All deposit actions (hold, release, capture) are logged in the booking's history.
- A Manual deposit records cash (or bank transfer) you physically hold as Held, then Released or Captured on return. The actual cash handling happens in person, but EquipDash tracks the status for you -- no card is involved.
- Widget holds are placed on the same card the customer used for the rental payment. EquipDash does not store an extra card on file for this.