Creating a Schedule Growth+This feature requires the Growth+ plan or higher
The schedule builder lets you plan who works when. Add shifts to individual staff members across the week, repeat shifts onto multiple days in one click, drag shifts around to reorganise, and read everyone's status at a glance.
Getting to the Schedule
- Click Staff in the left sidebar.
- Click Schedule in the Staff submenu.
- The page opens to the current week in Week by Staff Member view.
The subtitle under the page title shows the exact date range you're viewing — for example "Showing schedule for week of Apr-13-26 by staff member."
Understanding the Schedule Grid
The grid is laid out as a weekly table:
- Left column — each staff member's row, with their avatar, name, and total scheduled hours for the week.
- Top row — the days of the week with calendar dates underneath.
- Booking Demand row — shows live booking activity per day. See Booking-Linked Scheduling for what the numbers and colours mean.
- Time Off row — shows approved staff time-off so you don't accidentally schedule someone who's away.
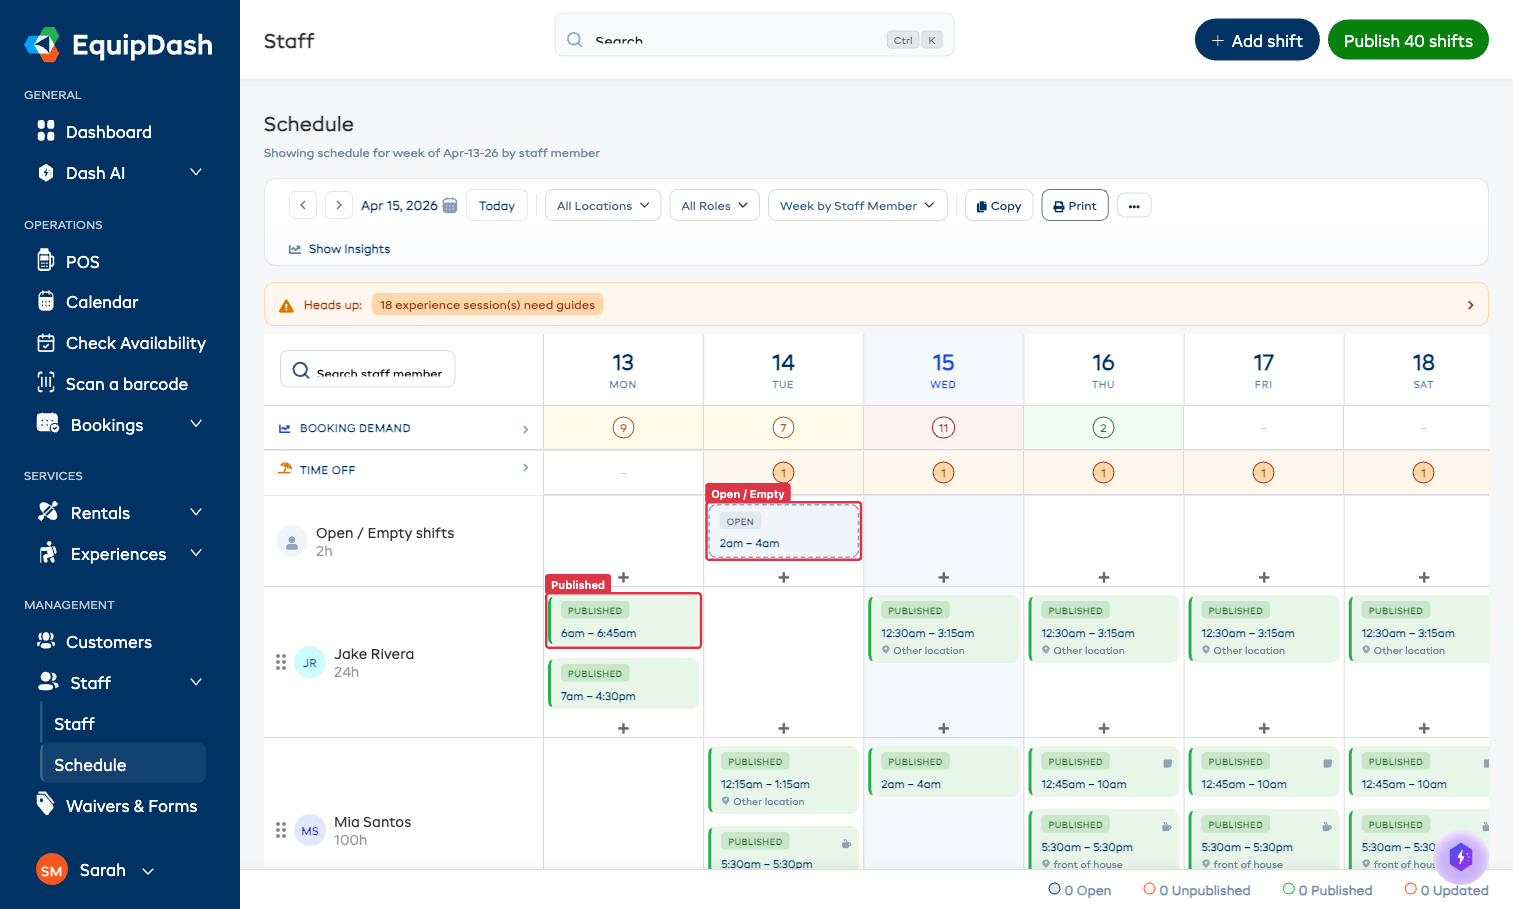
- Open / Empty shifts row — at the top, for shifts that haven't been assigned to anyone yet.
Filtering and Navigating
Use the toolbar above the grid:
| Control | What it does |
|---|---|
< > arrows | Move back / forward one week (or day, two weeks, month — depending on view) |
| Date picker | Jump to a specific week |
| Today | Snap back to the current week |
| All Locations | Filter the grid to one location |
| All Roles | Filter the grid to one staff role (Guide, Front of House, etc.) |
| View (Week by Staff Member) | Switch between Day, Week, Two-Week, Month, and Area views |
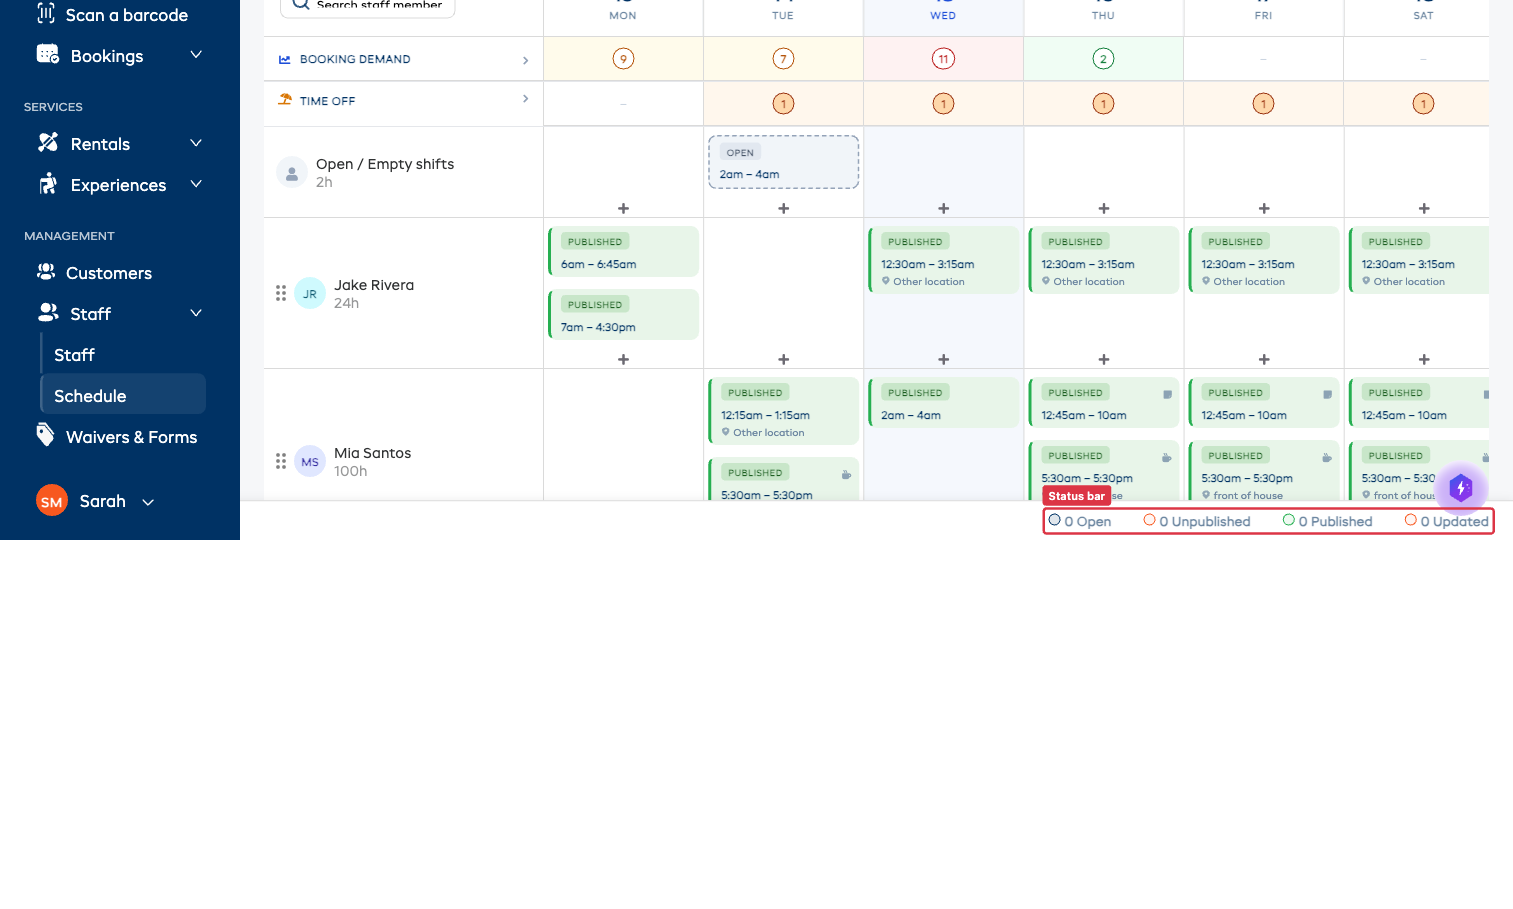
Shift Status Colours
Every shift block is colour-coded by status, so you can read the state of the week without clicking anything.
| Colour | Status | Meaning |
|---|---|---|
| Green | Published | Live and visible to the assigned staff member |
| Light blue | Unpublished | Drafted but not yet sent to staff |
| Amber | Updated | Was published, then edited — needs to be re-published so staff see the change |
| Dashed grey | Open | Not assigned to a specific staff member yet |
The bottom of the page always shows a live count of each status for the current view.
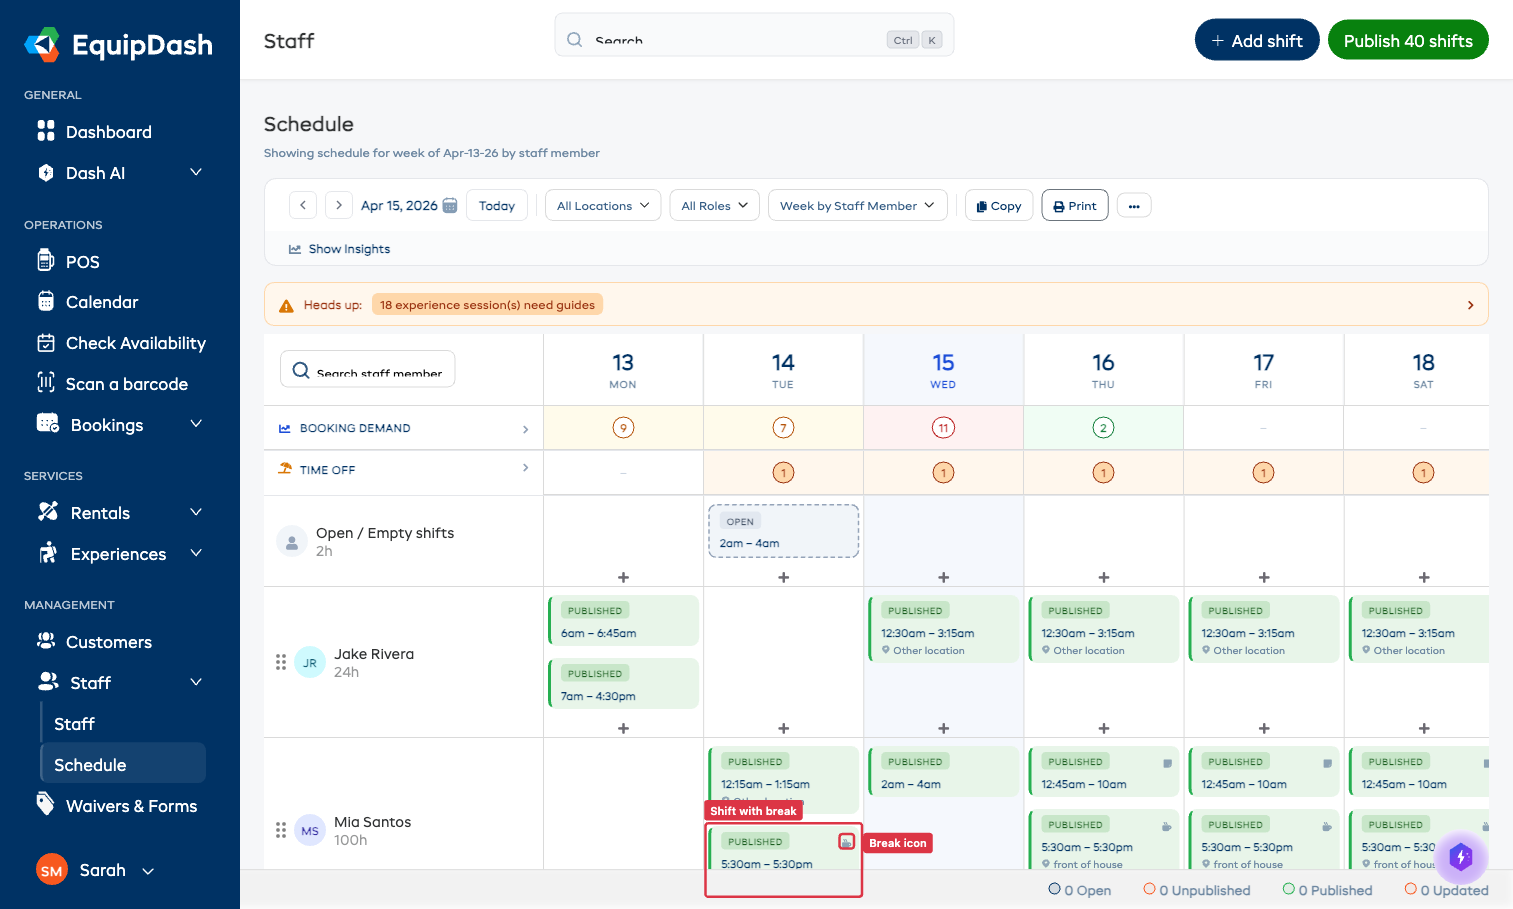
Shift Indicators
Shift blocks include small icons that tell you more without opening the shift:
- Coffee/break icon — the shift has a break configured. Clicking the shift opens the details, where you can see the break type, duration, and whether it's paid.
- Drag handle dots — visible on hover, indicating the shift can be drag-dropped to a different day or staff member.
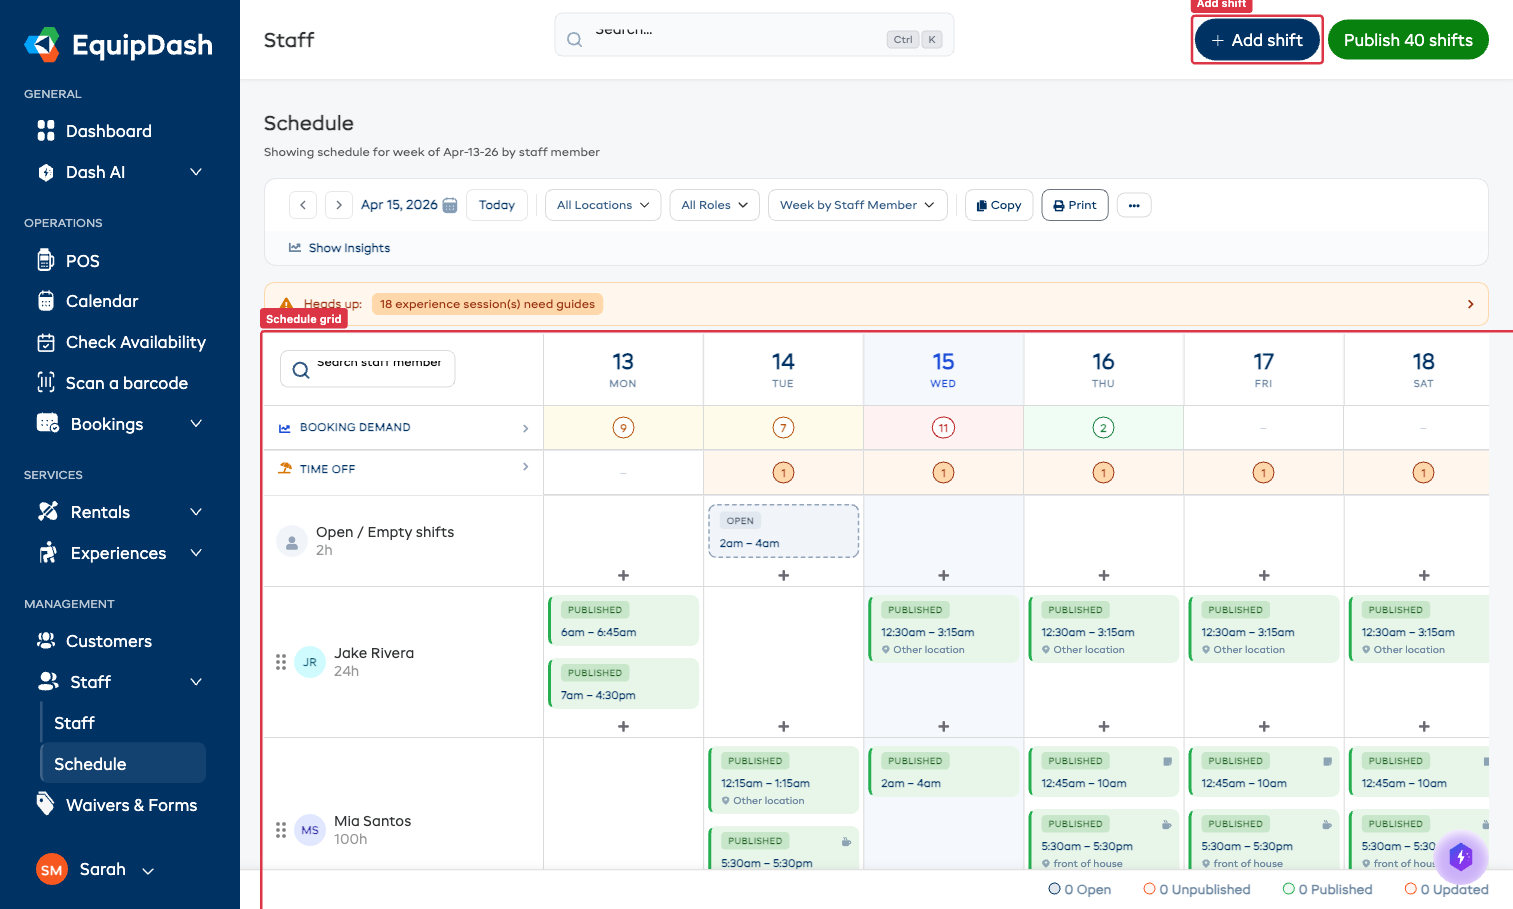
Adding a Shift
Two ways:
Option A — Click the + on an empty cell:
- Find the staff member's row and the day you want.
- Click the
+button in that cell. - The Add new shift panel slides open.
Option B — Use the + Add shift button:
- Click
+ Add shiftin the top-right corner. - The Add new shift panel slides open.
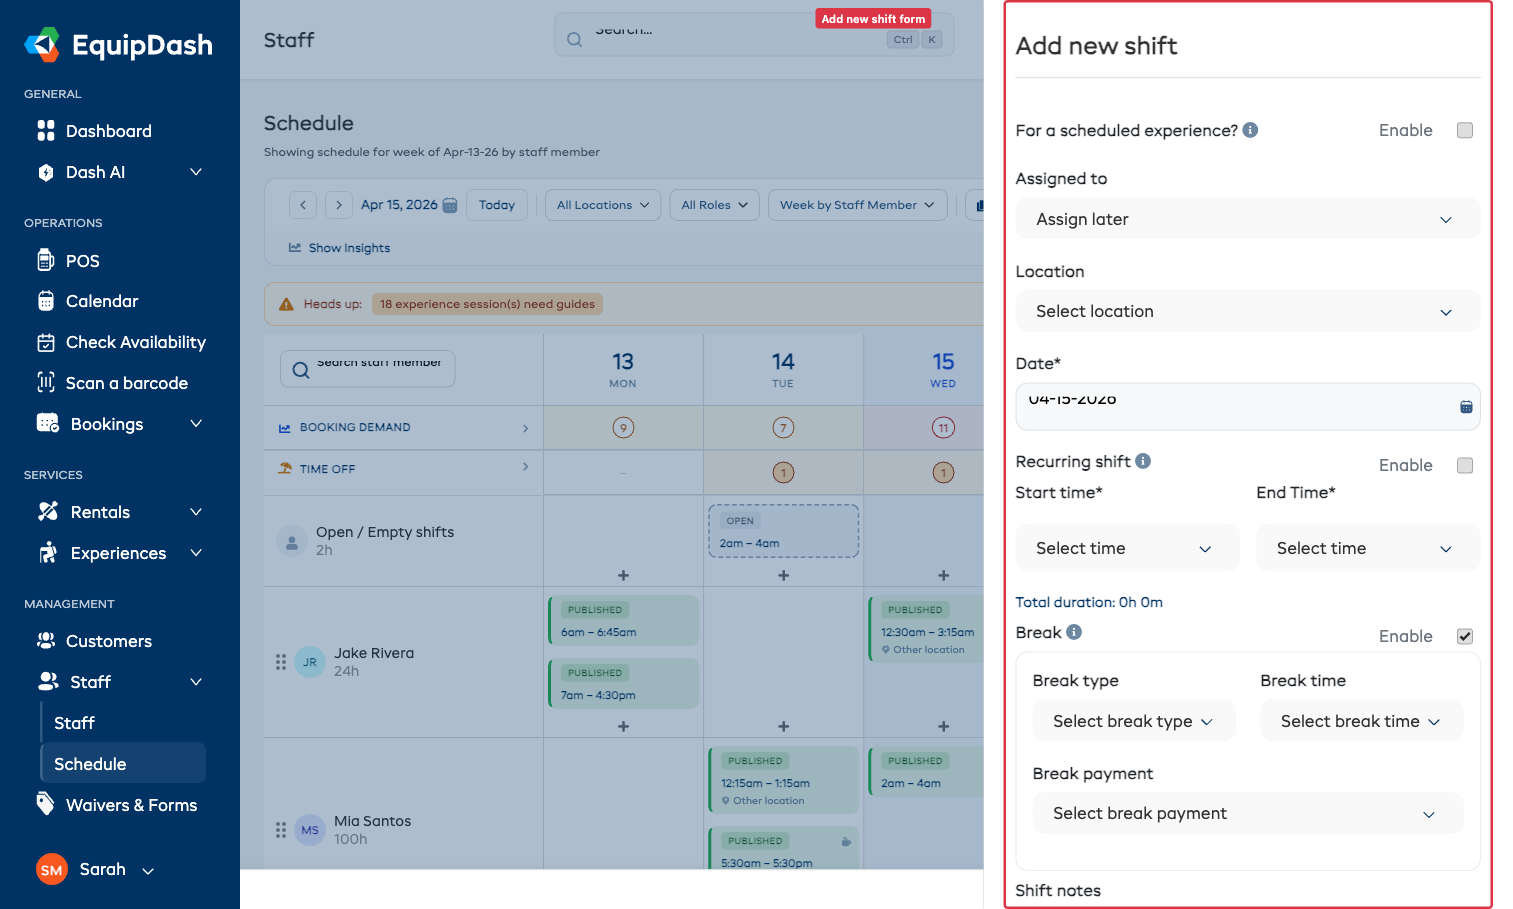
Add Shift Fields
| Field | Description |
|---|---|
| For a scheduled experience? | Toggle on to link this shift to an existing experience session — see below |
| Assigned to | Pick a staff member, or choose Assign later to leave it open |
| Location | Pick a supplier location |
| Date | The date for the shift |
| Recurring shift | Toggle on to set up a repeating pattern (every Monday, etc.) |
| Start time / End Time | The shift window — total duration is calculated automatically |
| Break | Toggle on to configure a break (Meal/Rest/Other, duration, Paid/Unpaid) |
| Shift notes | Optional notes for the staff member |
Click Add to save. Click Cancel to discard.
Linking a Shift to an Experience Session
If you're scheduling a guide for a specific experience session, toggle For a scheduled experience? at the top of the Add Shift form. A picker lets you choose any upcoming session — picking one auto-fills the date, start time, and end time from the experience.

This is the fastest way to make sure shift coverage matches your bookings. For more on guide assignments, see Booking-Linked Scheduling.
Quick Repeat — One Shift, Many Days
You don't have to re-create the same shift over and over. Right-click on any existing shift (or click it and choose Quick actions) to open the actions menu.
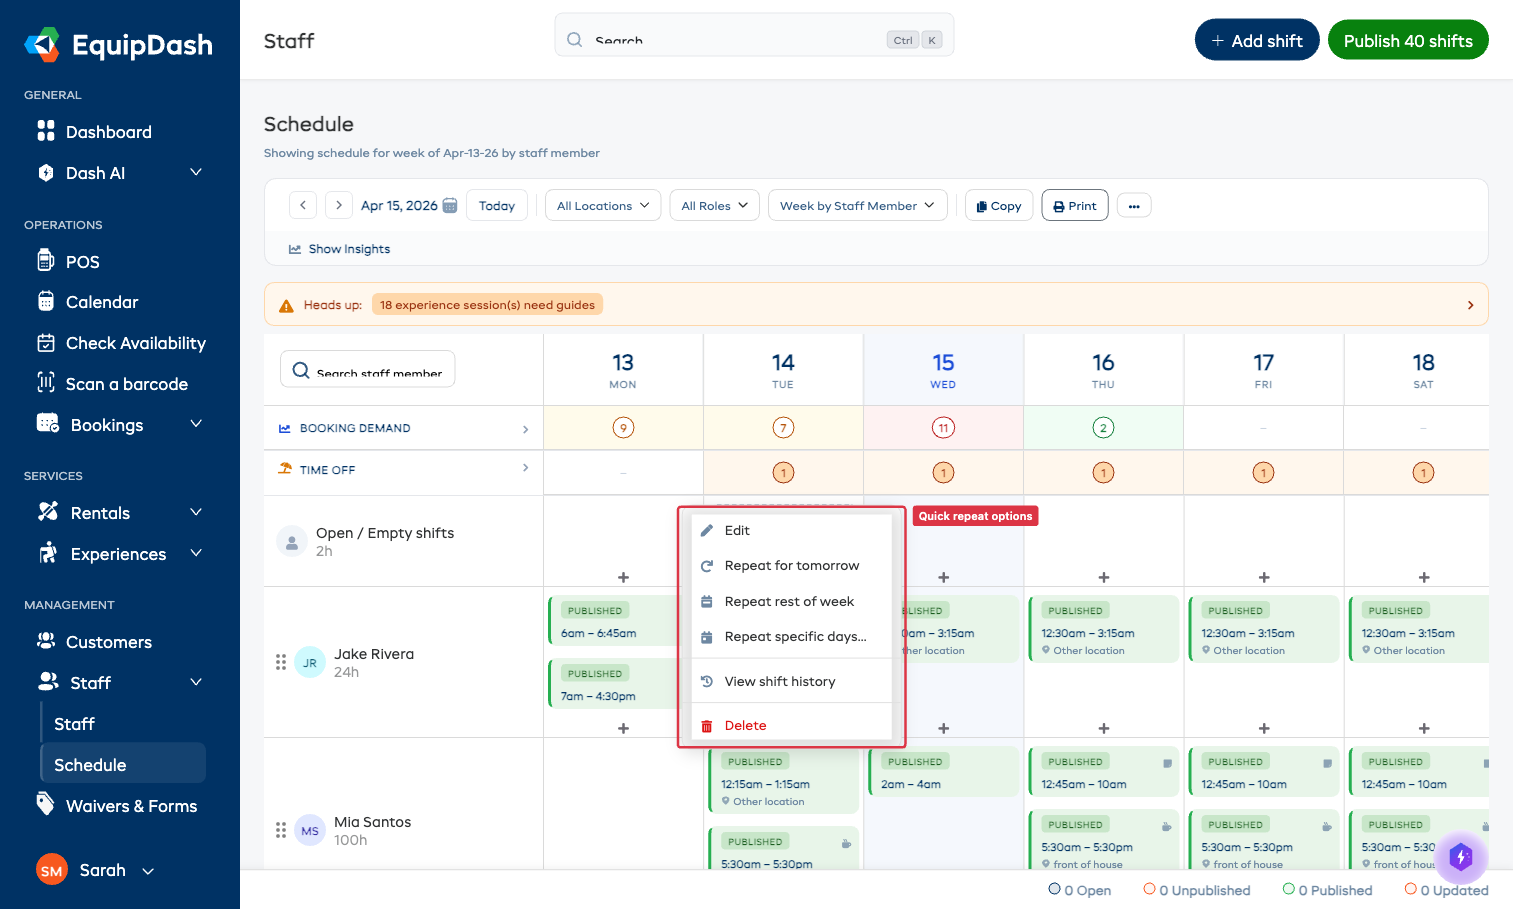
| Action | What it does |
|---|---|
| Repeat for tomorrow | One-click — duplicates the shift onto the next day |
| Repeat rest of week | Duplicates the shift onto every remaining day in the current week |
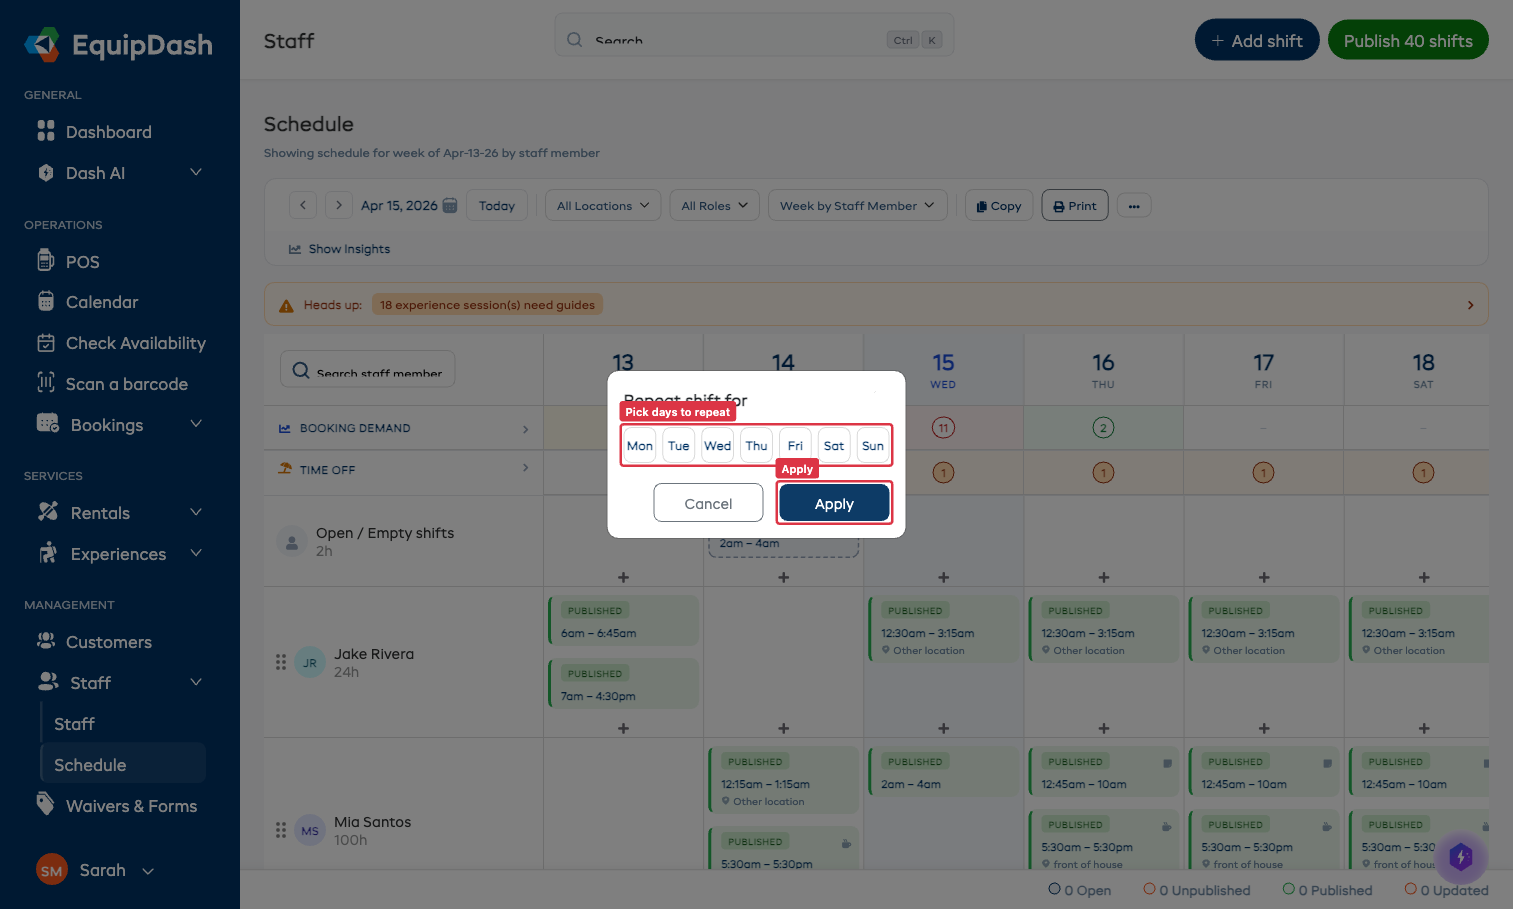
| Repeat specific days… | Opens a day-of-week picker — tick the days you want and Apply |
For copying an entire week's worth of shifts onto a different week, use the Copy button in the toolbar — see Copying a Week's Schedule.
Drag-and-Drop Shifts
Shifts can be moved around the grid with your mouse:
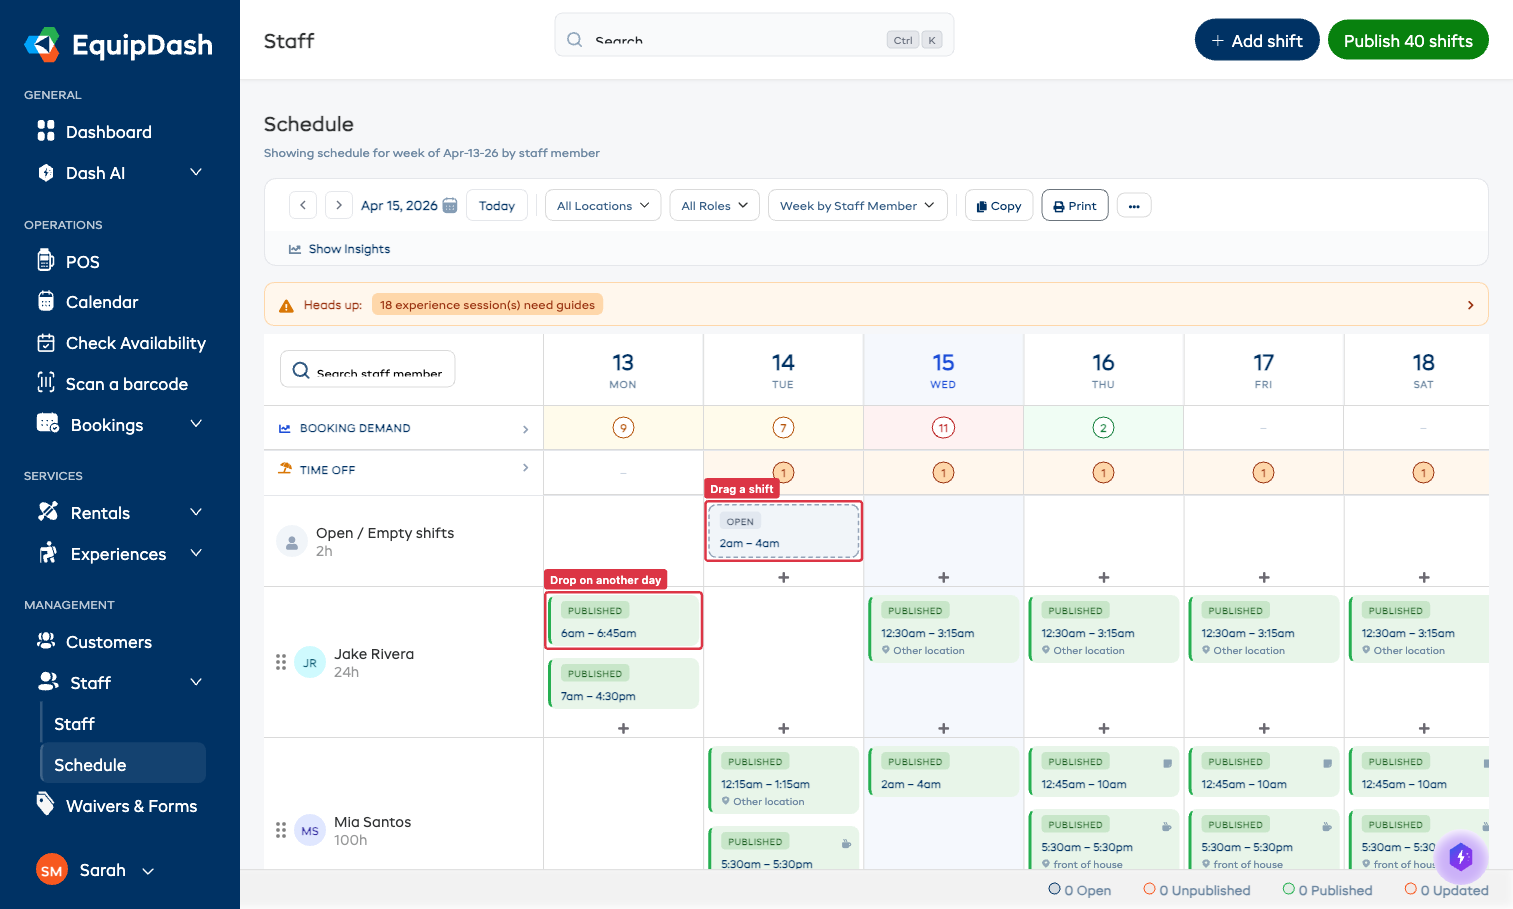
- Drag a shift to a different day in the same staff row — the times stay the same, only the date changes.
- Drag a shift to a different staff member's row to reassign it.
- EquipDash checks for conflicts before allowing the drop — if the target staff member already has an overlapping shift or approved time-off on that date, the drop is blocked with a clear message.
Editing or Deleting a Shift
- Click on an existing shift block in the grid.
- The shift details panel opens.
- Either:
- Update the fields and click Save.
- Click Delete to remove the shift.
Adding a Team Member to the Schedule
If a staff member isn't yet listed in the grid:
- Scroll to the bottom of the staff list on the left.
- Click + Add Team member.
- Pick the staff member to add them to the grid for that week.