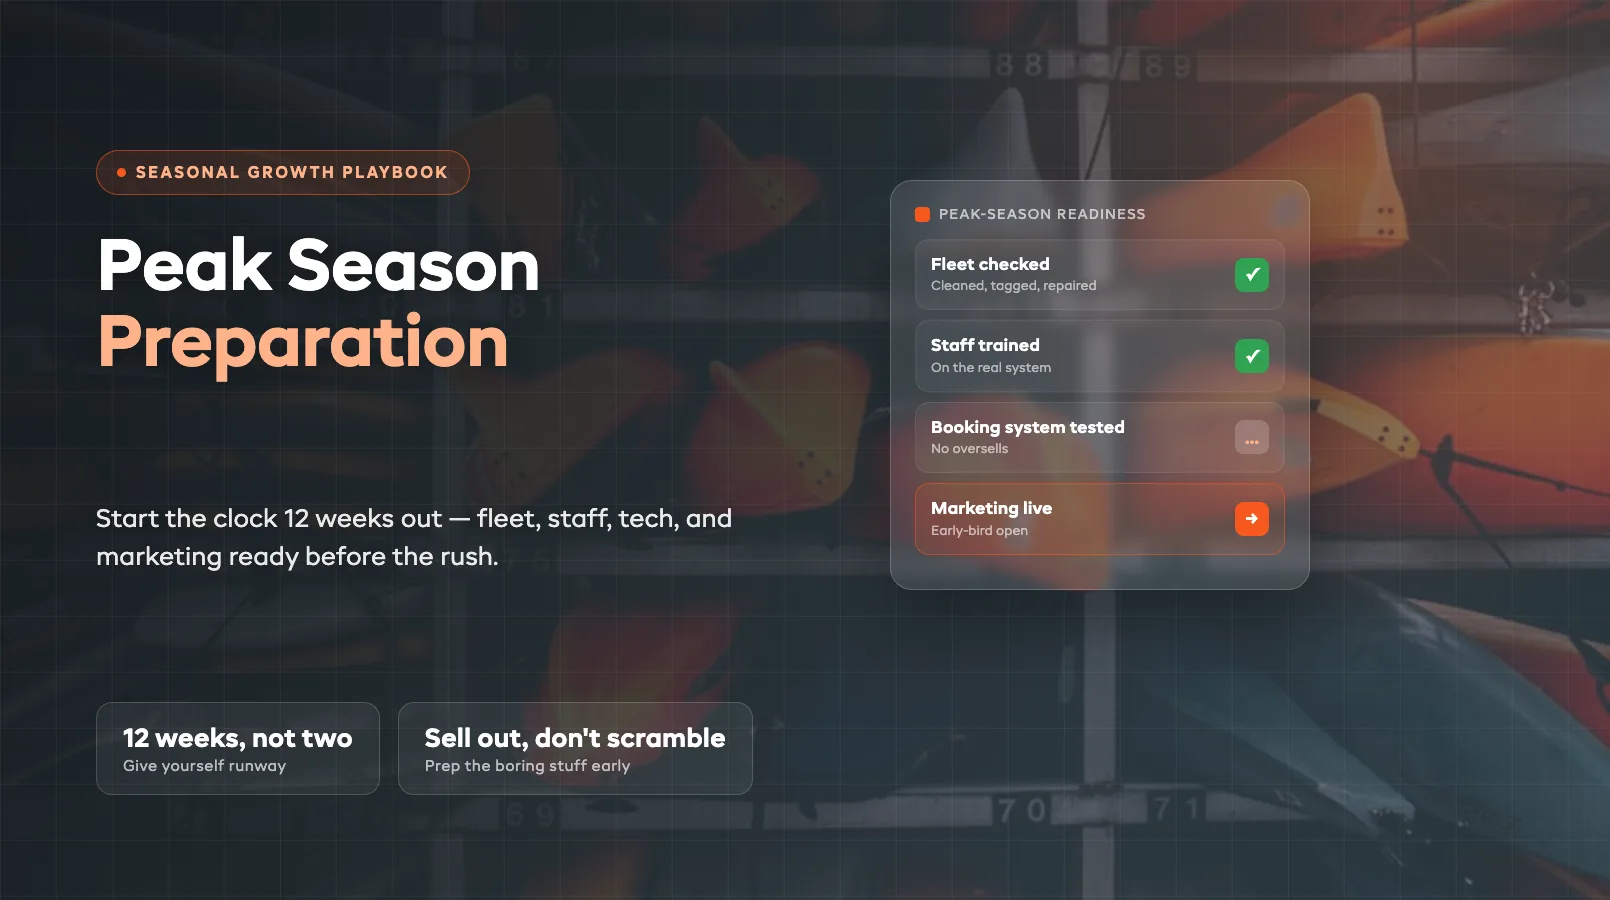
Camping Gear Hygiene at Scale: Cleaning Tents, Bags, Cookware
A tent comes back smelling like campfire smoke and dog hair. A sleeping bag arrives wadded up in a stuff sack with mystery stains. The cookware has last night's chili crusted on the inside. This is Tuesday morning at a camping gear rental shop.
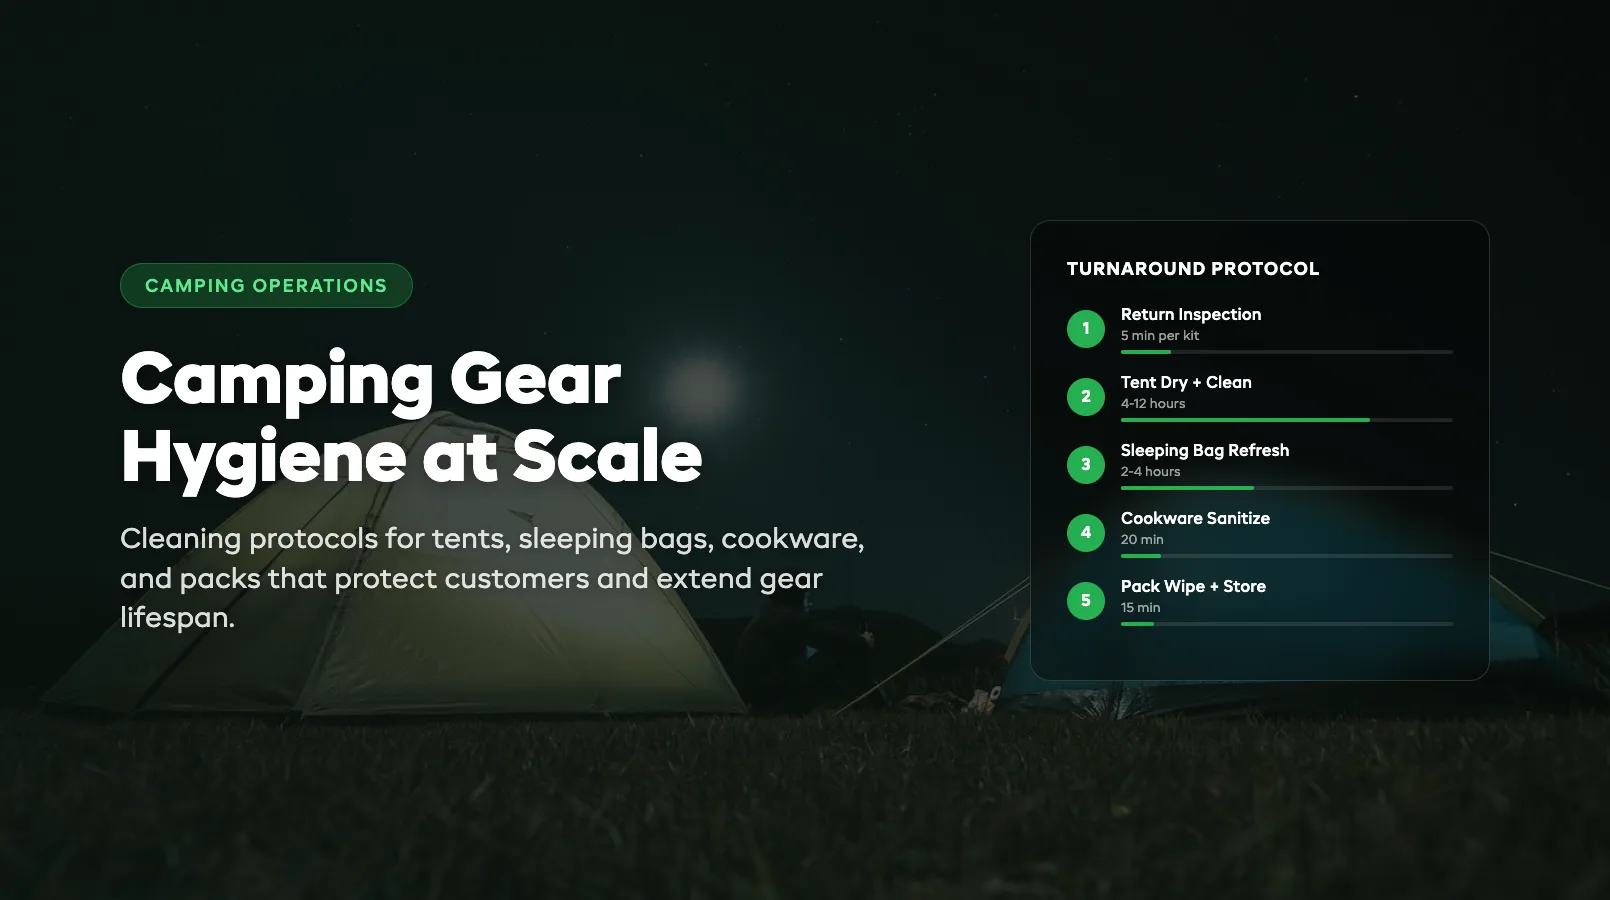
The difference between operators who scale past 50 bookings a week and those stuck at 20 isn't marketing or pricing — it's turnaround speed. And turnaround speed depends entirely on cleaning protocols. If every tent takes 90 minutes to inspect and clean, you cap your fleet utilization at one rental per tent every two days. Cut that to 35 minutes with a repeatable system, and the same fleet handles twice the volume.
This guide walks through cleaning protocols for every major gear category — tents, sleeping bags, cookware, and packs — with the specific steps, timelines, and storage conditions that keep gear safe for the next customer. For the full business playbook including inventory, pricing, and partnerships, start with our complete guide to running a camping gear rental business.
Return Inspection Protocol
Every item that comes back gets the same three-step check before it enters the cleaning pipeline. Skip this and you'll wash gear that should be retired — or worse, send damaged gear out to the next customer.
Step 1: Visual scan (30 seconds per item). Look for tears, broken zippers, bent poles, missing stakes, cracked buckles. Flag anything that needs repair before cleaning.
Step 2: Smell check. Mould, mildew, pet urine, or heavy smoke contamination requires a different cleaning track than normal use. Separate these items immediately.
Step 3: Completeness count. Verify all components are present — tent poles, guy lines, stakes, stuff sacks, pot lids, utensils. Missing items get logged and charged before the customer's deposit is released.
Build this into a post-rental return checklist that your staff follows for every single return. No exceptions, no "I'll check it later." The inspection happens at the counter while the customer is still there. That's how you catch damage early and avoid he-said-she-said disputes about missing stakes three days later.
Turnaround target: A trained staff member should complete inspection for a full 4-person camping kit in under 5 minutes. If it's taking longer, your checklist has too many steps or your staging area layout needs work.
Tent Drying and Cleaning
Tents are the most time-consuming item to turn around, and the one most operators get wrong. The critical rule: a tent must be bone dry before it goes into storage. Packing a damp tent guarantees mould within 48 hours — and mould means retirement.
The drying protocol:
- Unpack immediately. Don't let a returned tent sit in its stuff sack. Every hour it stays packed damp, you're growing mildew.
- Set up fully. Pitch the tent in your drying area — indoor if you have space, outdoor under shade if not. Direct sunlight degrades waterproof coatings, so keep it out of harsh UV.
- Open all doors and vents. Airflow is everything. Point a fan at it if indoors. Minimum drying time: 4 hours for a dry-weather return, 8-12 hours for a rain-soaked tent.
- Spot clean. Use a soft sponge with lukewarm water and mild soap (no detergent) on mud, bird droppings, or food stains. Never machine wash a tent — it destroys the waterproof membrane.
- Inspect seams. While it's pitched, check seam tape for peeling. Re-seal any lifted sections with seam sealer before storage.
The footprint trick. Issue a ground tarp (footprint) with every tent rental. This catches 80% of the dirt and moisture that would otherwise soak into the tent floor. One $15 footprint extends a tent's lifespan by 30-40 rentals. Reference your tent pre-rental inspection checklist to confirm waterproofing and zipper function before each deployment.
Batch processing tip. Set up your drying area with numbered stations. First-in, first-out. Tag each tent with its return time so you know which ones are ready to pack. A 10-station rotation gives you continuous throughput during peak season.
Sleeping Bag Care
Sleeping bags are the second-highest hygiene concern for customers after cookware. Nobody wants to zip into a bag that smells like the last three renters. Your cleaning protocol needs to balance hygiene with fabric care — aggressive washing destroys loft and insulation performance.
Between every rental:
- Remove the liner (if you use removable liners — you should). Liners wash in a standard machine on gentle cycle and dry in under an hour.
- Shake the bag out thoroughly. Inspect for stains, tears, and zipper function.
- Hang in a ventilated area for 2-4 hours minimum. A light spray of fabric-safe deodorizer is fine here — enzymatic cleaners work best.
- Spot-treat any visible stains with a damp cloth and mild soap.
Deep wash (every 5-8 rentals or when contaminated):
- Front-loading commercial washer only. Top-loaders with agitators shred baffles.
- Use down-specific detergent (Nikwax Down Wash or similar) for down bags. Synthetic bags can handle standard gentle detergent.
- Wash on cold, gentle cycle. Two rinse cycles to remove all soap residue.
- Tumble dry on low with 2-3 clean tennis balls. This re-lofts the insulation. Takes 2-3 hours — don't rush it.
- Verify loft has recovered before returning to inventory.
Follow your sleeping bag cleaning and care protocol to track wash counts per bag. A down bag typically handles 40-60 washes before loft degrades noticeably. Synthetic bags last 80-100 washes. Track this number and you'll know exactly when to retire a bag — no guessing.
The liner economics. A removable sleeping bag liner costs $8-12 wholesale. It adds 3 minutes to your turnaround (pull liner, insert fresh one) but reduces full bag washes by 70%. For a bag that gets rented 3 times per week in summer, that's the difference between monthly deep washes and weekly ones. Your bag lasts twice as long.
Cookware Sanitation
Cookware is a food-safety issue. Unlike tents and bags where "clean enough" might slide, pots and pans need to meet the same standard you'd expect at a restaurant. Customers with allergies or dietary restrictions are trusting that your cookware is genuinely clean.
Standard turnaround process:
- Disassemble completely. Remove handles, lids, pot grippers. Check inside stove fuel connectors for residue.
- Hot water soak (10 minutes minimum) with dish soap. This loosens baked-on food.
- Scrub with non-abrasive pad. Steel wool scratches non-stick coatings and creates bacteria-trapping grooves in aluminum.
- Sanitize. A quick dip in diluted food-safe sanitizer solution (same concentration used in commercial kitchens — 200ppm quaternary ammonium or 50-100ppm bleach solution).
- Air dry completely. No towel drying — towels reintroduce bacteria. Use a drying rack with good airflow.
- Visual inspection under good light. Check for residue in corners, handle joints, and lid rims.
Camp stove maintenance: Run your camp stove and fuel system inspection between each rental. Check for fuel leaks, blocked jets, corroded connectors, and damaged ignition systems. A malfunctioning stove is a safety liability, not just a cleanliness issue.
Kit packaging. Once clean and dry, nest cookware sets together in the order they'll be unpacked. Include a laminated card showing what's in the set and basic use instructions. This reduces "where's the pot lid" phone calls and makes return inspection faster — you can match items against the card.
Pack Cleaning
Backpacks accumulate sweat, sunscreen, insect repellent, and food residue over multiple rentals. They're also the item customers most often return with items still inside (headlamps, water bladders, snack wrappers).
Every-return cleaning:
- Empty completely. Check every pocket, every compartment, the hydration sleeve, hip belt pockets. You'll find forgotten items in roughly 1 out of 5 returns.
- Shake out debris. Turn the pack upside down. Sand, crumbs, and pine needles accumulate in the bottom.
- Wipe down interior. Damp cloth with mild soap on the main compartment floor and hydration sleeve.
- Clean contact surfaces. The hip belt, shoulder straps, and back panel absorb the most sweat. Wipe with an antibacterial solution and let air dry.
- Check adjustment points. Verify all straps, buckles, and load lifters work smoothly. Replace any frayed webbing.
Deep clean (every 10 rentals):
- Hand wash in a bathtub or large basin with lukewarm water and gentle soap. Never machine wash — frame stays can bend, foam padding compresses, and waterproof coatings delaminate.
- Rinse thoroughly. Soap residue attracts dirt.
- Hang to dry with all zippers open and pockets spread out. Allow 24-48 hours.
Run through your backpack pre-rental inspection before each deployment. Pay special attention to the frame stay alignment and hip belt buckle — these are the failure points that ruin a customer's trip.
Hydration bladder protocol. If you rent bladders with your packs, they need their own cleaning track: rinse immediately, dry with the tube disconnected and cap off, store with a rolled paper towel inside to prevent mould. Or skip the hassle and rent bladders as a separate add-on that customers can purchase if they prefer.
Storage Conditions
You've done the hard work of cleaning. Now don't undo it with bad storage. Improper storage is the silent fleet killer — gear that looked perfect in September comes out of the off-season closet in March with mould, rodent damage, or material degradation.
Climate requirements:
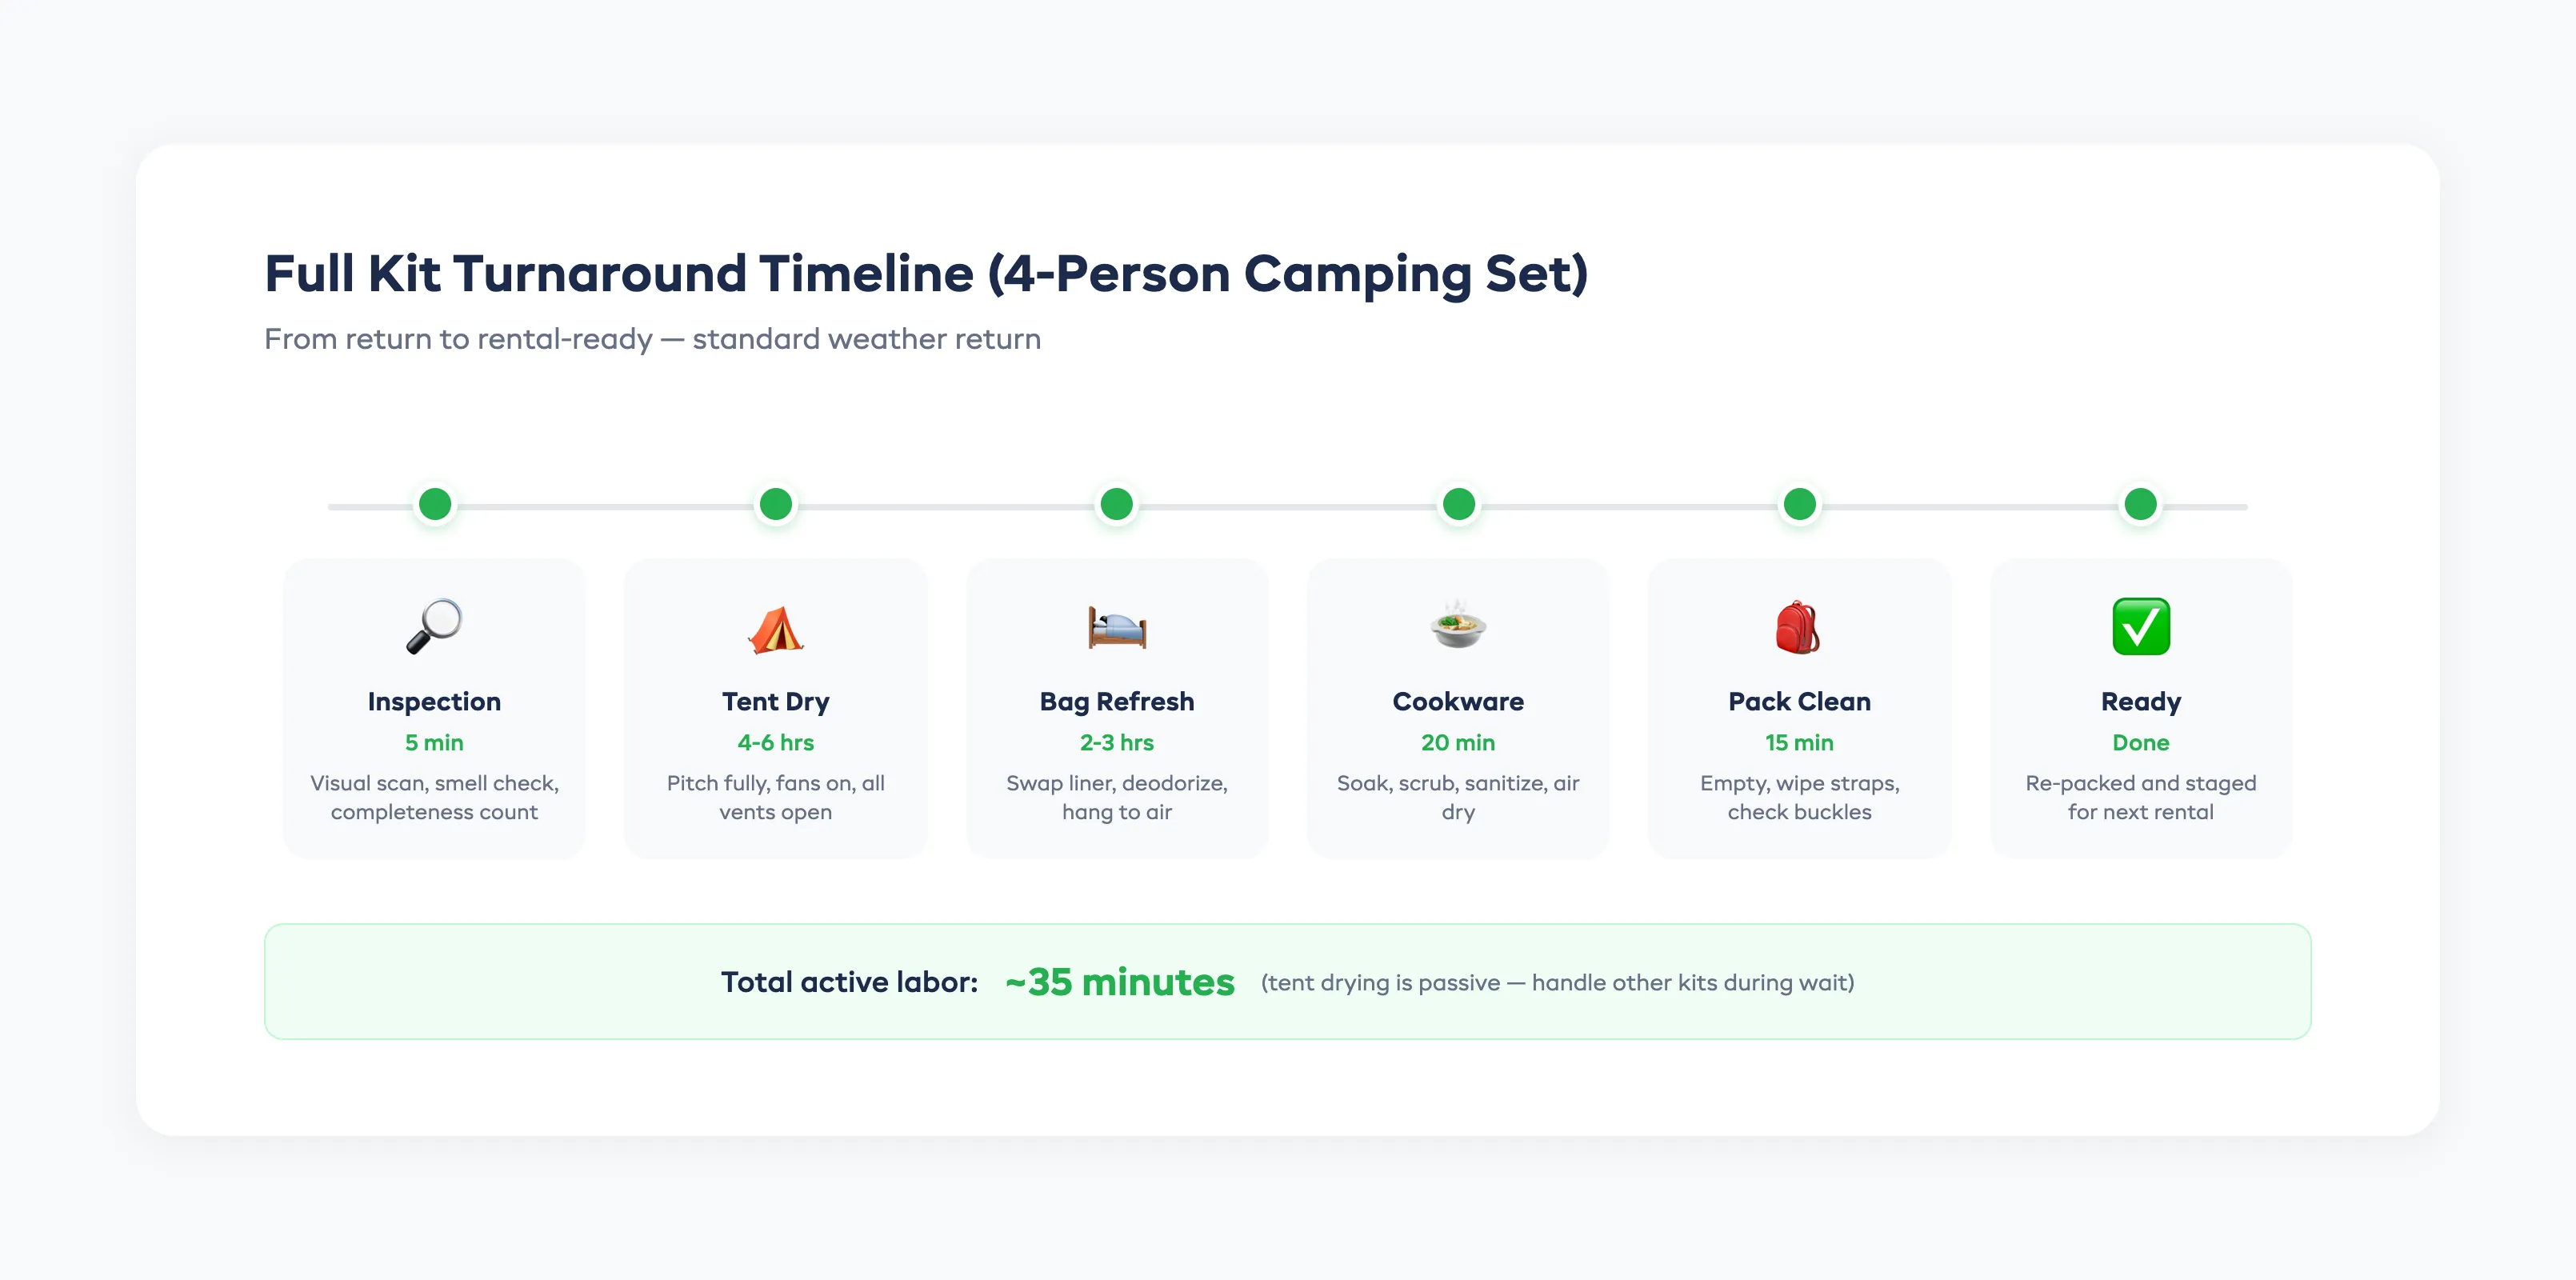
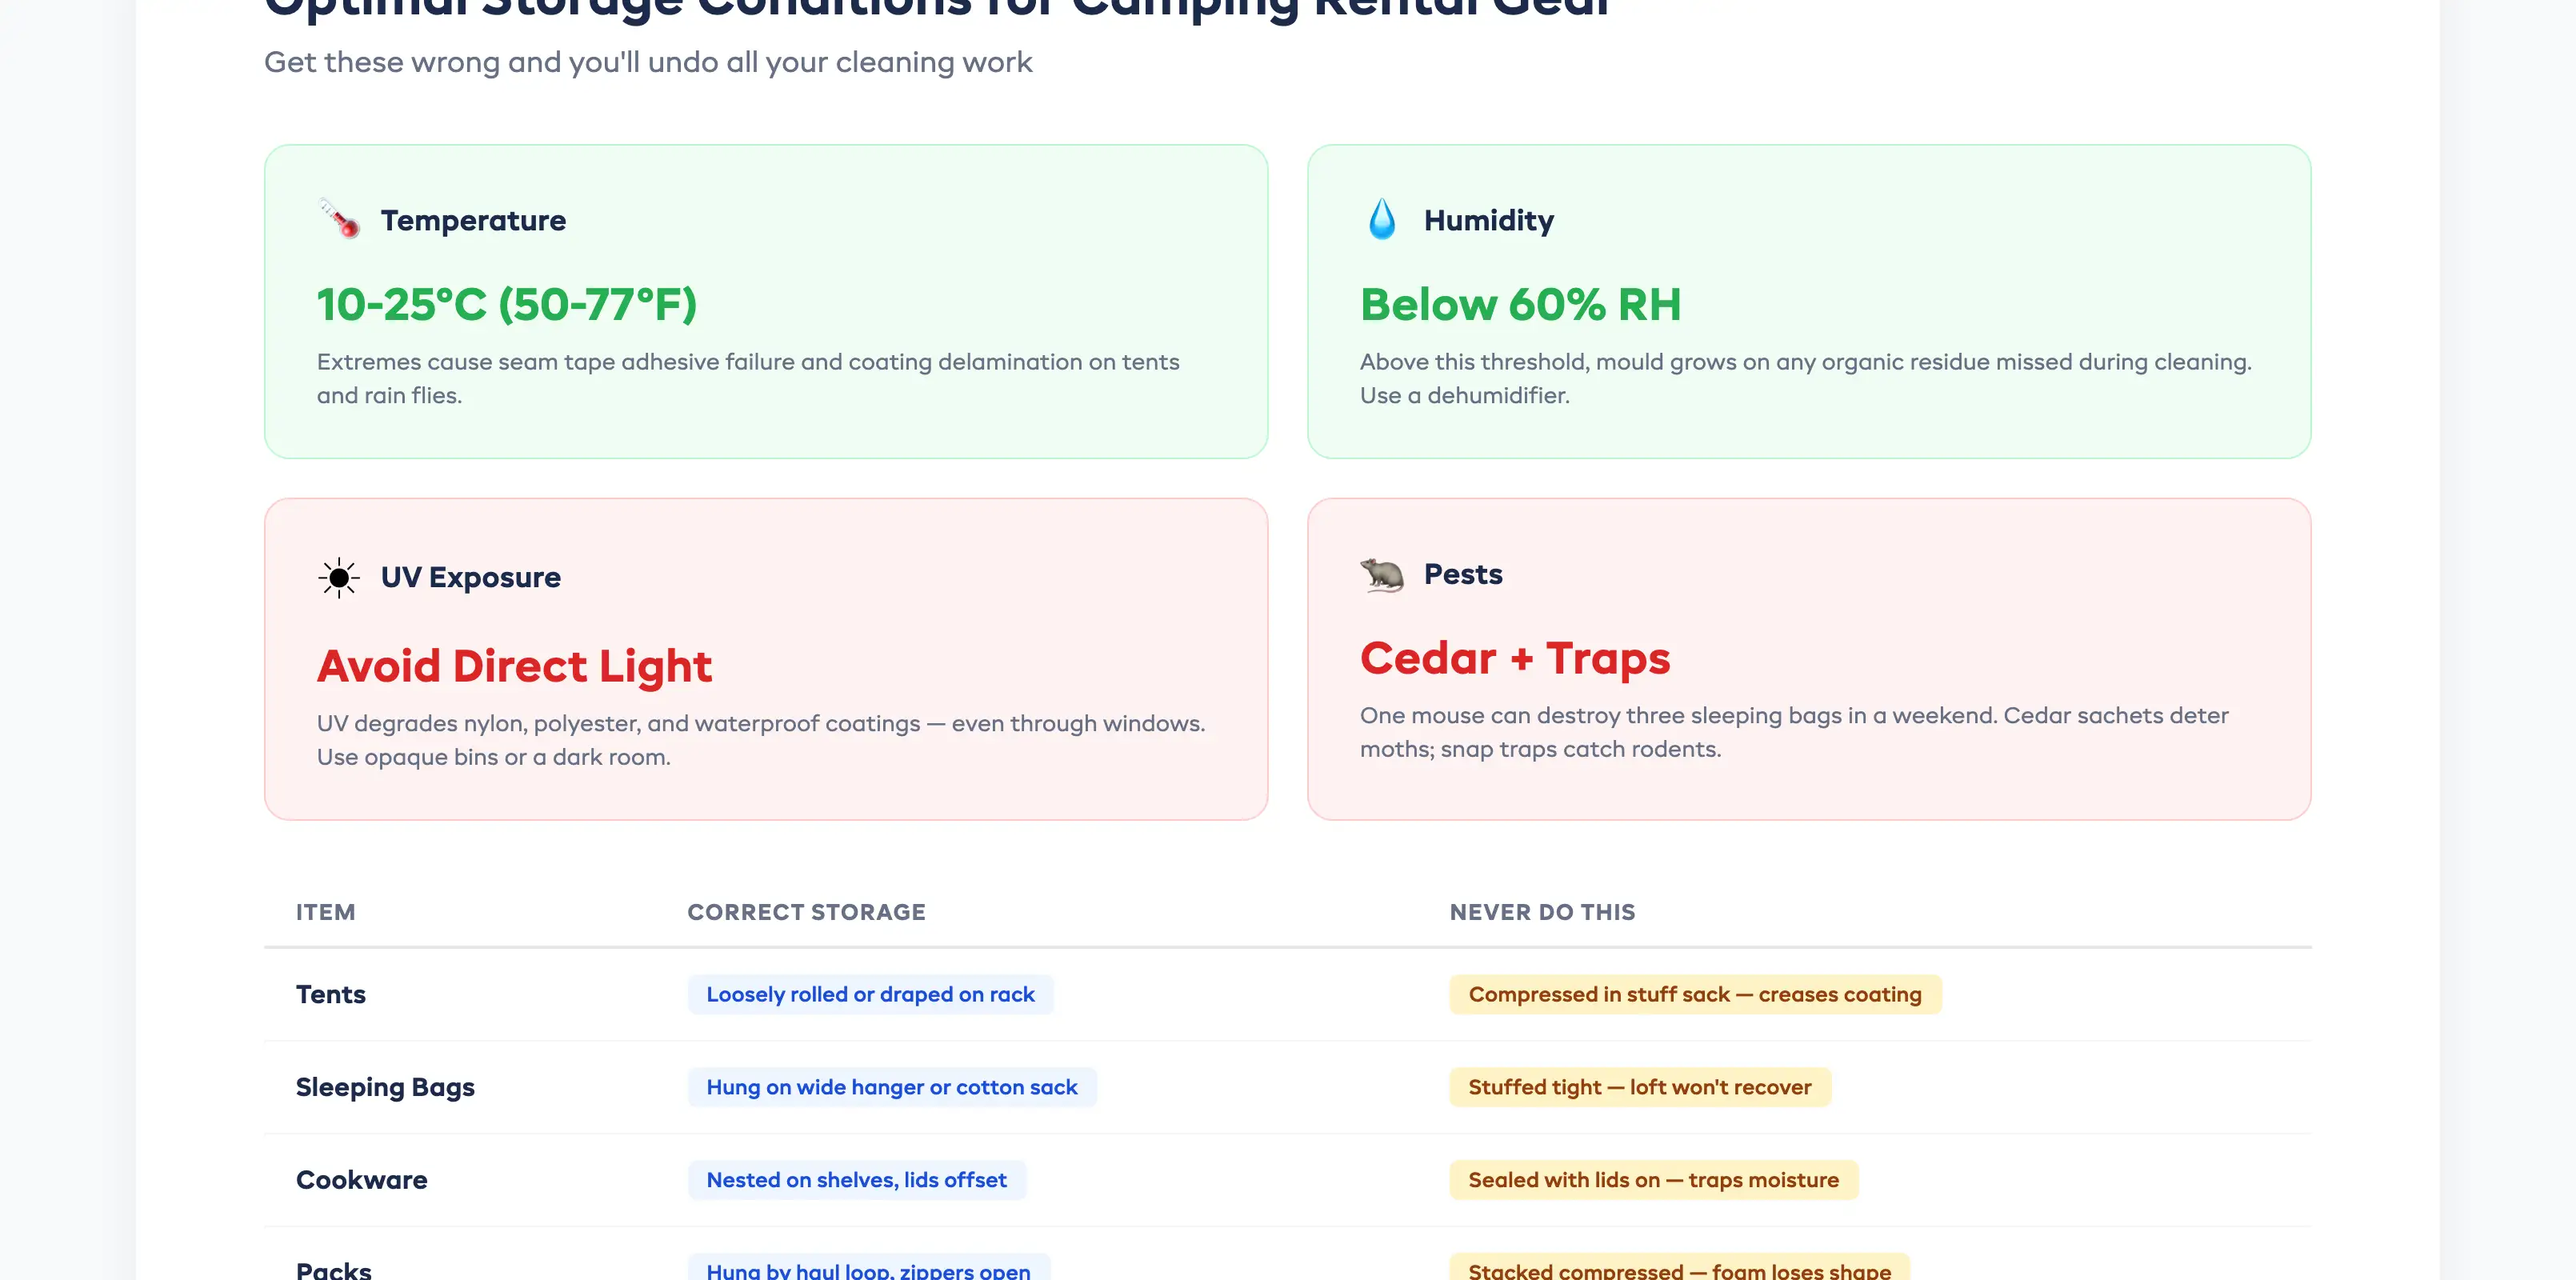
- Temperature: 10-25°C (50-77°F). Extremes cause adhesive failures in seam tape and coating delamination.
- Humidity: Below 60%. Above this threshold, mould grows on any organic residue you missed during cleaning. A dehumidifier in your storage area pays for itself in one season of preserved gear.
- Light: Minimal. UV degrades nylon, polyester, and waterproof coatings even through windows. Opaque bins or a windowless room.
Storage format by item:
| Item | Storage Method | Why |
|---|---|---|
| Tents | Loosely rolled or draped over a rack — never compressed in stuff sack | Compression creases waterproof coating |
| Sleeping bags | Hung on wide hangers or stored in large cotton sacks | Compressed loft doesn't recover |
| Cookware | Nested in sets on shelves, lids offset for airflow | Trapped moisture causes corrosion |
| Packs | Hung by the haul loop, all zippers open | Compressed foam loses shape |
Pest prevention. Cedar blocks or sachets between stored items deter moths and rodents. Check traps monthly. One mouse can destroy three sleeping bags in a weekend by nesting in the loft.
For more on how gear rotation, booking flow, and inventory connect to the cleaning pipeline, visit the camping & hiking hub.
Seasonal rotation. At the start of each season, pull everything out. Re-inspect. Test zippers, inflate pads, check waterproofing with a spray bottle. Anything that doesn't pass gets repaired or retired before it costs you a bad review. This pairs well with the pre-season camping fleet audit to catch degradation early.
Dash AI can flag items approaching wash-count thresholds or nearing retirement age based on rental frequency. Set up automated alerts so you're not manually tracking 200 sleeping bags in a spreadsheet.
If you handle backcountry multi-day returns, build extra turnaround time into your cleaning schedule — gear from 5-day trips needs priority processing, especially tents packed wet and sleeping bags that were compressed for days.
FAQ
How often should rental tents be deep cleaned?
After every return, tents need a spot clean and full dry. A deeper scrub of the entire tent body — floor, fly, and mesh panels — should happen every 3-5 rentals depending on the conditions. If a tent came back from a muddy festival campsite, that's an immediate deep clean regardless of cycle count.
Can sleeping bags be machine washed?
Yes, but only in front-loading commercial machines without agitators. Use down-specific detergent for down bags, gentle detergent for synthetic. Cold water, gentle cycle, two rinse cycles. Tumble dry on low with tennis balls for 2-3 hours. Never dry clean — the solvents destroy insulation.
What's the fastest way to dry a tent after a rain-soaked return?
Pitch it fully open in your drying area with fans pointed at it. All doors and vents open. Industrial fans can cut drying time from 12 hours to 4-6 hours for a rain-soaked tent. Never use a heater or direct heat source — it warps poles and degrades coatings.
How do you prevent mould in stored camping gear?
Three things: dry everything completely before storage (zero residual moisture), maintain storage humidity below 60% with a dehumidifier, and never compress tents or bags in stuff sacks for long-term storage. Loose storage allows airflow that prevents moisture pockets.
What cookware cleaning standard should rental operators follow?
Follow commercial kitchen sanitation standards: hot water wash, food-safe sanitizer dip at 200ppm quaternary ammonium or 50-100ppm bleach solution, complete air drying on a rack. This protects customers with allergies and meets health department standards if your jurisdiction requires inspection.
How many rentals before a sleeping bag needs replacing?
Down bags typically last 40-60 deep washes (200-400 rentals with liners). Synthetic bags handle 80-100 washes (400-600 rentals with liners). Track wash counts per bag and check loft recovery after each wash. When a bag no longer lofts fully after tumble drying, it's time to retire it.
Is it worth investing in removable sleeping bag liners?
Absolutely. A $10 liner reduces full bag washes by 70%, extends bag lifespan by 2x, and adds only 3 minutes to turnaround time. For a bag rented 150 times per year, liners are the single highest-ROI hygiene investment you can make.
Keeping gear clean isn't glamorous work. But it's what separates the shops with 4.8-star reviews ("gear was spotless and smelled great") from the ones getting refund requests ("the sleeping bag smelled like wet dog"). Build the protocol once, train your staff, track your wash counts, and let your pricing structure reflect the quality you're delivering. And if you're handling backcountry multi-day returns, build extra turnaround time into your schedule — that gear needs priority processing.
in one place