Check What's Inside a Product
A contents list records the parts handed out with one rental product. Staff check the same list when packing the product and when it comes back. You can set a quantity and an optional replacement cost for each part.
The pickup and return checklist is internal. Customers can choose an included part's size or option on the booking page when you link another product and enable Customer picks the option.
The contents list lives on the product, not on a bundle or a booking. Set it up once on the product and it runs automatically on every booking that includes that product - at pickup and at return, on the web app and the mobile app.
Turn It On for a Product
Contents tracking is off by default. Switch it on for any product that's made of multiple parts.
You can turn it on in two places - whichever is handier:
From the product's add/edit panel
- Open Rentals > Products and add a new product or edit an existing one.
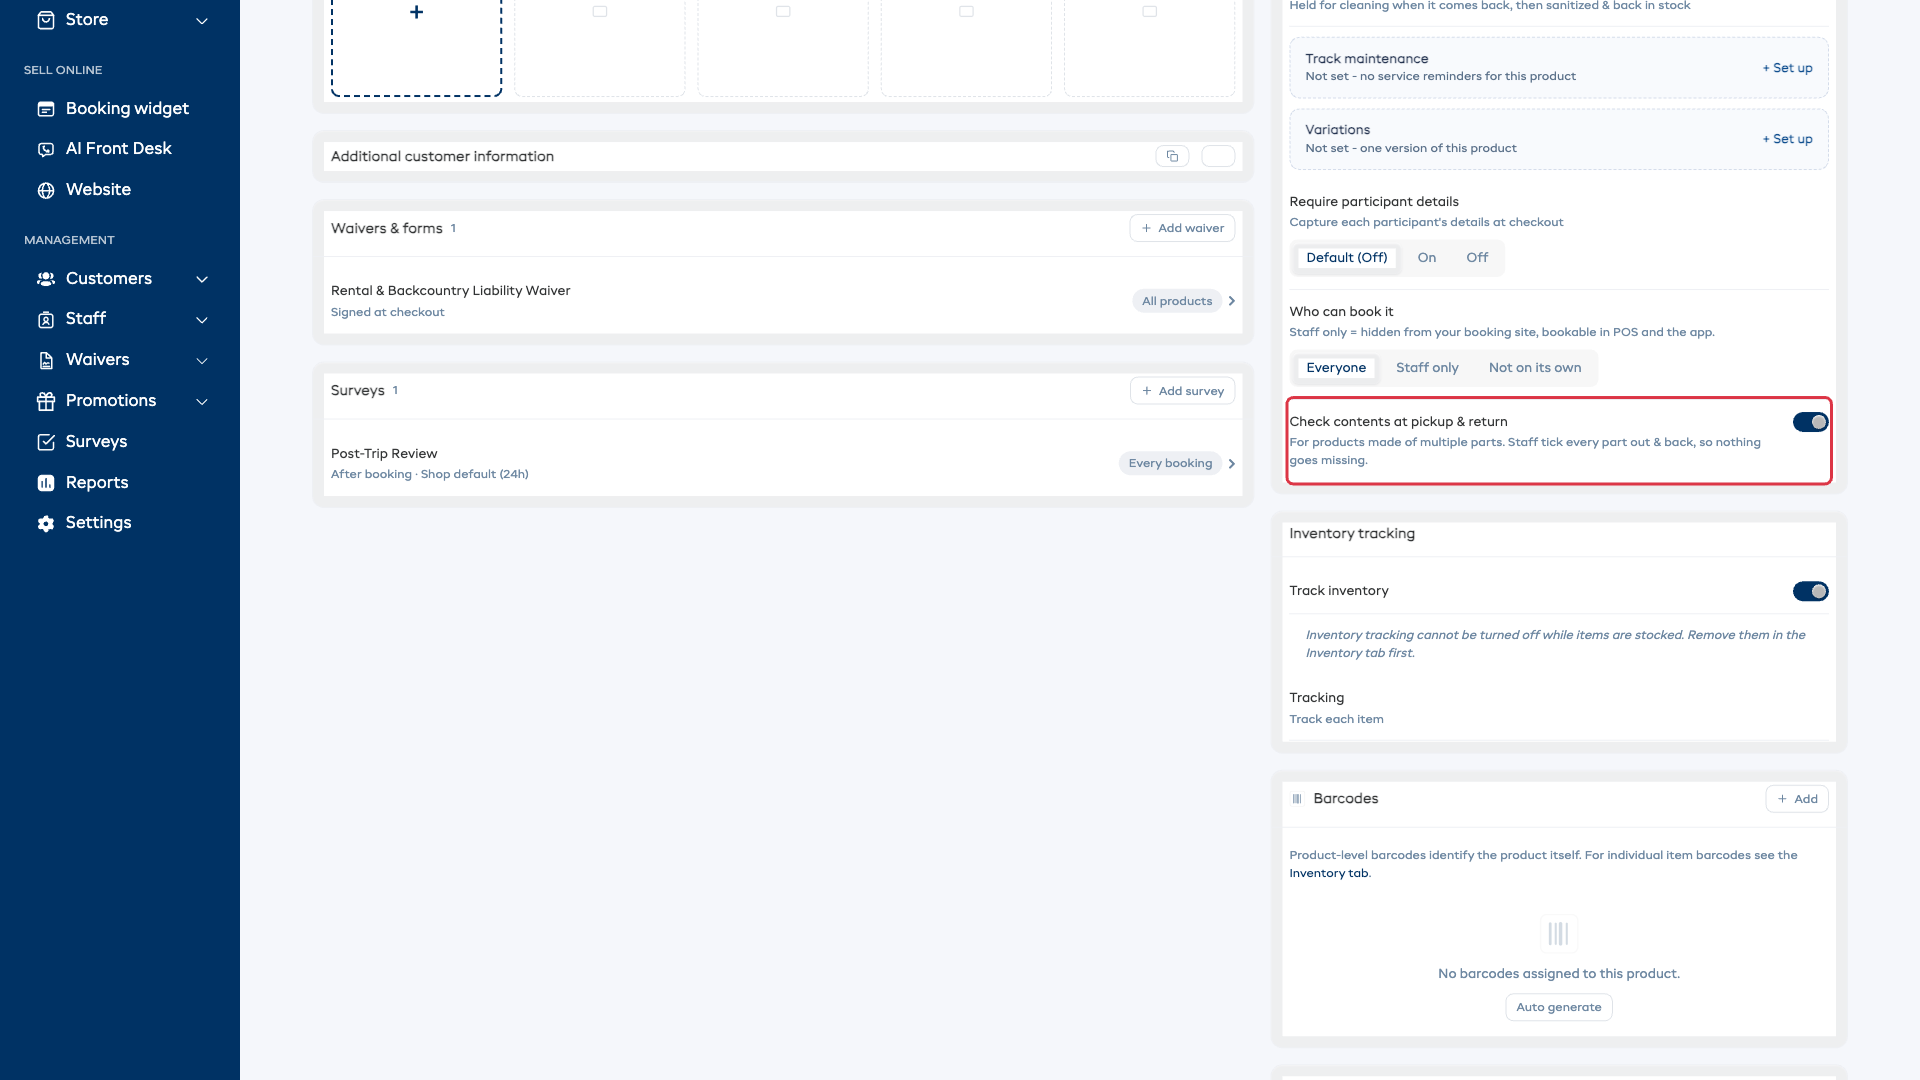
- On step 3 of the panel, switch on Check contents at pickup & return.
- Finish saving the product.
From the product page
- Open the product and go to the Details tab.
- In the Product settings card, switch on Check contents at pickup & return.
List the Parts - and What They Cost
Once the toggle is on, a Contents tab appears on the product. This is where you list what's inside.
- Open the product and click the Contents tab.
- Type each part's name. Use + Add part for another row, and enter the number of parts in Qty.
- Optionally set a Replacement cost for each individual part. A missing-parts charge multiplies that cost by Qty.
- Click Save contents.
New bookings that include this product use the saved list at pickup and return.
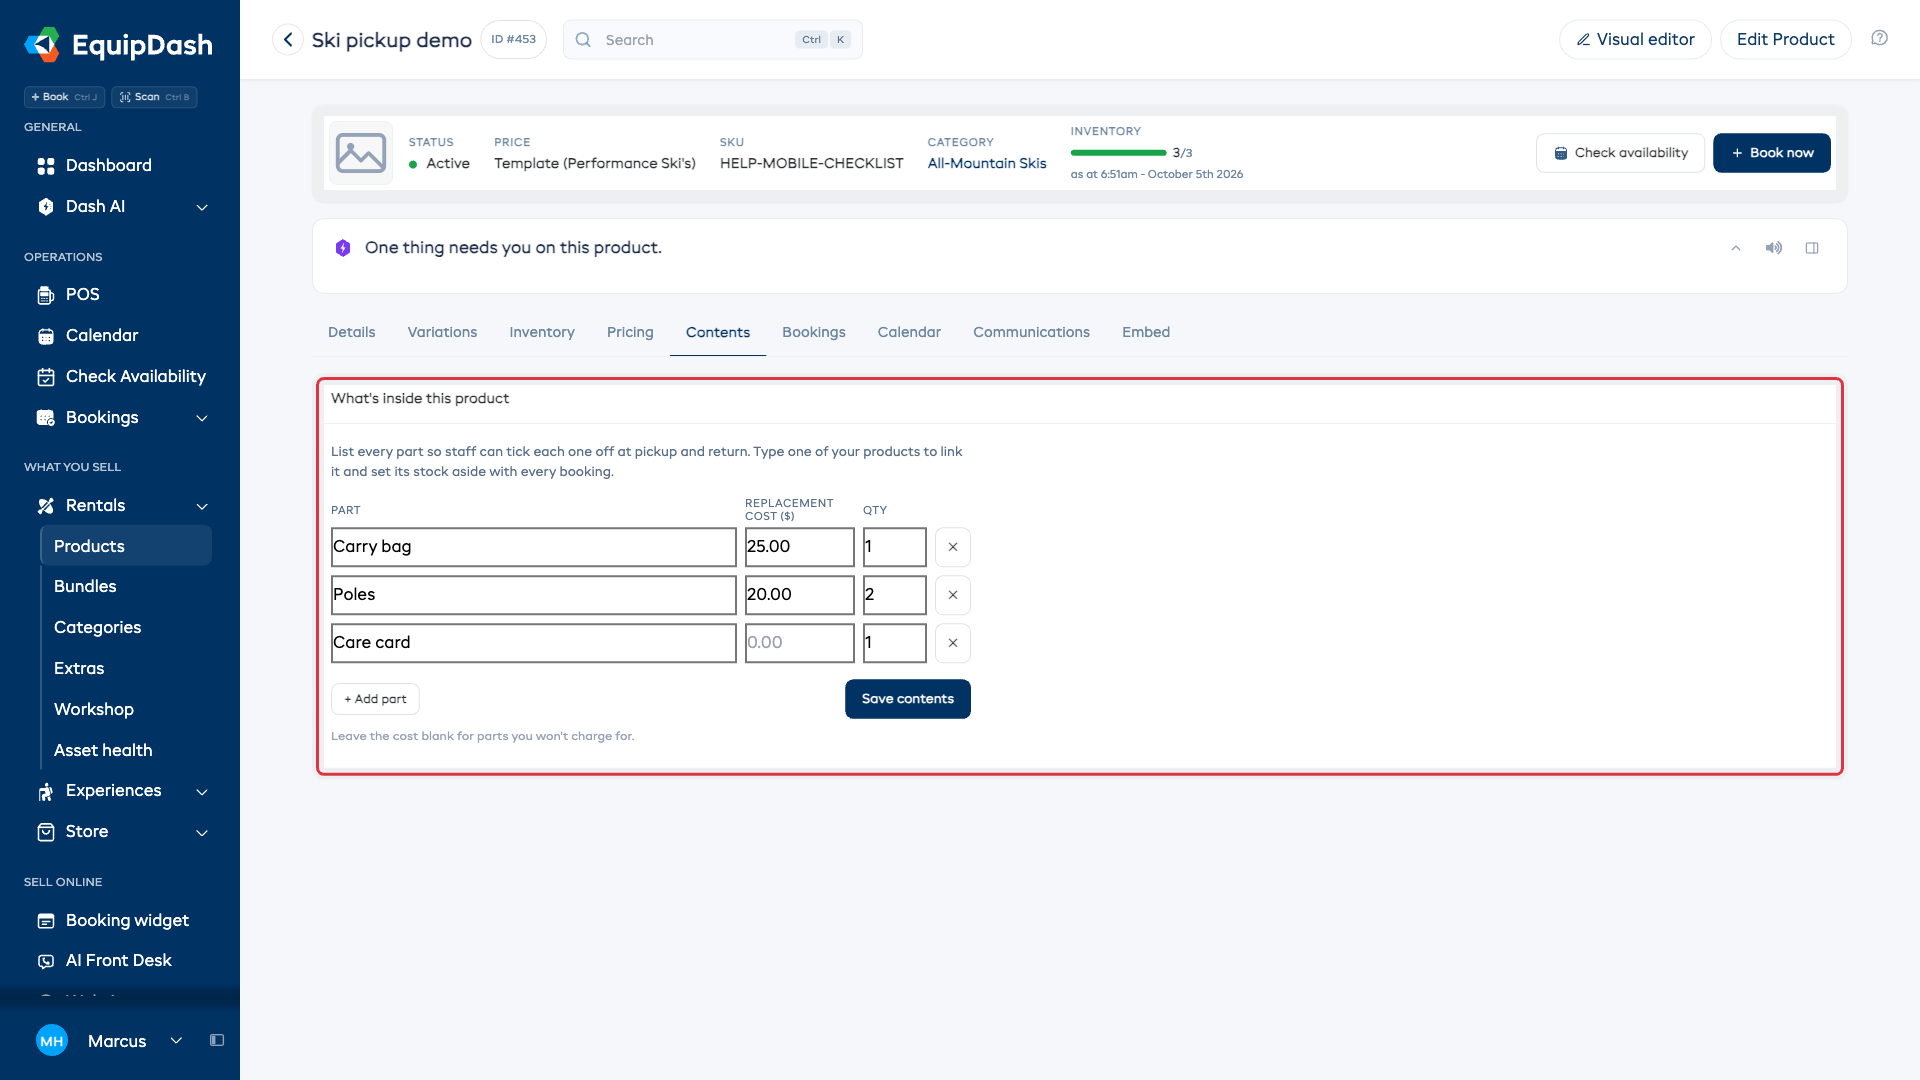
Leave it blank for parts you won't charge for. For example, this list tracks a care card without a cost and sets a $25 replacement cost for the carry bag. Only priced parts can be added to the bill.
Link a Real Product as a Part
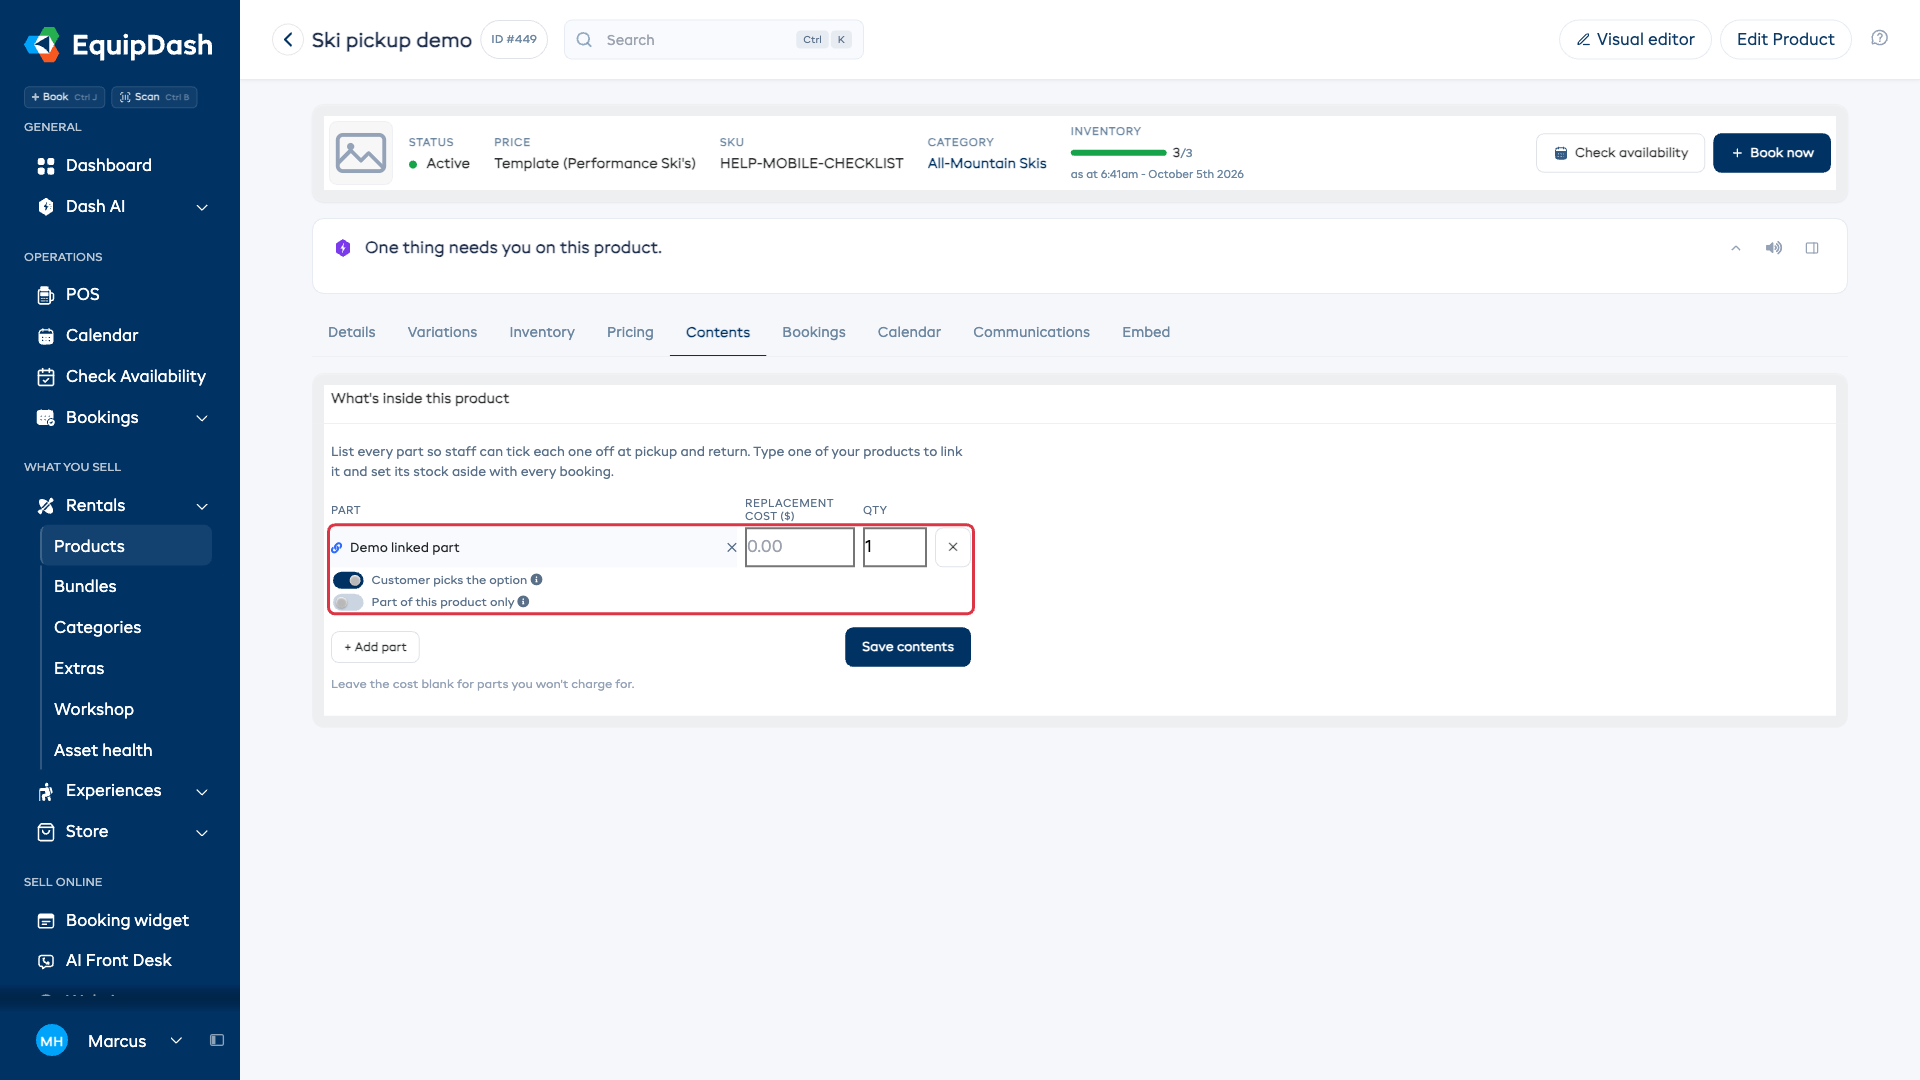
A part doesn't have to be plain text. If a part is something you also track as its own product - such as a carry bag supplied with another item - you can link that product as the part, and its stock is then set aside automatically with every booking.
- On the Contents tab, start typing the part's name. Your other products appear as suggestions.
- Pick the product.
- Click Save contents.
From then on:
- Every booking of this product sets aside the linked part's stock for those dates - one per kit, or more if you set a higher quantity on the row.
- Linked stock limits availability. If you have 5 kits but only 3 of a linked part free, your booking site, POS, and calendar all show 3 available.
- The linked product keeps renting on its own. Linking only sets its stock aside; nothing leaves your booking site unless you say so.
Some parts are never rented by themselves, such as a bag supplied with a larger item. Turn on Part of this product only under that row and save. The part then disappears from your booking site as its own item and goes out only inside this product. It stays fully visible in your Products list, tagged Contents only, with its inventory, servicing, and history intact.
Parts that come in sizes or options
If the linked product has sizes or colors, enable Customer picks the option to let customers choose the included part's option when booking. The booking page and POS offer available options for their dates, and the chosen stock is set aside.
Switch off Customer picks the option when staff should choose a free option at pickup. Stock is then set aside from the whole pool.
Plain text parts (like Care card ×1) work exactly as before - they're just ticked at pickup and return. Only linked parts set stock aside.
- The × on a linked part removes the whole row.
- A product that has linked parts of its own can't be placed inside another product - kits can't contain kits.
- Unlinking a part later does not put the product back on your booking site - set Who can book it back to Everyone on the product itself when you want it bookable again.
What Staff See at Pickup
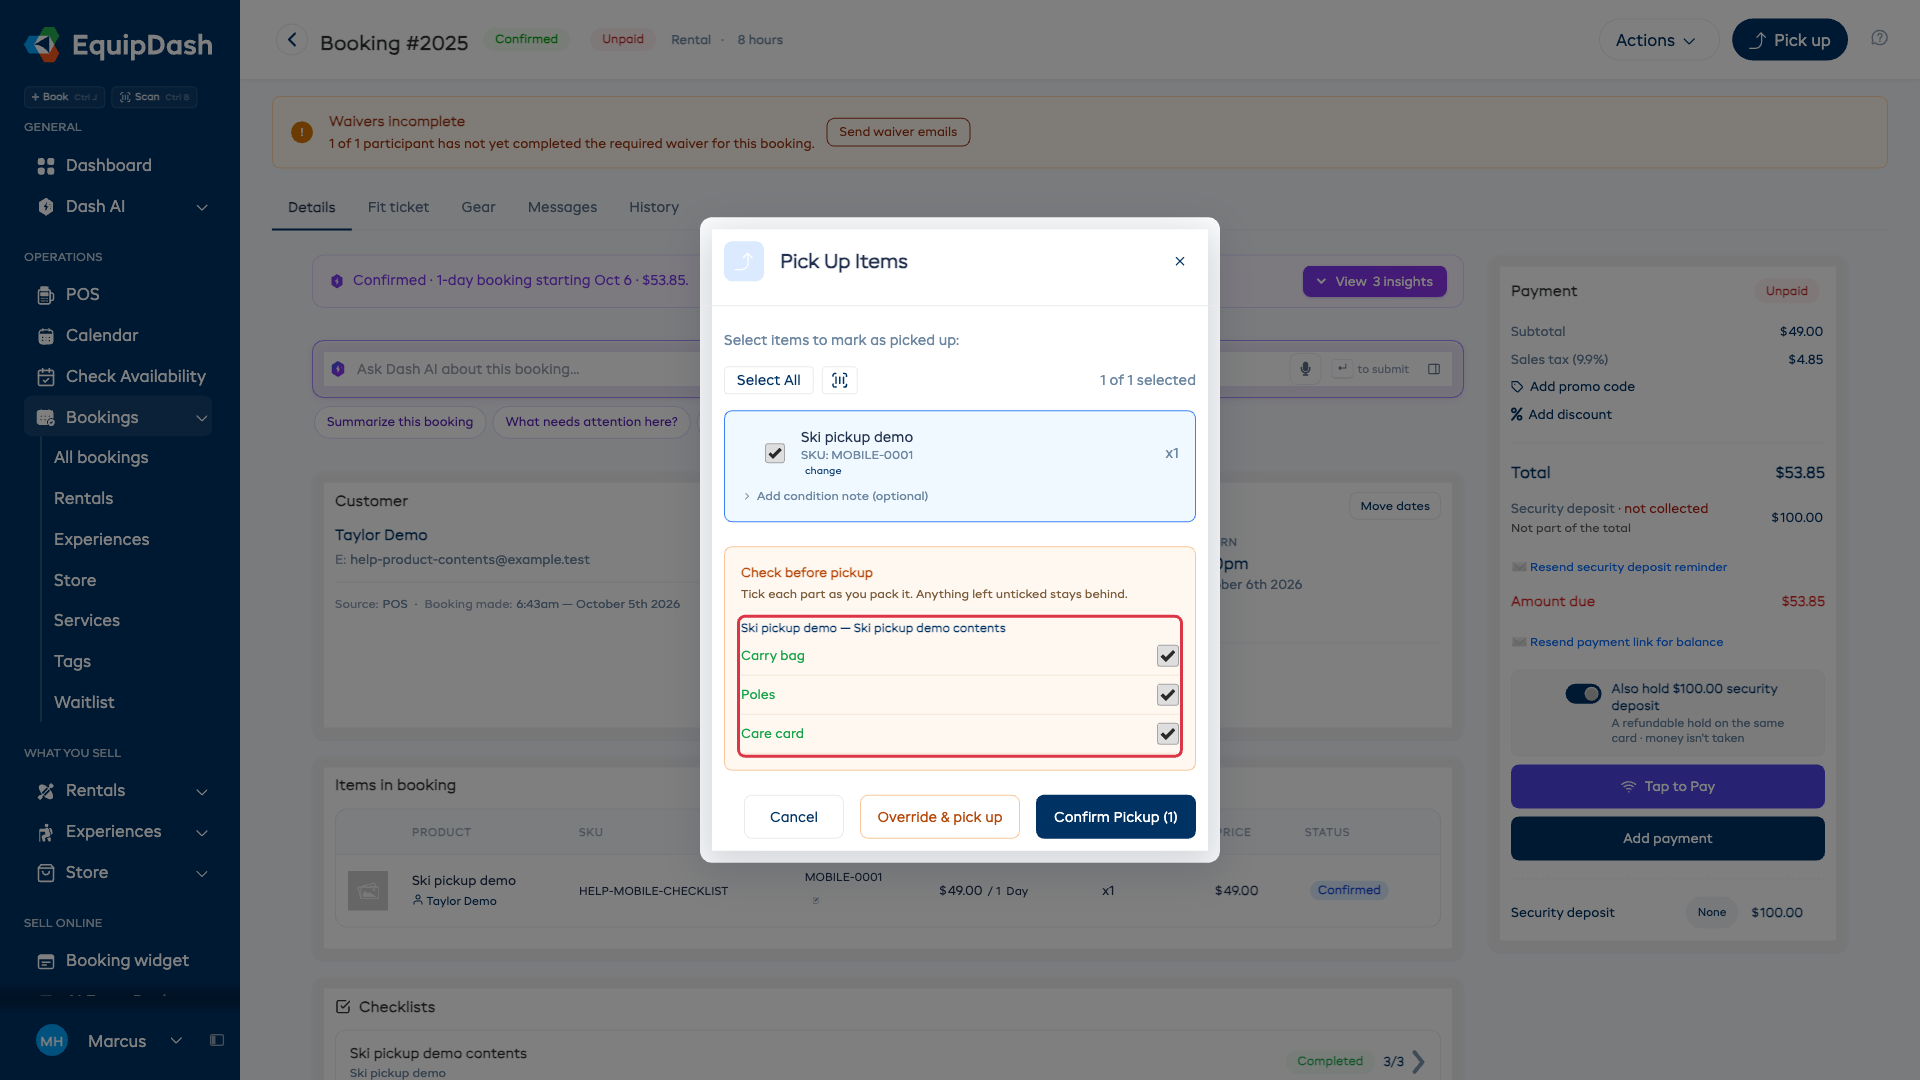
When a booking includes a product that tracks its contents, the Pick Up Items panel shows the parts right alongside the item being picked up, under Check before pickup.
- On the booking, click Pick up.
- Select the rental item, then tick each part under Check before pickup as you pack it. Only tick parts you are handing over.
- Click Confirm Pickup.
These saved answers record what went out. A part that was never checked out cannot be counted as missing later. If you need to proceed with an incomplete pickup check, staff with the override permission can use the pickup override and give a reason.
What Staff See at Return
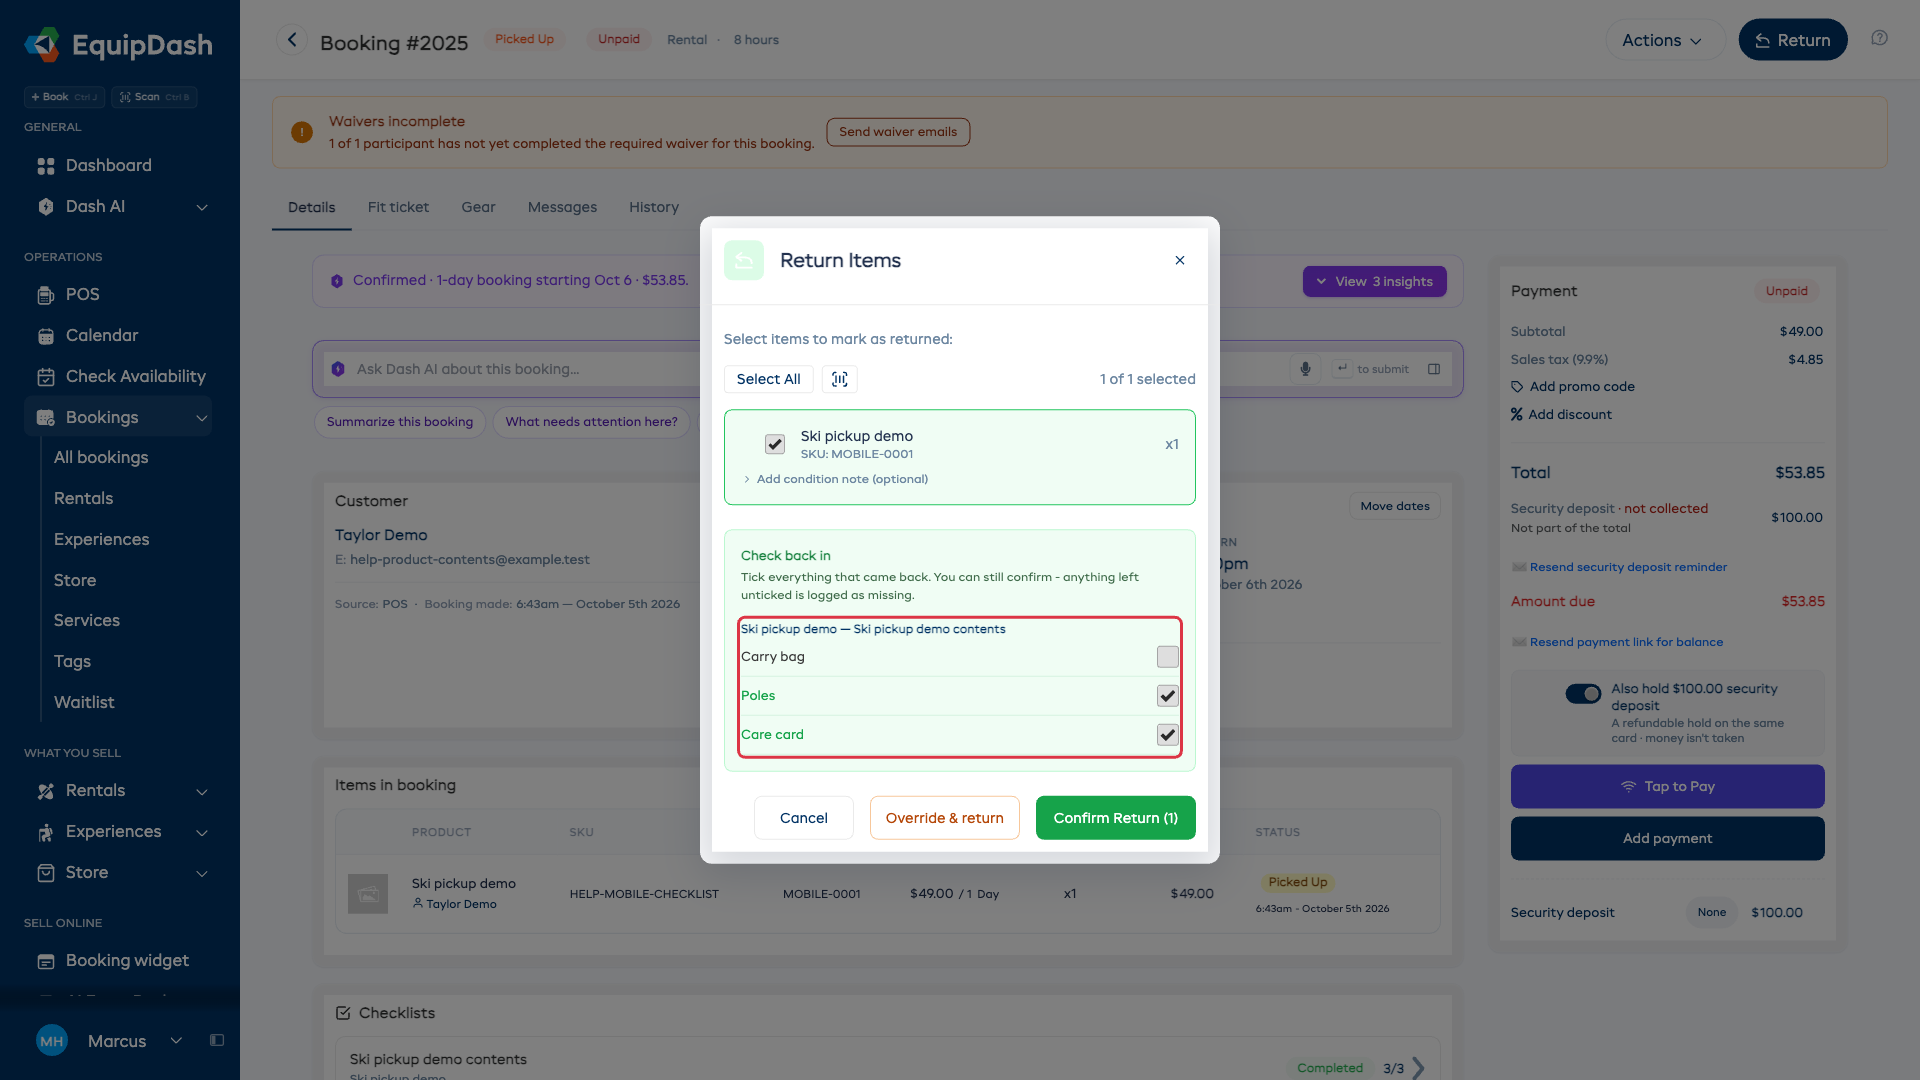
When the gear comes back, the Return Items panel shows the same parts under Check back in.
- On the booking, click Return.
- Select the rental item, then tick the parts that came back under Check back in. Leave missing parts unchecked.
- Click Confirm Return.
Unchecked contents can still be returned through Confirm Return. Whatever you leave unticked is recorded as missing on the booking, so you have a clear record before the gear goes back on the shelf. A part marked "Not checked out at pickup" is grayed out and won't count as missing - you can't lose something you never handed over.
Charge for Parts That Don't Come Back
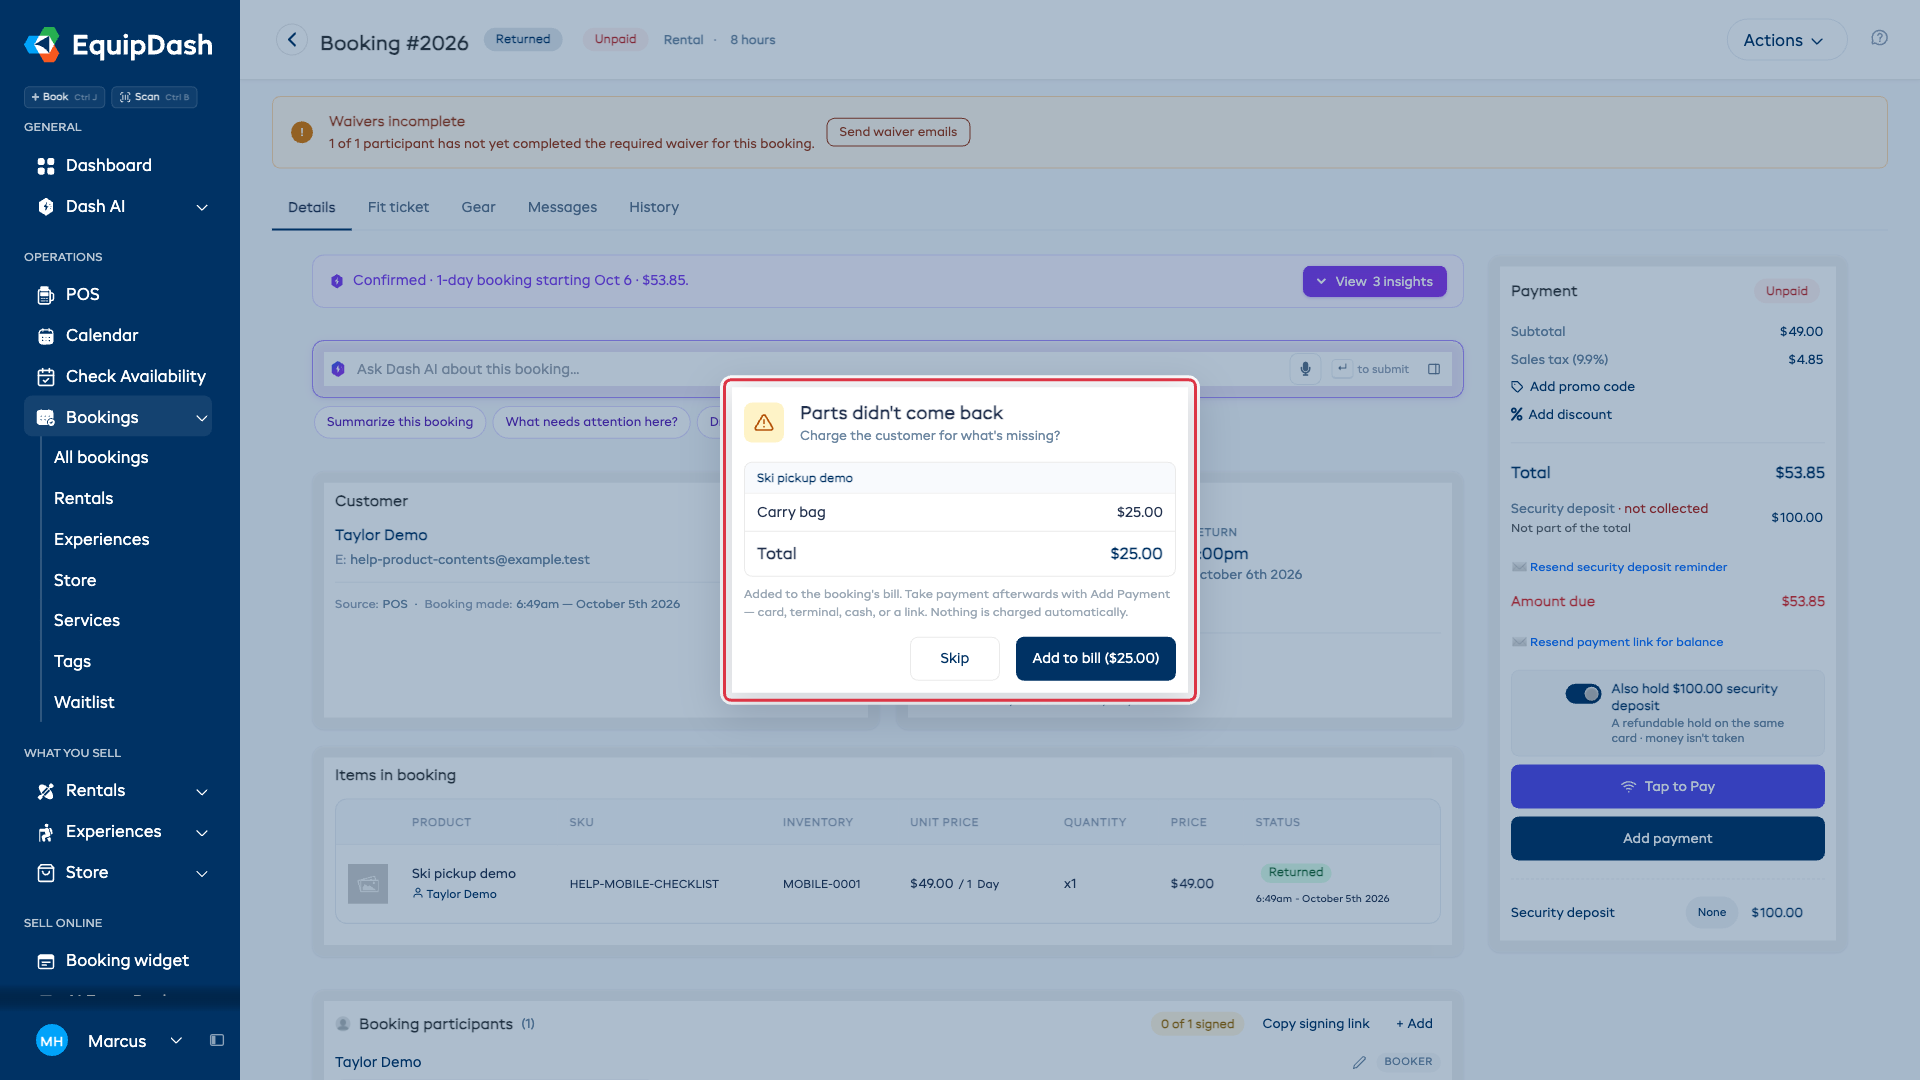
If a part with a replacement cost is left unticked at return, EquipDash adds up what's missing and offers to put it on the customer's bill.
- Finish the return with the missing parts left unticked.
- A Parts didn't come back prompt appears with an itemized total - such as Carry bag $25.
- Review the total, then click Add to bill. Choose Skip to finish without adding the charge.
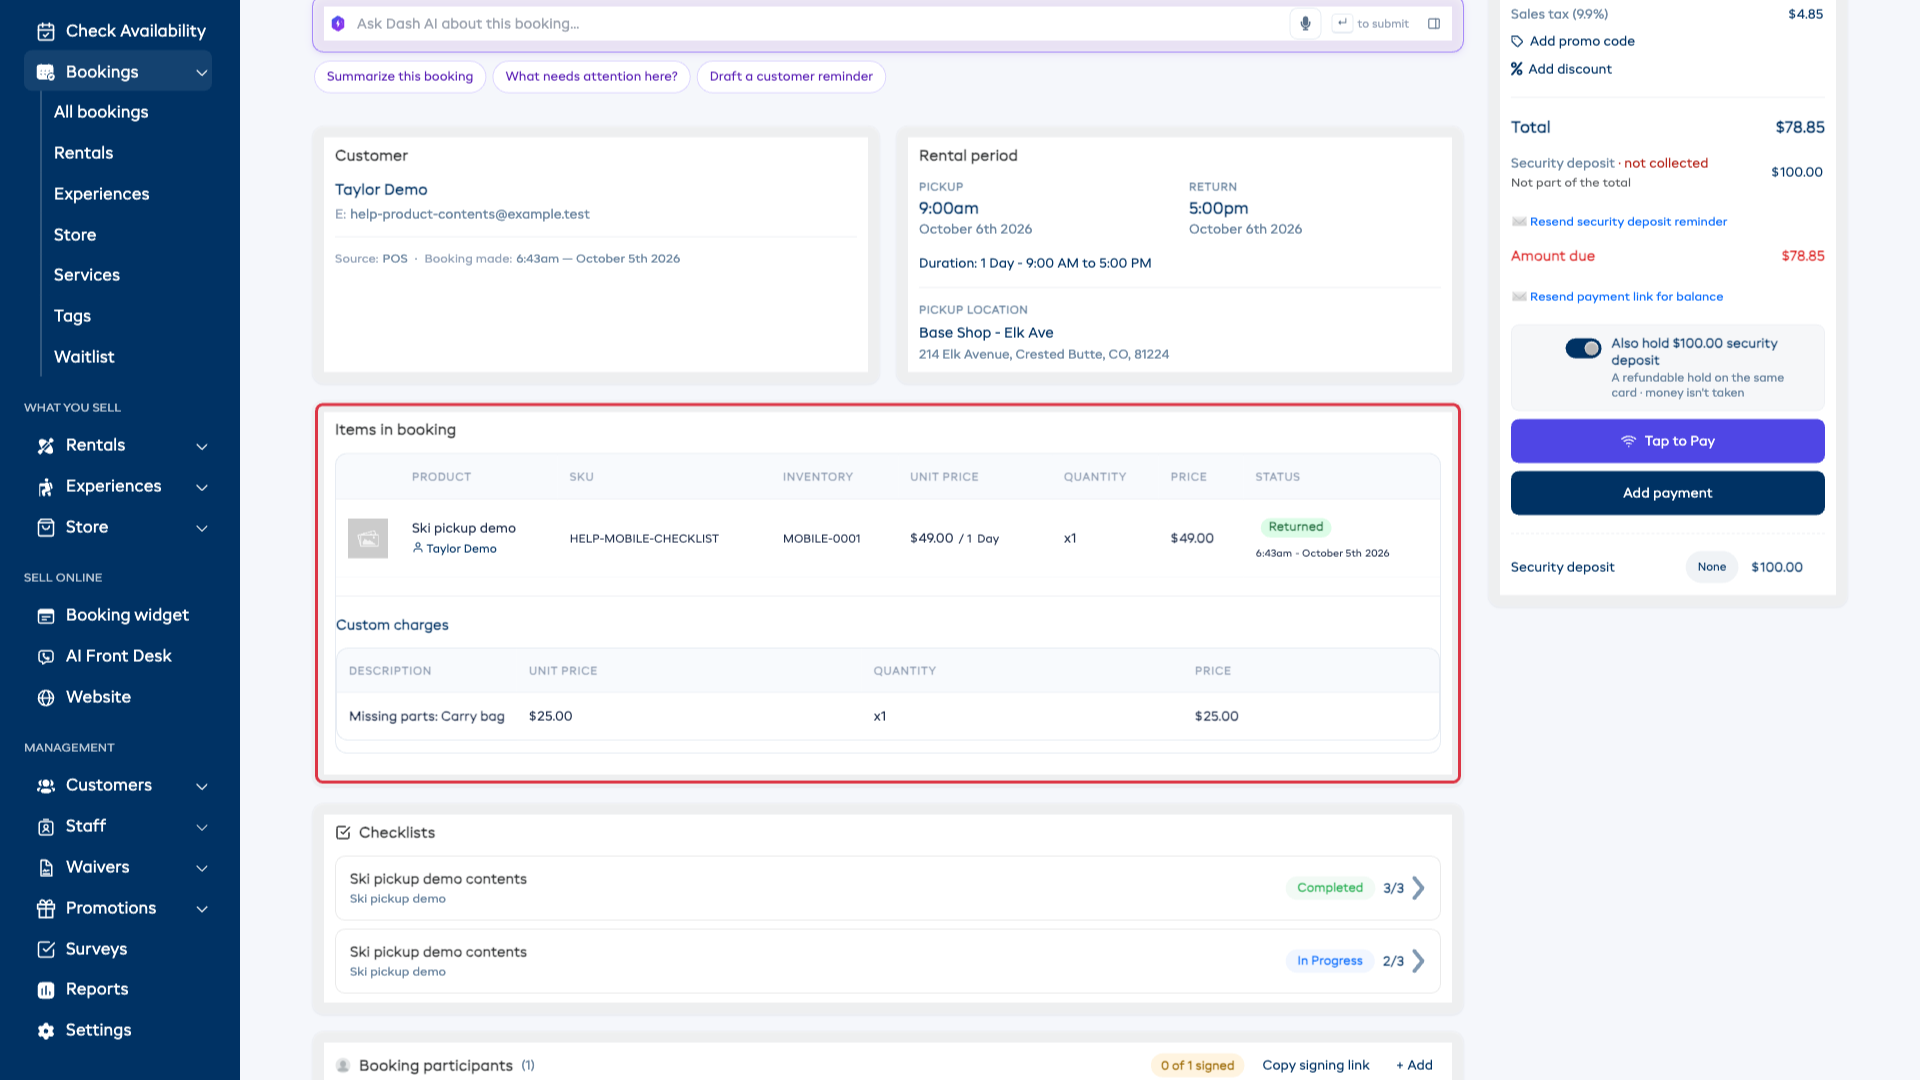
The missing-parts amount is added to the booking as a Missing parts line, and the booking's Total and Amount due go up by that amount. From there you take the money however you normally do - card on the terminal, manual card, cash, a bank transfer, or a payment link - using the same Add payment button you use for everything else.
Because it's one amount due, whatever settles it settles it once: if the customer pays the link, there's nothing left to take in store, and vice versa.
Staff with the override permission can choose Override & return instead of Confirm Return. It still logs exactly what was missing on the booking's history, but it doesn't add anything to the bill - for when you'd rather let it slide for a good customer.
How It Relates to Booking Checklists
The contents check is the simplest member of the Booking Checklists family. The difference is who sets it up and what it's for:
- Contents check (this page) - you list the parts of one product right on the product, and staff tick them at pickup and at return. It's a packing list, owned by the product.
- Booking Checklists - you build safety and readiness checks in Settings ("brakes work", "life jackets aboard") and choose which products and experiences they apply to. They run at handover.
Both run in the same Pick Up panel, so a product can have a safety check and a contents check side by side.