Quick Settings
Quick settings gathers the handful of settings almost every business needs onto one page, so you can get set up — or check your setup — in a couple of minutes instead of clicking through every settings page.
Everything on the page saves automatically. As soon as you change something you'll see a Saved confirmation — there is no save button to remember.
Brand new to EquipDash? Setting Up Your Business walks you through the basics in order. Quick settings is the page you'll come back to for everyday changes.
Find the settings you need
Use Settings to manage your business setup. Quick settings brings the common choices together; the grouped pages hold the other options.
Open Settings in the sidebar and use Search settings to find a page by name or by what you want to change. For example, searching for time zone finds Localization.
- Your business includes business details, localization, locations, and billing.
- Selling and operations includes opening hours, booking rules, closures, customer messages, forms, and review links.
- Payments and pricing includes payment connections, taxes, cancellation policies, and seasonal pricing.
- Team and access includes team members and staff roles. Your account holds your own details and notifications.
- Connections and advanced includes accounting connections, tracking, and other tools.
The pages you can open depend on your plan and your access. Use Quick settings for the essentials described below; open the full settings page for that area's other options.
Opening Quick settings
There are two ways in:
- Click Settings in the sidebar — the navy Quick settings · Set up the essentials banner sits at the top of the page. Click Open quick settings.
- On any settings page, click Quick settings — it is pinned at the top of the settings menu, above the setting groups.
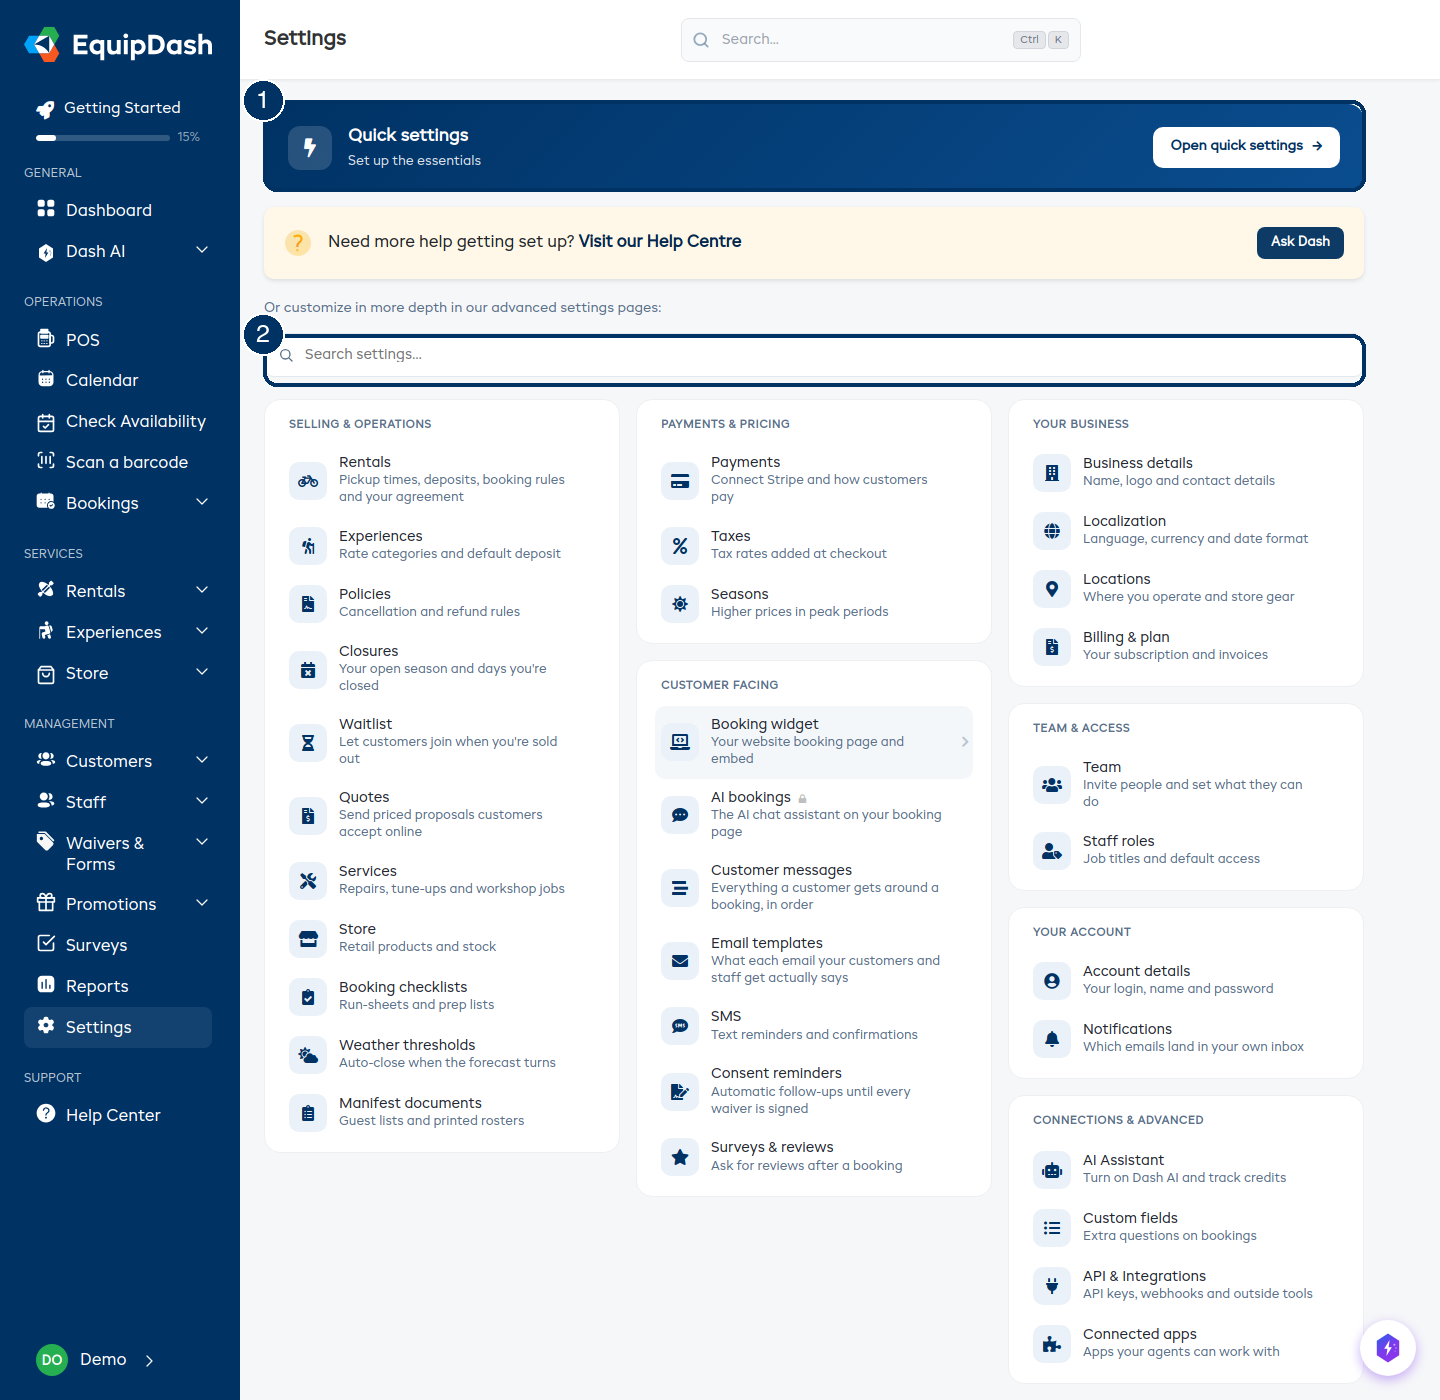
- The Quick settings banner — your way into the essentials.
- The advanced settings pages — everything else, with a search bar that jumps straight to the page you need. Use these for anything beyond the essentials (see When to use the advanced settings pages).
How the page works
- Each area is a collapsible section. Click a section's header to open or close it. The page remembers which sections you left open, so it looks the same when you come back.
- Everything saves automatically — change a time, pick a color, or flip a switch, and a Saved message confirms it.
- Every section ends with a More … settings → link — a shortcut to the full settings page for that area, where the less common options live.
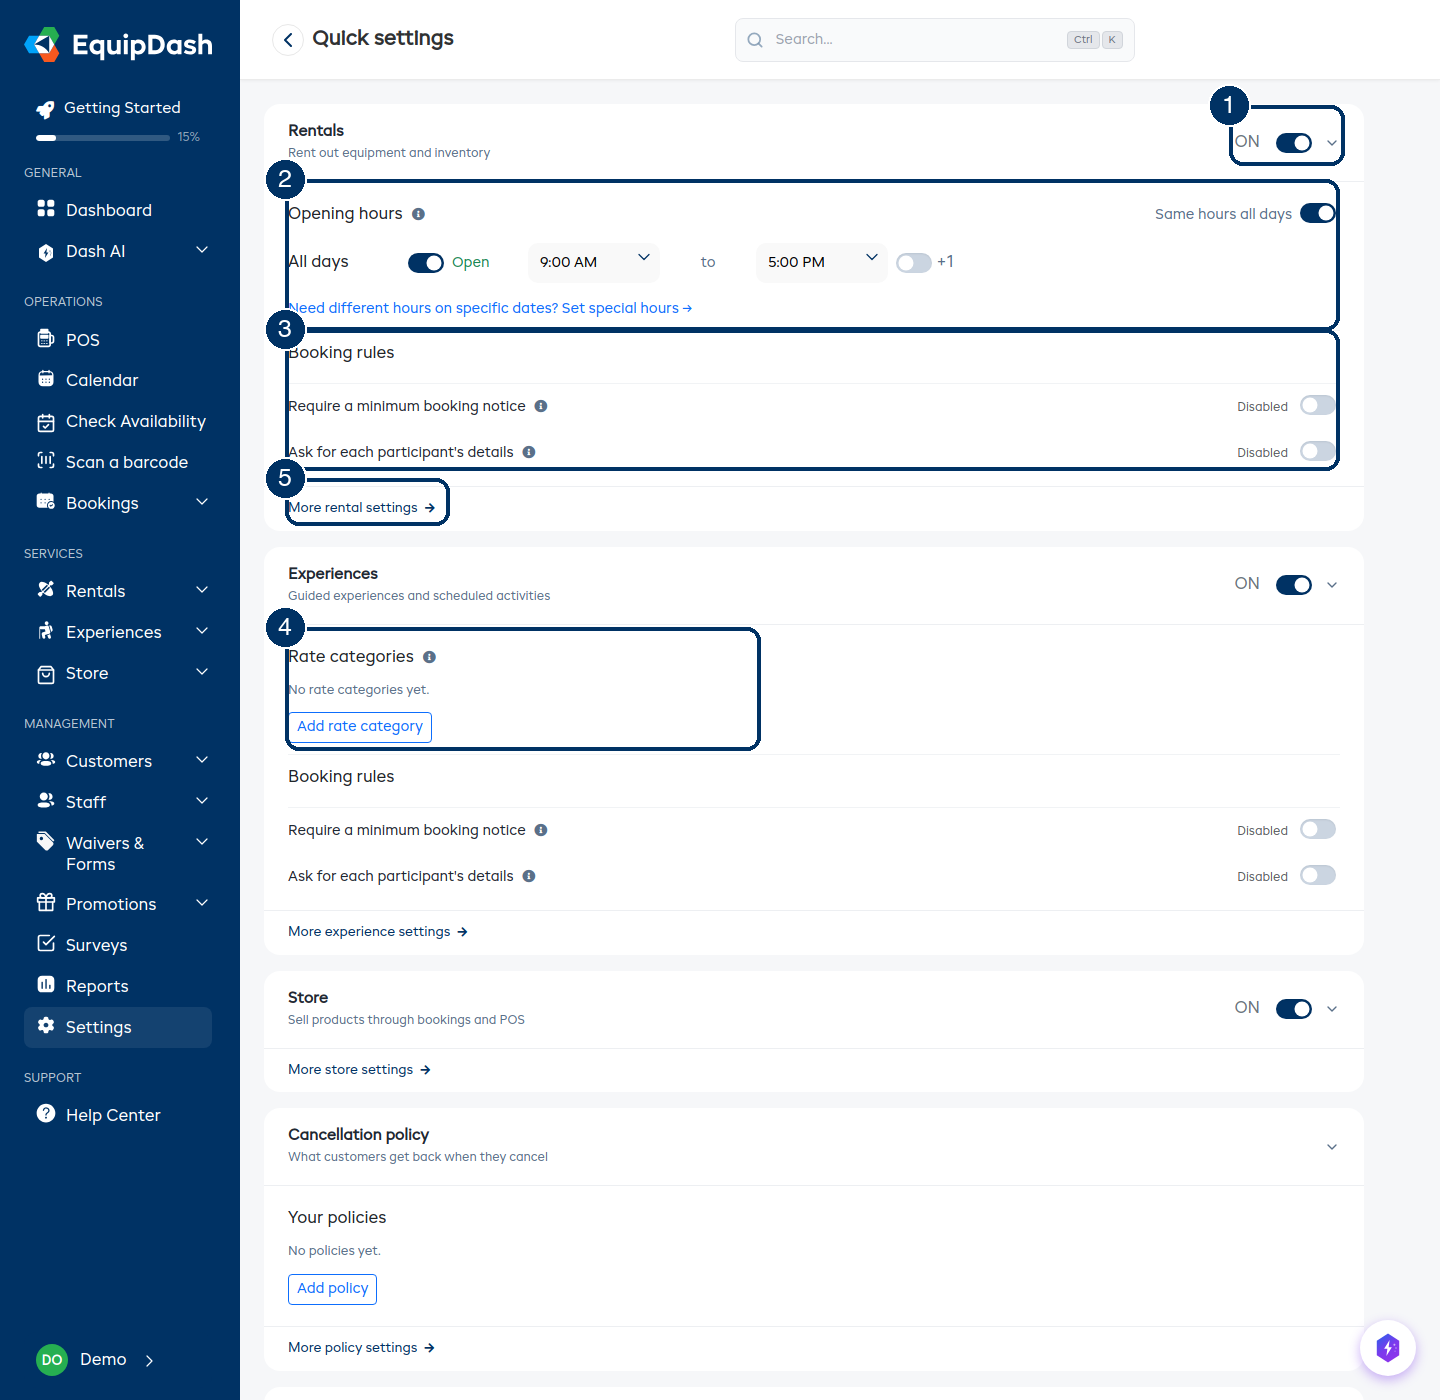
- Module switch — turns that part of EquipDash on or off (see Turning modules on or off).
- Opening hours — when you're open, so customers can only book pickups and returns in hours that work for you.
- Booking rules — last-minute bookings and participant details.
- Rate categories — who can join and at what price. Add rate category opens a panel on the right; the pen and trash icons on each chip edit and delete it.
- More rental settings → — the deep link to the full settings page for that section.
Turning modules on or off
Rentals, Experiences, and Store each have an ON/OFF switch in their section header.
- Turning a module off hides it across the portal — its menu items, calendar tabs, and booking-widget listings disappear. Nothing is deleted: your products, experiences, prices, and past bookings are all still there when you turn it back on.
- Turning a module on makes it available across the portal straight away.
Two guardrails keep you out of trouble:
- You can't turn off your last module. At least one of Rentals, Experiences, or Store must stay on. Enable another module first, then come back.
- You can't turn off a module that still has upcoming bookings. Cancel or complete those bookings first, then try again.
Learn more about modules and exactly what's hidden when one is off
The sections, top to bottom
Rentals
Your opening hours (with a Same hours all days shortcut, or different hours per day) and your booking rules:
- Require a minimum booking notice — stops customers booking at the last minute.
- Staff can book inside the notice at the POS - on by default, so your counter can still take a walk-in for right now.
- Ask for each participant's details — collects everyone's name and details at checkout, not just the person booking.
More rental settings → leads to the full page, which adds things like default pricing, deposits, pickup capacity, and your rental agreement wording. See Default Rental Pricing.
Experiences
Rate categories — who can join and at what price, such as Adult or Child, or a combo like Family. Each category shows as a chip: click the pen to edit it, the trash to delete it, or Add rate category for a new one. All three open the same slide-over panel the full settings page uses. A rate that has already been used to take bookings can't be deleted — archive it instead.
Below that are the same two booking rules as Rentals: minimum booking notice and participant details.
More experience settings → leads to the full page, which adds deposits, self check-in, and the archived-rates list. See Rate Categories.
Store
Just the on/off switch — the Store module has no essentials of its own on this page. More store settings → leads to its full settings page. See Store Settings.
Cancellation policy
Your policies as chips, each with a plain-English summary of what a customer gets back (for example, "100% refund up to 3 days before, 50% after"). Click Add policy or the pen on a chip to open the same slide-over the full Policies page uses — refund tiers, reschedule rules, and what each policy applies to. See Creating a Cancellation Policy and Assigning Policies.
Taxes
Your tax rates as chips — name, rate, and whether the tax is already included in your prices. Click Add tax rate or the pen on a chip to open the same slide-over the full Taxes page uses.
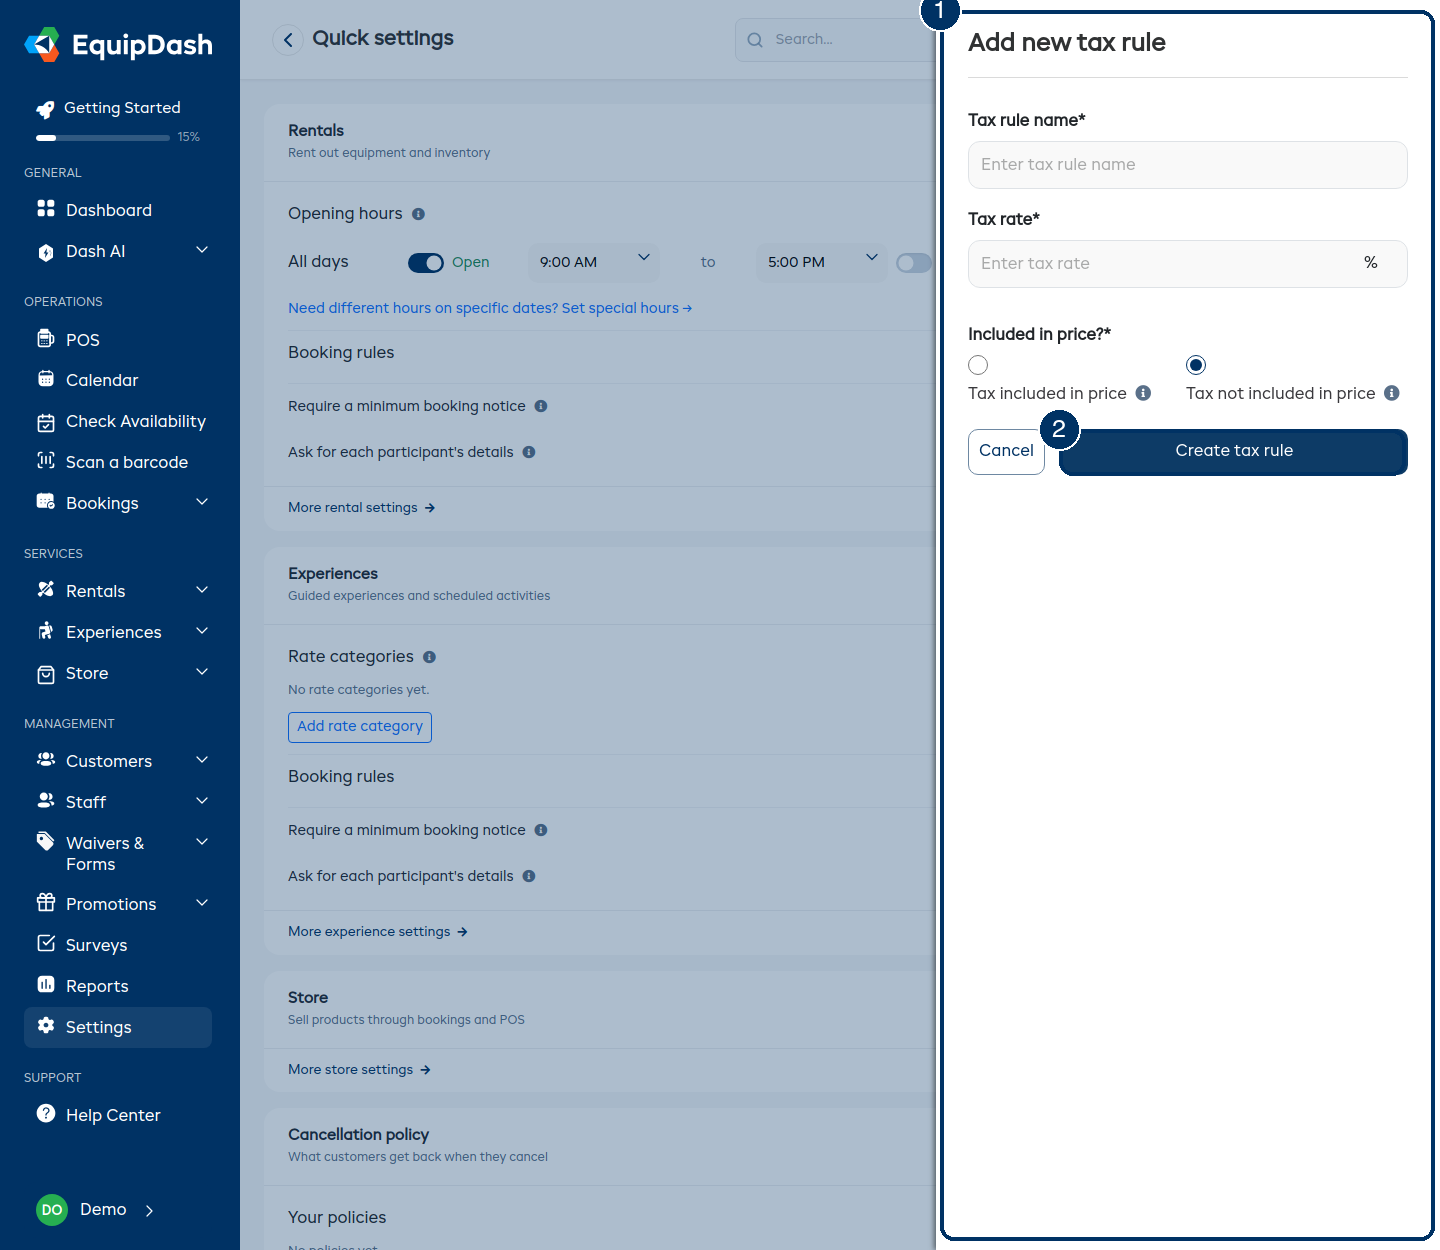
- The slide-over panel — the same form as the full settings pages, so everything you can do there works here too.
- Create tax rule — saves and adds the rate to your chips (when editing, this button updates the rate instead).
See Adding Tax Rates.
Payments
A read-only status: Stripe connected or Stripe not connected. The button takes you to the Payments page to connect Stripe (or manage the connection) — connecting happens there, not here. See Connecting Stripe.
Booking widget
How your public booking page looks:
- Logo — drag and drop an image onto the upload area (or click to browse), then crop it in the editor. You can replace or remove it any time.
- Brand color and Text color — pick from the color well or type a hex code. The save happens the moment you choose.
More widget settings → leads to the full customization options — layout, content blocks, checkout fields, and more. See Widget Colors & Branding.
AI front desk
The on/off switch for the chat on your booking page. AI Front Desk is a paid add-on ($49 a month, including 250 chats and 150 call minutes, on Growth and Pro). Until it is active the switch is off and a banner links you to your Billing page to add it. See AI Front Desk.
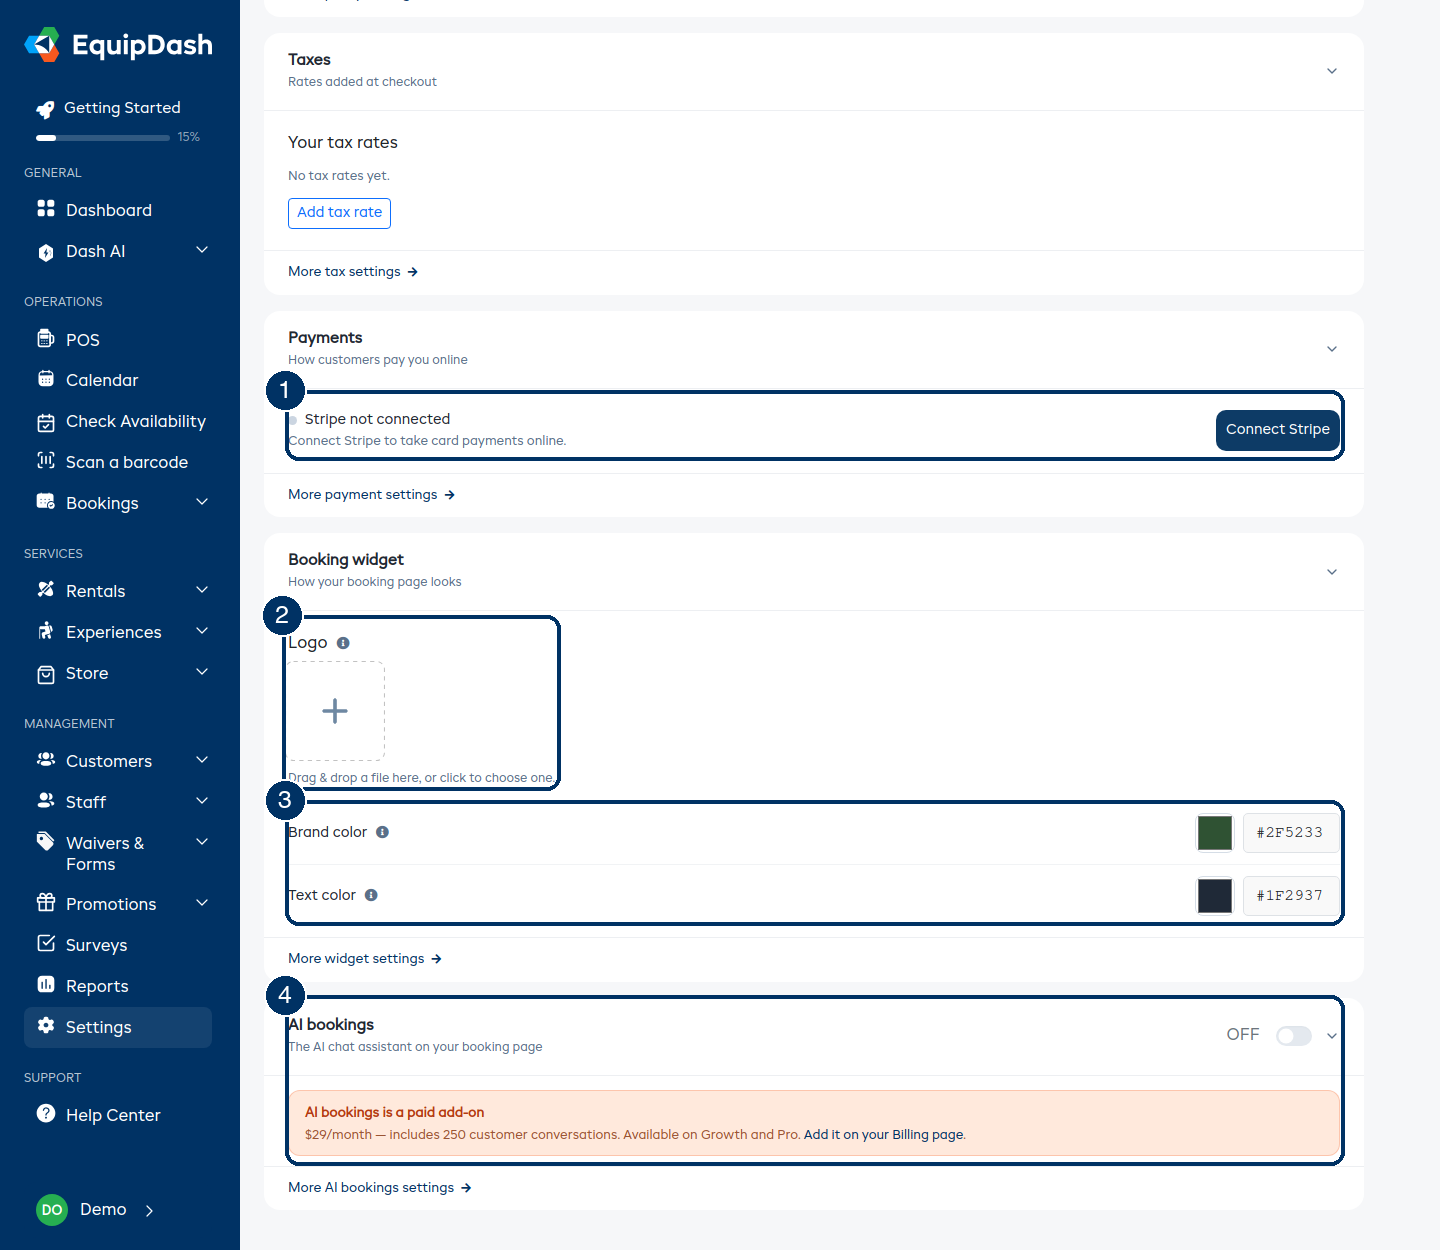
- Stripe status — whether online card payments are live.
- Your logo — drag & drop, crop, replace, or remove.
- Brand and text colors — the look of your booking page.
- AI bookings switch — with the paid add-on note below it when the add-on isn't active.
When to use the advanced settings pages instead
Quick settings deliberately covers only the essentials. Head to the full settings pages — via the tiles and search on the Settings page, or any More … settings → link — for everything else, for example:
- Seasonal pricing, extras, and availability rules
- Email templates and automatic customer messages
- Team members, roles, and permissions
- Locations, billing, integrations, and the API
Anything you set on Quick settings is the same setting you'd find on the full page — there's only one copy, so you can mix and match without anything drifting out of sync.