Creating a Bot Growth+This feature requires the Growth+ plan or higher
There are four ways to create a Dash Bot: use a ready-made template, build one from scratch in the three-step builder, describe what you want and let Dash build it, or simply ask for it in the Dash AI chat. This guide covers all four.
Before You Start
Make sure you have:
- The Bots: Manage permission (Admins have this by default).
- At least a basic idea of what you want the bot to do - for example, "send a reminder to customers with overdue returns every morning."
Opening the Bots Page
- Click Bots in the sidebar navigation.
- The Dash Bots page opens, showing your existing bots (if any) and the template library.
Method 1: Start from a Template
Templates are the quickest way to get started. Each template comes pre-configured with instructions, what it is allowed to do, when it runs, and which actions ask you first.
- On the Dash Bots page, click the Bot templates tab.
- Browse the available templates. You can narrow the list by Use case (e.g., Operations, Reports, Customers, Inventory), by Industry, or by typing in the search box.
- Click Use this on the template you want.
- The bot opens already written out, with its steps, its schedule and what it may reach.
- Read the steps and change anything you want - the name, the wording of a message, when it runs, and whether it asks you first.
- Click Turn it on to start it, or Keep it off for now to save it switched off.
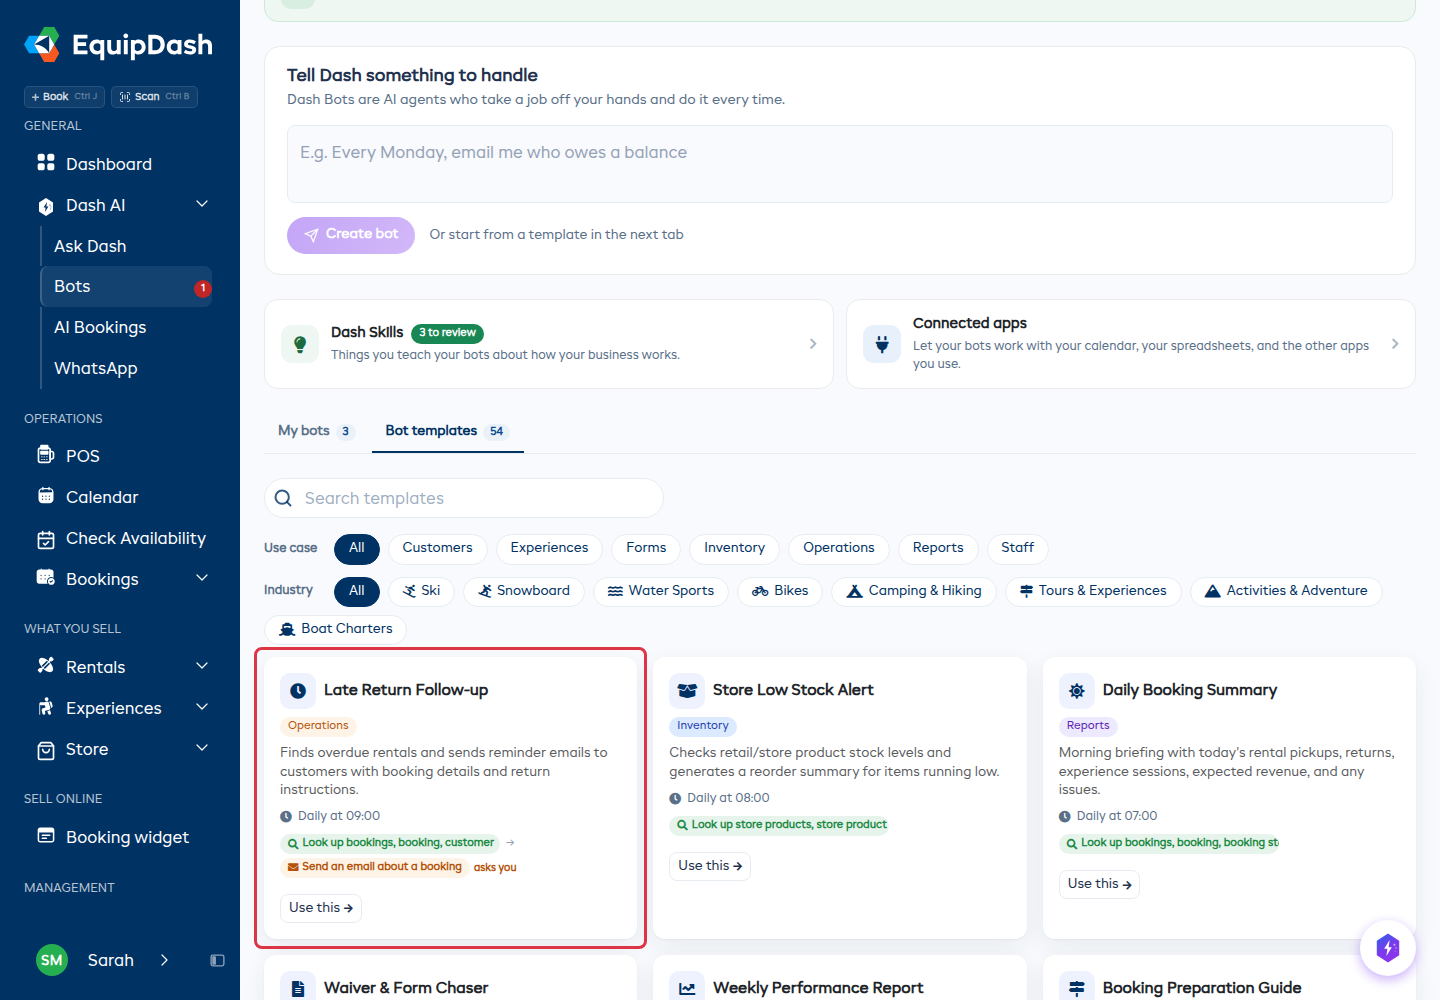
Available Templates
| Template | What It Does | Trigger |
|---|---|---|
| Late Return Follow-up | Finds overdue rentals and sends reminder emails | Daily at 9:00 AM |
| Store Low Stock Alert | Checks store stock levels and generates a reorder summary | Daily at 8:00 AM |
| Daily Booking Summary | Morning briefing with pickups, returns, sessions, and revenue | Daily at 7:00 AM |
| Waiver & Form Chaser | Reminds customers to complete waivers before their booking | Every 4 hours |
| Weekly Performance Report | Revenue, bookings, and top products compared to last week | Weekly on Monday at 8:00 AM |
| Booking Preparation Guide | Sends a "what to expect" email when a booking is created | When a booking is created |
| Late Pickup Reminder | Contacts customers who have not picked up on time | Every hour |
| Workshop Status Digest | Reviews workshop items and flags overdue repairs | Daily at 10:00 AM |
| Survey Follow-up Bot | Thanks promoters and follows up with detractors | When a survey response is received |
| Experience Availability Monitor | Flags under-booked and fully-booked sessions for tomorrow | Daily at 6:00 PM |
| Staff Roster Builder | Reviews next week's bookings and creates staff shifts | Weekly on Sunday at 6:00 PM |
| Customer Re-engagement | Finds customers who have not booked in 30+ days | Weekly on Friday at 10:00 AM |
Method 2: Build from Scratch
If none of the templates fit, describe the job and Dash writes it up for you.
- On the Dash Bots page, click New bot.
- Under What should it handle?, say what you want in one sentence - the way you would say it to a new staff member. For example: "The evening before a booking, text the customer where to meet."
- Click Create bot.
Dash names the bot and writes it out as a short list of steps in plain English. There is no form to fill in and no list of technical abilities to pick from.
Read the steps before you turn it on
Each step says what it does and carries a small tag:
| Tag | What it means |
|---|---|
| Check | It only looks something up. Nothing leaves your shop. |
| Text / Email | It sends a message to a customer. |
| Asks you first | It stops and waits for you before doing this one. |
Above the steps, one line says when it runs - "Every day at 6:00pm" - with Change when beside it.
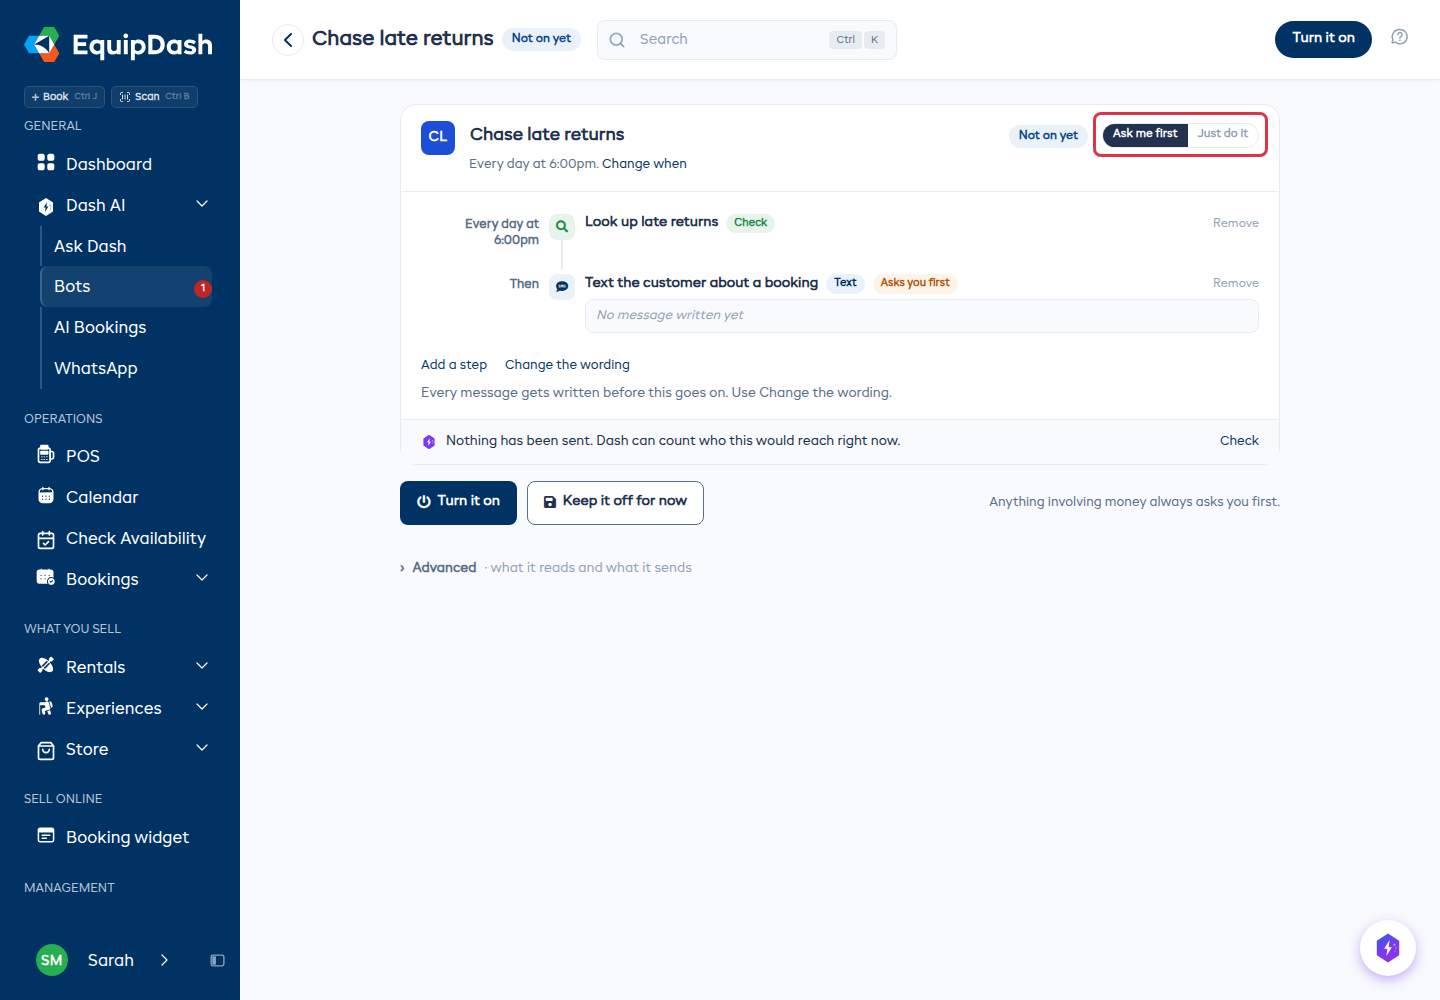
Change what it does
- Add a step - describe another thing it should do and Dash writes that step too.
- Change the wording - write the exact message it sends. Every message is written before the bot goes on; until you do, the step shows "No message written yet".
- Remove - drop a step you do not want.
- Change when - set whether it runs on a schedule, on an event, on a weather rule, or only when you press Run. More about triggers.
Decide how much it does on its own
In the top right of the bot, one control sets the whole bot:
- Ask me first - it does the looking up, then waits for your OK before anything leaves the shop.
- Just do it - it gets on with the job and tells you afterward.
Anything involving money always asks you first, whichever you pick. More about approvals.
Check who it would reach
Before you turn a bot on, click Check on the line that reads "Nothing has been sent." Dash counts who the bot would message right now, without sending anything. It is the quickest way to catch a bot that is pointed at the wrong people.
Turn it on
- Turn it on - it starts running to its schedule.
- Keep it off for now - it is saved and stays off. Turn it on later from the bots list.
Advanced - what it reads and what it sends
Most shops never open this. It holds:
- Anything else it should know - extra instructions in your own words, for rules the steps do not cover ("never contact the same customer twice in a day").
- What it is allowed to reach - one switch per area of your shop. Turn off anything this bot has no business touching.
| Switch | What it covers |
|---|---|
| Look things up | Bookings, customers, products, availability, reports. Read-only, always safe. |
| Email & message customers | Emails, texts, forms, and reminders. |
| Payments & refunds | Payment links, charges, refunds, deposits. |
| Change bookings | Create, update, move, or cancel bookings; notes and tags. |
| Manage customers | Create and update customer records and groups. |
| Manage products & inventory | Products, stock levels, workshop, store items. |
| Manage experiences & sessions | Experiences, departures, series, programs. |
| Manage staff & schedules | Shifts, time off, certifications. |
| Promotions & vouchers | Promo codes, vouchers, campaigns. |
| Day-to-day operations | Seasons, closures, waitlists, bundles, categories, settings. |
| Connected apps | The outside apps you connected in Settings > Connected apps. |
Payments & refunds is locked to Always asks first, and so is anything that cancels a booking or sends money out. You cannot switch that off - however the bot is set up, it pauses and waits for a person.
Connected apps are locked the same way: anything a bot sends out to a connected app asks you first.
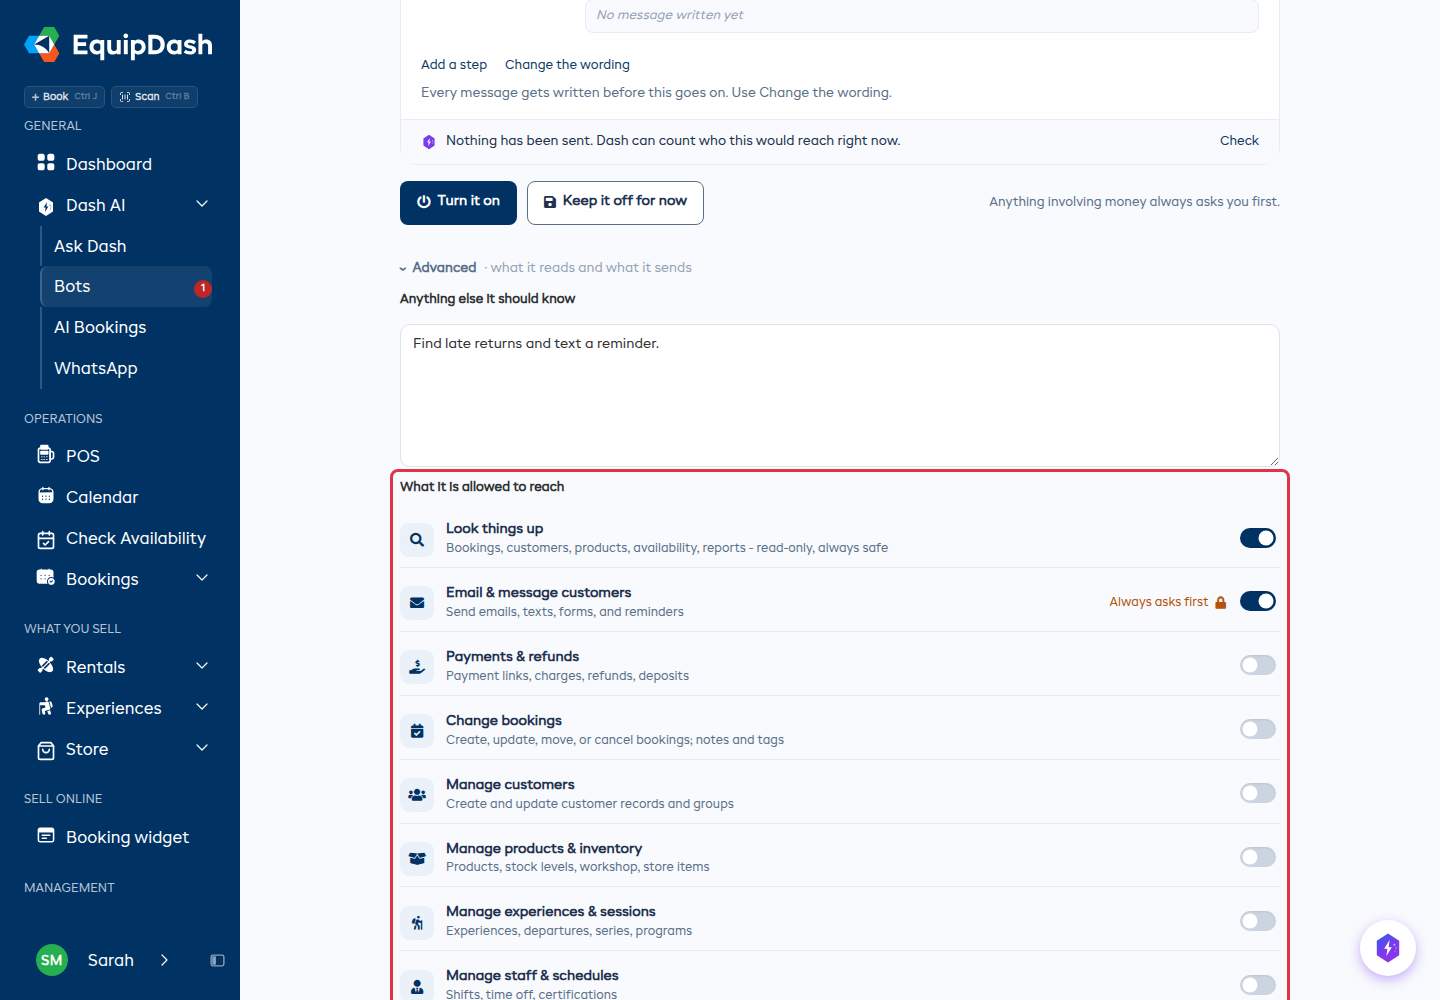
If a switch is broader than you want, click Fine-tune individual abilities underneath to tick or untick each ability one at a time. Select for me lets Dash read your instructions and pick them for you. Not sure what something does? See the Tools Reference.
Also in Advanced:
- AI model - which model the bot uses. The default, DeepSeek V4.1 Flash, is the fastest and suits most jobs; the larger models are there for more complex reasoning. See Choosing the Right AI Model.
- Max steps - how many actions the bot may take in one run (1 to 50, default 10). If a run stops early because it ran out of steps, this is the setting to raise.
Method 3: Describe It and Let Dash Build It
If you are not sure how to set a bot up, just describe the job.
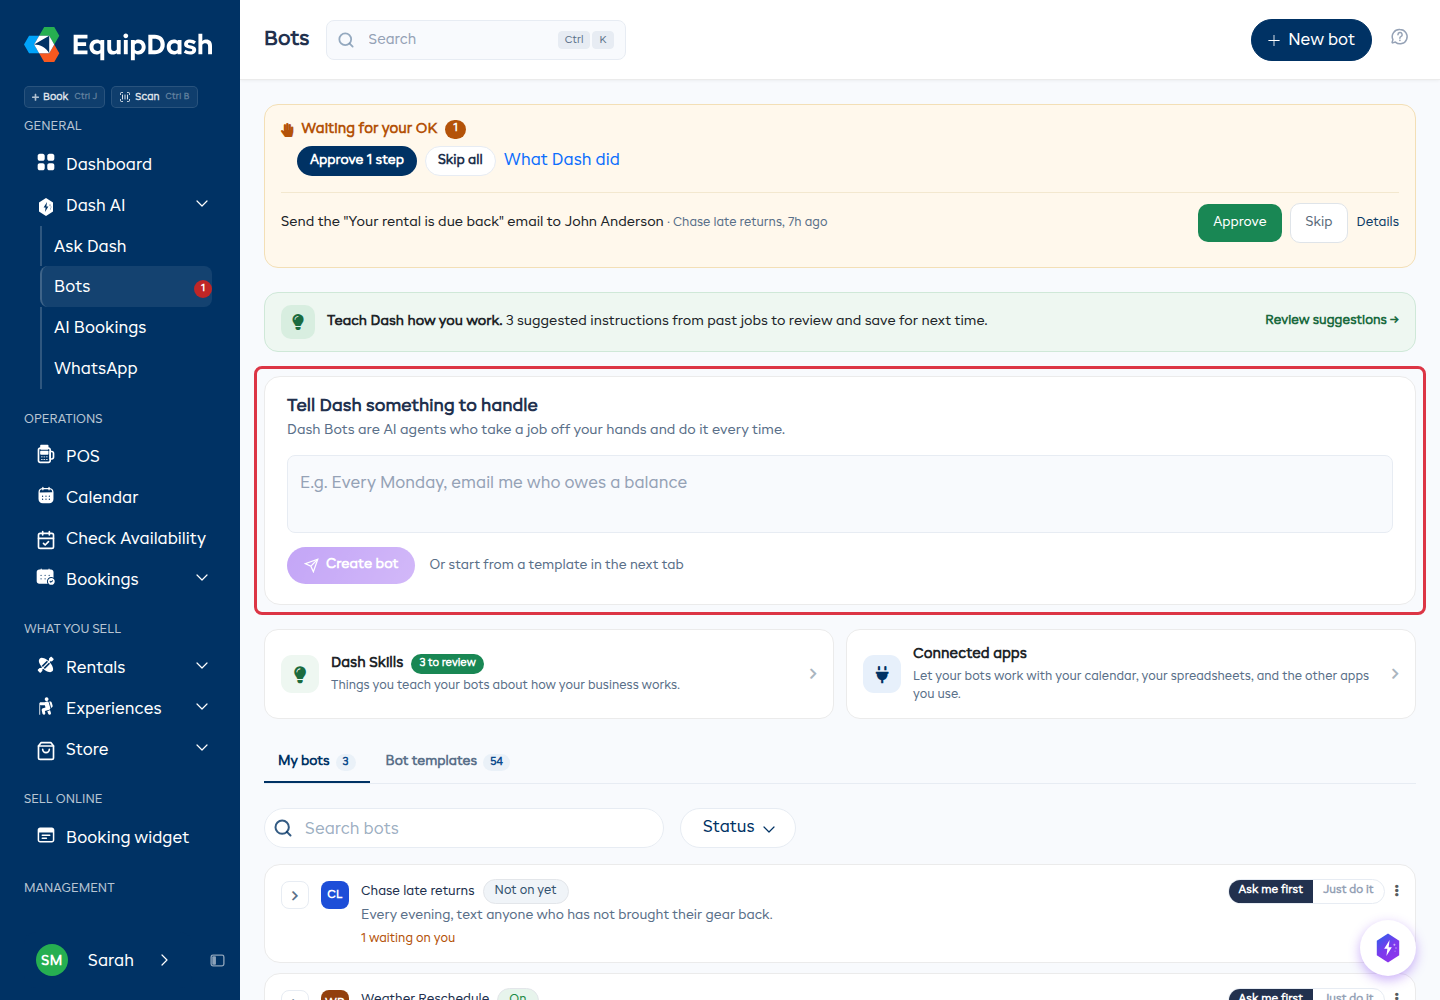
- On the Dash Bots page, find the Tell Dash something to handle box.
- Type what you want the bot to do. For example: "Every morning, check for bookings starting today that have incomplete waivers and send a reminder email to those customers."
- Click Create bot.
- The builder opens with everything filled in - instructions, what it is allowed to do, and when it runs.
- Read it over, change anything you want, then click Turn it on or Keep it off for now.
Method 4: Ask for It in the Chat
You can also ask for a bot without leaving the Dash AI chat.
- Open Dash AI.
- Say what you want - for example, "create a bot that texts customers the day before their session."
- Dash builds it and tells you it is ready.
- The bot is saved as a draft, switched off. Open it from the Bots page, review it, and turn it on when you are happy.
Bots created this way are never switched on automatically - you always get to look first.
Editing a Bot
- Go to the Bots page.
- Click the bot you want to edit, or click the Edit button on the bot card.
- The builder opens with the bot's current settings.
- Make your changes and click Turn it on, or Keep it off for now to leave it off.
Enabling and Disabling a Bot
You can toggle a bot on or off without deleting it.
- On the Bots page, find the bot you want to toggle.
- Click the Enable/Disable toggle on the bot card.
- A disabled bot will not run automatically (scheduled or event triggers are paused), but you can still run it manually.
Deleting a Bot
- On the Bots page, click the Delete button on the bot card.
- Confirm the deletion in the window that appears.
- Deleting a bot is permanent and removes all its run history.
How Many Bots Can I Have?
| Growth | Pro | |
|---|---|---|
| Bots | 3 | 10 |
| Runs per month | 200 | 1,000 |
If you hit the limit, either turn off a bot you no longer need or upgrade your plan.