Widget for Rentals
The rentals widget lets your customers browse your rental products and bundles, check availability, select dates, and complete a booking — all from your website. This page explains what the rental booking flow looks like from the customer's perspective and how it connects to your EquipDash account.
Rental products only appear on your widget when the Rentals module is enabled. Disabling the module hides them across the portal and the widget.
The Customer Experience
Browsing Products
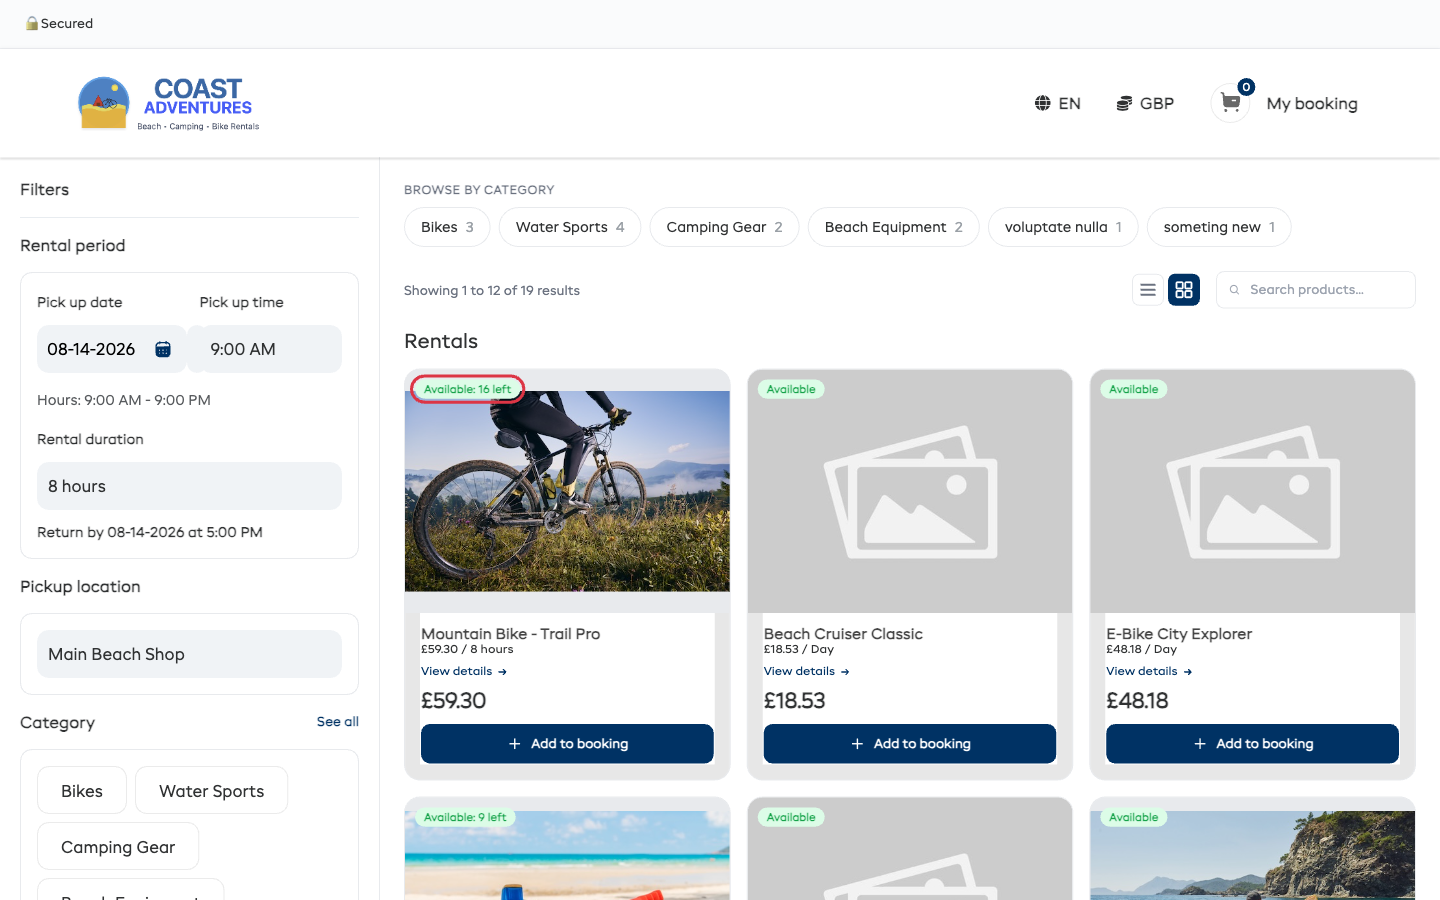
When customers open the rentals widget, they see your product catalog displayed in a grid or list view (depending on your display settings). A View: toggle in the top right lets customers switch between List and Grid views, and a Search products bar lets them search by name.
The page is organized into sections:
- Bundles — If you have bundles configured, they appear at the top with a count badge (e.g., "Bundles 2"). Each bundle card shows the bundle image, name, number of products included, price, original price with savings, and a View Bundle button. The bundle page opens with a Pick your day card at the top, then lets the customer set each activity's time inline — see Rental + Experience Bundles for the full walkthrough.
- Products — Individual rental products appear below the bundles.
Each product card shows:
- Rotating image strip — on desktop images cycle automatically, on mobile customers can swipe
- Availability badge — how many are free for the dates the customer picked: Available: 4 left in green, Available: 1 left in amber when it's the last one, Fully booked in red when nothing is free for that window. Items you don't track stock for simply read Available.
- Product name
- Price per day (e.g., "$55.00 / Day")
- View details link
- Total price for the selected rental period
- + Add to booking button (or Select variation if the product has variations)
Filters Sidebar
On the left side, customers see a Filters sidebar with:
- Rental period — Pick up date, Pick up time, Return date, Return time fields. A Same day drop off? toggle allows customers to set a single-day rental. The widget shows the selected rental period duration (e.g., "You have selected a rental period of 8 hours."). If you have switched to defined-duration mode in Rentals settings, the Return date and Return time fields are replaced by a single Rental duration dropdown.
- Category — Category chips that customers can click to filter by product category (e.g., "Bikes", "Water Sports", "Camping Gear").
- Browse our store — A link to the store widget (if the store module is enabled).
Selecting Dates
Customers need to choose when they want to pick up and return the equipment:
- The customer selects a Pick up date from the calendar and a Pick up time from the dropdown.
- If they want a same-day rental, they toggle Same day drop off? on.
- Otherwise, they select a Return date and Return time.
- The widget automatically calculates the price based on the selected duration.
- Product availability badges and prices update to reflect the selected dates.
If you've turned on Customer picks from a list of durations in Rentals settings, step 3 changes. Instead of a Return date and Return time, customers pick a Rental duration (e.g., 2 hours, Full day) from a single dropdown -- the return time is calculated automatically. The Same day toggle is hidden.
Changing dates with items in the booking
Customers don't lose their booking when they change their mind about the dates. When they pick a new date, time, or pickup location with items already added:
- Items that still work on the new dates stay in the booking — re-priced automatically if the price is different (for example, a weekend rate).
- If fewer units are free on the new dates, the quantity drops to what's available.
- Items that aren't available at all on the new dates (fully booked, or a day you're closed) are removed.
If anything changed, a Your cart was updated summary pops up listing exactly what moved — each item, the old and new price or quantity, and the old and new total. If nothing changed, the customer sees nothing at all.
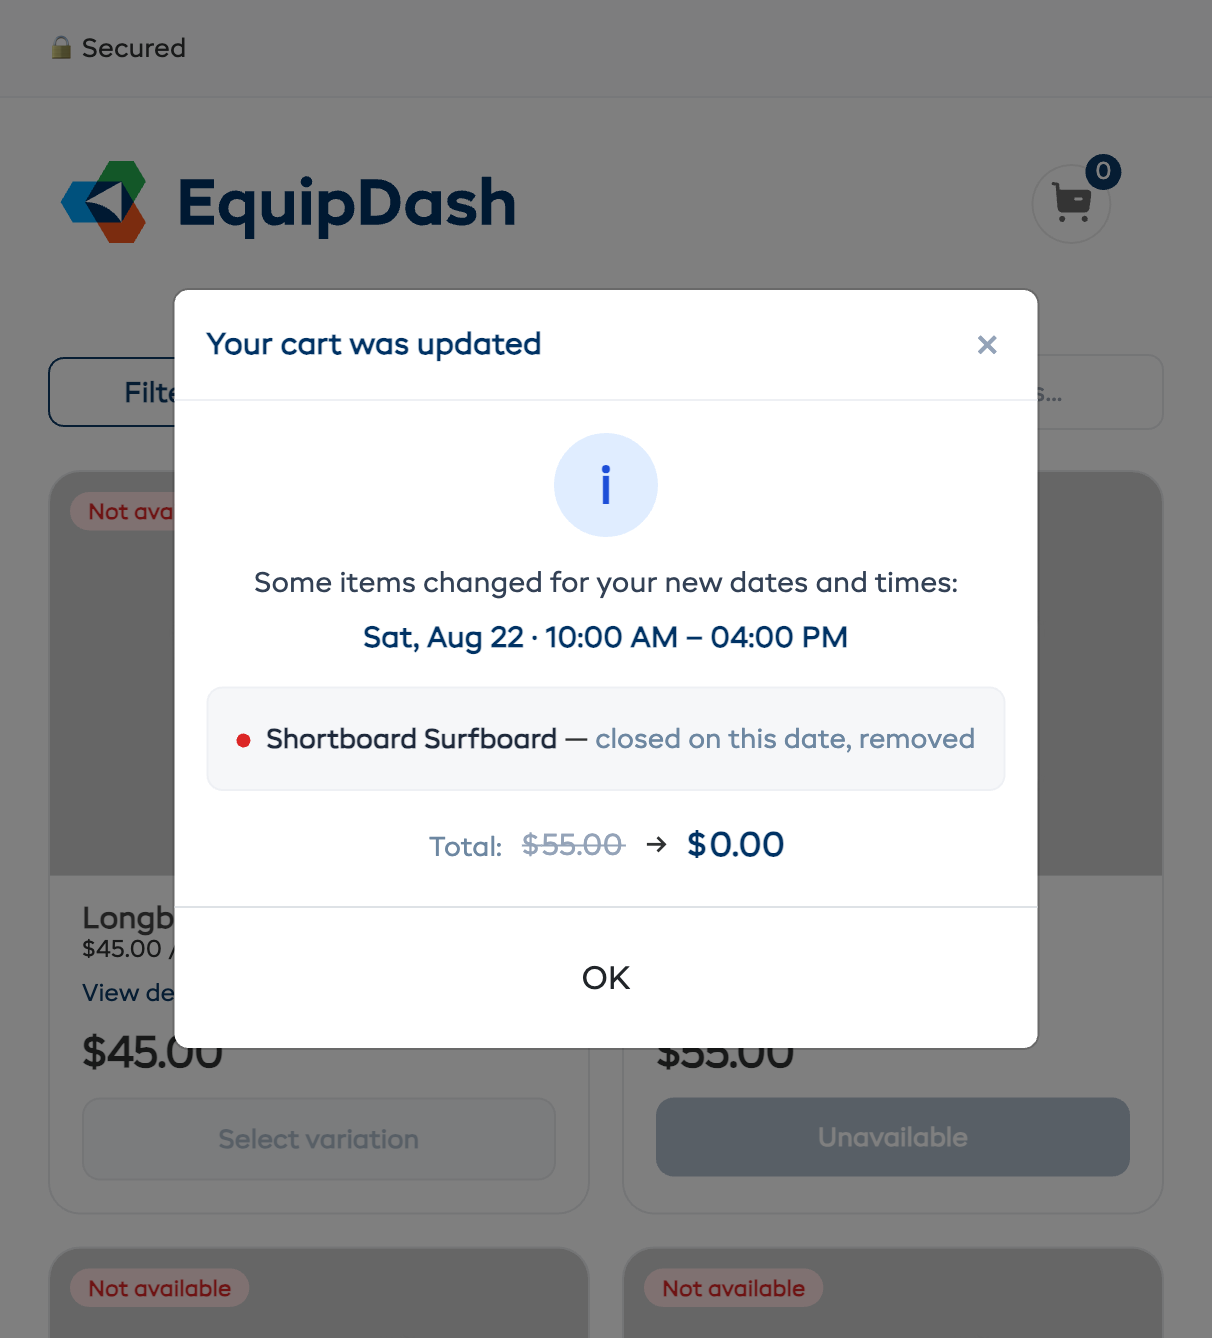
The same safety net runs at payment time: if something sold out while the customer was checking out, the booking is adjusted and the summary shows before any payment is taken — the customer reviews the updated booking and confirms again.
Product Detail Page
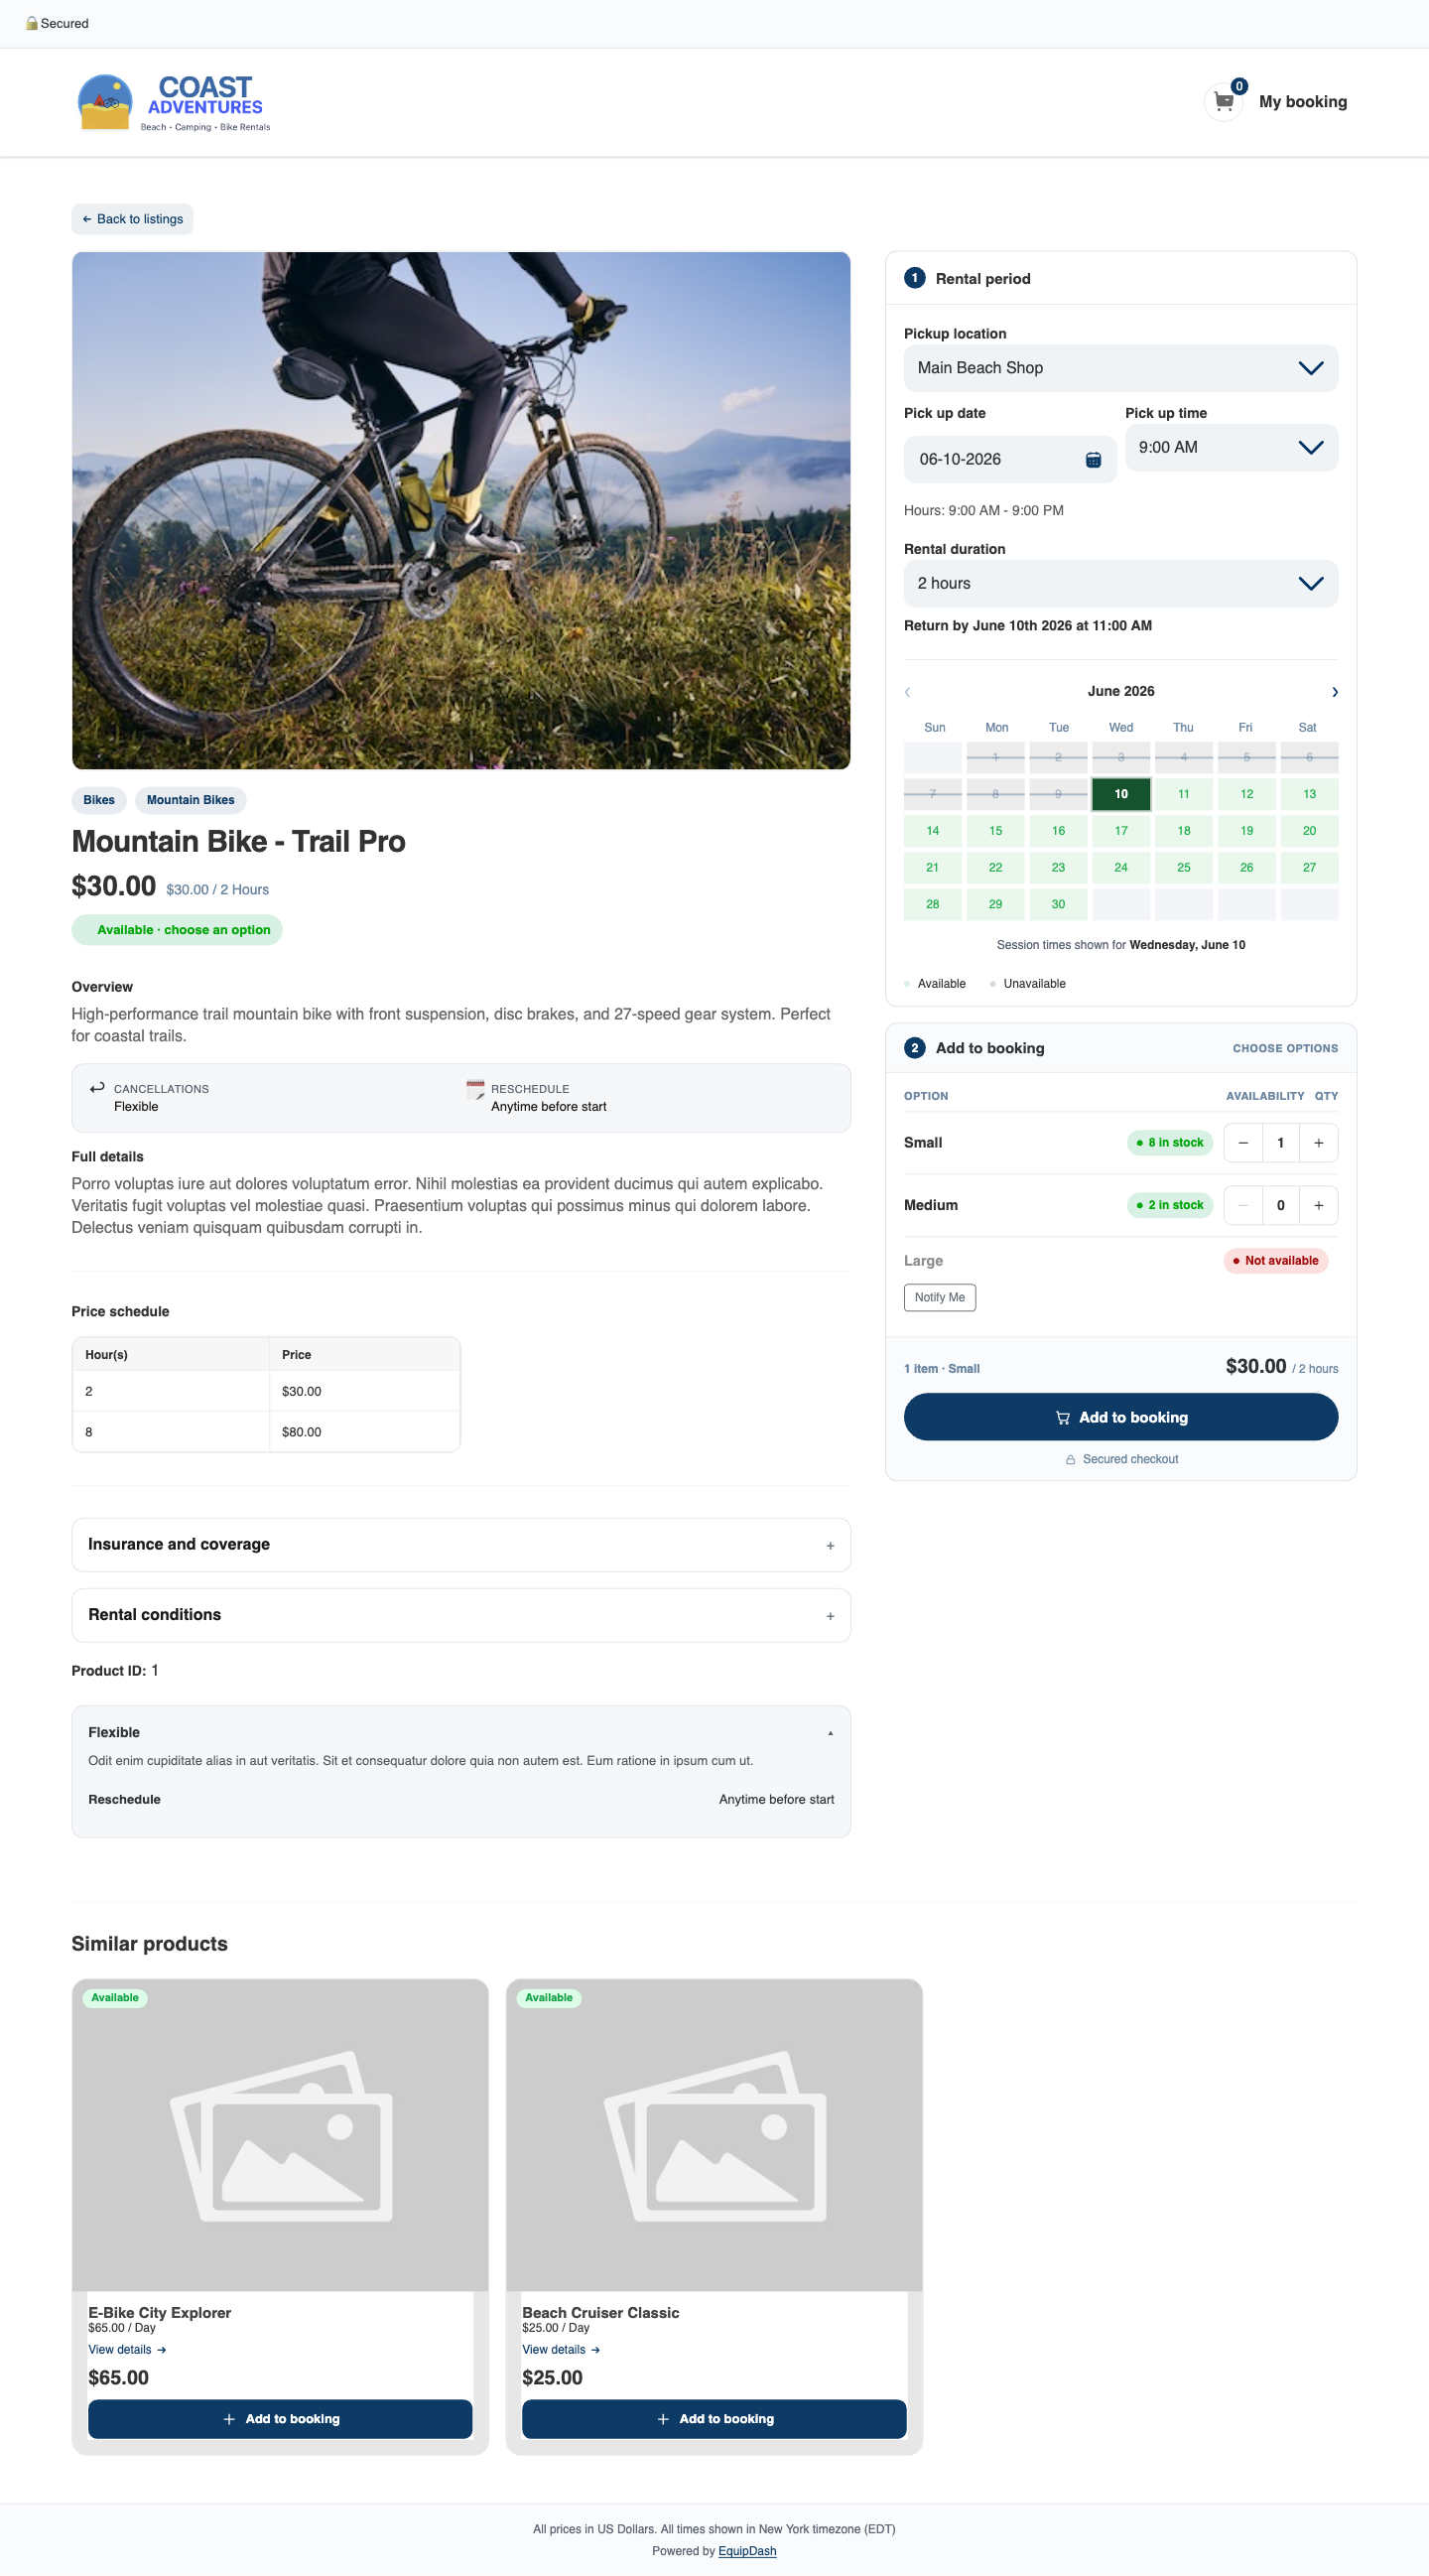
When a customer clicks View details, the product page opens with the product on the left and the booking panel on the right, organized as two numbered steps:
- The product (left) — Image gallery with thumbnails, category tags, product name, the price for the selected rental period, an availability pill, plus the Overview block, full description, price schedule, and Content blocks (Highlights, What's Included, Check-in Details, What to Bring, Restrictions, Health & Safety, Cancellation notes — no Itinerary on rentals).
- Step 1 — Rental period — Pickup location (when you have more than one), pick up date and time, and the rental duration (or return date and time). The card shows the calculated return-by line and a monthly availability calendar.
- Step 2 — Add to booking — For a simple product, a quantity stepper. For a product with variations (e.g., sizes), one row per option with its own availability chip and quantity stepper. A running total and a single Add to booking button sit at the bottom of the card.
Adding to Booking
Simple products can be added straight from the listing card with + Add to booking. Products with variations open the product page, where the customer adds their options in Step 2 — Add to booking:
- The customer sets (or adjusts) the rental period in Step 1 — location, date, time, and duration.
- They choose a quantity — or, for a product with variations, set a quantity on each option they want. The total updates live as they change quantities.
- They click Add to booking — every selected option is added in one go.
- The cart icon in the top right (My booking) updates to show the item count.
- They can continue browsing to add more products, or click My booking to proceed.
The badge counts down as the customer fills their booking, so they can see the last one coming. If a product is not available for the selected period, the Add to booking button is disabled and the card explains why (for example, outside business hours or a booking-notice requirement). A product with nothing free for those dates reads Fully booked. Sold-out variations are dimmed with a Not available chip. If you have the waitlist feature enabled, a Notify Me button appears so the customer can be alerted when the item frees up.
The Booking Summary
The My booking page shows all items the customer has added:
- Product names and quantities
- Pickup and return dates for each item
- Individual item prices
- Subtotal and total
- A button to proceed to Checkout
Customers can remove items or update quantities from the booking summary. When a line has claimed half or more of what was free for those dates, a short note under the quantity buttons shows how much is still left — so nobody hits the + button and wonders why nothing happens.
Checkout
The checkout flow collects customer details and completes the booking:
- The customer enters their name, email, and phone number.
- They can apply a promo code or voucher if they have one.
- The order summary shows all items, pricing, taxes, and the total amount.
- If online payments are enabled, the customer enters their payment details via Stripe.
- They click Complete Booking.
- A confirmation page appears with the booking reference and details.
- A confirmation email is sent to the customer automatically.
How It Connects to Your Dashboard
Every booking made through the widget appears in your EquipDash dashboard:
- The booking shows up in Bookings with the source marked as "Widget"
- Inventory availability updates automatically
- If a customer already exists in your system (matched by email), the booking is linked to their profile
- If they are a new customer, a customer profile is created automatically
- Confirmation emails are sent based on your email notification settings
Rental Widget with the Wizard
If you have the wizard mode enabled, the rental flow changes to a step-by-step process:
- Choose dates — Customer selects pickup and return dates first
- Choose a level — If skill levels are configured, the customer picks their level
- Select products — The widget shows only products available for the chosen dates and level
- Checkout — Customer completes the booking
This guided flow reduces confusion for first-time customers and ensures they only see what is actually available.