Open-Window (Time Period) Experiences
With Open window, customers choose a date. For a one-off day, you can leave the time window off for date-only booking, or set the times they can attend. A recurring schedule uses the same opening window on each applicable day.
Use Fixed start times when customers need to book a specific departure time.
When to use this
Use Open window for experiences like:
- All-day passes (museum, theme park, ski lift, beach access)
- Self-guided activities with a check-in window (mountain bike trails, hiking permits)
- Equipment rental pickup windows ("collect any time between 8 AM and 10 AM")
- Drop-in sessions or unstaffed attractions
- Open-entry experiences where the customer arrives whenever they want
Use Fixed start times (the default) for experiences with a specific start:
- Guided tours that depart at a set time
- Group classes (yoga, cooking, fitness)
- Show times, scheduled performances
- Anything with a defined start the customer must arrive for
Setting it up
When creating an experience, Step 3 of the wizard asks about your Schedule type:
- Click + Add Experience and complete Steps 1 and 2 as normal.
- In Step 3, open Advanced settings and find Schedule type.
- Select Open window - customer picks date only.
- Finish Step 3, including the capacity and booking settings that apply to the experience.
- Click Save.
After saving, add availability (see below) and the experience is ready to book.
Editing existing experiences
On the experience's Details tab, choose Open window in the Schedule type controls. This saves immediately. You can also choose it in Step 3 of Edit Experience.
The schedule type is locked once the experience has bookings, including canceled bookings. To use a different schedule type, create another experience; archive the old one when you no longer need to sell it.
Adding availability
A one-off day can be date-only or have a time window. Recurring availability asks for an opening window. Each saved departure or window has its own capacity.
Manual (one-off days)
- Open your experience and go to the Availability tab.
- Click Add session.
- Pick the Date.
- Leave Set a daily time window off for a date-only departure. Turn it on and choose the start and end times when customers should attend within a window.
- Set the capacity using the people or group limits shown in the drawer.
- Optionally pick Guides.
- Click Add Availability.
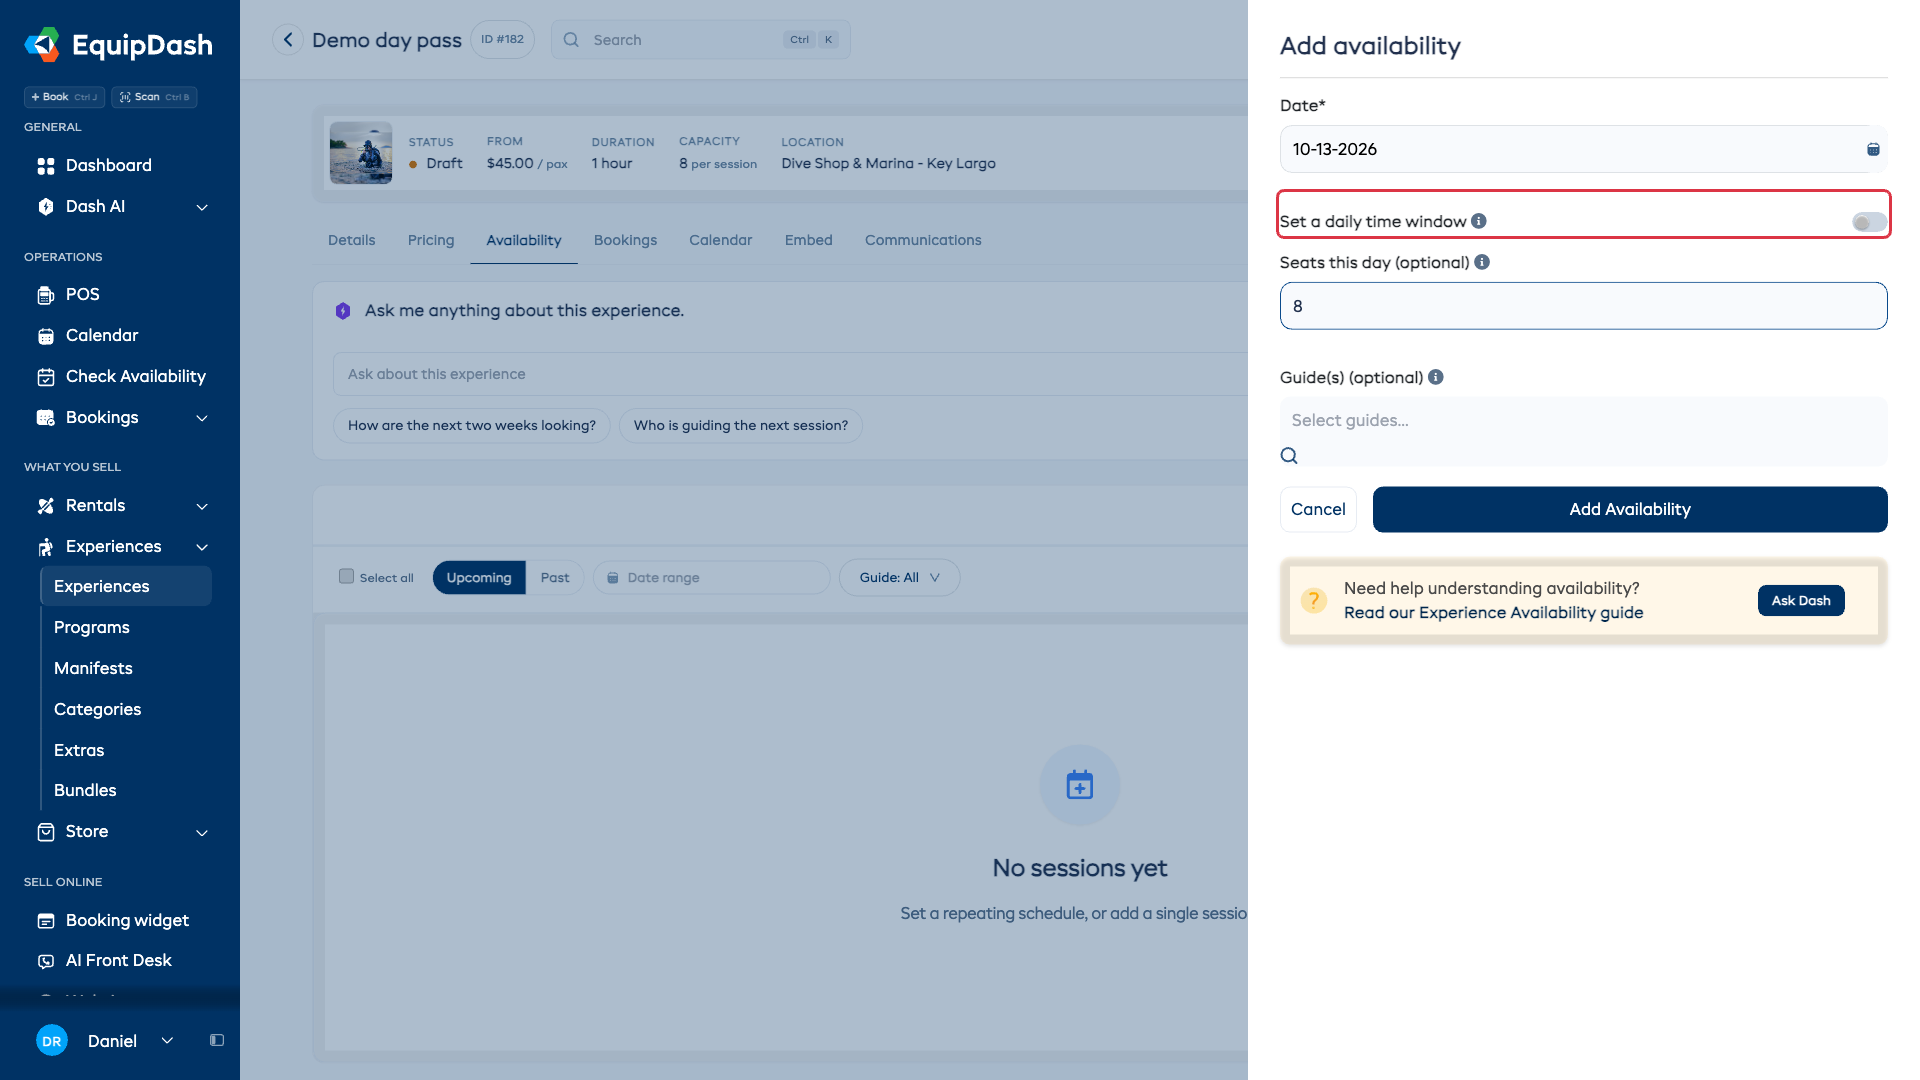
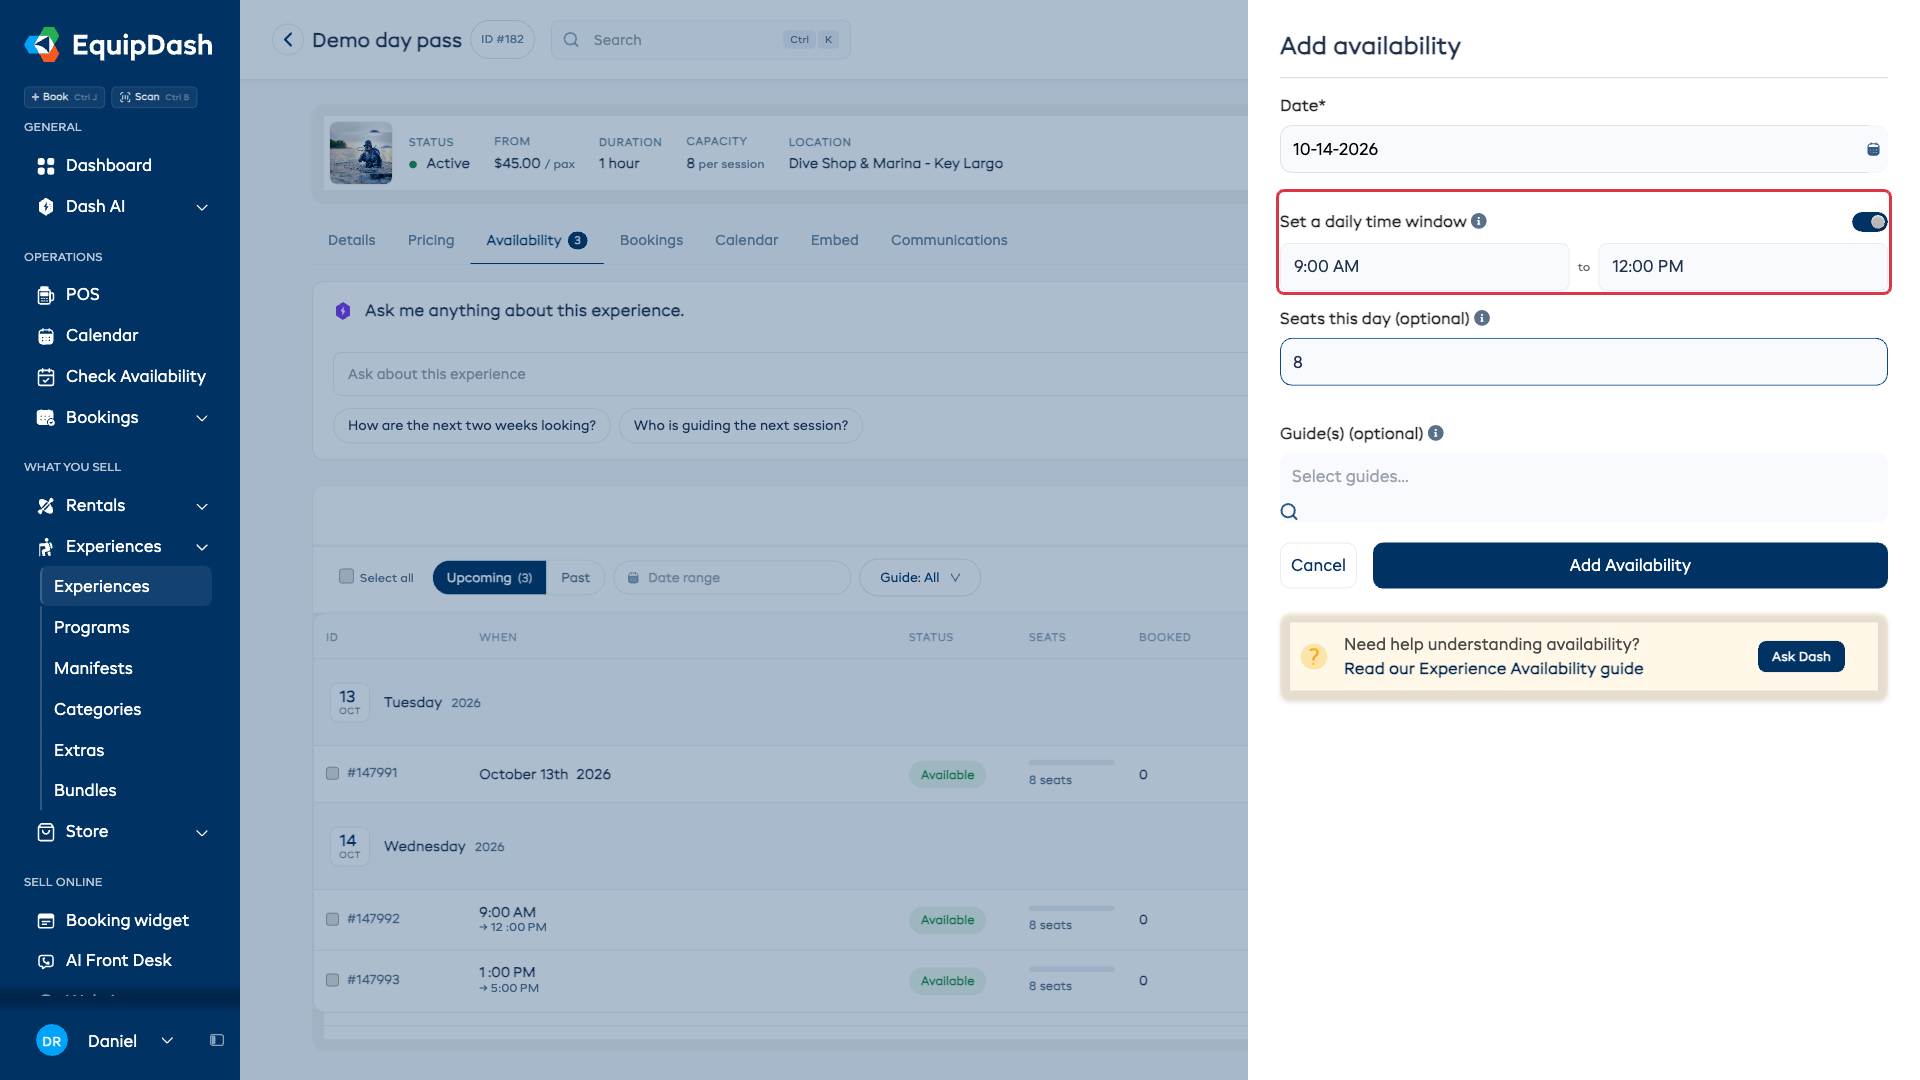
The saved row shows the date and, when enabled, its time window. You can add a different window on the same date. An exact duplicate of the date, start time, and end time is rejected.
Recurring schedule
- Open your experience and go to the Availability tab.
- Click Manage schedule.
- Set the Date range (or pick seasons).
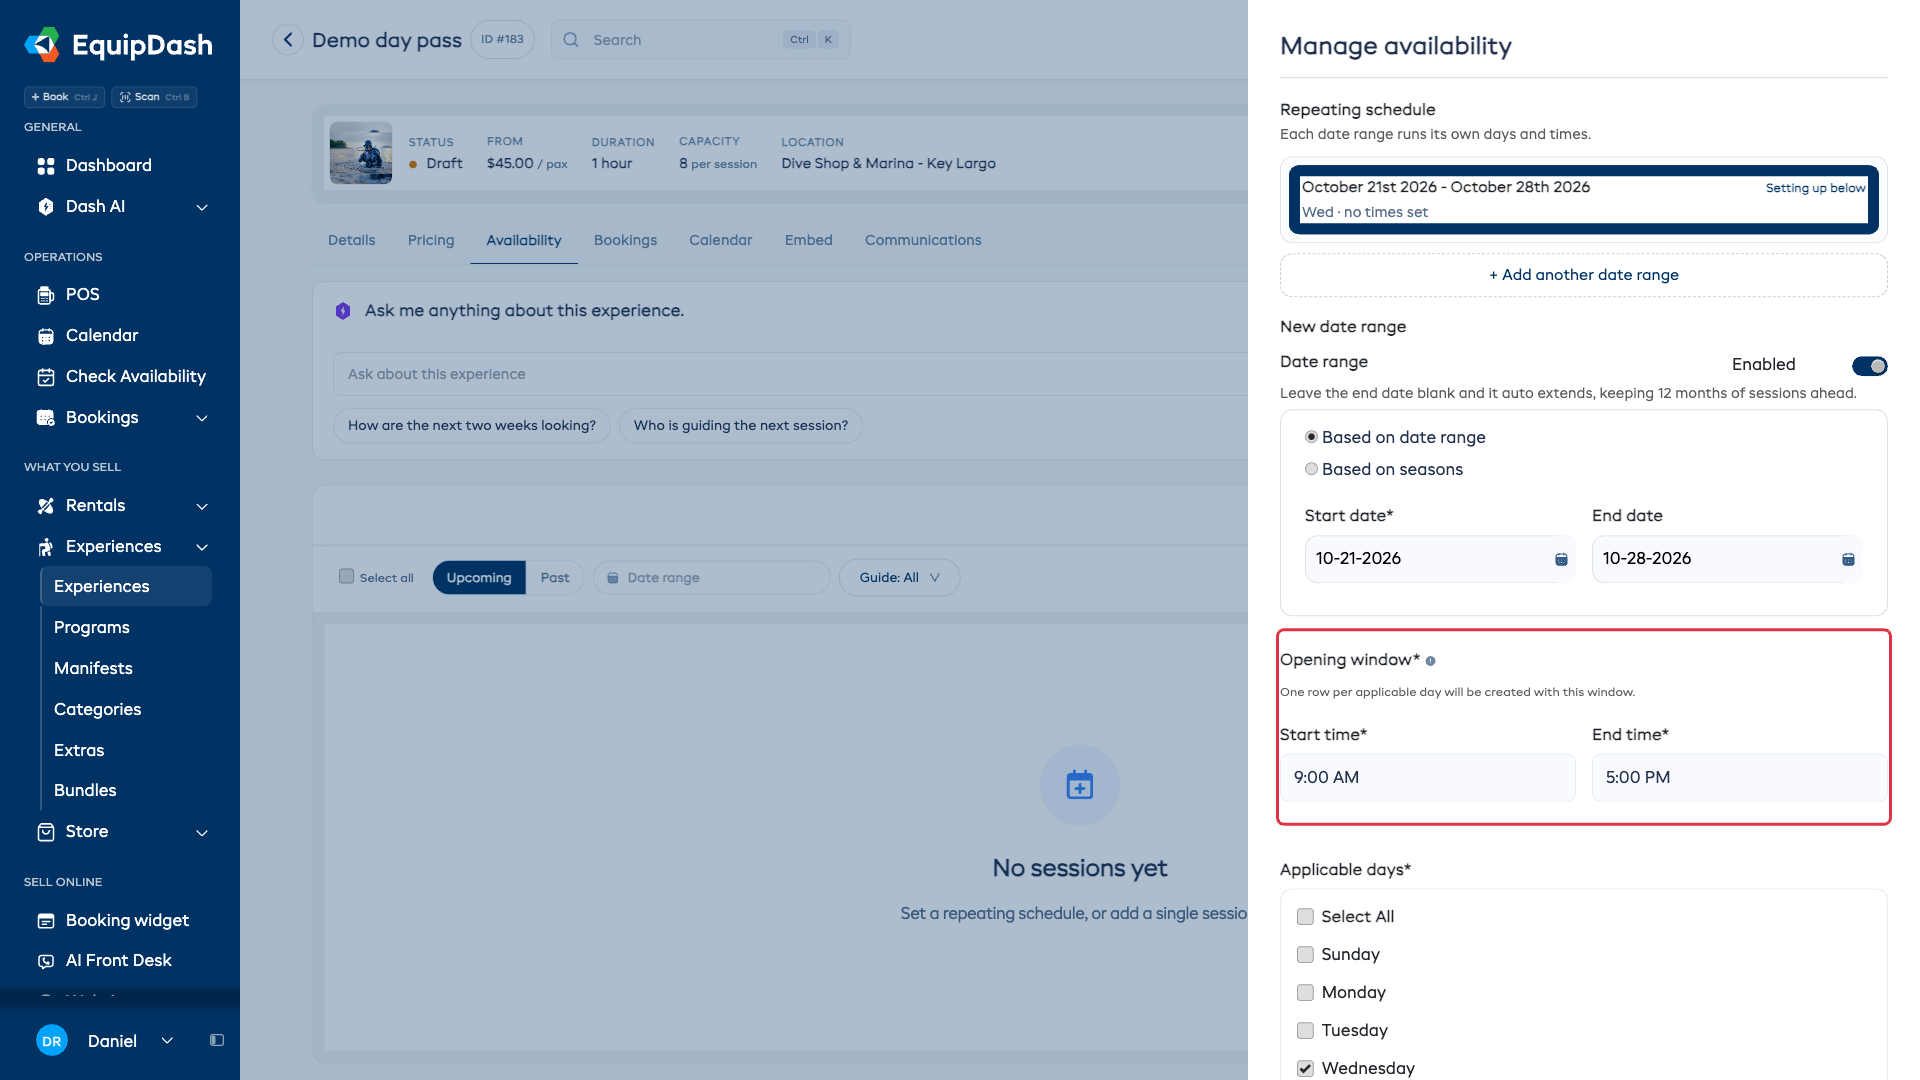
- Set the Opening window - applies to every applicable day.
- Tick the Applicable days of the week.
- Check the selected days and opening window.
- Click Save Availability.
EquipDash creates one row per applicable day in the range, each with the same opening window. Capacity comes from the experience's Details settings. Edit one saved departure to give it a different capacity.
How it looks to customers
On your booking widget:
- The customer picks a date from the calendar.
- The available departures show their opening window, or the date without a clock time for a date-only departure.
- They pick how many participants and check out.
The customer books the departure's date or window, rather than an exact arrival time.
Capacity model
Capacity belongs to each saved departure or window. For an experience priced per person, a capacity of 20 allows 20 people on that departure, regardless of when they arrive within its window. It shows as sold out when those places are filled.
For group pricing, use the group and people limits shown in your availability settings. See Group booking rules.
How bookings appear in your portal
Open-window bookings show up the same as fixed-time bookings - in the Bookings table, manifest, and calendar - except the Time column shows the window (e.g. "9:00 AM - 5:00 PM") instead of a single start time. When you set a start time for a day (below), that day shows its own time instead.
Booking several days with a different start each day
One booking can hold the same experience on several days, with one invoice and one payment. On an open-window experience you can also give each day its own start time.
- Go to POS (or open the booking and click Edit booking).
- Pick the experience and add it for the first day.
- Change the date at the top, then add it again for the next day. Repeat for each day. Days already in the booking stay on their own date.
- Each line in the booking shows its date and a Starts picker. Leave it on Any time, or pick the time for that day.
- Click Create booking (or Update booking).
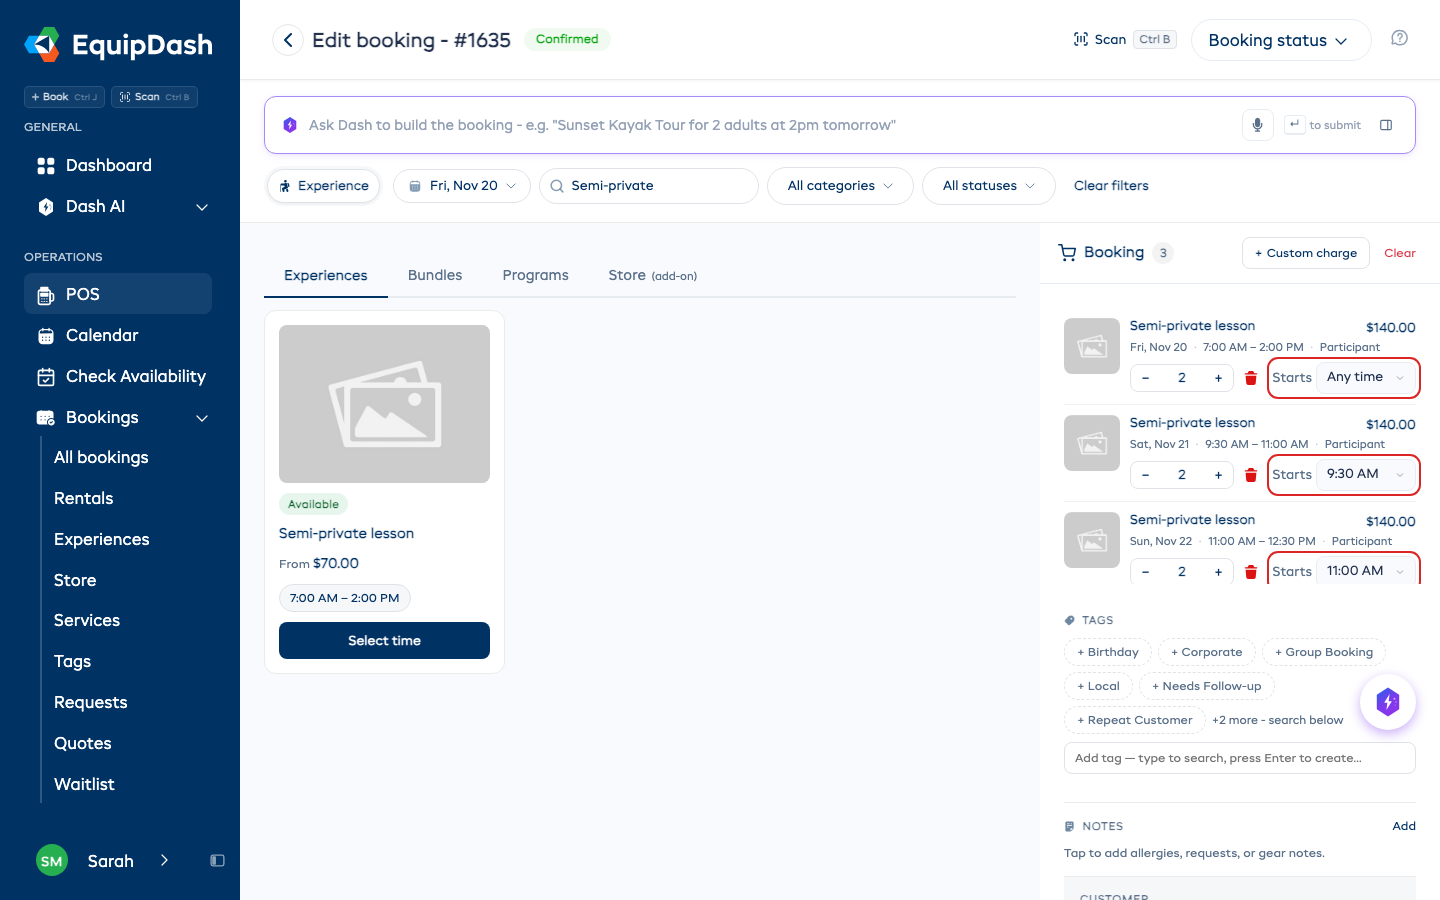
The times offered run from the window's opening to the last start that still finishes by closing time. A day left on Any time shows the whole window, as before.
The Starts picker appears when the window is at least half an hour longer than the experience. A window the same length as the experience (8:00 AM - 9:00 AM for a 1-hour lesson) has only one possible start, so it shows that time instead.
The booking then runs from the first day's start to the last day's finish, and the booking page counts the sessions:
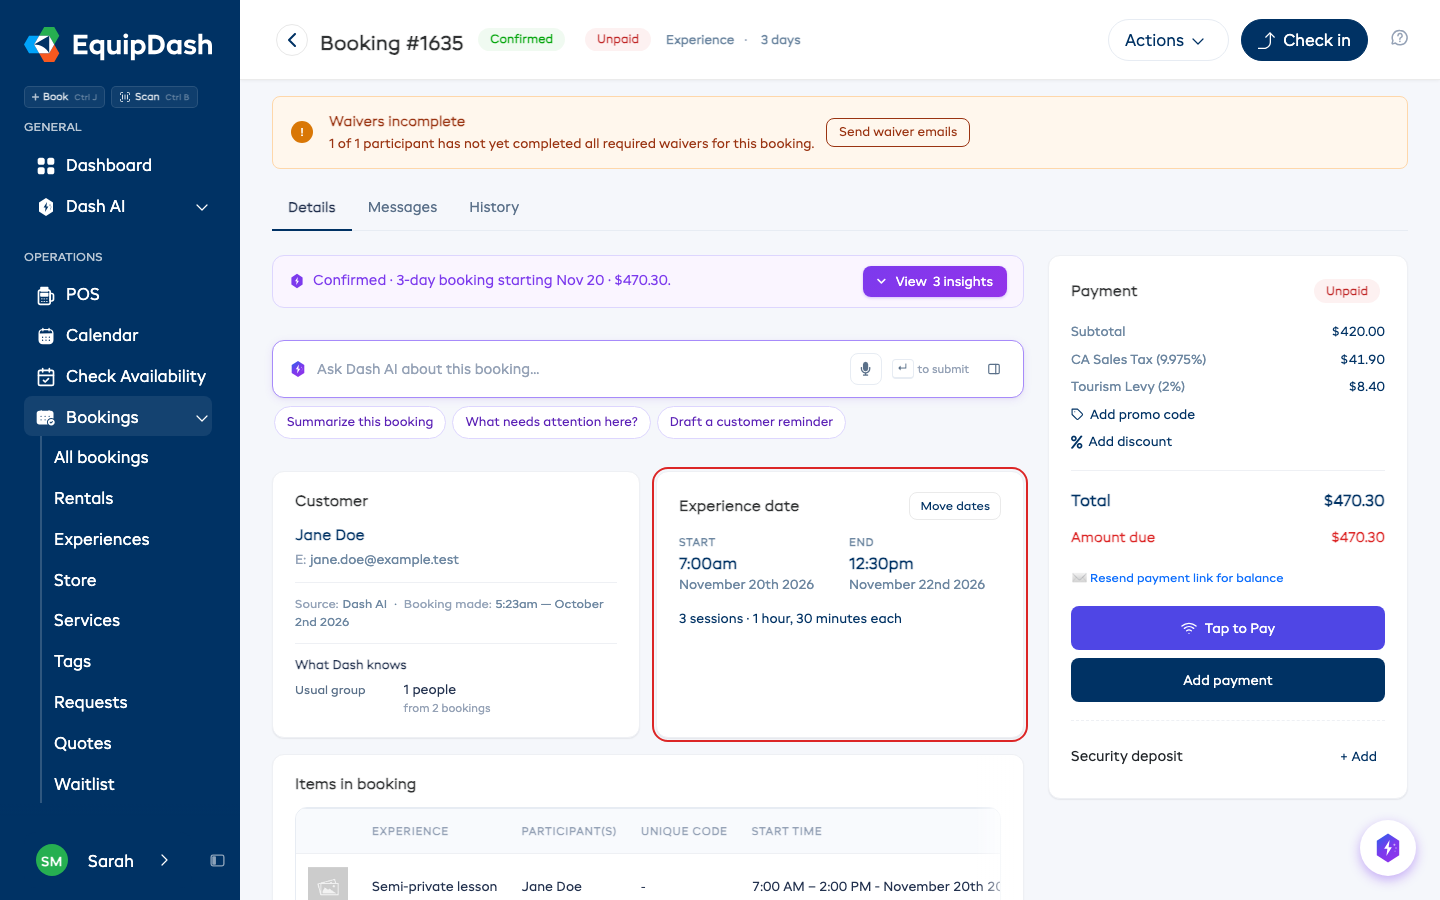
Each day's time shows on the confirmation email, the invoice, the tickets, the calendar and that day's manifest. Customers booking online still pick the day only.
To move one day to another date, remove that day from the booking in POS and add it again on the new date.
A guest booked on several days signs each waiver once, not once per day. Type their name the same way on each day and they count as one person. Two guests with the same name on the same day stay two people. A guest added to one day is added to every day of that activity, so each day's manifest lists them.
Checking in each day
Each day is checked in on its own:
- Check in on the booking page or the bookings list checks in the day that's due: today, or the next day still to check in. The other days stay booked, and the button comes back for the next day. Complete appears once every day is in.
- On a day's manifest, in the portal or the phone app, Check in and Check all in check in that day only.
- The customer gets your usual reminder before each day, naming that day's time.
- Undo takes back the latest day checked in, not the earlier ones.
- If a day is missed, only that day is a no-show. The booking page names the missed day and the next one, and the booking stays under Upcoming experiences, showing its next day, until its last day is checked in or missed.
OTA integrations (GetYourGuide, Viator)
For GetYourGuide: nothing extra to configure. As soon as your account is connected, EquipDash detects that the experience is open-window and automatically sends it to GetYourGuide as a time_period product with the correct opening window in the availability response.
For Viator: if your Viator product is configured as a time_period (open window) product on their side, EquipDash will send the matching shape automatically once the experience is mapped to that Viator product.
See Sell on GetYourGuide and Sell on Viator for the full setup.
Limitations
- Exact duplicate windows are blocked. Add a different window or edit the existing one.
- Customers can't pick a start time online. Your staff can set one per day in POS. If every customer must commit to an arrival time when they book, use Fixed start times instead.
- Schedule type can't be changed once bookings exist. Archive and recreate to switch.
Related
- Setting Up Availability - overview of both approaches
- One-Time Sessions - manual fixed-time sessions
- Recurring Schedules - recurring fixed-time sessions
- Creating an experience - full walk-through of the wizard