Recurring Schedules
Recurring schedules let you define a pattern for when your experience runs, and EquipDash generates the individual sessions automatically. This saves you from manually adding sessions one by one for experiences that run on a regular basis.
Schedules That Run Until You Say Stop
Leave the End date blank and the schedule keeps going. We create sessions 12 months ahead and extend them as time passes, so a "Monday to Friday, 9am" schedule never needs setting up again.
The date range reads onwards, with the date it currently runs to underneath, and the session list ends with the same date. That date moves forward on its own.
Set an end date and the schedule stops there, which is what you want for a season.
A season that comes back every year
If you run the same dates every year (December to April, say), turn on Repeats every year on that date range in the Manage availability sidebar. It saves as soon as you flip it. While it is on, next year's copy of the range, with the same days and times, is added by itself, so next season is always on your calendar.
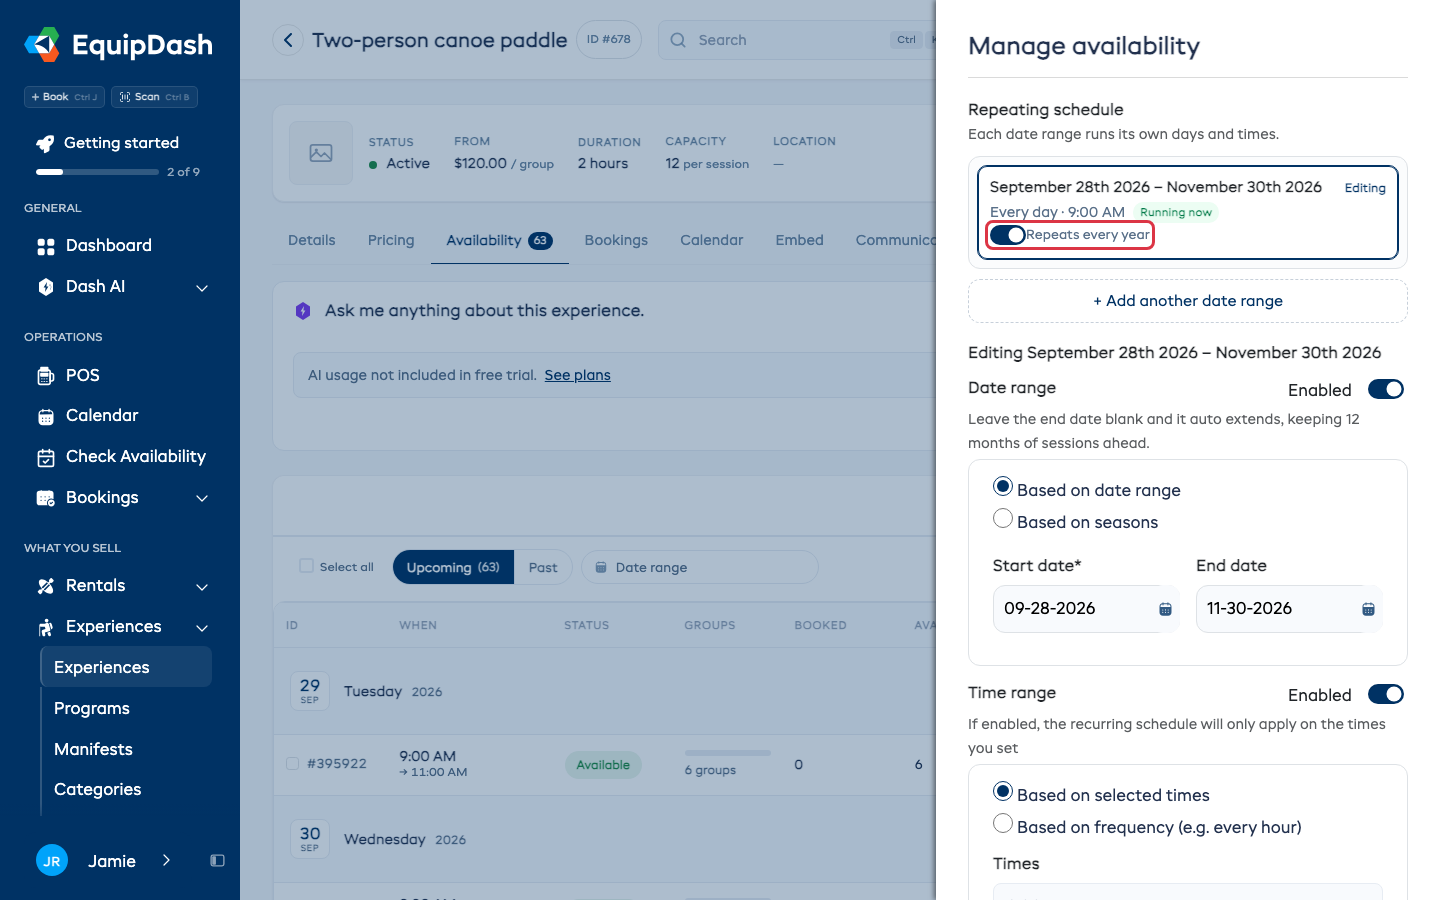
It is off unless you turn it on, and it needs a range with an end date. A range with no end date already keeps going.
When to Use Recurring Schedules
Recurring schedules are ideal when your experience follows a predictable pattern. For example:
- "Sunset Kayak Tour runs every Tuesday and Thursday at 5:00 PM from October through March."
- "Morning Yoga on the Beach runs daily at 7:00 AM and 8:30 AM, all year round."
- "Weekend Family Hike runs every Saturday and Sunday at 9:00 AM during summer."
Setting Up a Recurring Schedule
Your experience must have its Availability Management set to Recurring (configured in Step 3 when creating or editing the experience). Then:
- Go to the experience detail page by clicking the experience in the Experiences table.
- Click the Availability tab.
- Click Manage schedule at the top-right (next to + Add session).
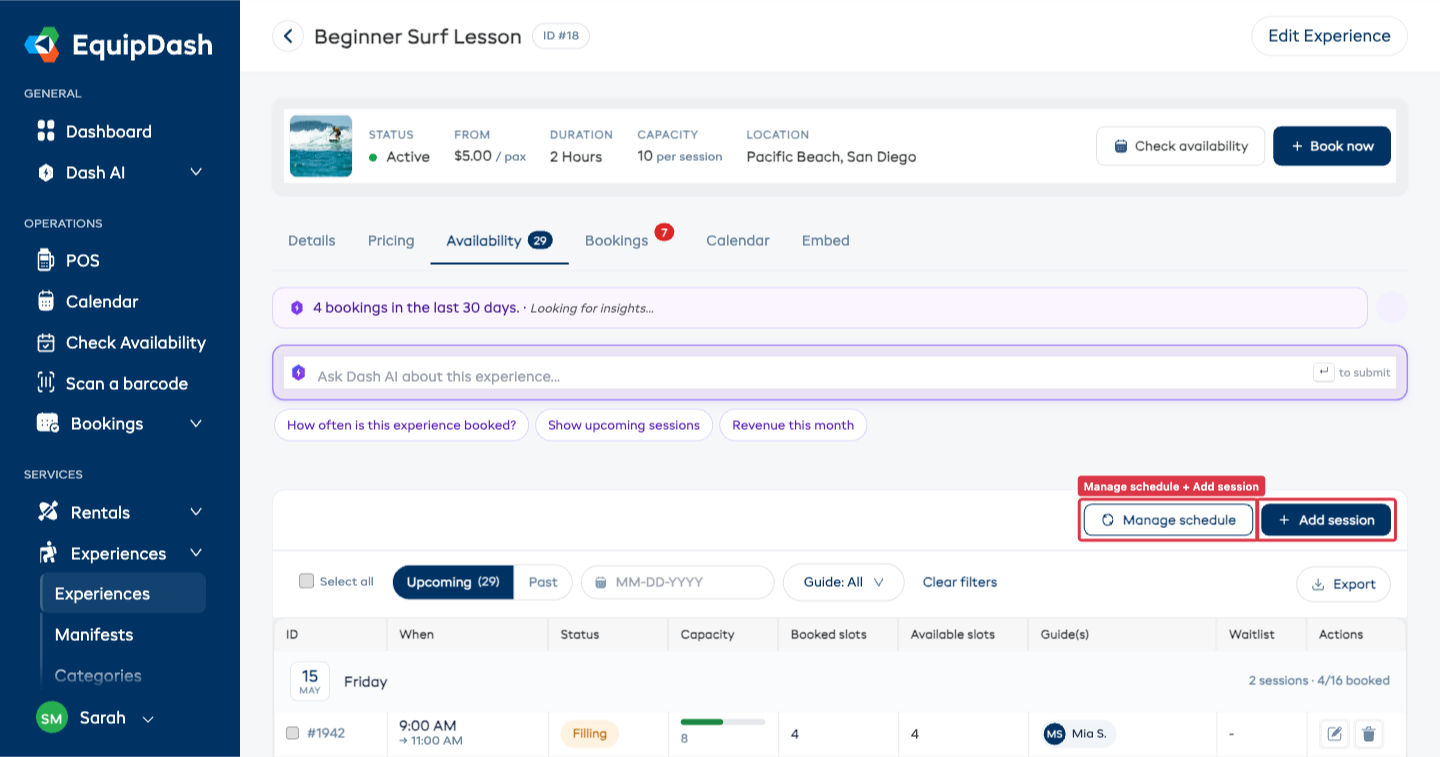
The Manage availability sidebar slides in from the right. It has several sections:
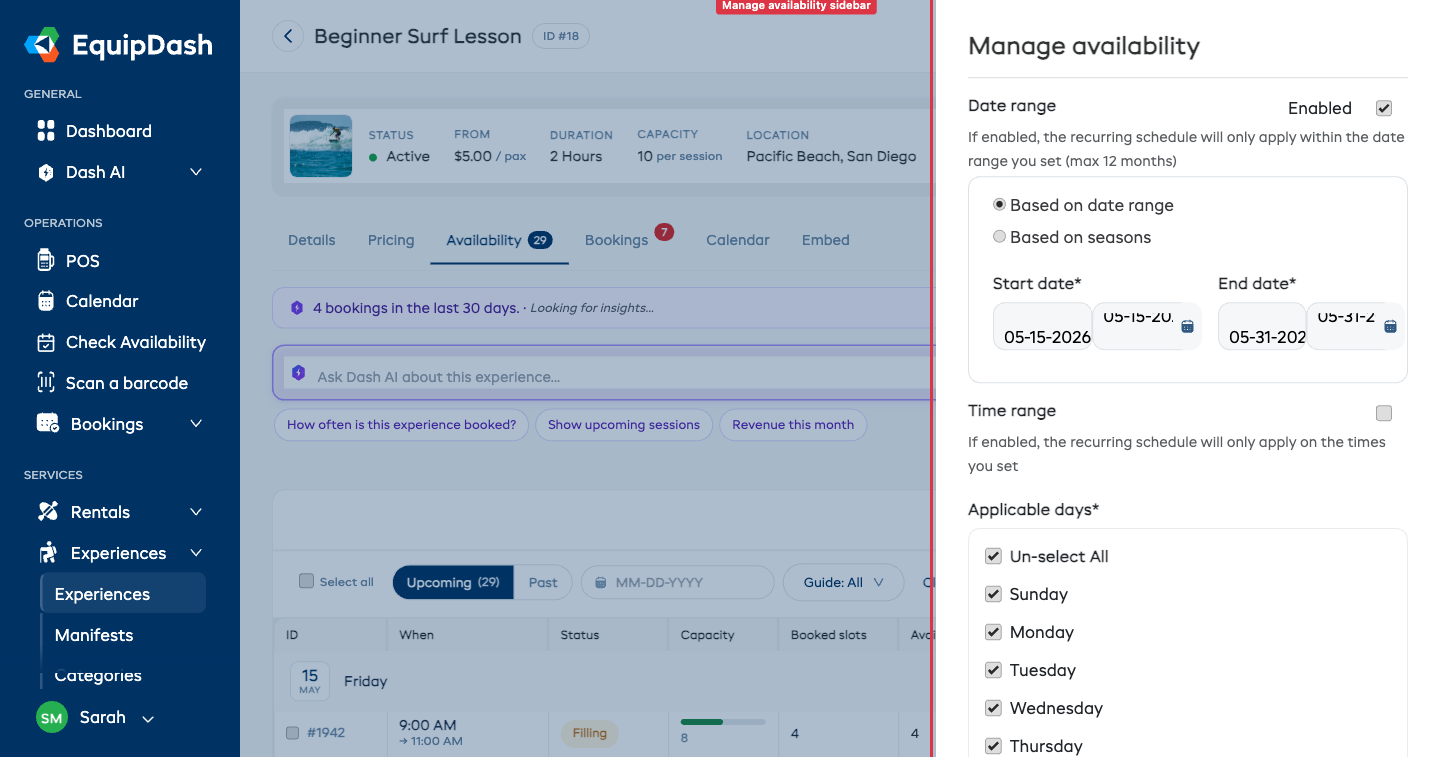
Date Range
Choose the period during which sessions should be generated:
- Date Range - Set a specific Start Date and (optionally) an End Date. Leave the end date blank and the schedule keeps going on its own, as above.
- Seasons — Instead of specific dates, select one or more seasons from your account settings. Sessions will be generated for the dates covered by those seasons.
Running Different Times in Different Months
Your schedule is a list of date ranges, each with its own days and times. Most experiences need only one — that is the single schedule you have always had, and it behaves exactly the same. Add a second when your times change with the season:
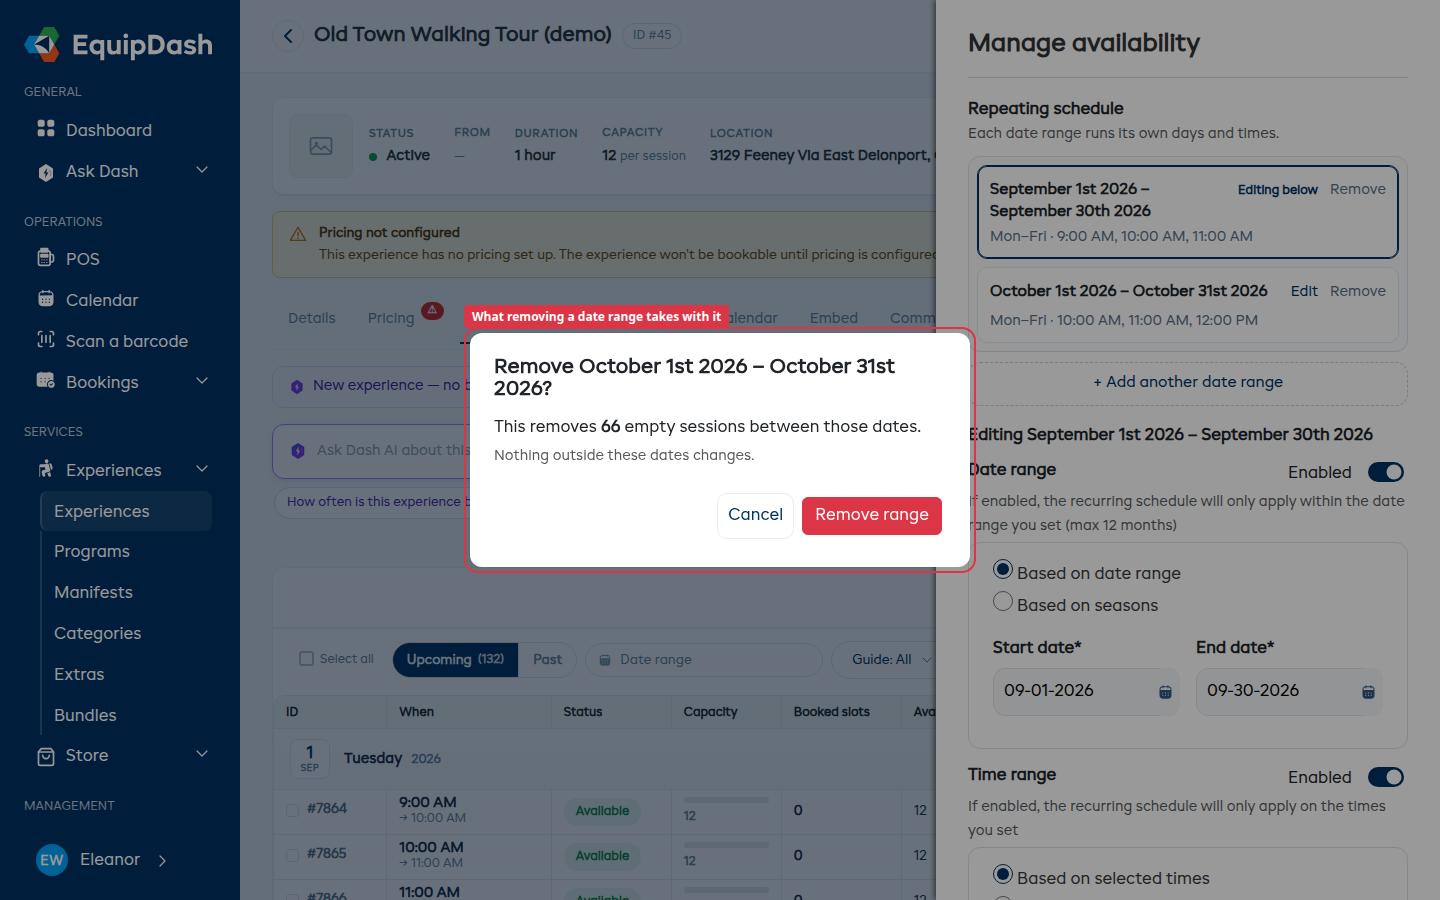
September runs Mon–Fri at 9:00, 10:00 and 11:00 AM. October runs Mon–Fri at 10:00, 11:00 AM and 12:00 PM.
Every range you have set up is listed at the top of the Manage availability sidebar, with the days and times it runs. The one you are editing is outlined, and the range covering today is marked RUNNING NOW.
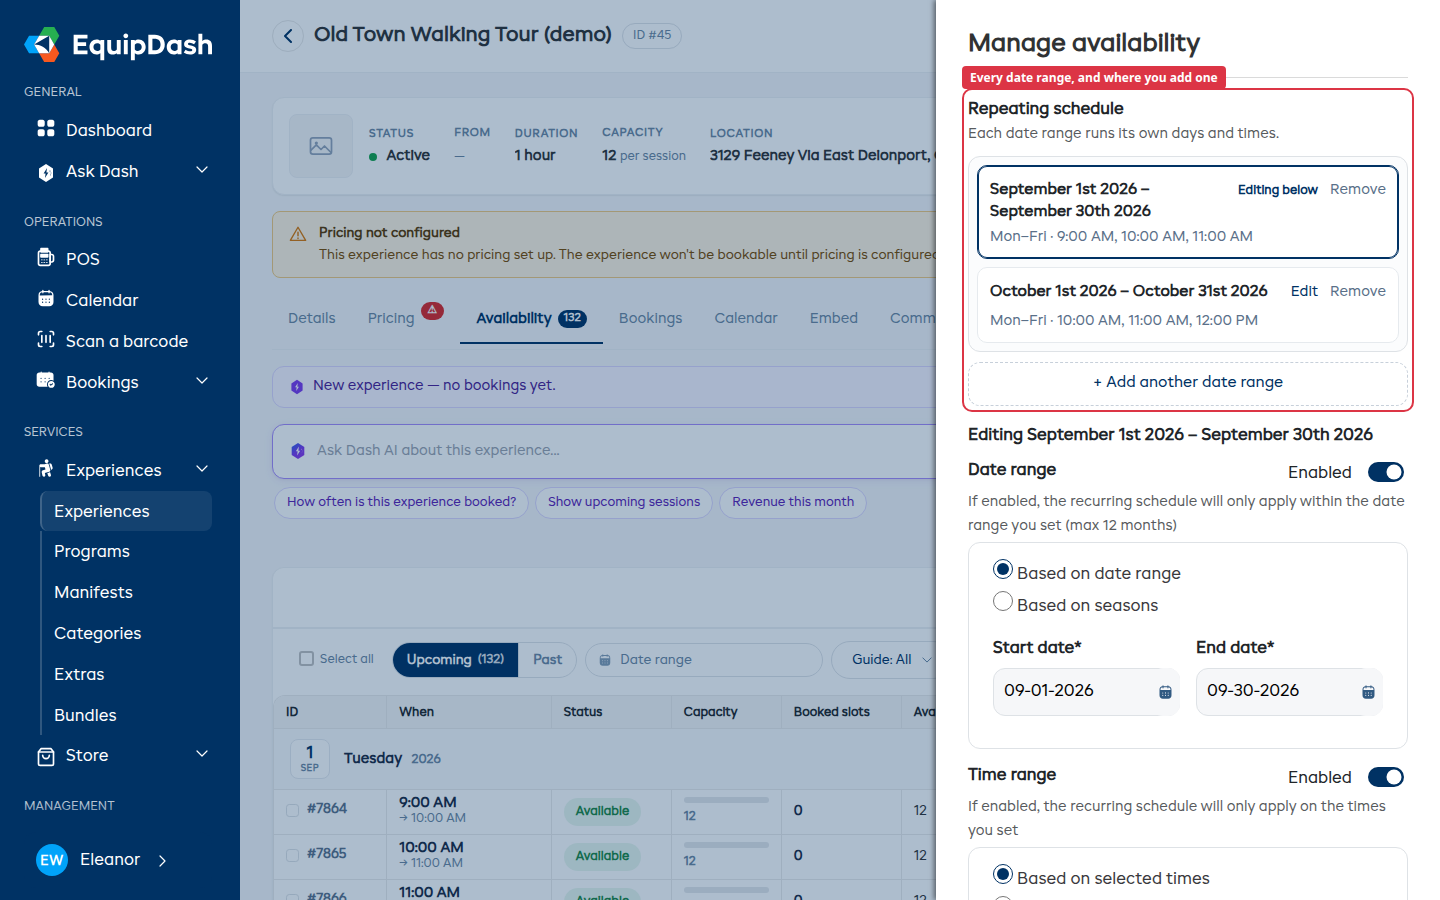
To add one: click + Add another date range. It opens already filled in with your current days and times, starting the day after your last range ends — change the dates and times and click Save Availability.
To change one: click Edit on its row. The form underneath switches to that range, and the row updates as you go, so you can see what you are setting up. Saving only affects that range's dates — your other ranges are untouched.
A few rules worth knowing:
- Ranges can share dates when they run on different weekdays. A Monday to Thursday range can run alongside a Friday to Sunday range. If two ranges use the same weekday, EquipDash tells you which one clashes and asks you to change it.
- A gap is fine. If nothing runs between two ranges, the list says so — useful for a closed season.
- A range with no end date keeps running. It stops the day before a later range that uses any of the same weekdays starts, while a range on different weekdays can run alongside it.
Removing a Date Range
Click Remove on the range's row. EquipDash tells you exactly how many empty sessions it will remove first, and sessions with bookings are always kept. Nothing outside that range's dates changes.
Applicable Days
Select which days of the week the experience runs. By default, all days are selected. Untick any days when the experience does not run.
For example, if your experience runs only on weekends, untick Monday through Friday and keep Saturday and Sunday ticked.
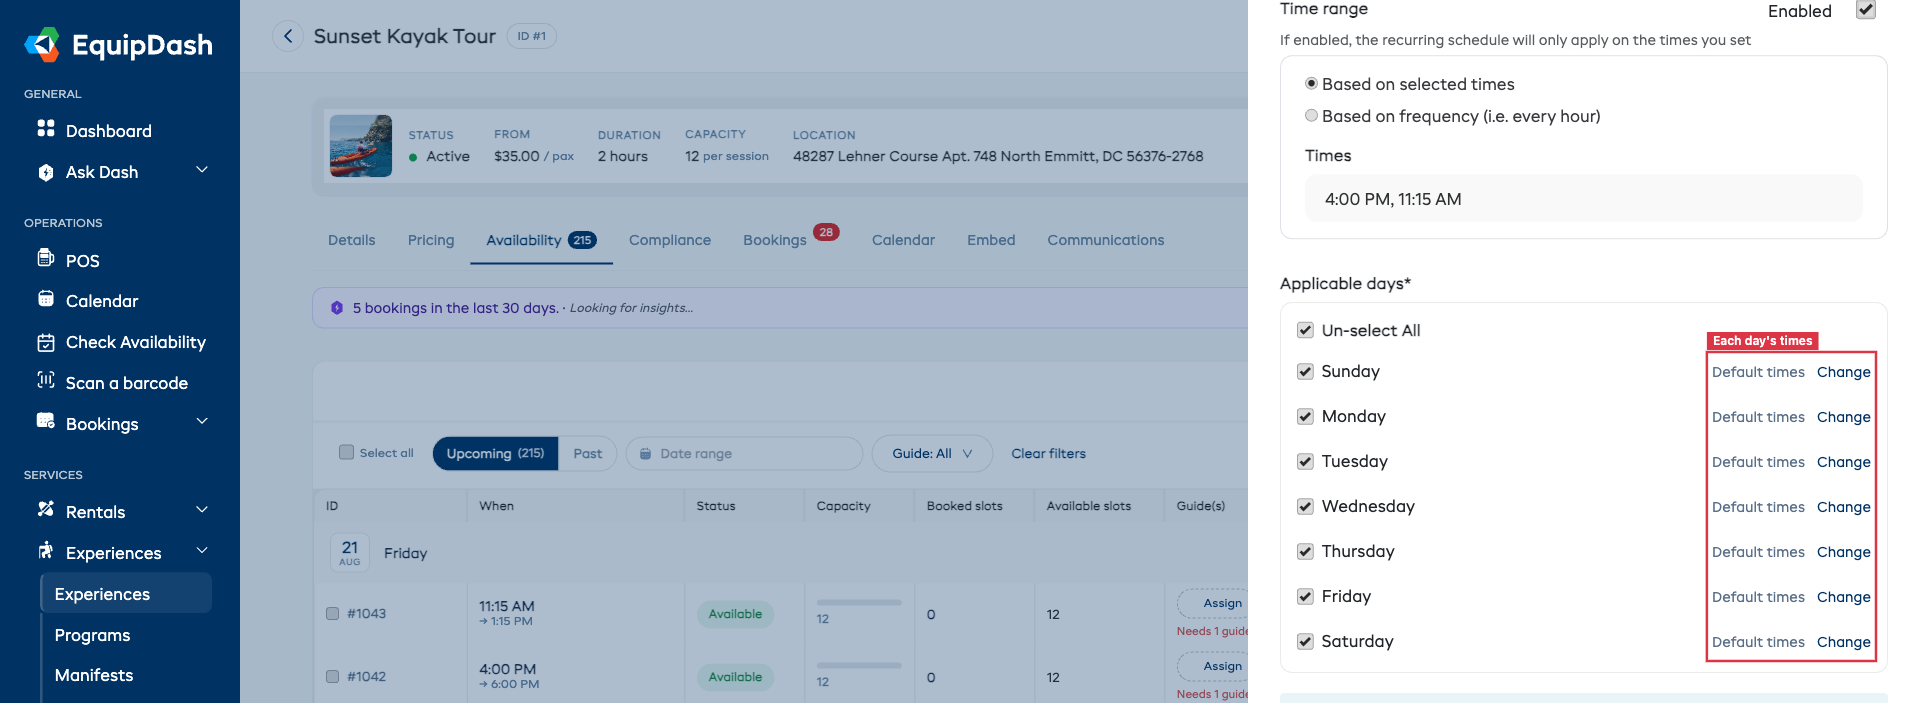
Each ticked day shows whether it runs the default times — the ones you picked under Time Slots — or times of its own.
Running Different Times on Some Days
Most experiences run the same times every day — pick those times once under Time Slots and every ticked day follows them. When one or two days are different, change just those days:
- Next to the day, click Change.
- A time picker opens, already showing the times every day runs. Add or remove times for this day.
- The day now lists its own times, and Use default times appears beside it if you want to put it back to following the times at the top.
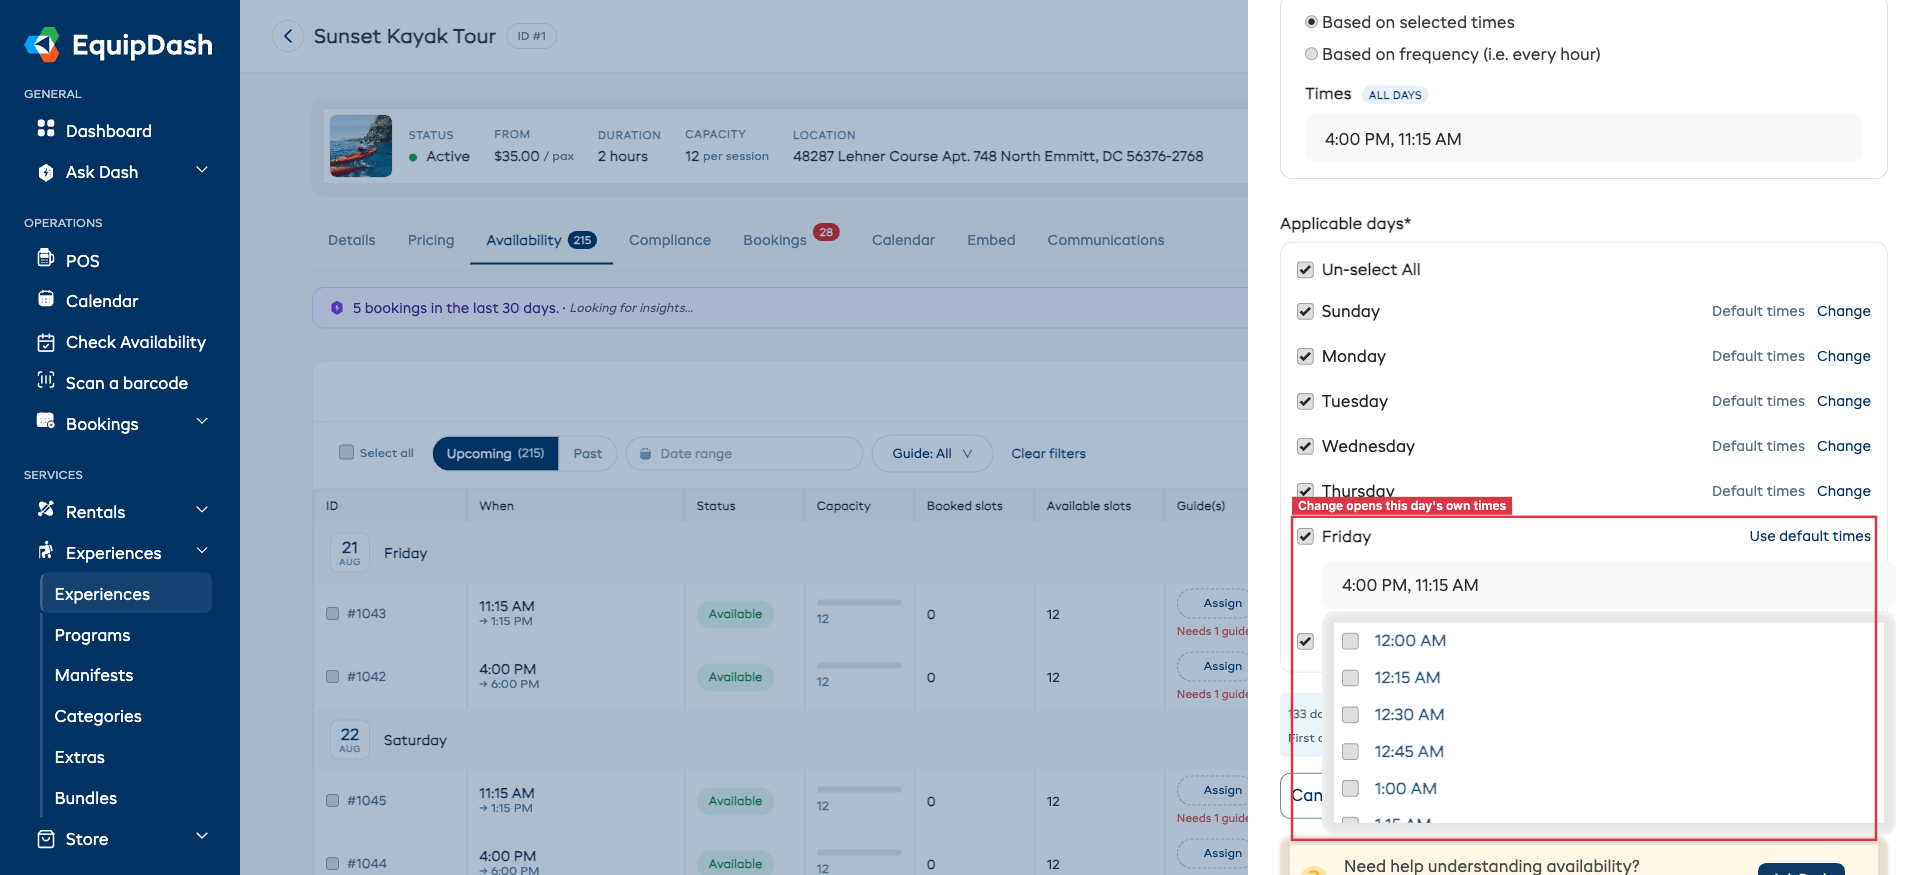
For example, an evening experience that runs at 7:00 PM and 8:30 PM every night, with an extra 9:30 PM on Friday and Saturday: pick 7:00 PM and 8:30 PM under Time Slots, then click Change on Friday and on Saturday and tick 9:30 PM as well.
Days you have not changed keep following the times at the top, so editing those times updates every day at once.
Time Slots
Define what times the experience runs each day. There are two options:
Selected Times
Pick specific start times from a dropdown. You can select as many times as you need.
For example, select 9:00 AM, 11:00 AM, and 2:00 PM to run three sessions per day.
Frequency
Instead of picking individual times, define a start time, end time, and how often sessions repeat.
For example, "Start at 9:00 AM, end at 5:00 PM, every 2 hours" would generate sessions at 9:00, 11:00, 1:00, 3:00, and 5:00.
Ending Every Session at the Same Time
Some activities start at different times but all finish together, for example launches every hour with everyone back on shore by 4:30 PM.
- Open Advanced at the bottom of the form.
- Pick the time in All sessions end at.
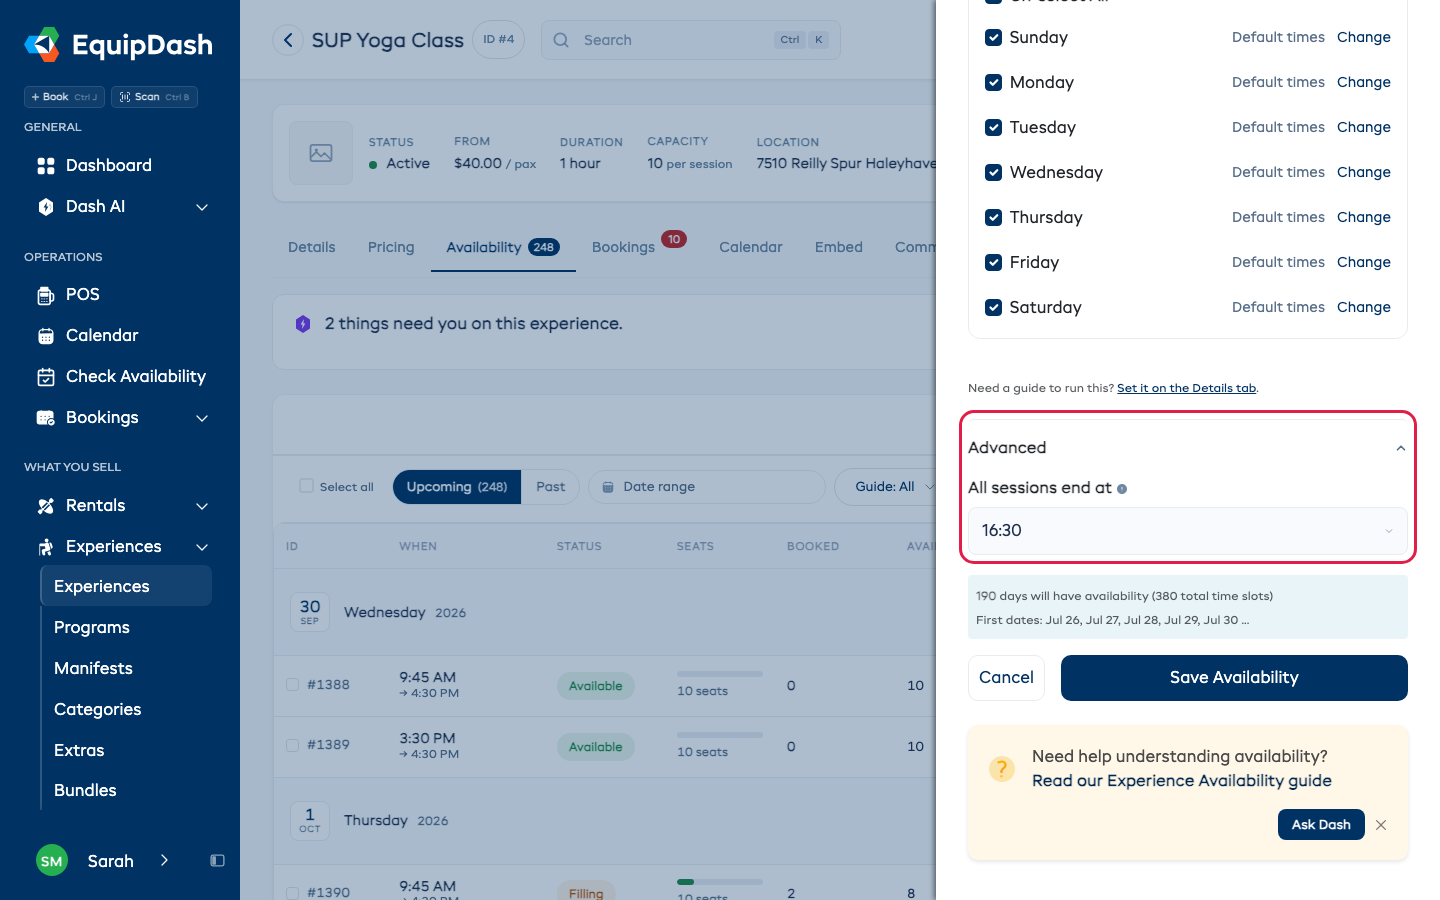
Every session in this date range then ends at that time, whatever time it starts, and your booking page shows the duration as Until 4:30 PM instead of a length. Leave it empty and each session ends when the experience length says it does. Sessions that already have bookings keep the end time their customers were given.
What Changes When You Save
Saving a date range updates the sessions that range created:
- Empty sessions move to the new days and times.
- Sessions with bookings stay exactly where they are — the new time is added alongside them.
- Sessions you added by hand with + Add session are left alone.
Saving the Schedule
Once you have configured your date range, applicable days, and time slots:
- Review the preview that shows how many sessions will be generated and the first few dates. The total counts each day separately, so a day running an extra time is included.
- Click Save Availability to generate the sessions.
EquipDash will create all the individual sessions based on your pattern. They will appear in the Availability table and be bookable through the widget.
Editing a Recurring Schedule
To change an existing recurring schedule:
- Go to the experience detail page and click the Availability tab.
- Click Manage schedule at the top-right of the toolbar.
- The sidebar opens with your current settings pre-filled. Make your changes.
- Click Save.
When you save, EquipDash regenerates the availability sessions based on the updated pattern. Sessions that have existing bookings will be preserved.
Editing Individual Sessions
Even with a recurring schedule, you can edit individual sessions from the Availability table. For example, you might want to increase the capacity for a specific date or change the assigned guides.
- Click the Edit icon on the session row.
- Make your changes to the date, time, capacity, or guides.
- Click Save.
Individual session edits are independent of the recurring schedule. However, if you regenerate the recurring schedule by saving it again, any manually added changes to generated sessions may be overwritten.
Capacity for Recurring Sessions
Recurring sessions use the Seats per session number set on the experience (or Max groups per slot, if you sell it by the group and one booking takes the whole slot). If you need different capacities on different days, you can edit individual sessions after they are generated — either one at a time or in bulk by selecting rows in the Availability table and choosing Action ▾ → Edit capacity. See Bulk Editing Capacity for the full workflow.
You cannot reduce a session's capacity below the number of bookings already on it (single edit or bulk). Cancel the relevant bookings first to free up the slots, then reduce the capacity. In bulk edits, only the conflicting sessions are skipped — the rest update normally.
Guides for Recurring Sessions
Recurring sessions are generated without guides. To assign a guide across many generated sessions at once, select the rows in the Availability table and choose Action ▾ → Assign guides. See Bulk Assigning Guides for the full workflow.
To shift the start time of many generated sessions in one go (without regenerating the whole schedule), use Action ▾ → Change time — see Bulk Changing the Time of Day.
To change how long selected generated sessions run without changing the repeating schedule, use Action ▾ and choose Change duration. Timed sessions keep their start times, and date-only sessions are skipped. See Bulk Changing Duration.